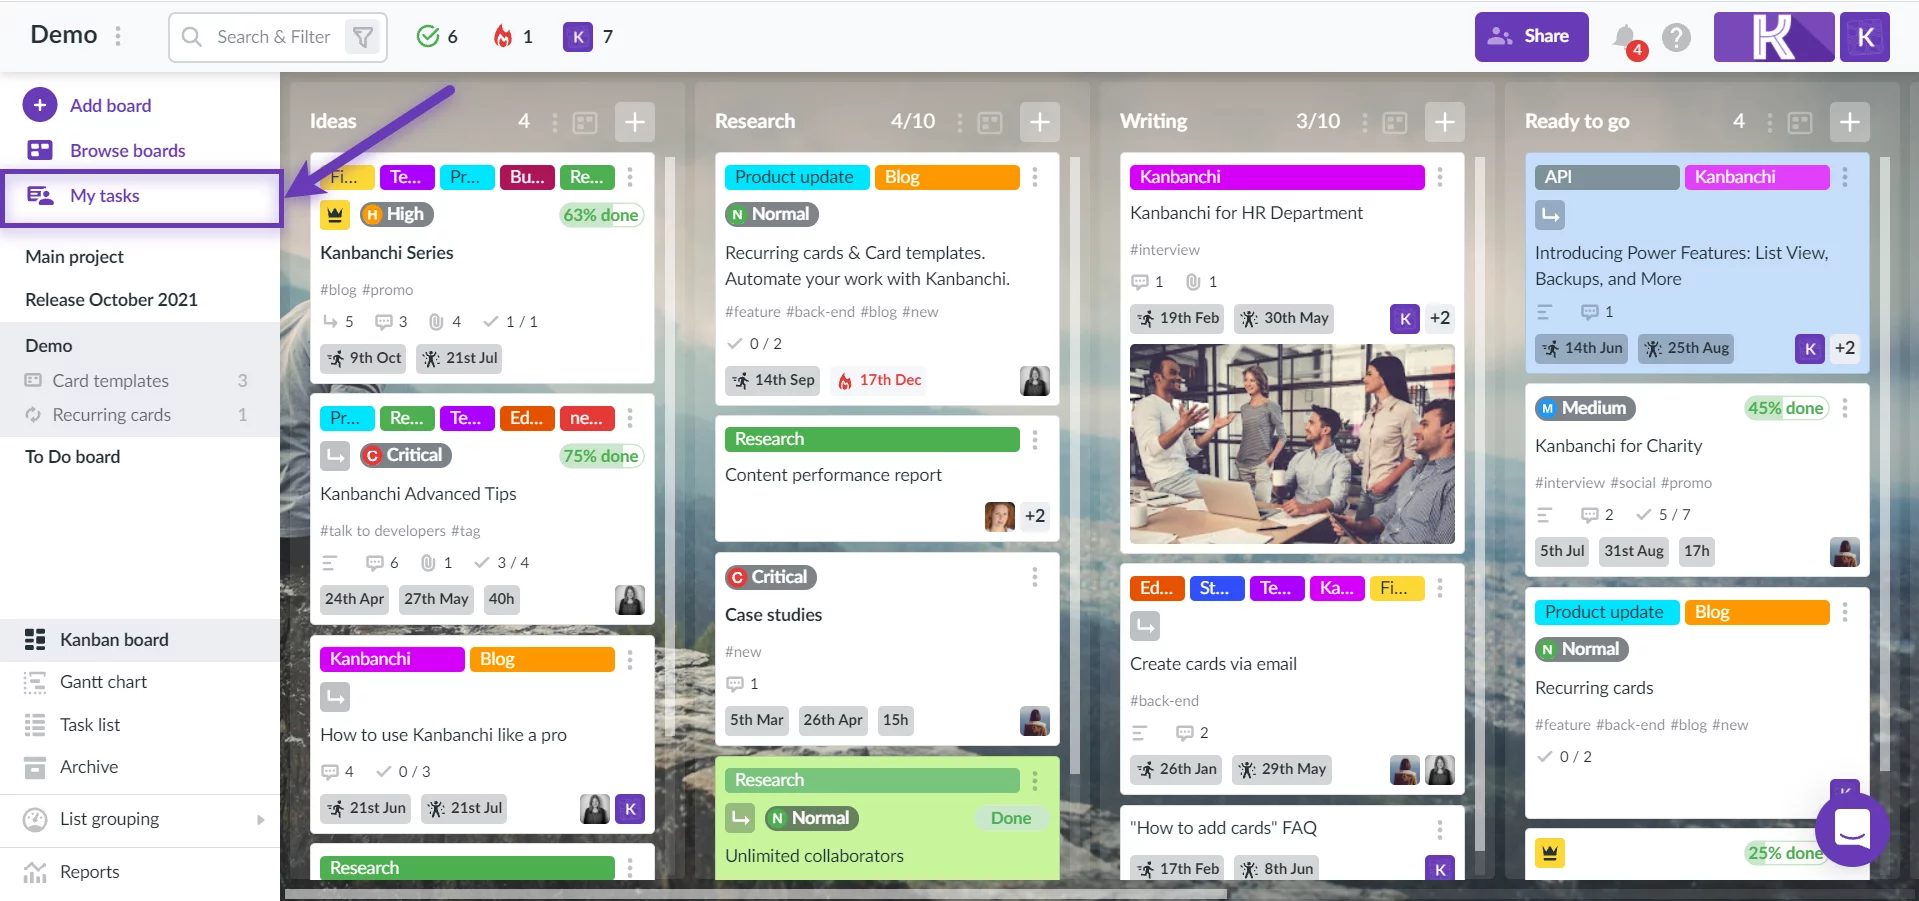
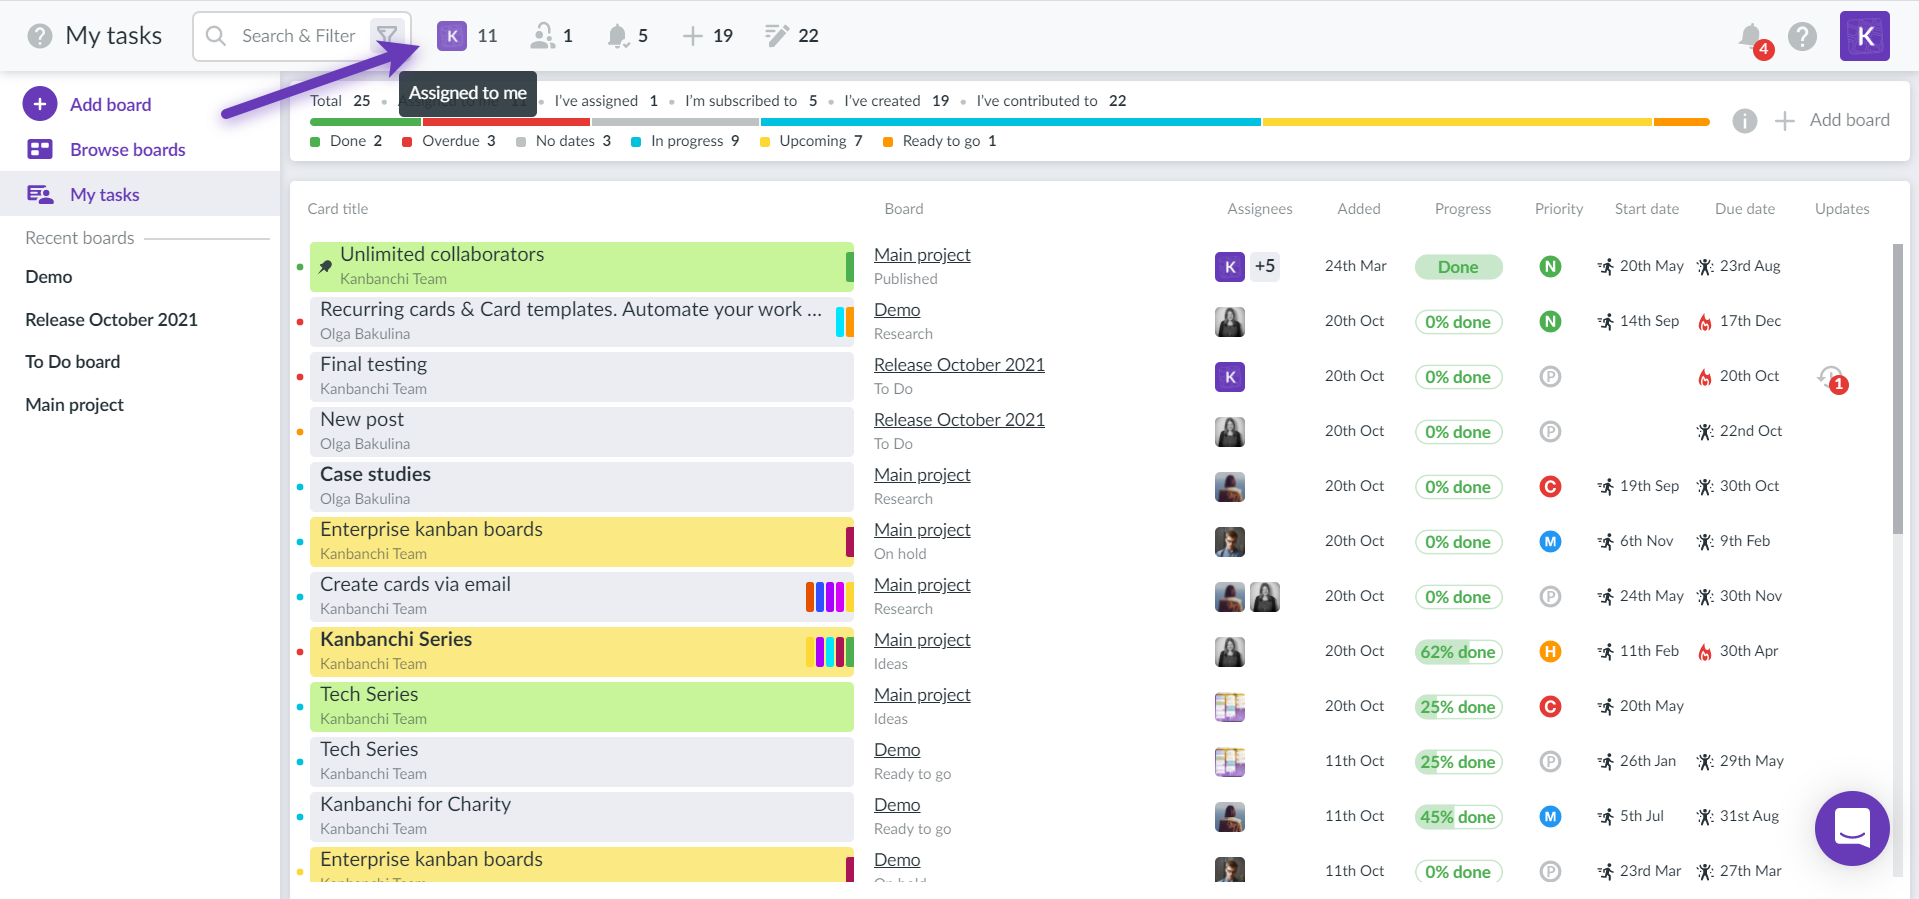
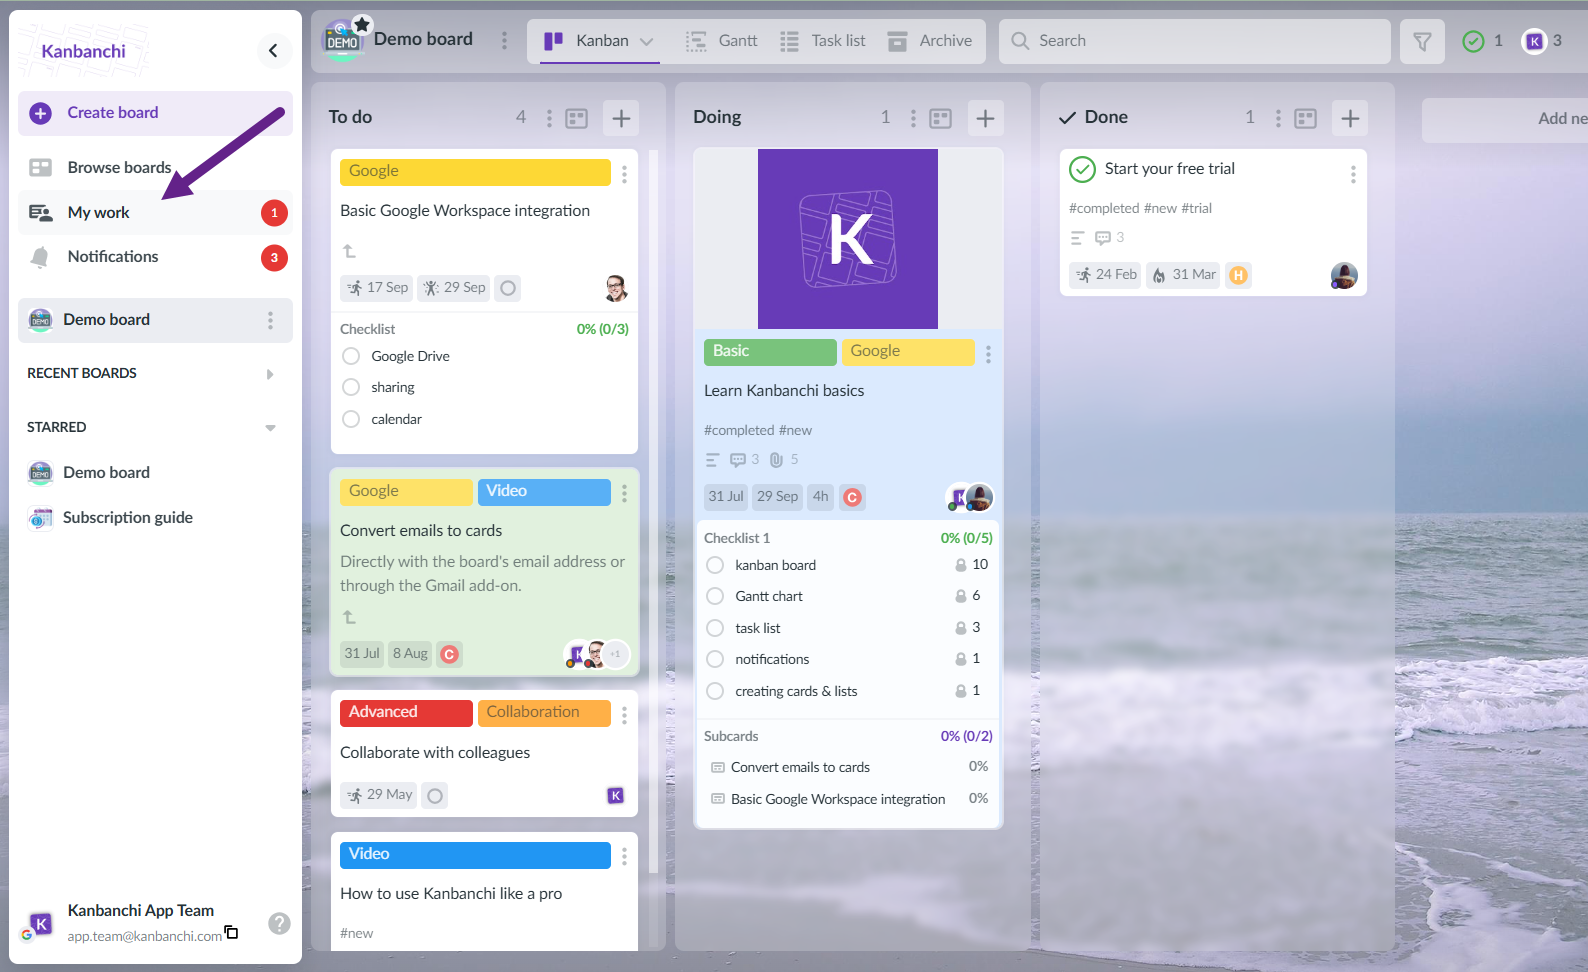
To find all the cards assigned to you from different Kanbanchi boards, please click "My tasks" in the left-side navigation panel.
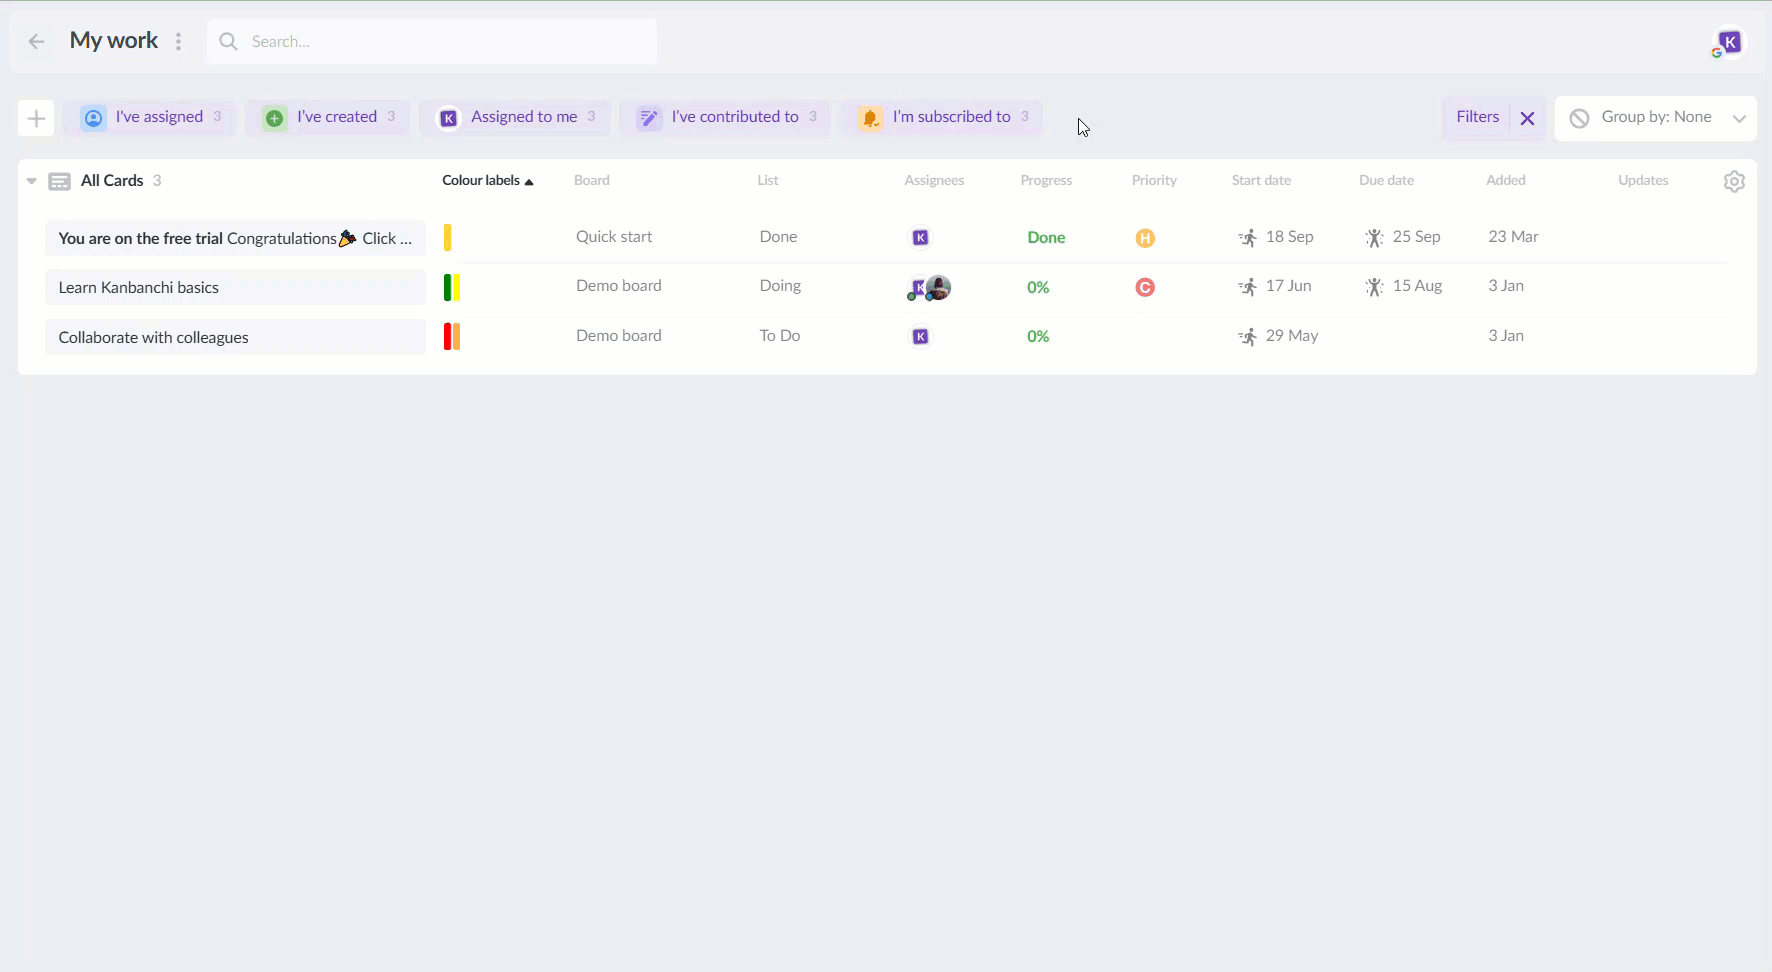
You will see all the tasks you are involved in. To see only the tasks assigned to you, click the button with your profile picture at the top panel. The number on the button shows how many cards are assigned to you. "Assigned to me" contains all the tasks assigned to you, even if you made the assignment by yourself.
To learn more about the "My tasks" space, please review this FAQ article:
3. Is there a way to move a card from one board to another?
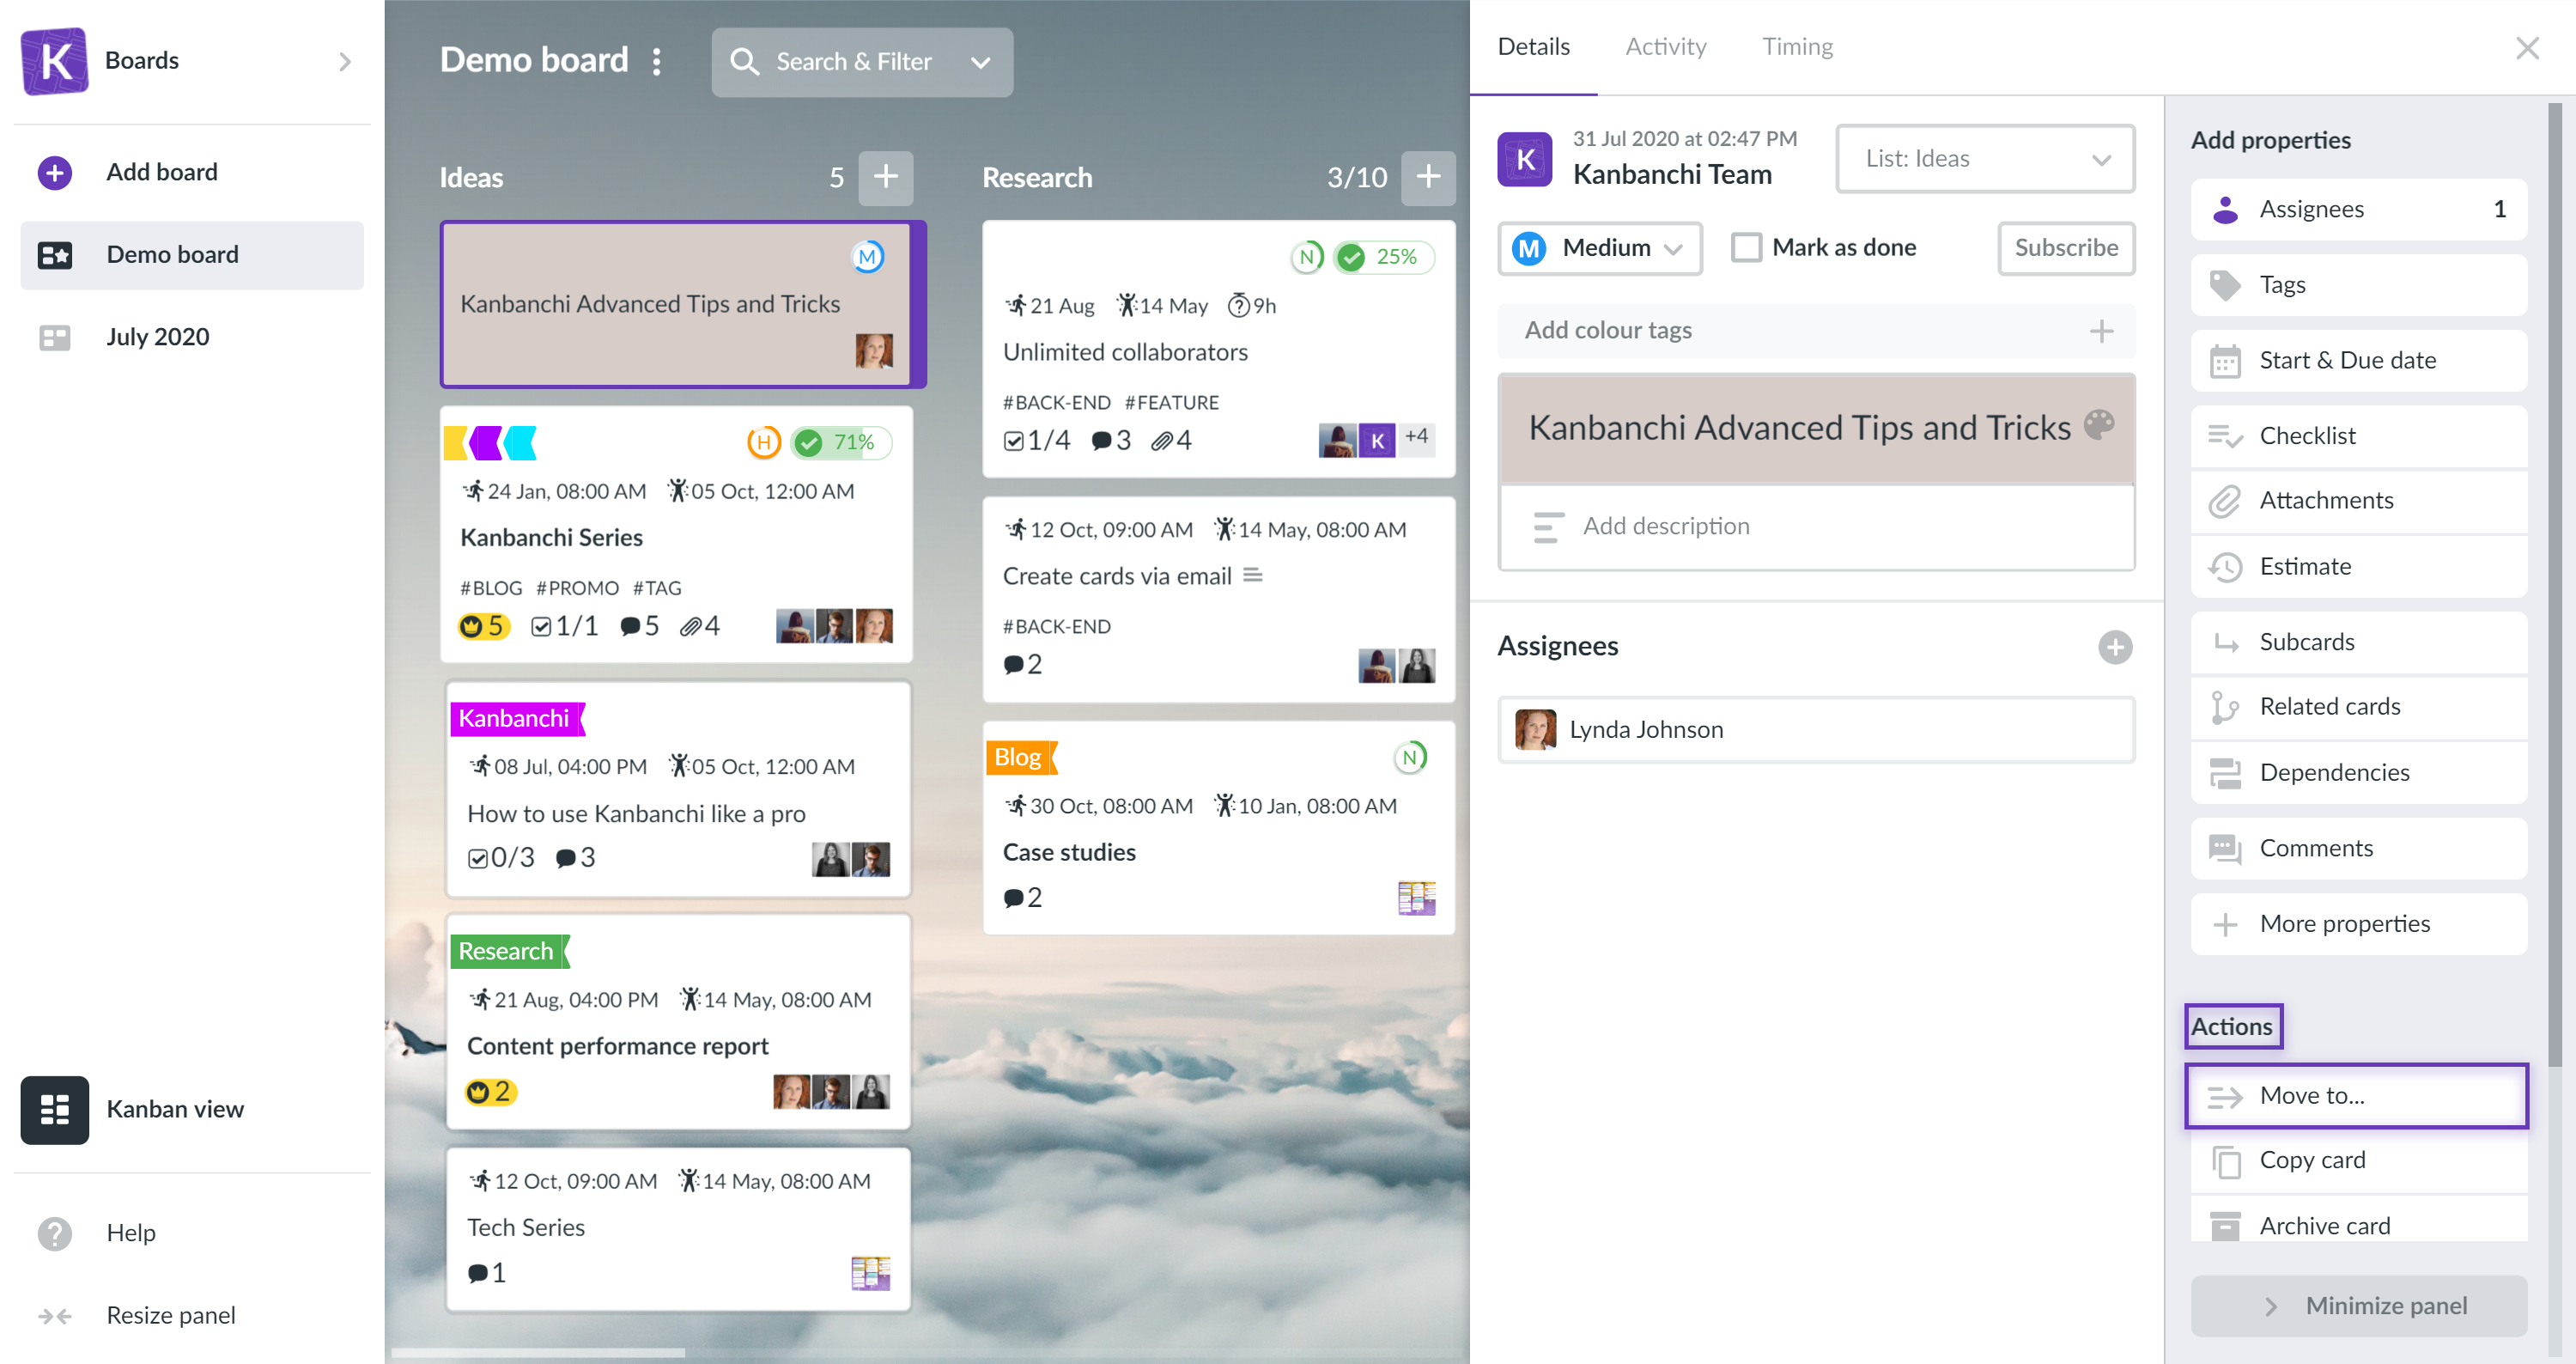
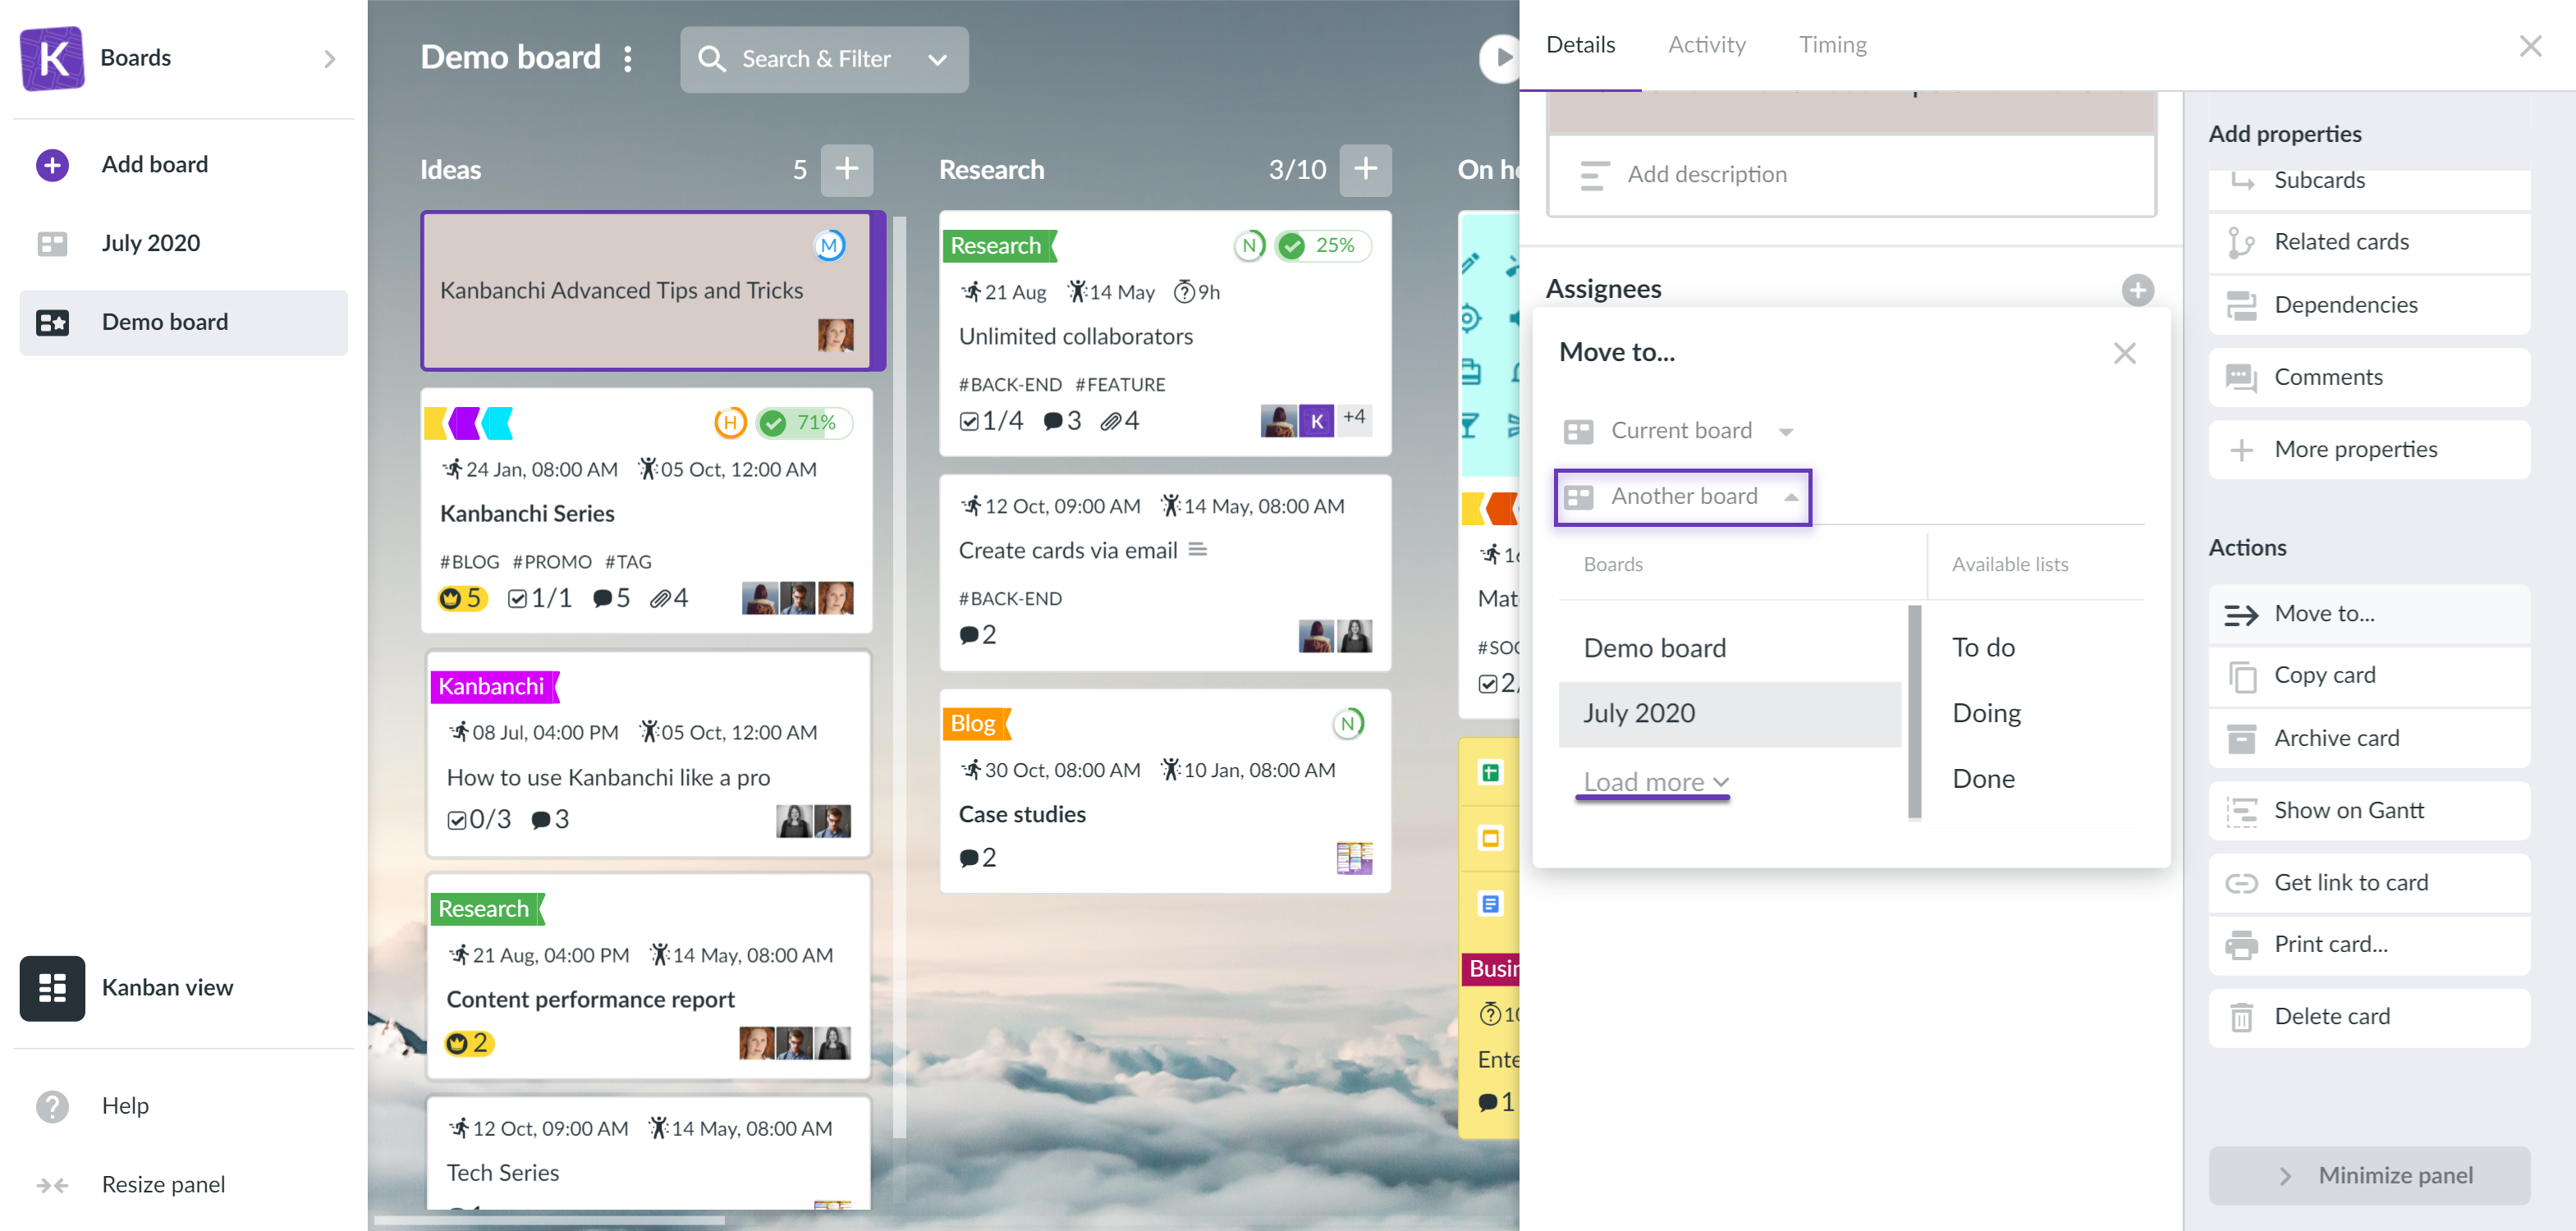
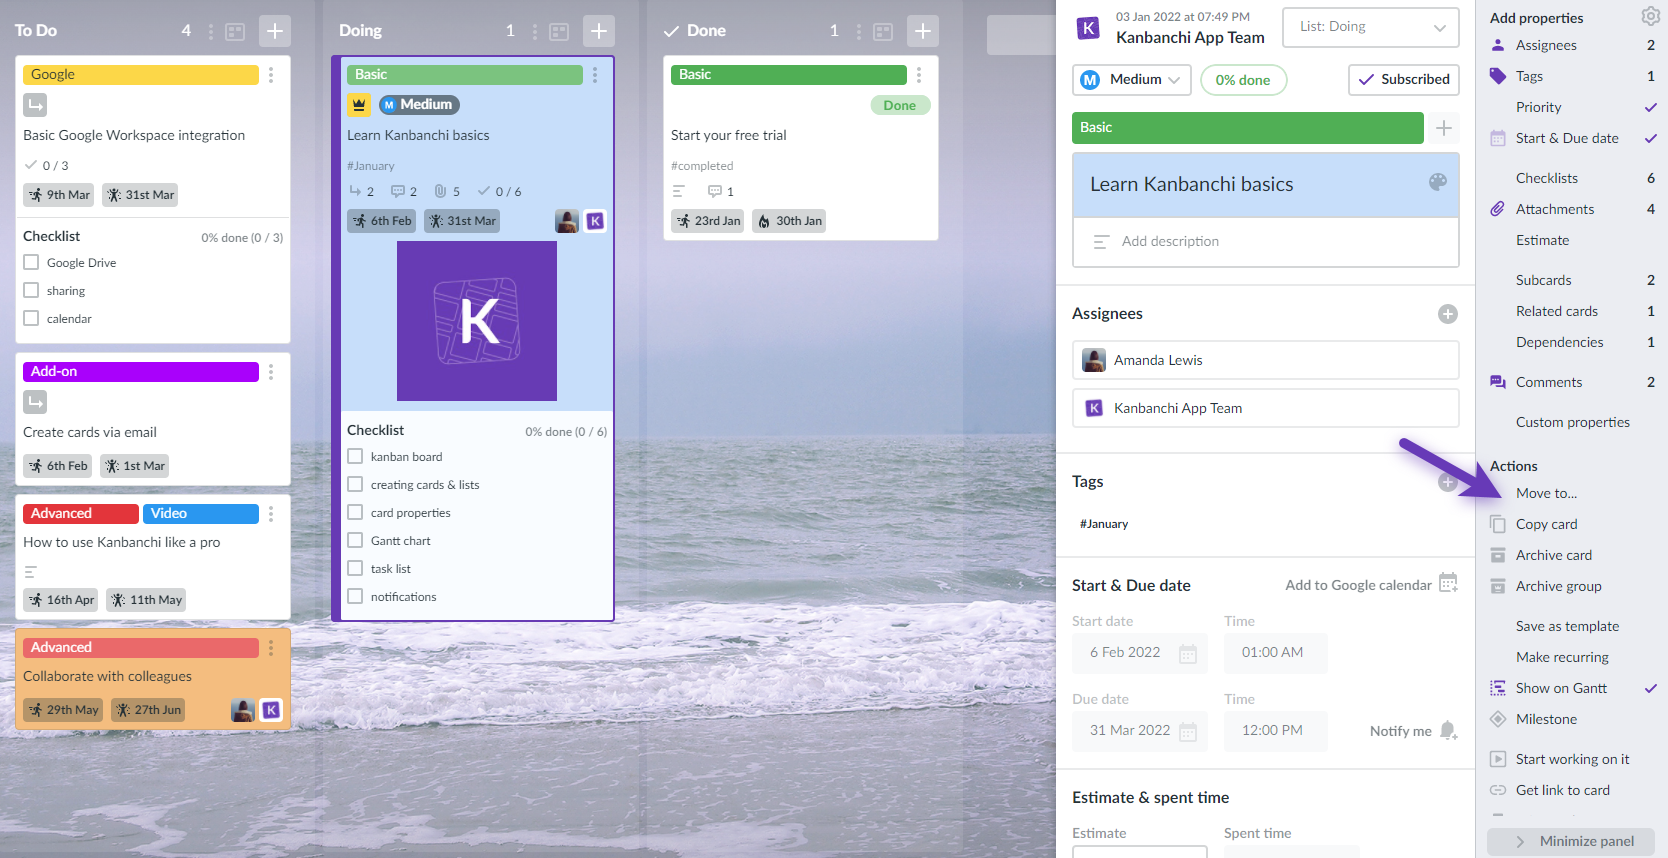
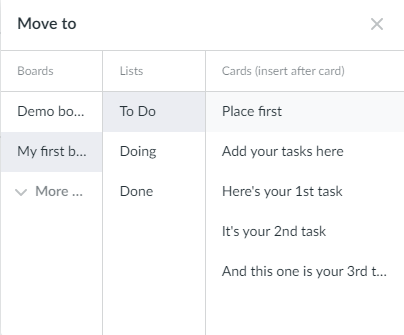
To move a card from one board to another, click on the card to see Card Details. Scroll down to Actions and click Move to.
Choose Another board. The menu will appear. By default, you see the boards which are currently open (the same you see in the left-side navigation panel). Click Load more to load the other boards. Choose the board and the list you want to move the card to.
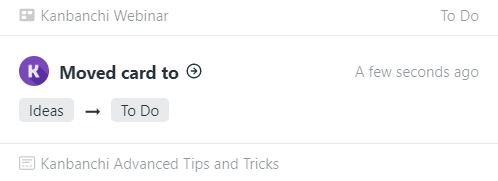
You’ll see a system notification that the card was moved.
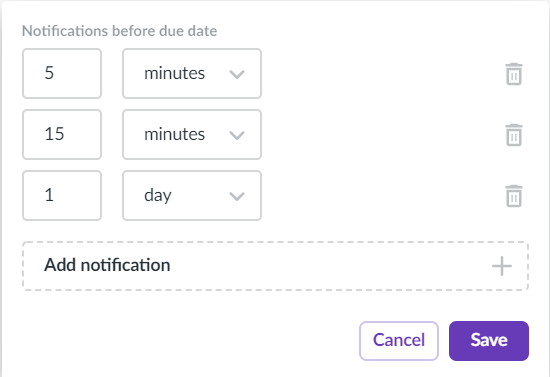
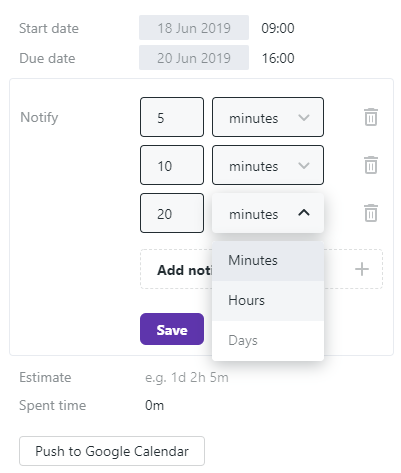
4. How can I set up a notification before the due date?
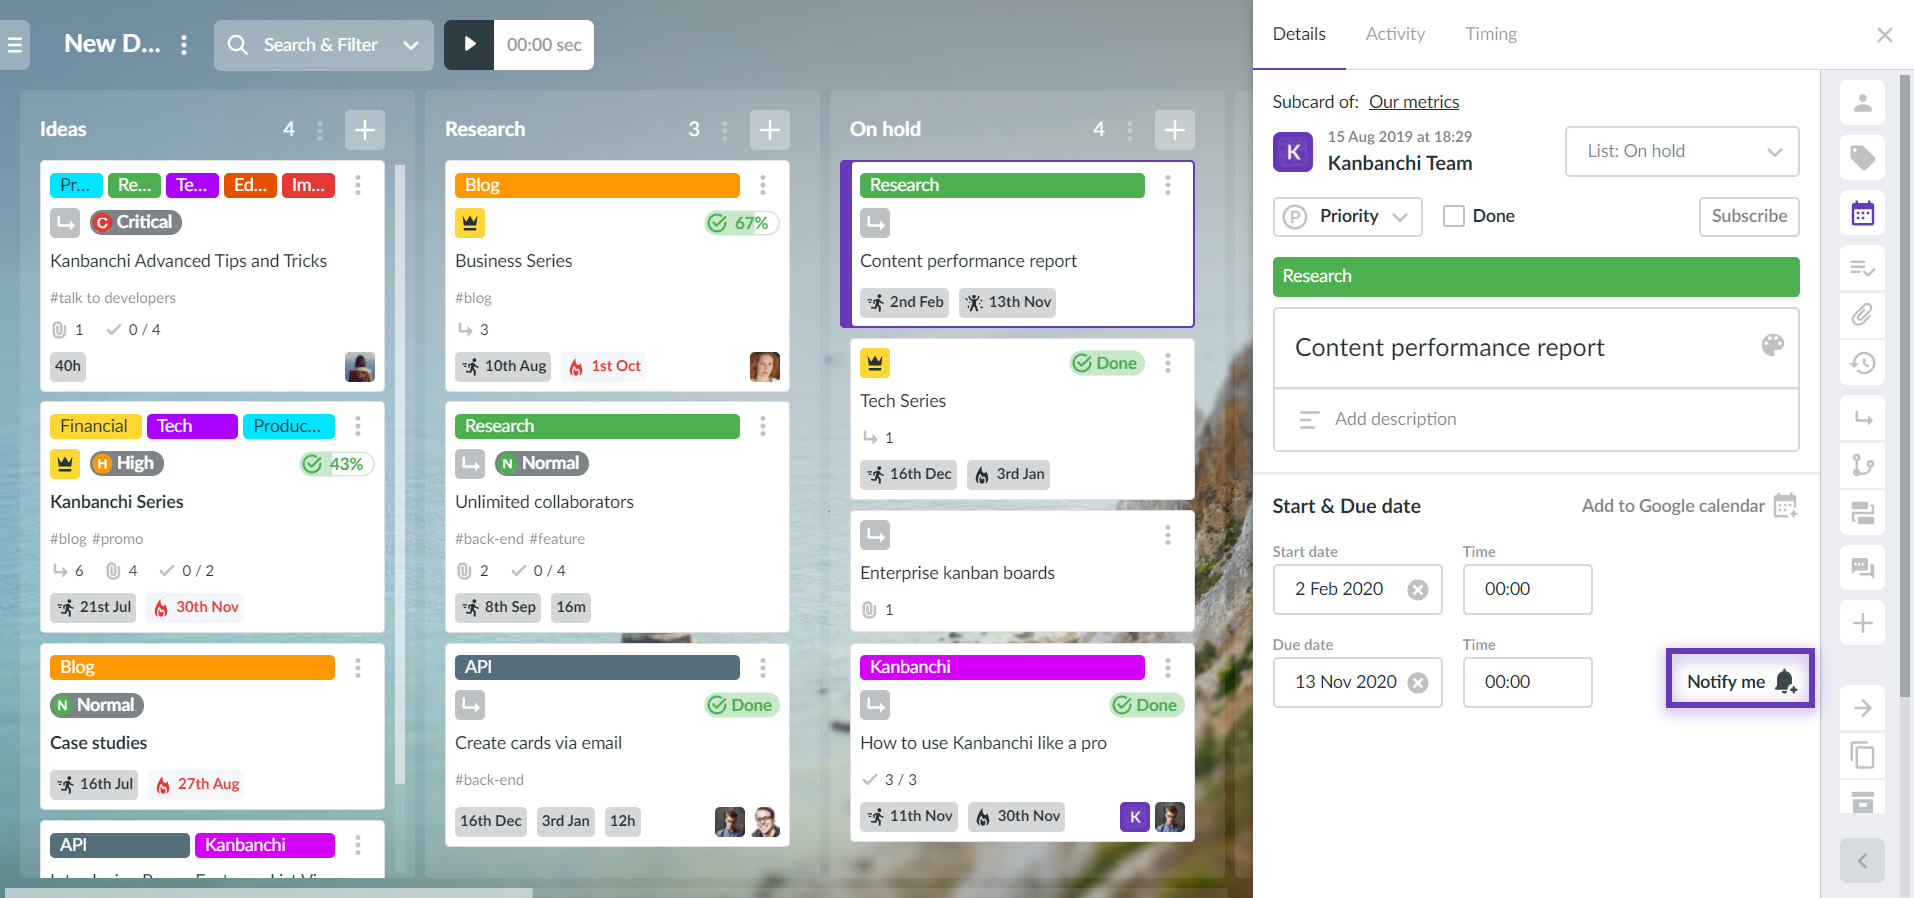
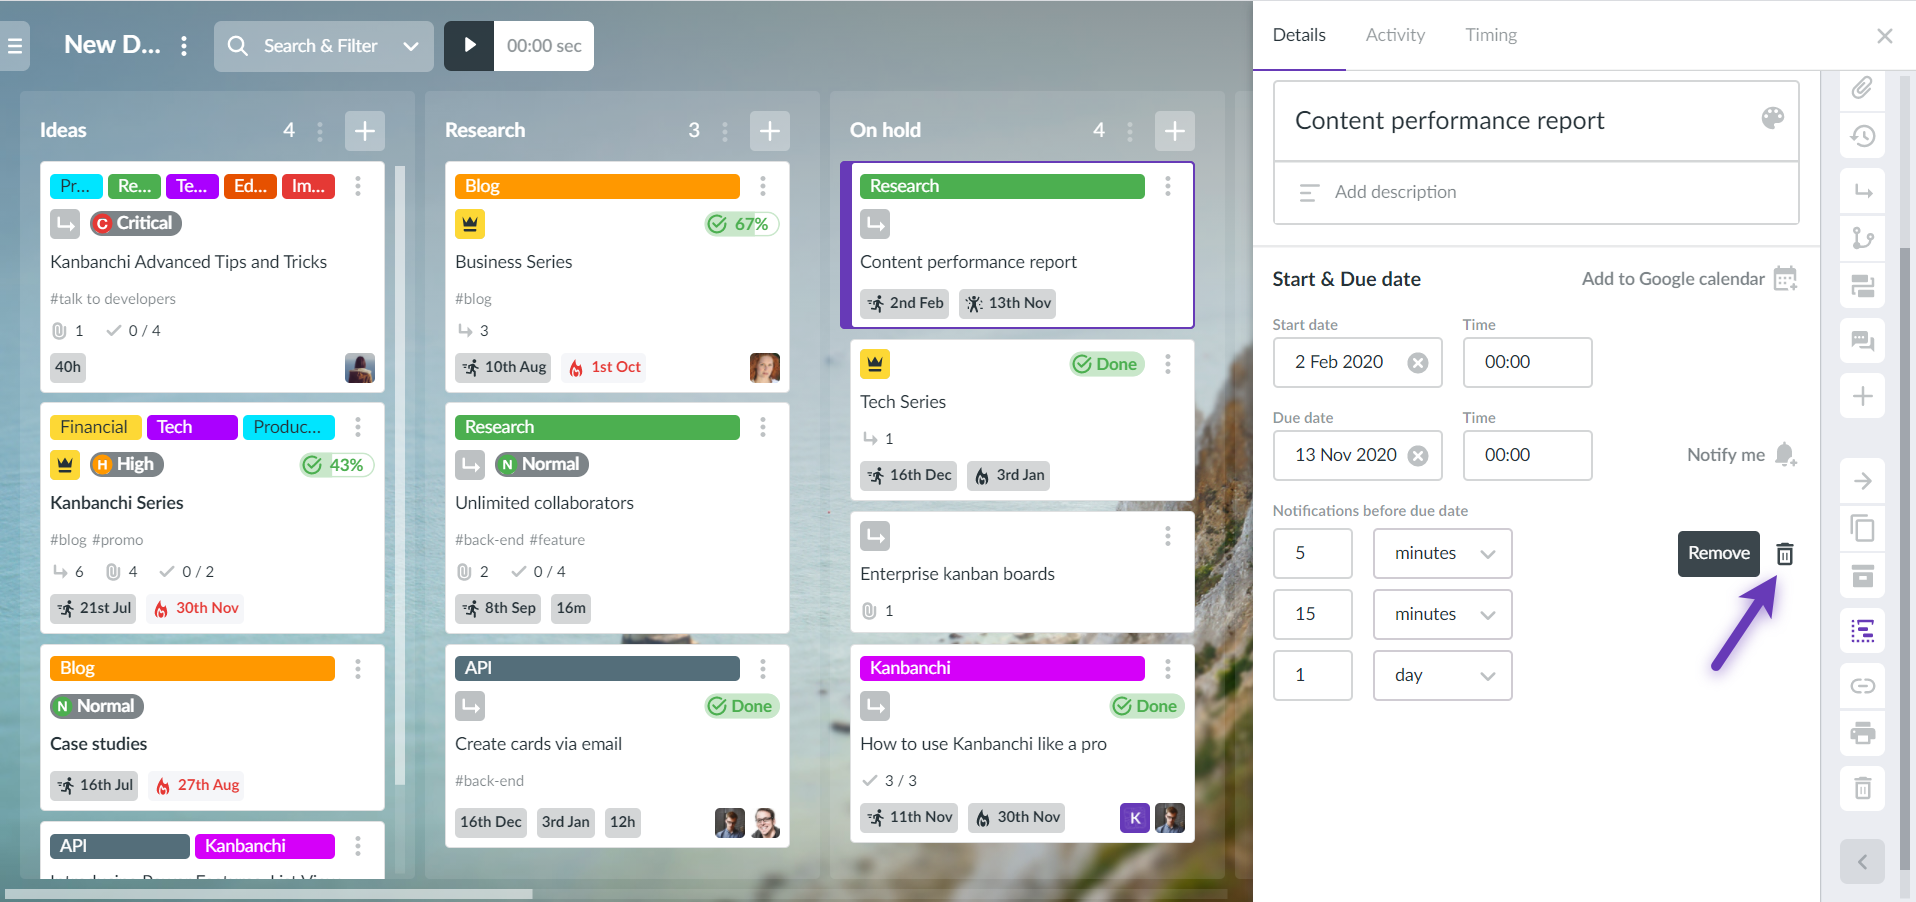
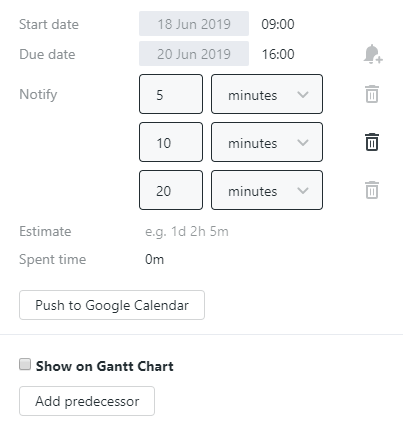
You may set up a notification before the due date in order not to miss the deadline and fulfil the task in time. In order to be notified by Kanbanchi before the due date, please, choose the task by clicking on it with the left button of the mouse. After the right-side panel with card details opens, set the due date and time for the task.
Click the bell button to add the notification.
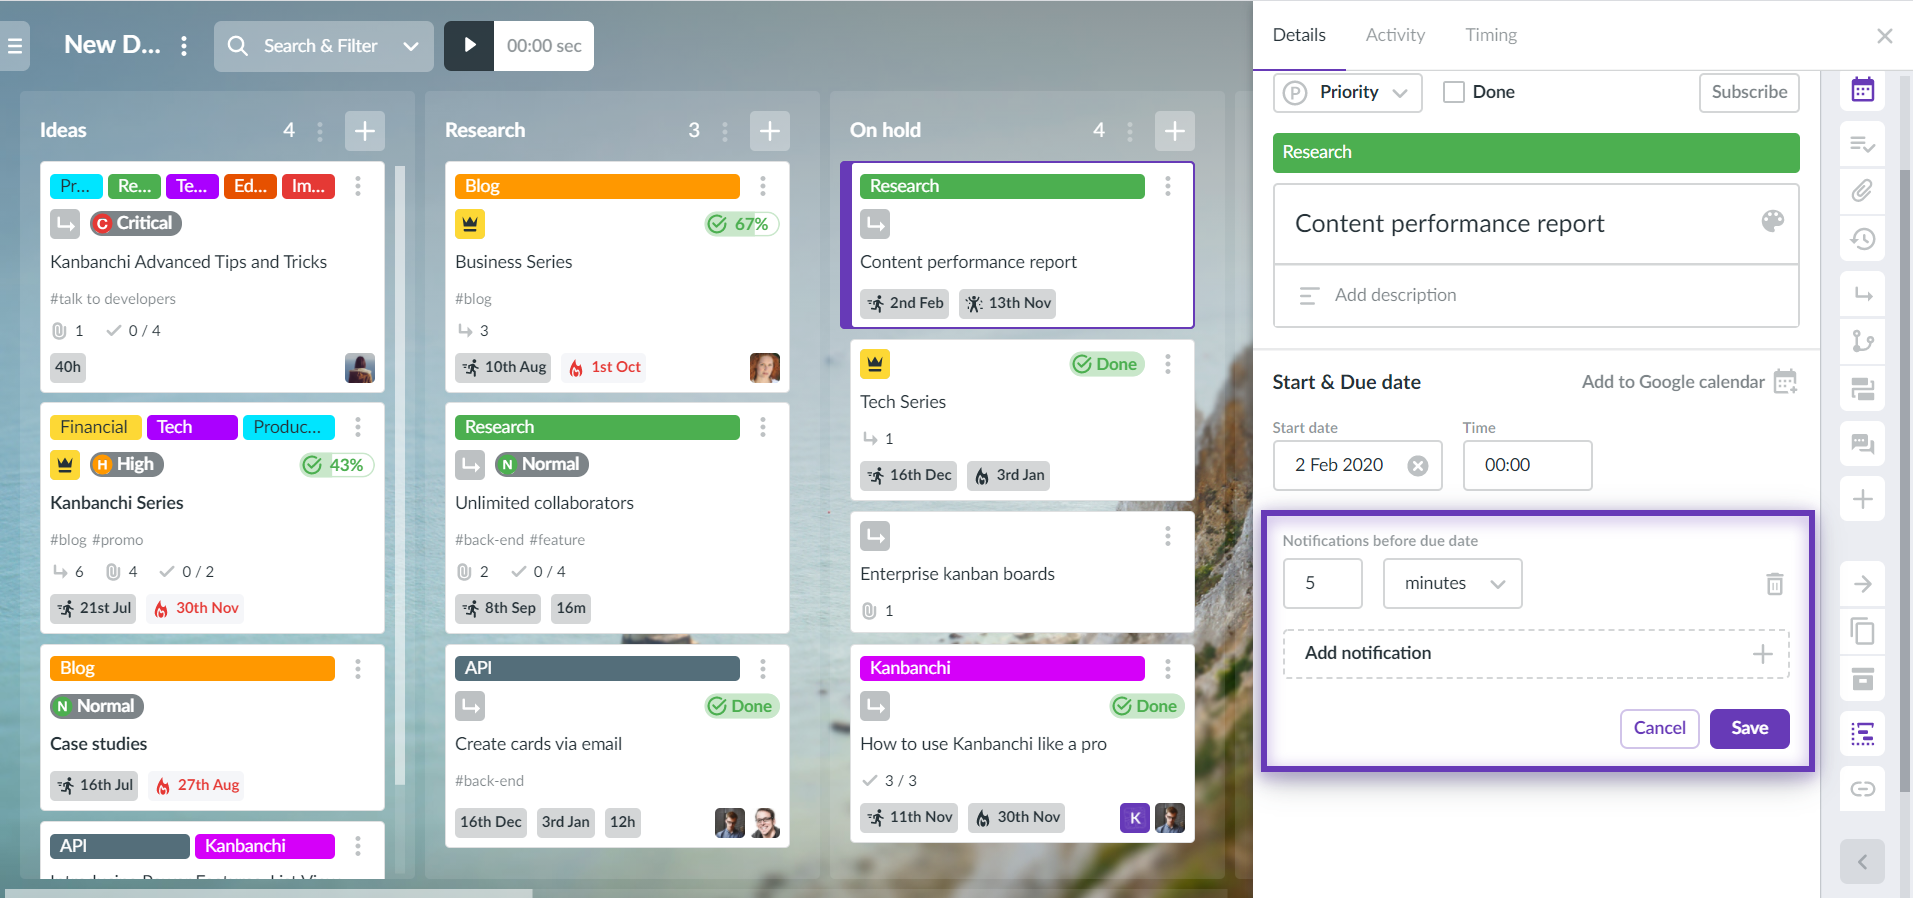
Choose one of the options: minutes, hours or days. Set the number. Click Save to set the notification. You may click Cancel if you have changed your mind and don’t want to set the notification up.
You may set several notifications for one card.
After the notification is saved you will see the information about it in card details.
If you would like to delete the notification click the trash bin icon.
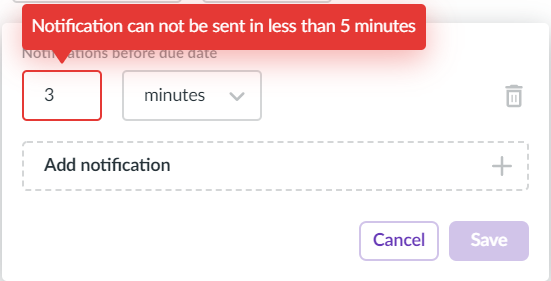
Please, note, you will be notified in the application. The notification will be sent only to the person who has set it. Notification cannot be set up in the past.
You can not set the notification less than 5 minutes before the due date.
You cannot set two identical notifications for one card.
5. How can I delete the installed notification before the due date?
You may delete the installed notifications before the due date. Open the card by clicking on it. The right-side panel with card details opens. Click the trash bin icon near the notification to delete the notification.
6. How can I change the installed notification before the due date?
You may change the installed notification before the due date if necessary. Open the card by clicking on it. The right-side panel with card details opens. You may change the number by clicking on the time that has been set. You may also change the time property. Click Save to save the changes. Click Cancel if you’ve changed your mind and don’t want to change the notification.
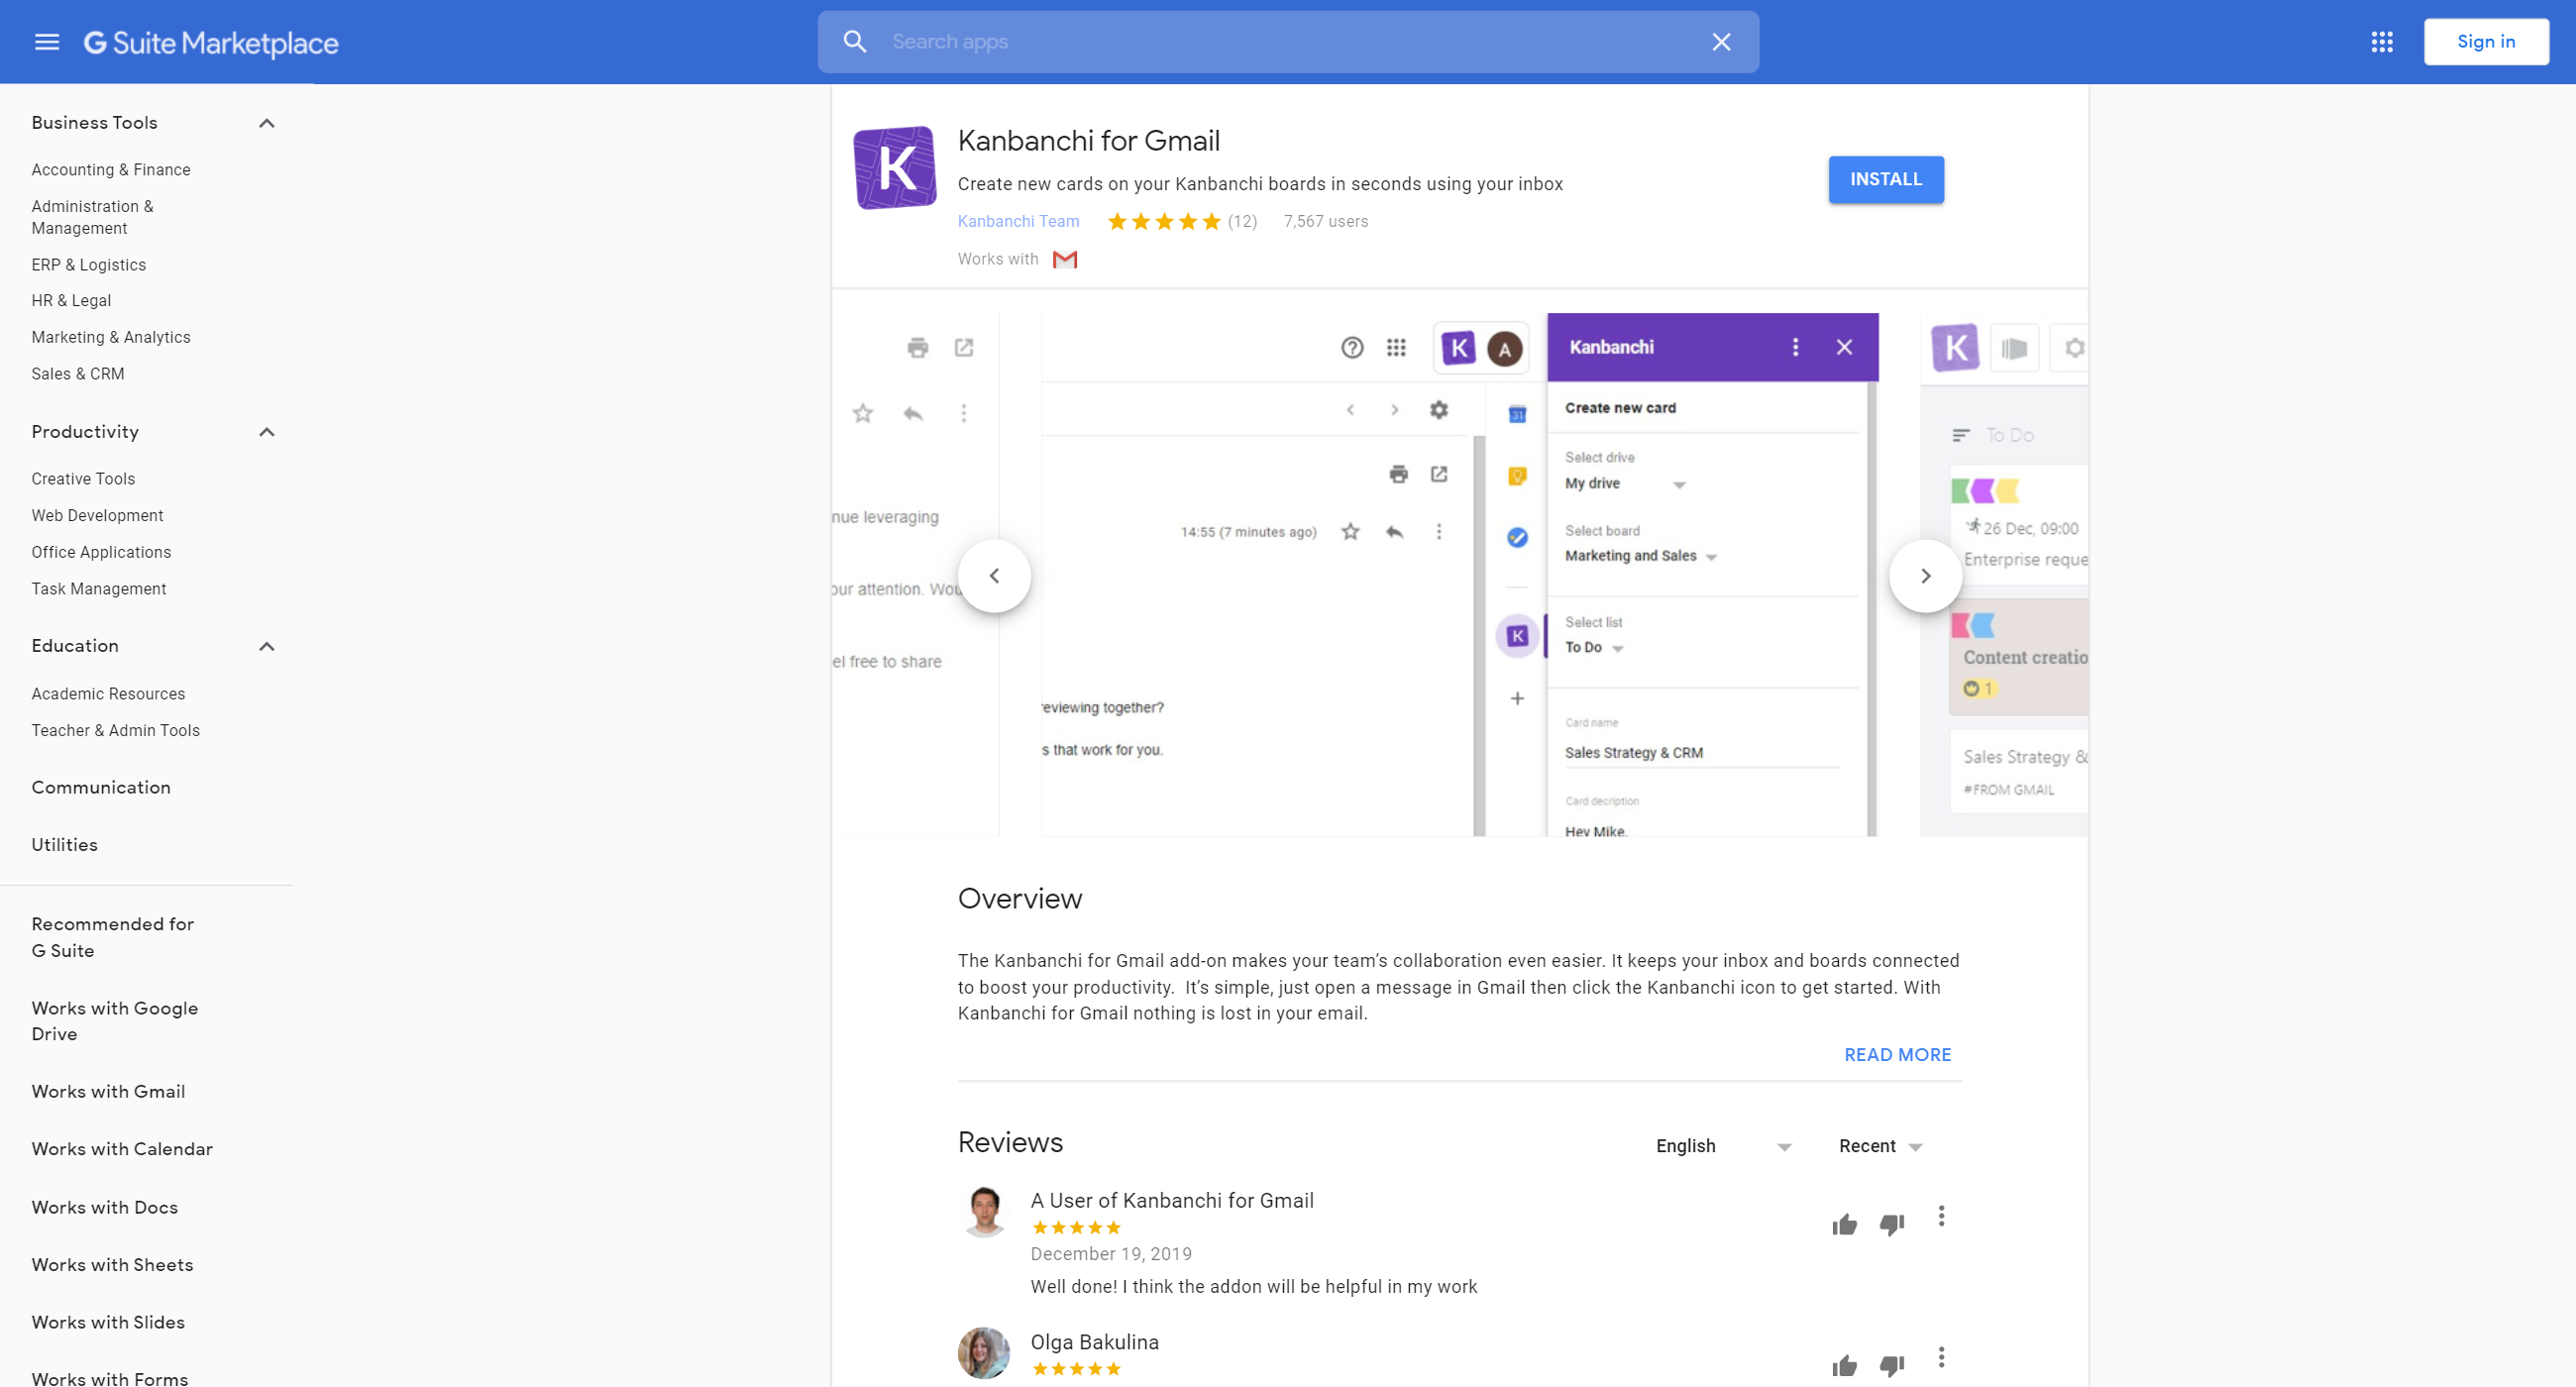
Kanbanchi for Gmail Add-on makes your team’s collaboration even easier. It keeps your inbox and boards connected to boost your productivity. Users with the installed Add-on have an opportunity to convert emails into Kanbanchi cards.
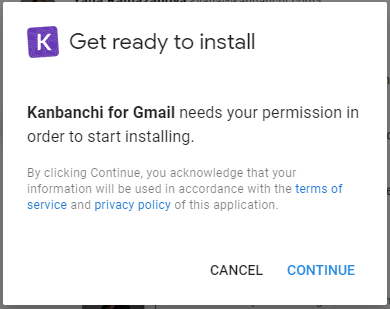
You should be logged in to your Google account to install the add-on. Click Install.
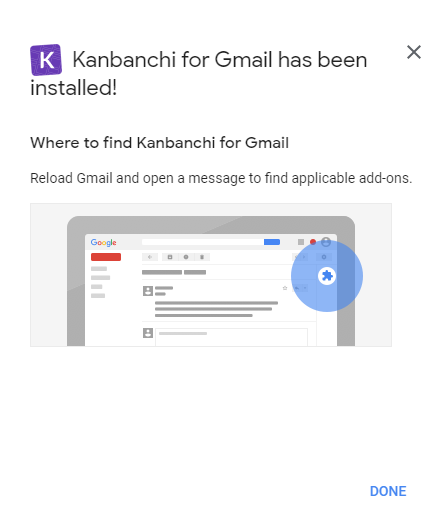
You will see the pop-up window. Click Continue.
When the Add-on is installed you will see the confirmation message. Click Done.
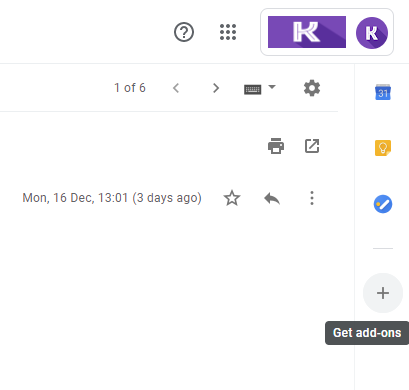
Also, it is possible to install the addon directly from your inbox. Click the Plus icon on the right-side panel.
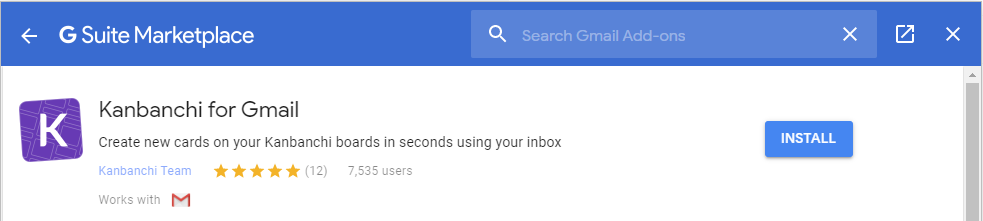
Find Kanbanchi for Gmail in the list of GSuite Marketplace add-ons. Choose Kanbanchi and click Install. You will be taken through the same steps described above.
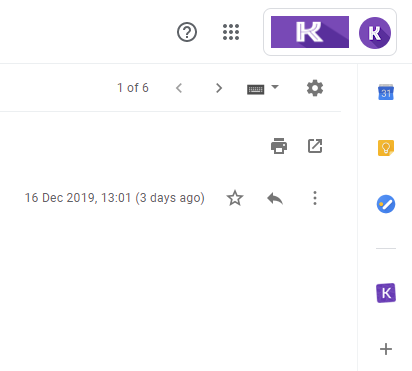
Once the Add-on is installed, Kanbanchi icon will appear in the right-side panel.
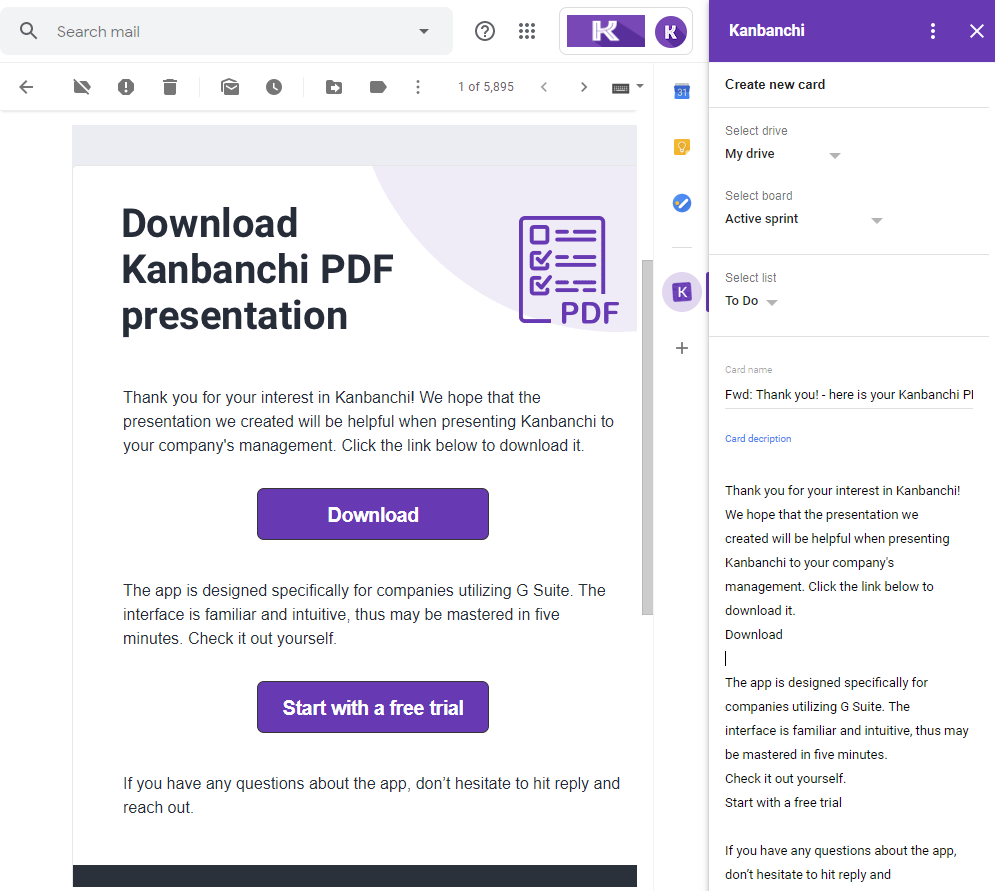
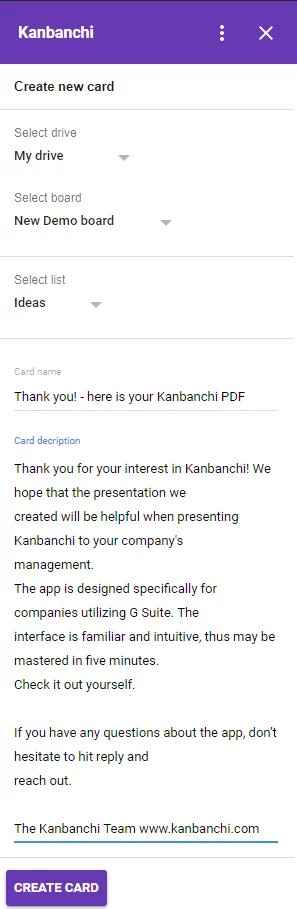
How can I create cards from Gmail with Kanbanchi for Gmail add-on? Once the Add-on is installed, you may start using it. Open an email. Click Kanbanchi icon on the right-side panel.
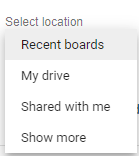
Select board location. Selecting Recent boards you will see the same list of boards you see in the Recent board section in Kanbanchi.
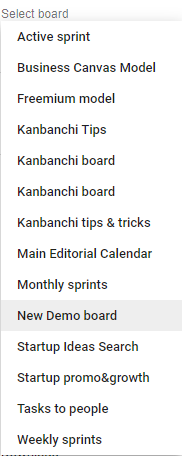
Select board (templates, archive and Read-only boards won't show).
Select list.
Edit the content if needed.
Click Create card.
The subject will be displayed as the card title and the email body will be added as the card description automatically. You may edit the content if needed.
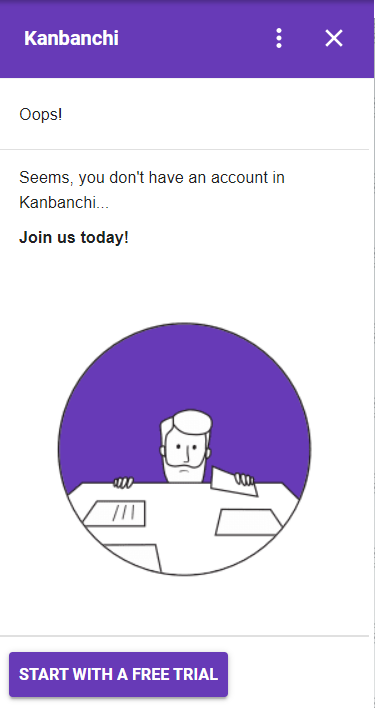
What will happen if I install the addon without having Kanbanchi account? While trying to create a card from Gmail you will be informed that no Kanbanchi account has been found for the email. You may start using Kanbanchi app by just clicking Start with a free trial.
Known issues “Content not available for this message.” The issue occurs on Google’s side. Unfortunately, there is no walkaround that the developer can apply. “Add-on error. Something went wrong when executing the Add-on.” Please, contact us if you’ve met the issue.
How can I uninstall the Add-on? In case you don’t need the Add-on anymore you may uninstall it. Go to Manage Apps in the G Suite Marketplace, click on the three-dotted menu and click "Remove". Also, you may uninstall the Add-on in the Gmail settings. Click the nut icon and choose Setting in the drop-down menu. Open the Add-ons tab. You will see Kanbanchi in the list of installed add-ons. Click Manage. You will see the Add-on in GSuite Marketplace. Click Uninstall.
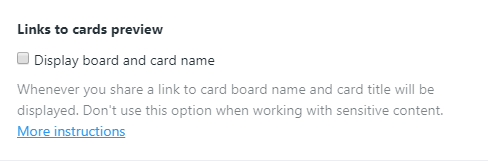
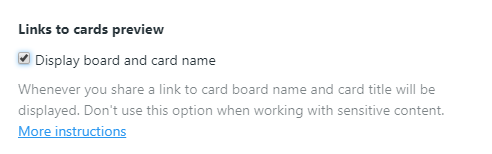
If you are a board's owner you may decide what data links to cards will contain. By default, no data is represented while sharing a link to card. But in case you want your team to preview the link's content you may use the links to cards preview setting in boards setting.
Open the board's settings by clicking the board's name.
The right-side panel with board's setting is opened.
Scroll down to the bottom of the panel. Find Links to cards preview option.
Check the checkbox.
Note, don't use this option when working with sensitive content.
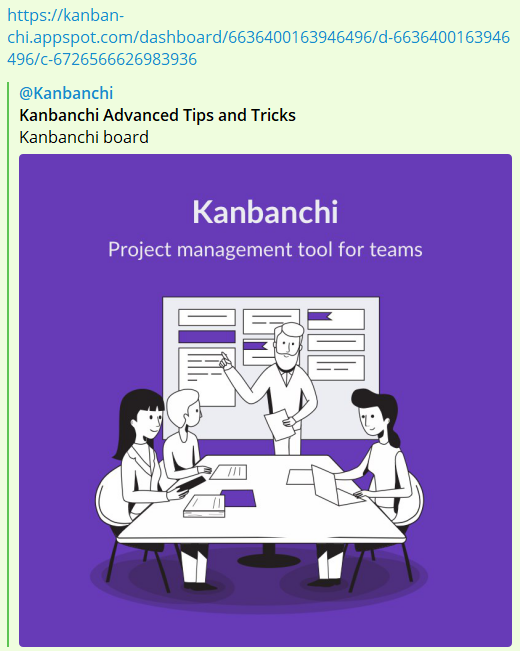
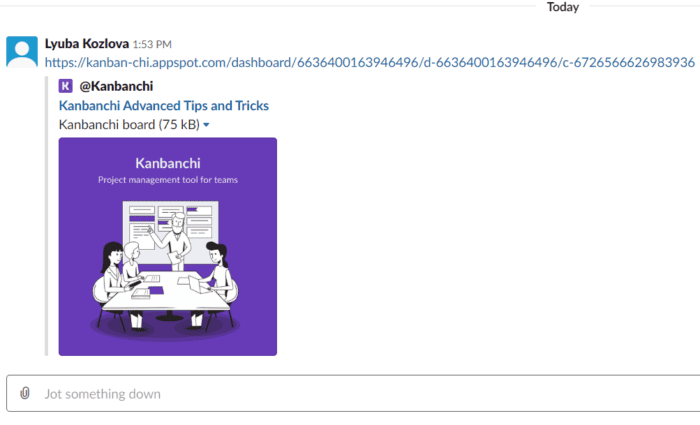
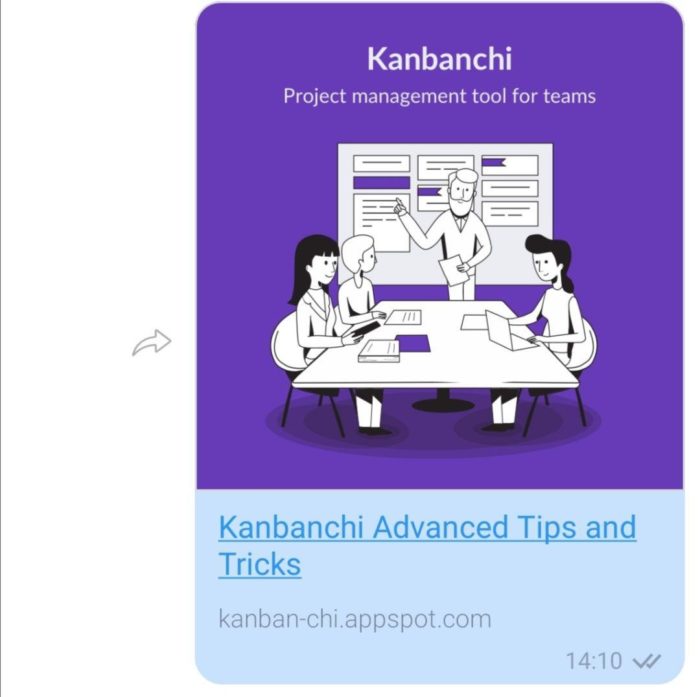
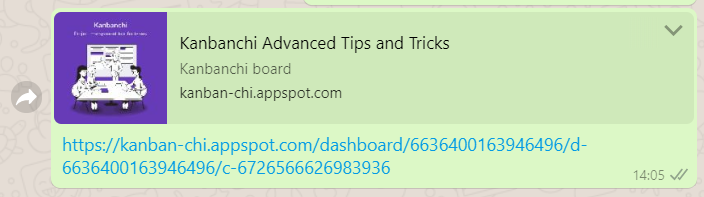
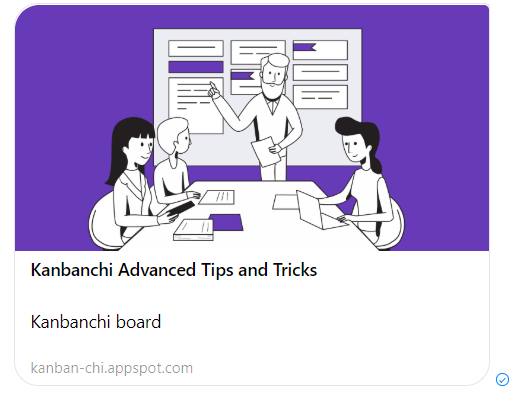
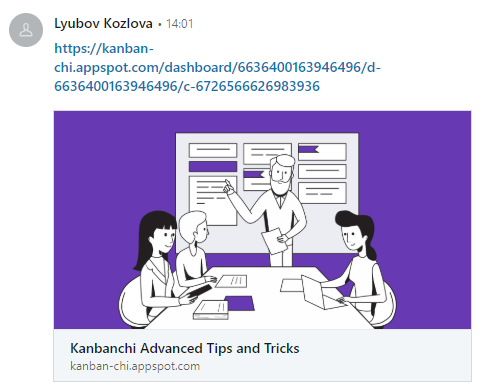
What information the link will contain?
Sharing the link you will let your teammates preview the card's name and the board's name. Here are screenshots from different social media chats and messengers:
Telegram
Slack
Viber
WhatsApp
Facebook
LinkedIn
Please, contact us indicating what social media or messenger you've used if the feature doesn't work for you.
11. How can GSuite Admin install and remove Add-on for Gmail for domain?
Domain administrators can install, authorize and remove add-ons for users in their domain. You can install Kanbanchi for Gmail in your organization's domain from within the Google Admin console, or from the Marketplace website. When you get to the add-on's description page:
- Click Install,then Continue.
- Review the terms of service, specify if you want to make the add-on available to your whole domain or to a specific team or department, check the agreement box and click Accept.
After you install the add-on to your domain, it's listed under Marketplace Apps in your Admin console.
- From the Admin console Home page, go to AppsMarketplace apps.
- Click Kanbanchi for Gmail to access settings.
Note: domain installation may require time for the add-on icon to appear for the domain users.
As an admin, you can remove add-on for Gmail from your organization's G Suite account. When you delete it, none of your users can access it.
- From the Admin console Home page, go to AppsMarketplace apps.
- Click Kanbanchi for Gmail.
- In the upper right of the Settings page, click .
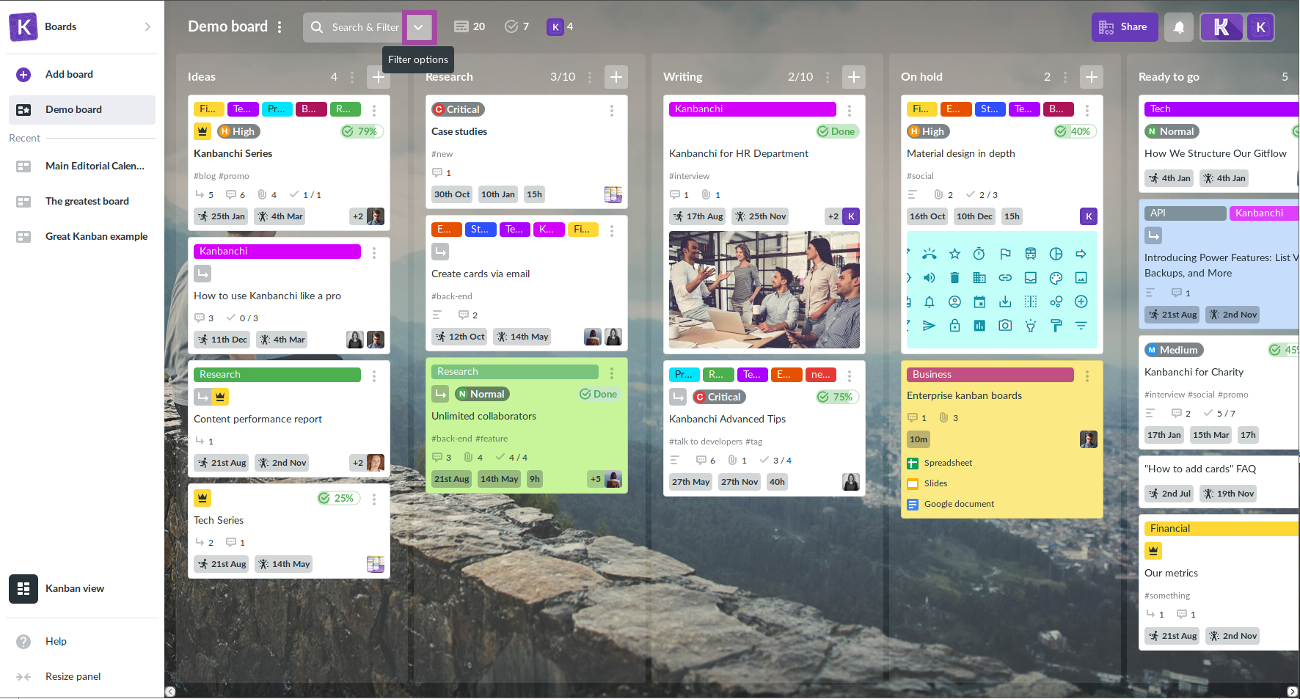
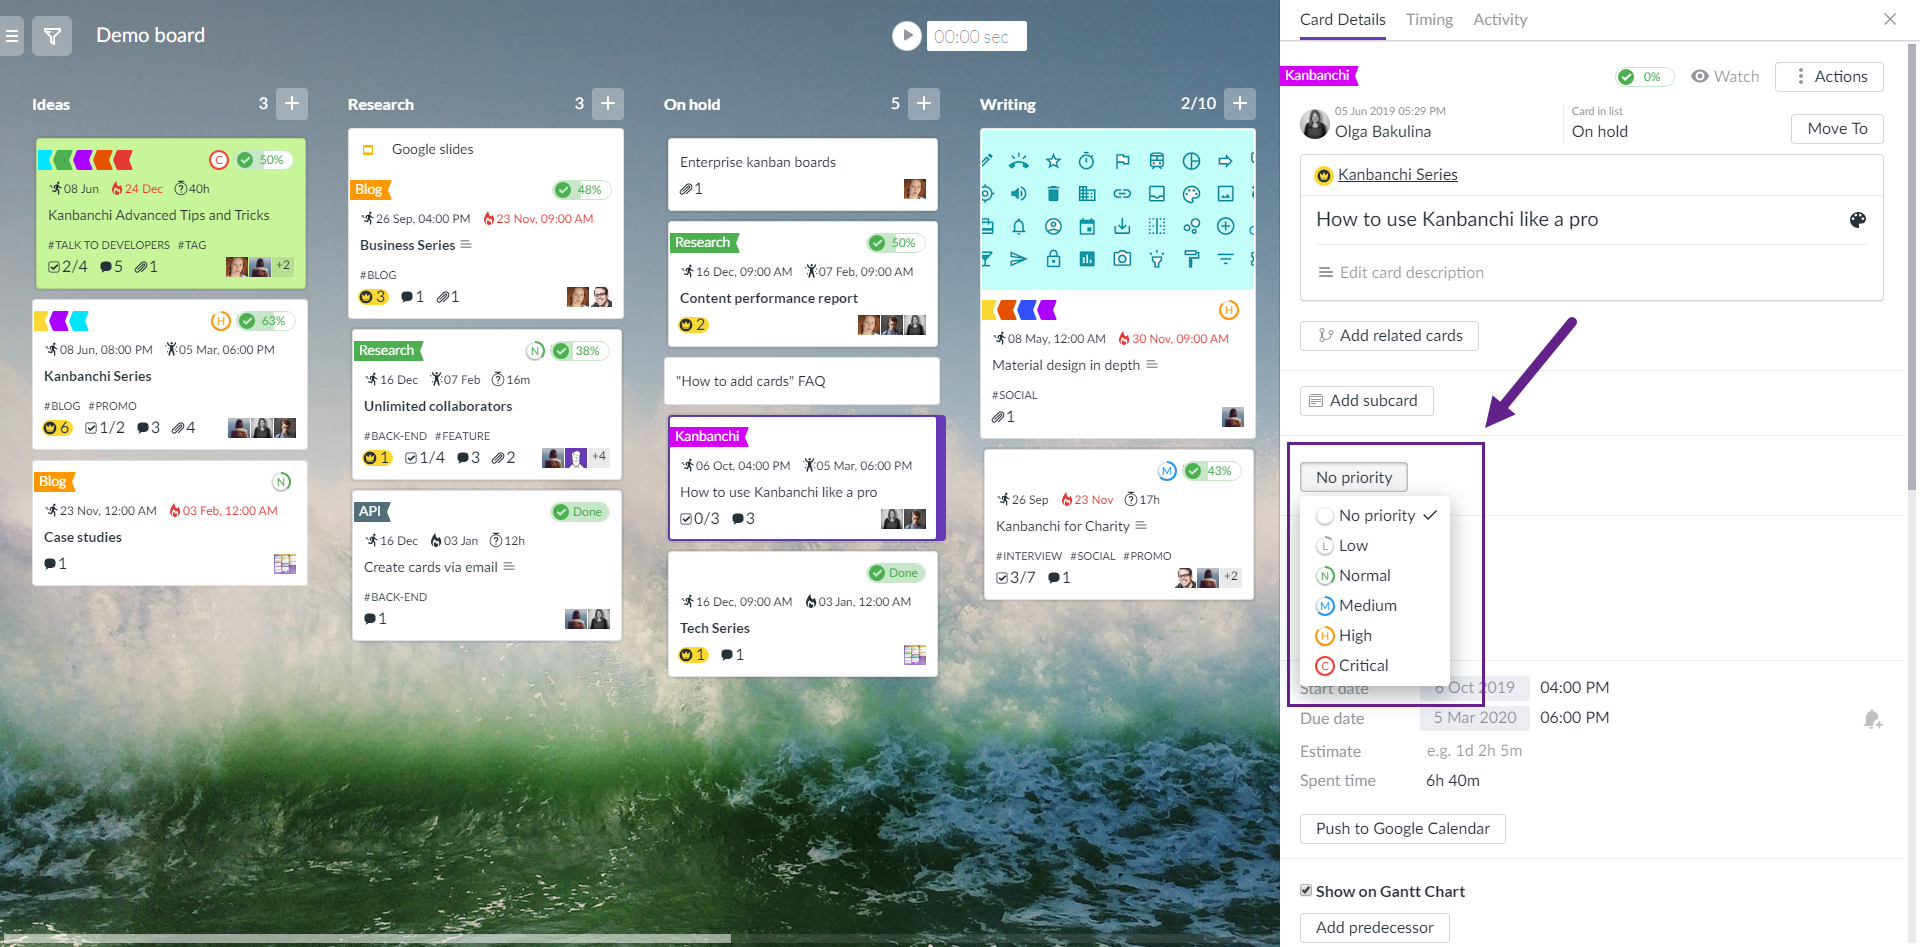
Visualise your priorities on boards. To add priority to cards, open Card details and hover your mouse cursor to No priority button. Choose the necessary priority from the drop-down.
Kanbanchi card prefix is a short text and number that you can add to your cards on boards. It allows unique identification, for example for a quick search. You may set up card prefixes in board settings if you are the creator of the board (My Drive) or have sufficient permissions higher than contributing (Shared Drives).
14. How to create recurring tasks (cards) in Kanbanchi?
If you have tasks that repeat regularly, you can automate the process of creating cards for these tasks. Such cards that will be re-created according to the rule you set are called recurring cards. To create a recurring card, open the card with the task you want to repeat regularly. Click the three dots in the actions menu, then choose Make recurring. Then select the date it should start repeating, and set the repeating rule.
To view the list of all recurring cards, edit or delete them, click on the board title (or three dots next to the title), and choose Recurring cards.
You will see a panel with all your recurring cards, and you will be able to create them from scratch - just set the rules and give your recurring tasks names.
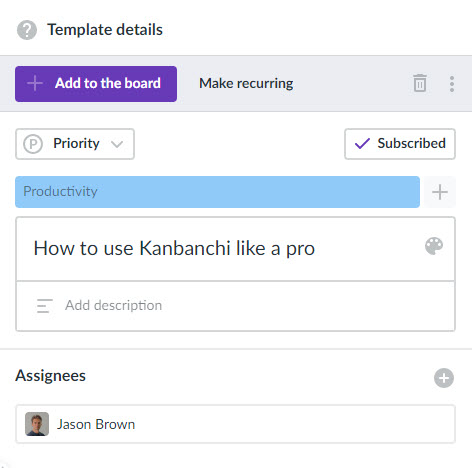
Creating card templates saves much time when you have tasks that repeat from time to time. Instead of adding the details or checklists every time, use card templates.
Choose a card that will become a template, and click the three-dots icon and choose Save as a template. The template will be instantly created.
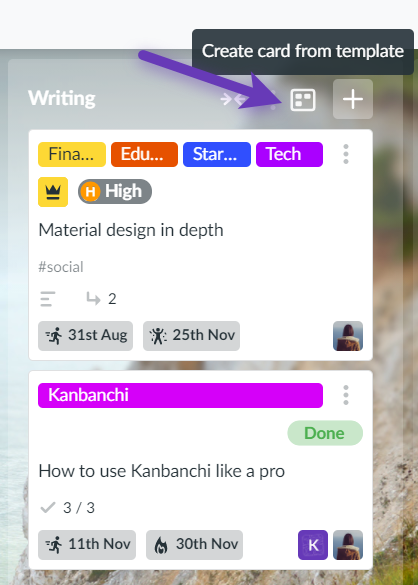
To add a card from the template to your board, click Add to the board
Alternatively, you may click the template icon right next to the list title and choose a template from the drop-down menu.
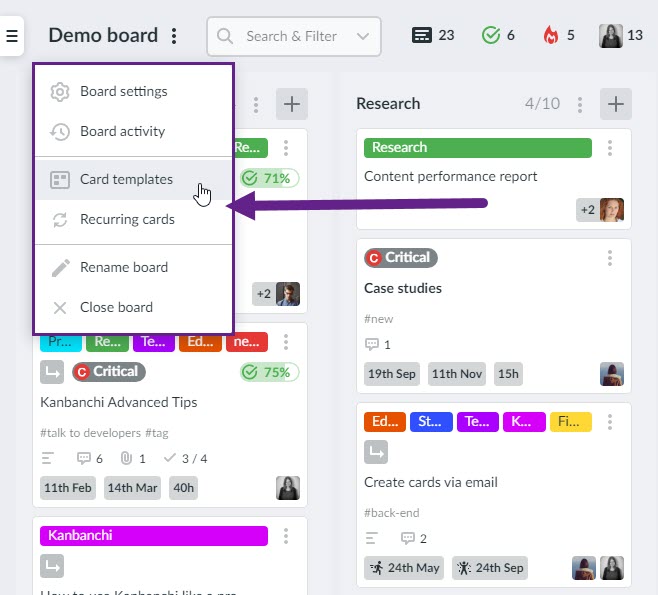
To access the list of all your templates, edit or delete them, click on the board title and choose Card templates.
You may choose a default template for your board. All new cards will be created from the selected template.
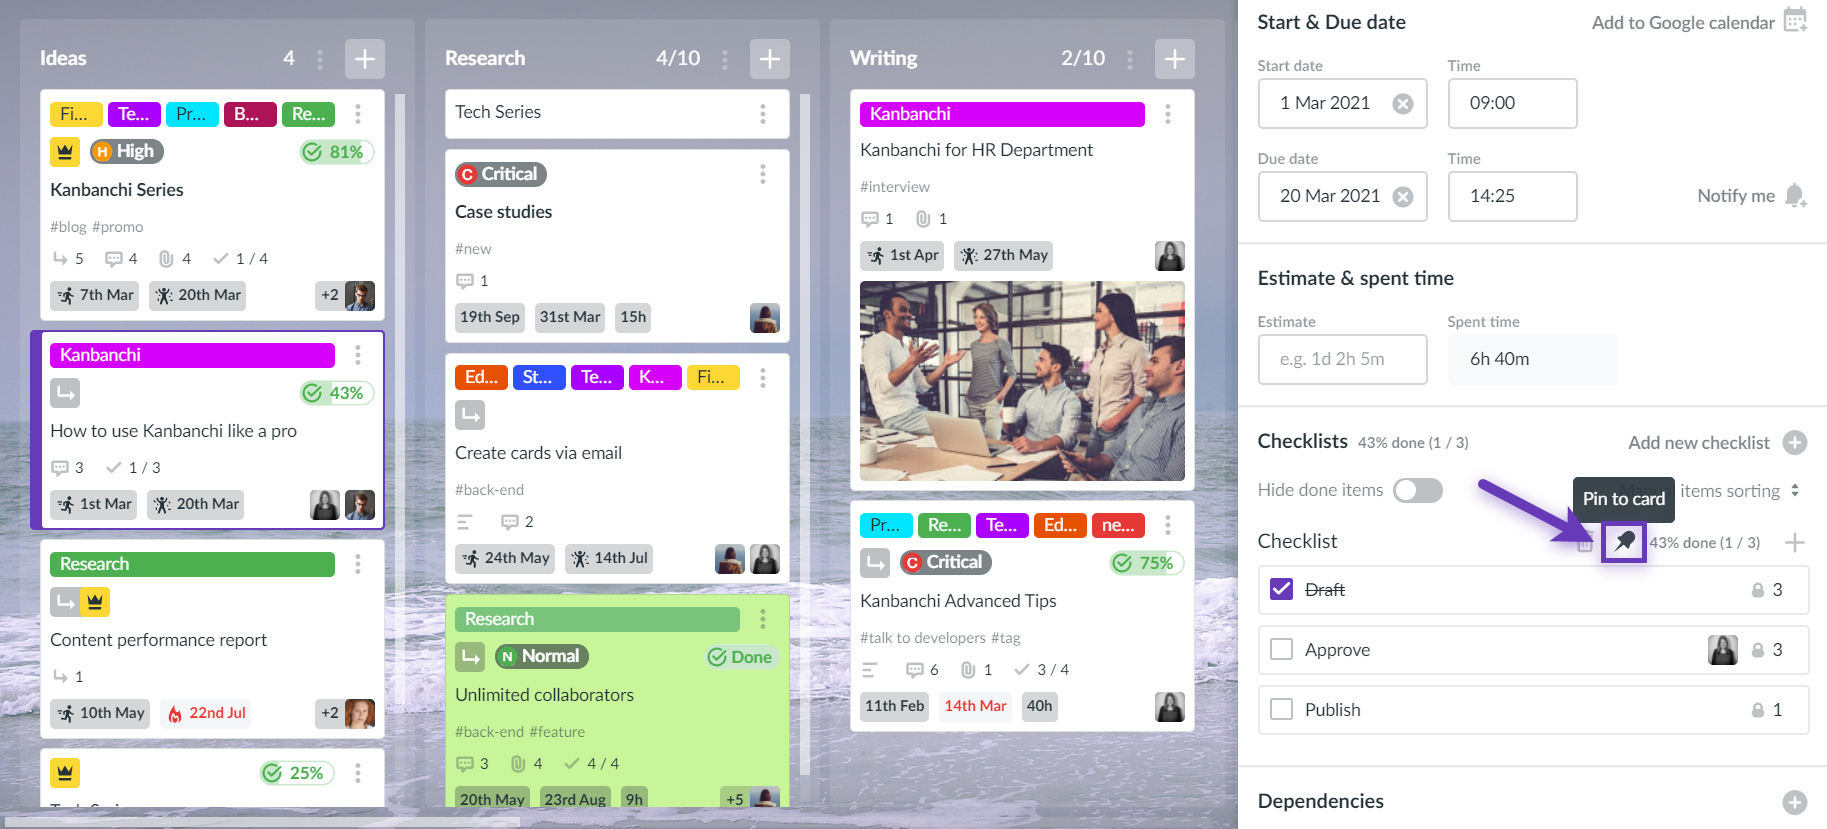
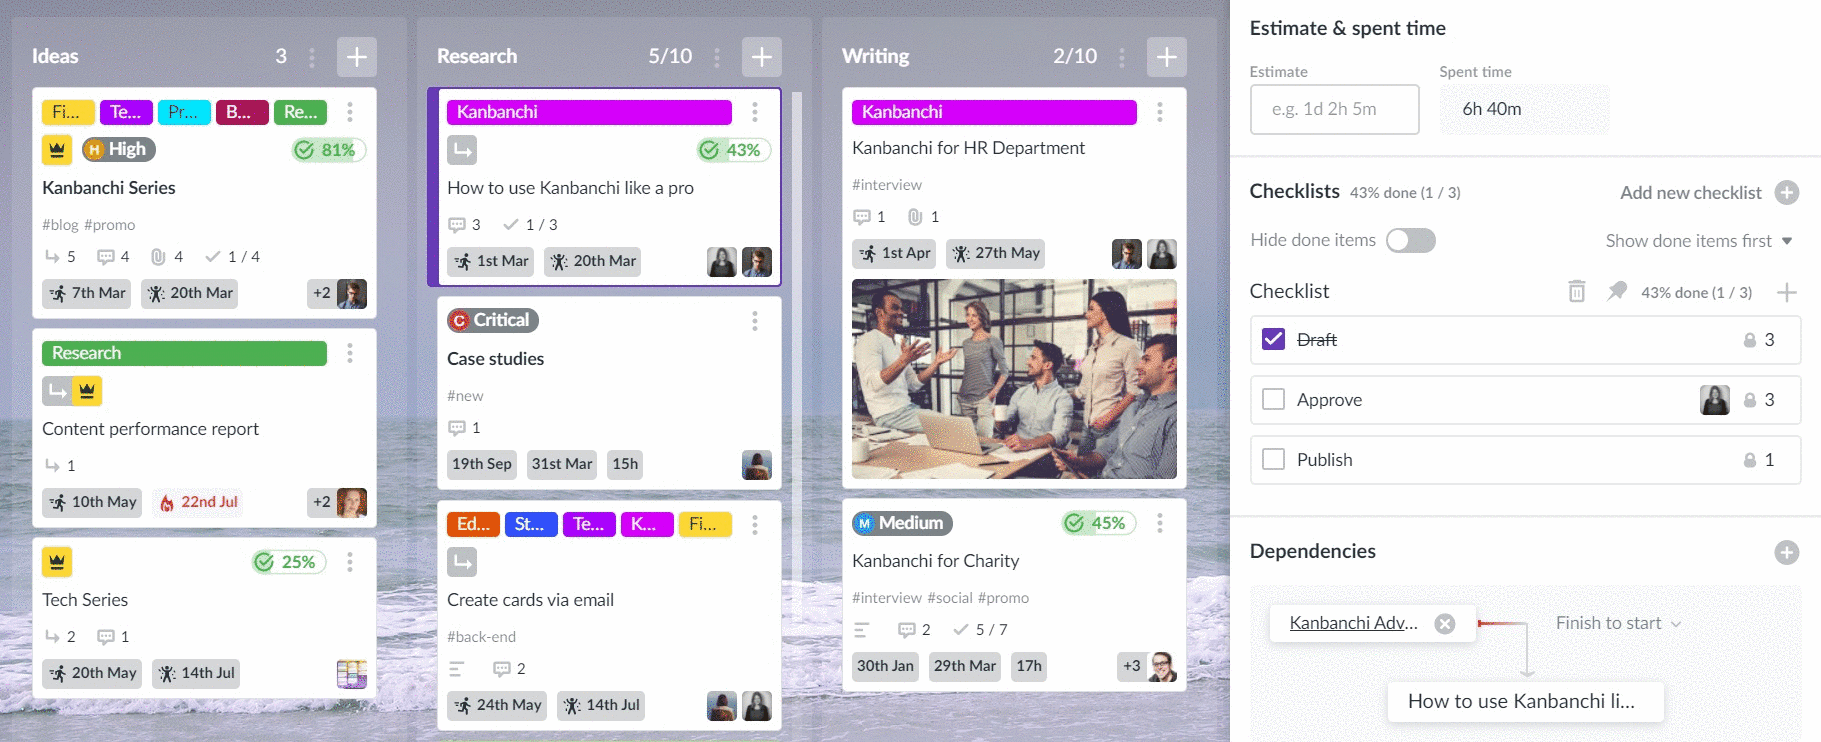
In case you need checklist items to be displayed on a card you may pin a checklist to a card. To do it open the card and go to the Checklists section. If the card has no checklist, please create it. Find the pin icon next to the checklist title and click it.
The order in which the items will be displayed on the card will depend on the sorting setting. If the Hide done items setting is enabled, the done items won't be displayed on the card.
Please, note: the weight indicator won't be reflected on the card if it equals 1 for all the items. However, if there is at least one item with a weight of more than 1 in the checklist, the weight indicator will be reflected on the card.
You may check items as done right on the card without opening it.
To unpin the checklist from the card, open the card again and click .
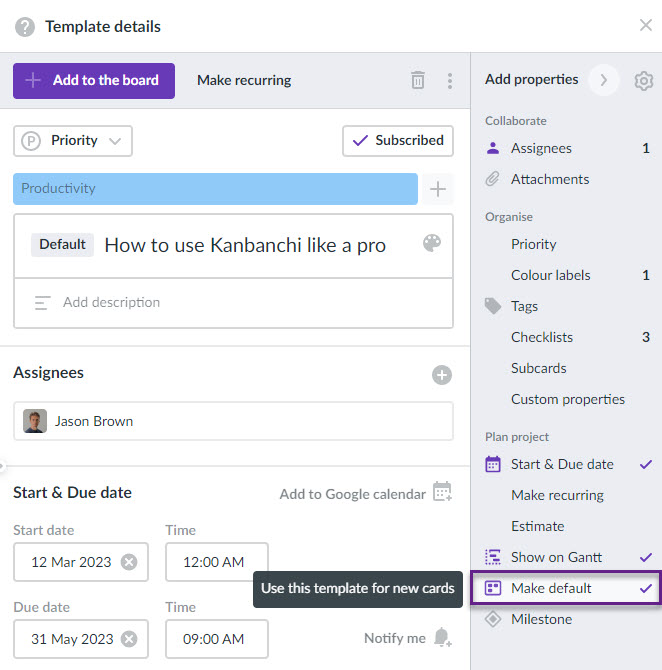
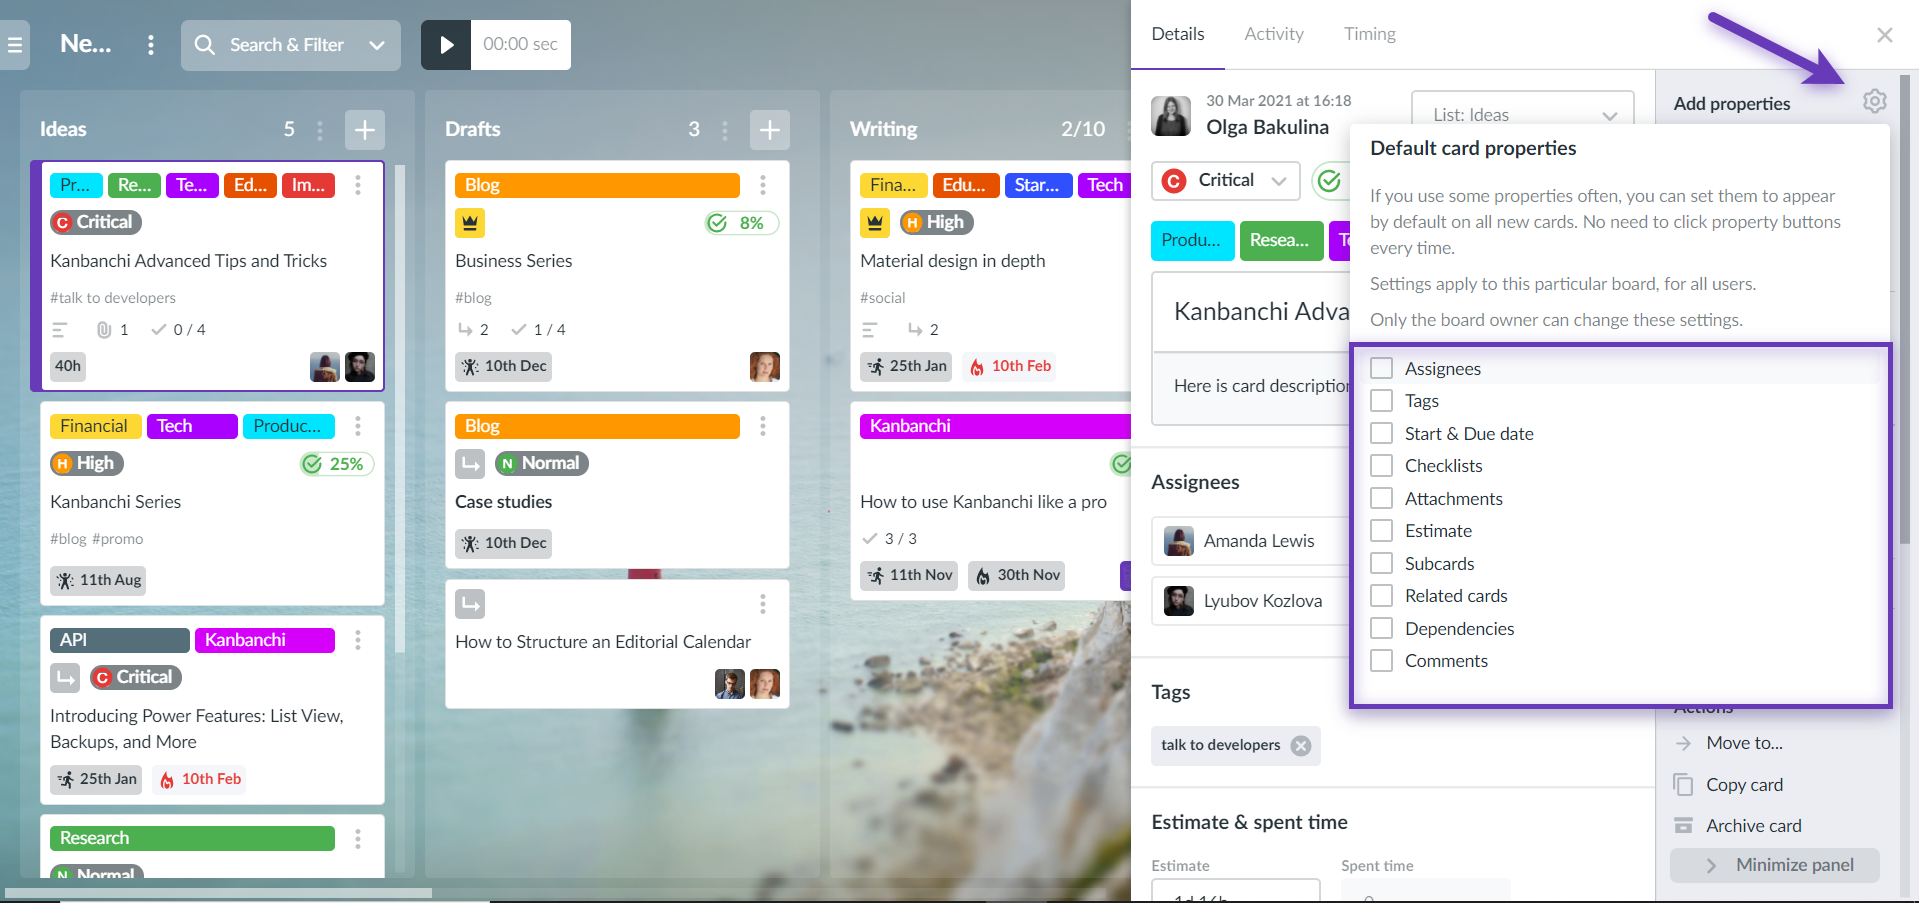
18. How do I set default properties for Kanbanchi cards on a specific board?
You may set default card properties in Kanbanchi. It is a helpful feature for those who use pretty much the same properties for almost all cards. This setting is board specific. Thus you may set default card properties on different boards depending on the nature of the project.
To set default properties open a card and click the nut icon in the right-side menu. Click the corresponding checkboxes. When you create a new card on the board, it will automatically have these properties preset in card details.
Please, note: only the board owner can set default card properties. The settings apply to a particular board, for all users.
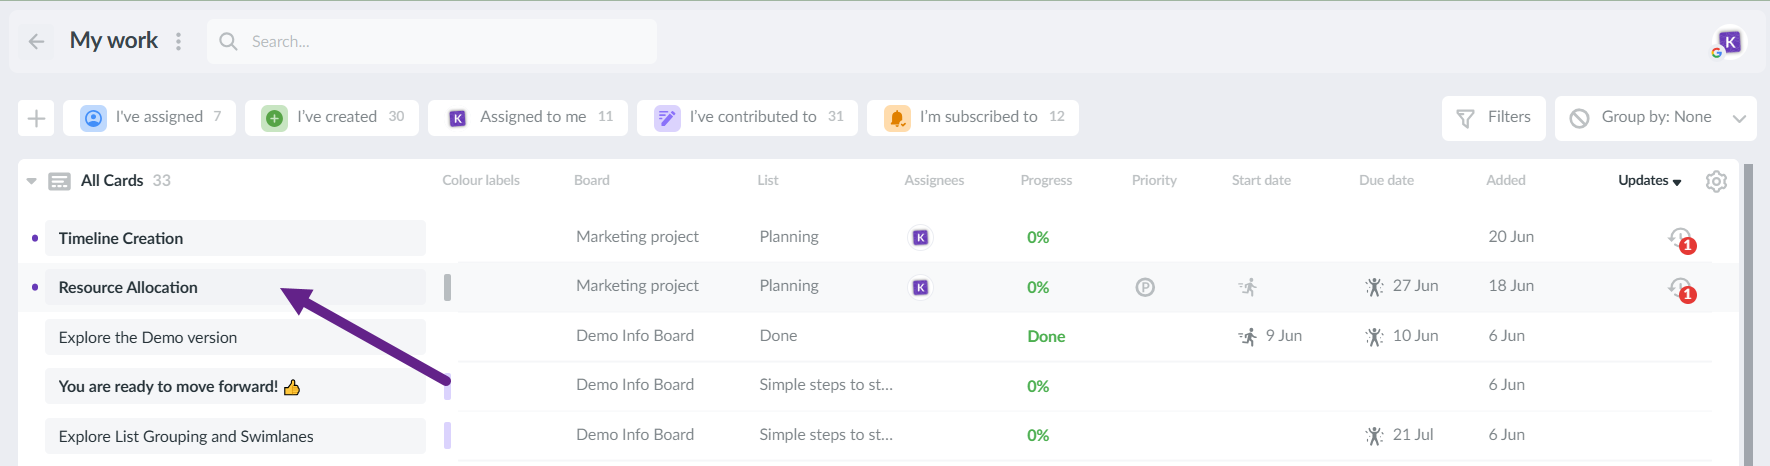
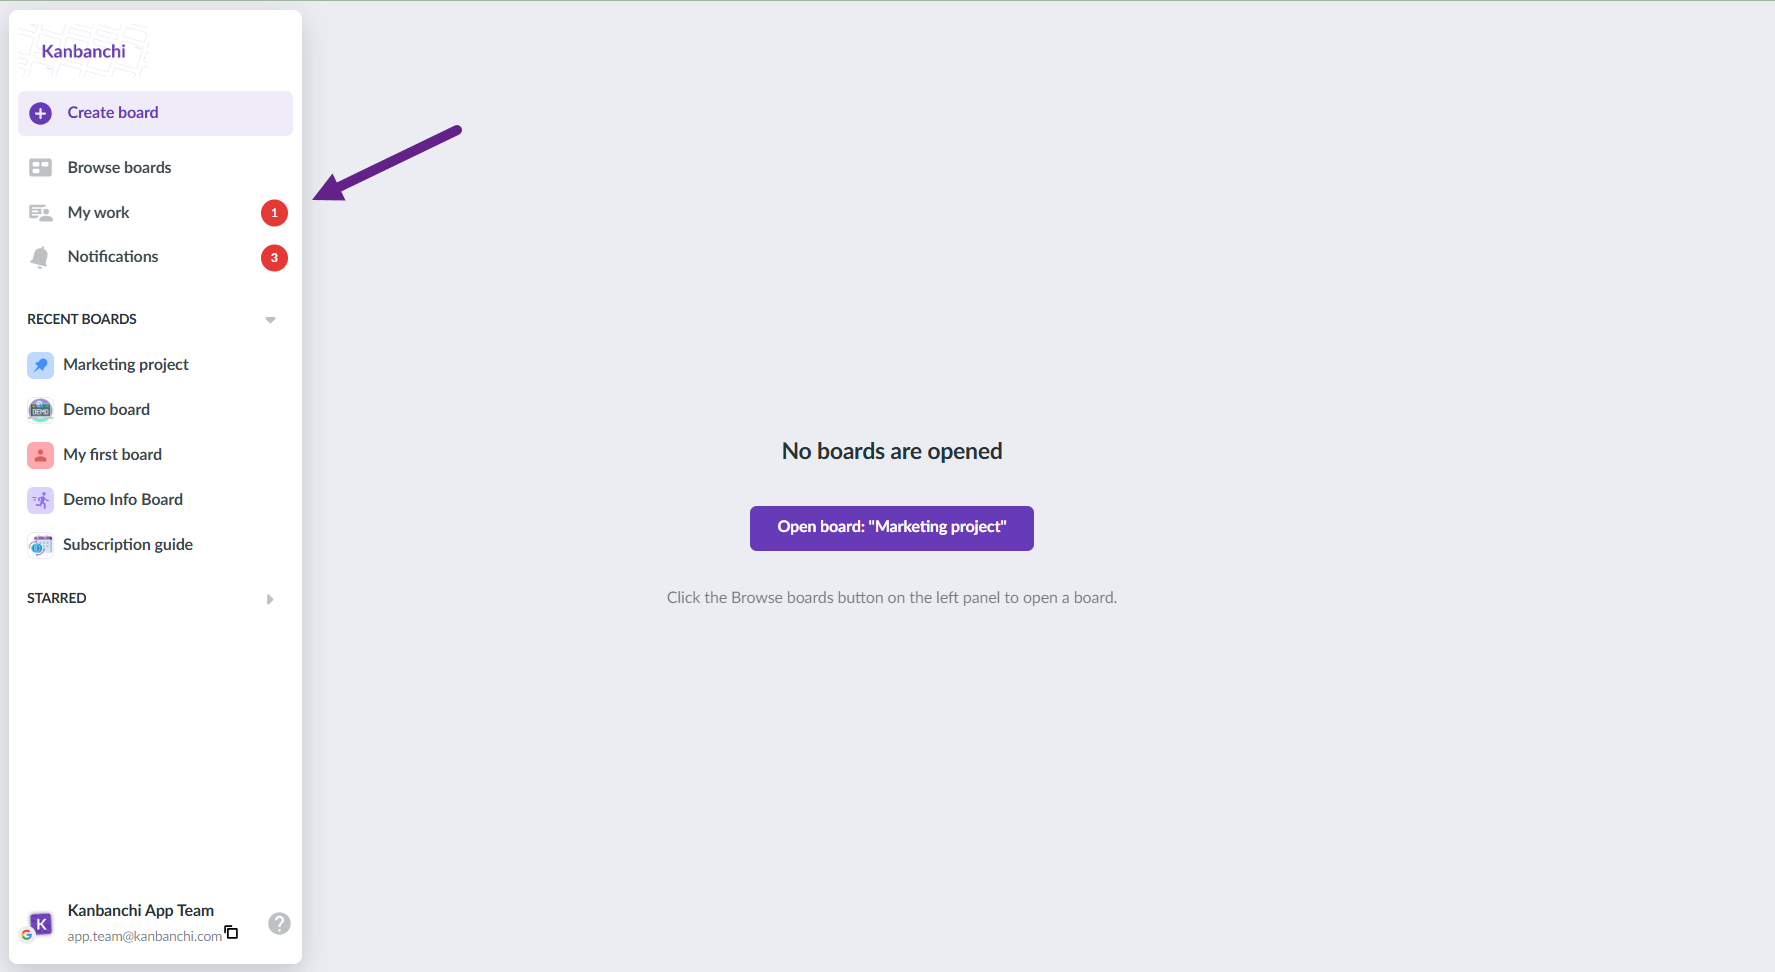
"My Work"/"My tasks" is a space where you can see cards and projects you are involved in. To switch to it, please click My tasks/My work on the left-side navigation panel.
Note: The My Work section will not be displayed if you don’t have any assigned cards. Depending on your subscription, this section may be called "My tasks" and display only the cards you are assigned to.
Types of cards
The "My tasks" space shows cards you've interacted with. They are grouped into the following types:
Assigned to me
I've assigned to someone
I'm subscribed to
I've created
I've contributed to
You can add or remove any of these categories as filters to tailor your view. To switch between categories or move, use the buttons in the filter panel. Also, you can create your custom filters to add to the top panel or to the list of filters.
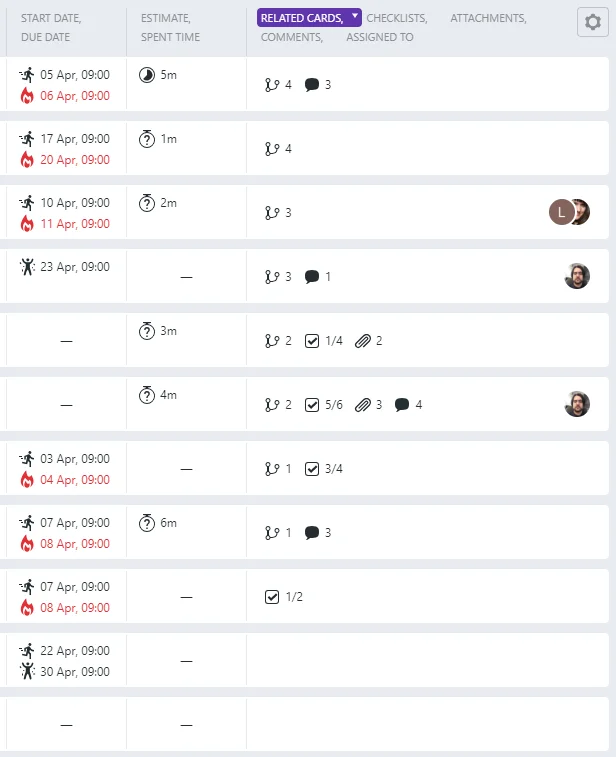
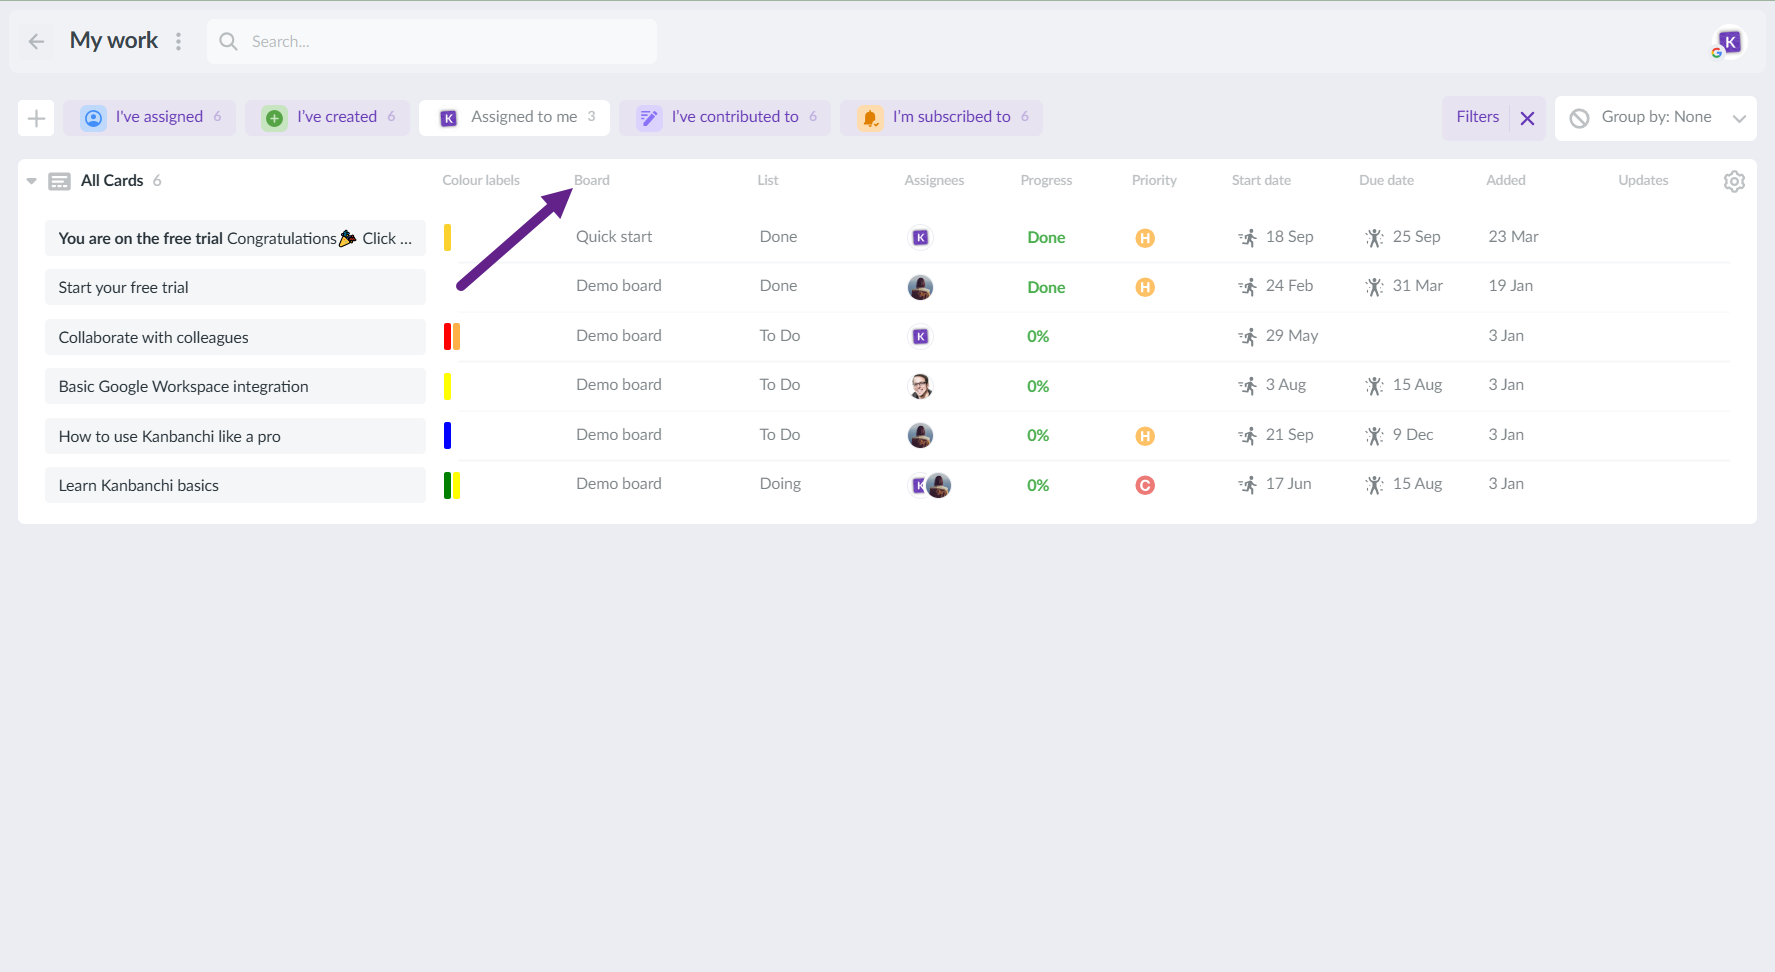
Columns
All the tasks are shown in a list with properties in columns. Clicking the column titles activates sorting. The first click initiates ascending sort. The second click initiates sorting in descending order. The third click turns sorting off.
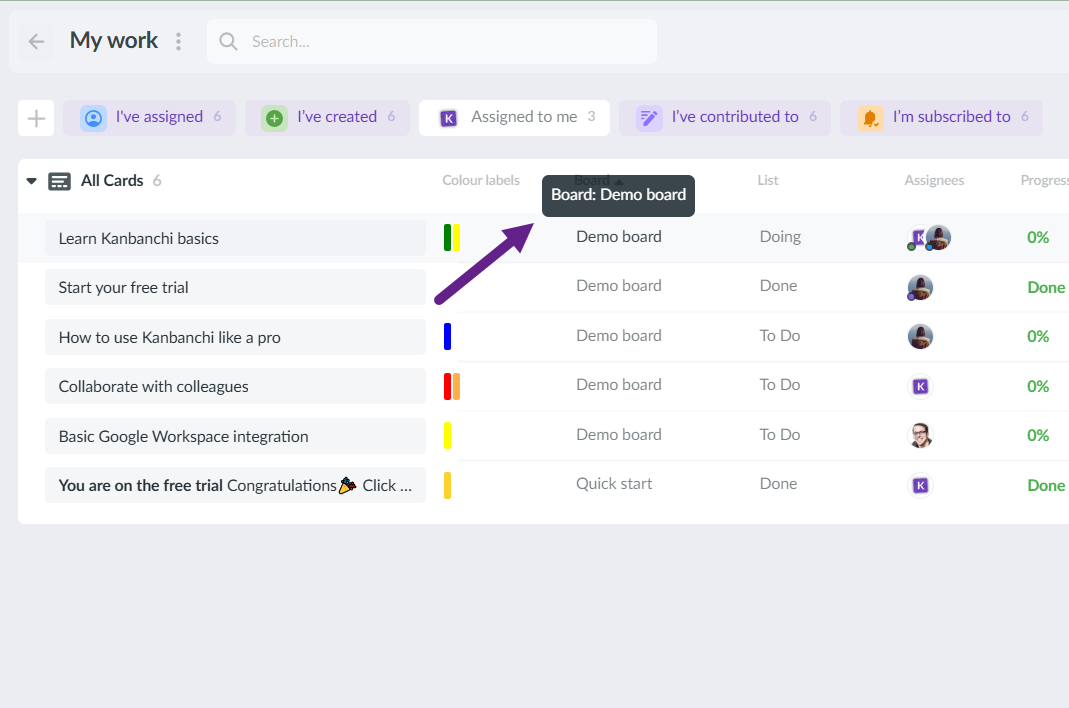
Board titles in the second column are clickable so that you may open any board with just one click. Additionally, you may open and change any card by clicking on it.
Please note: the Added column reflects the date when the card was added to "My tasks".
Groupping
You can group all the cards in "My work" according to your preferences. Choose Group by to re-group your cards.
Updates
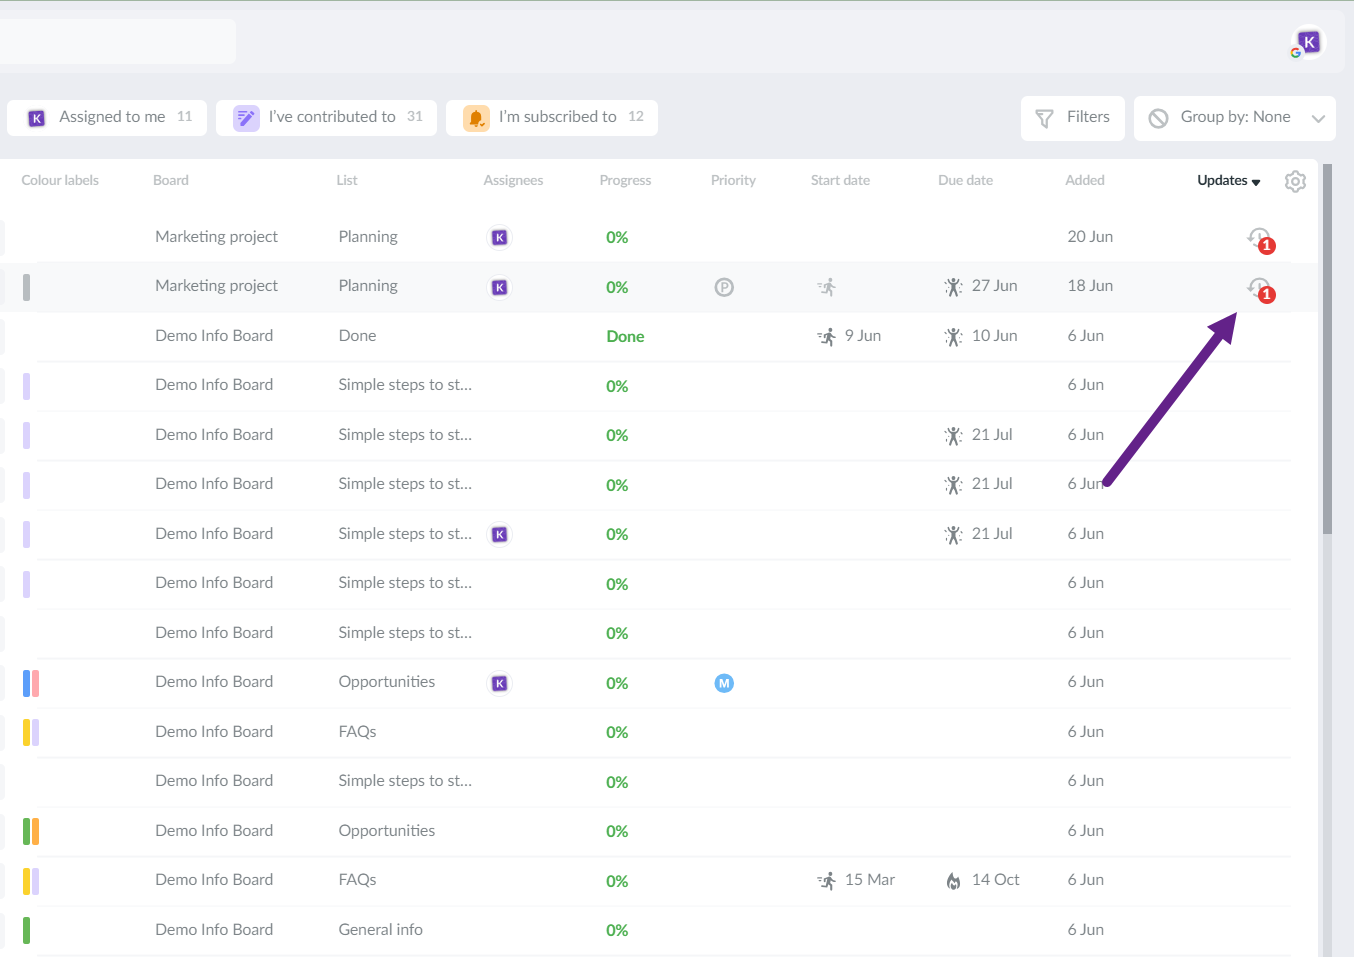
The Updates column shows if any changes were made to the card you see in the list. If you see a red indicator, click on it to see the latest changes. You will be taken to the card's Activity tab. You will see the latest updates in purple frames.
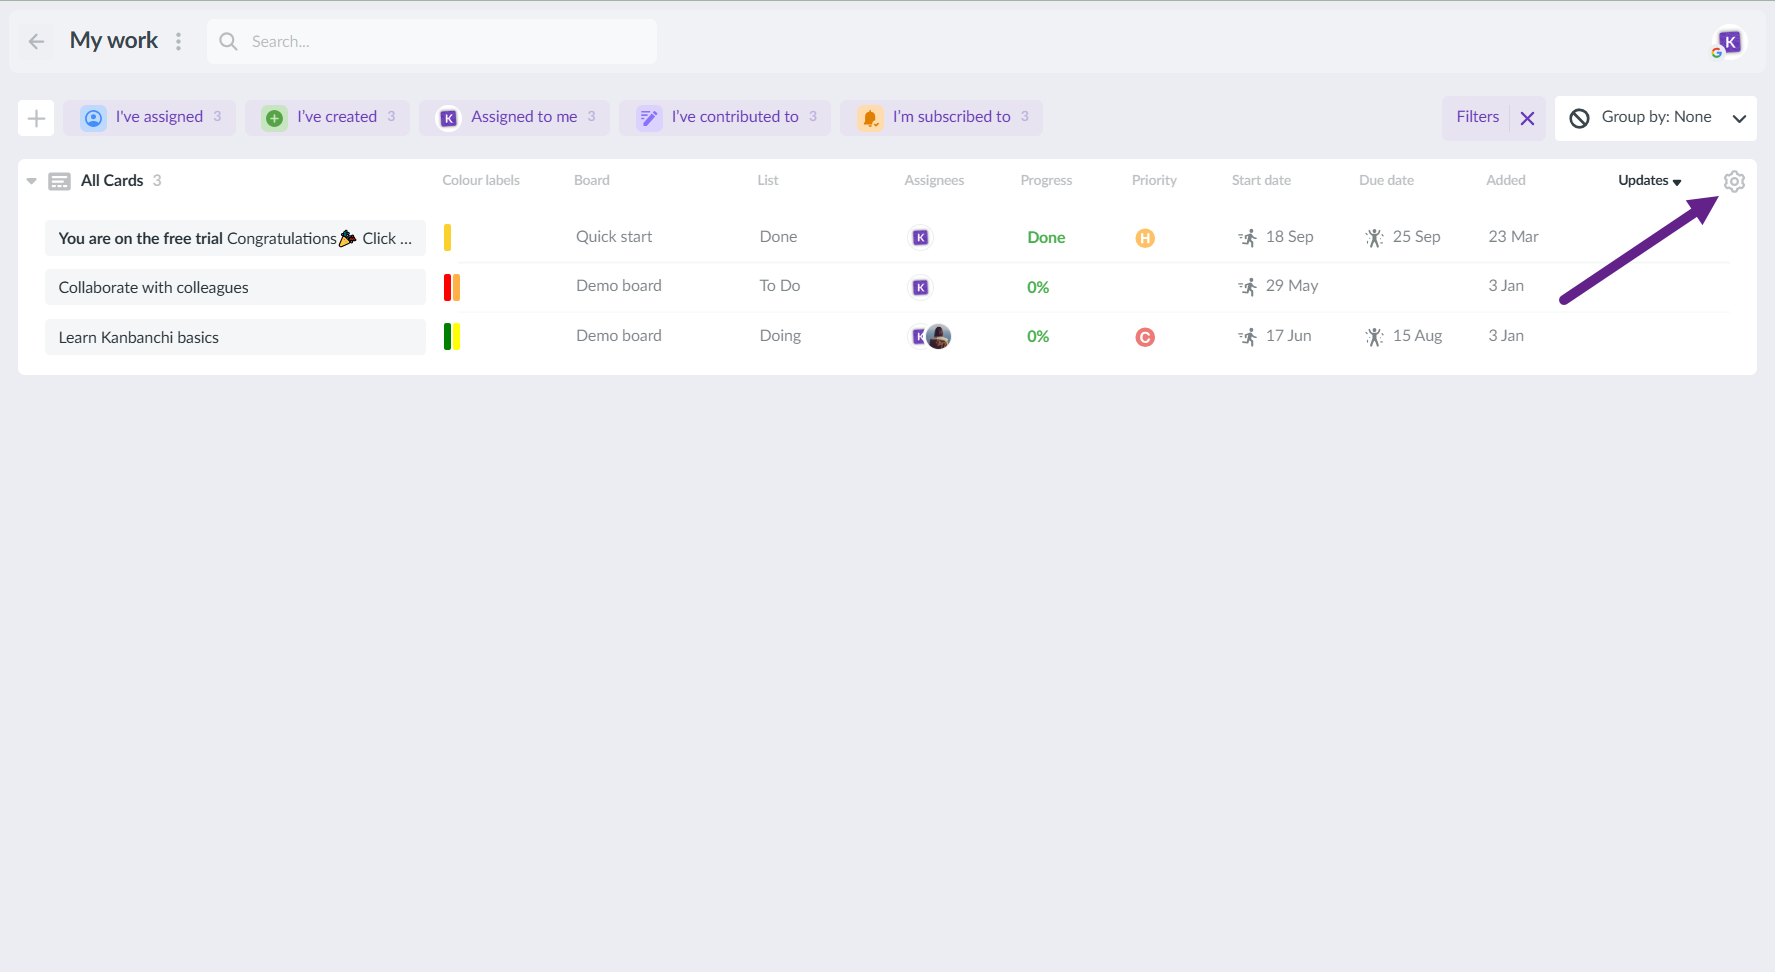
Settings
Using the Settings, you can customise your workspace to suit your preferences.
Choose what to show or hide, rearrange elements, and change backgrounds to personalise your experience.
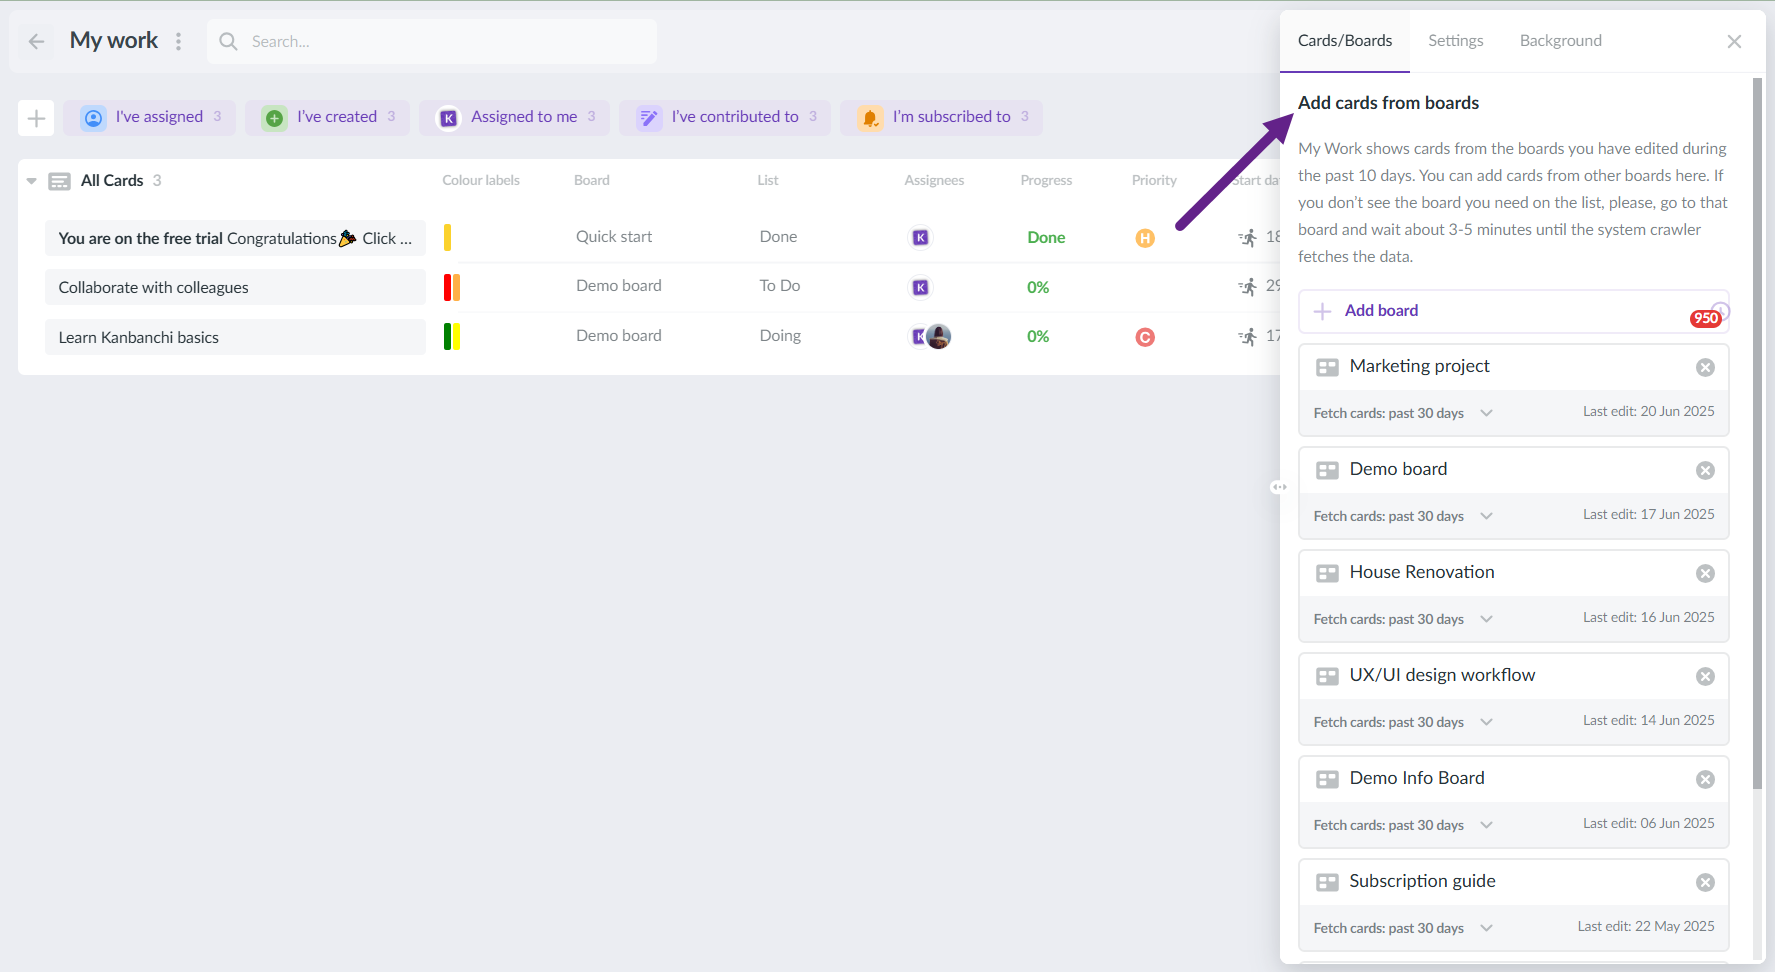
Please note: By default, "My work" shows cards only from those boards that you edited during the past 10 days. You will see those boards and the date of the last edit in the filter panel. To add earlier-edited boards, use the drop-down list in settings.
Notes
Newly added cards are shown in bold.
Also, if you have a new assignment, you will see a red point indicator.
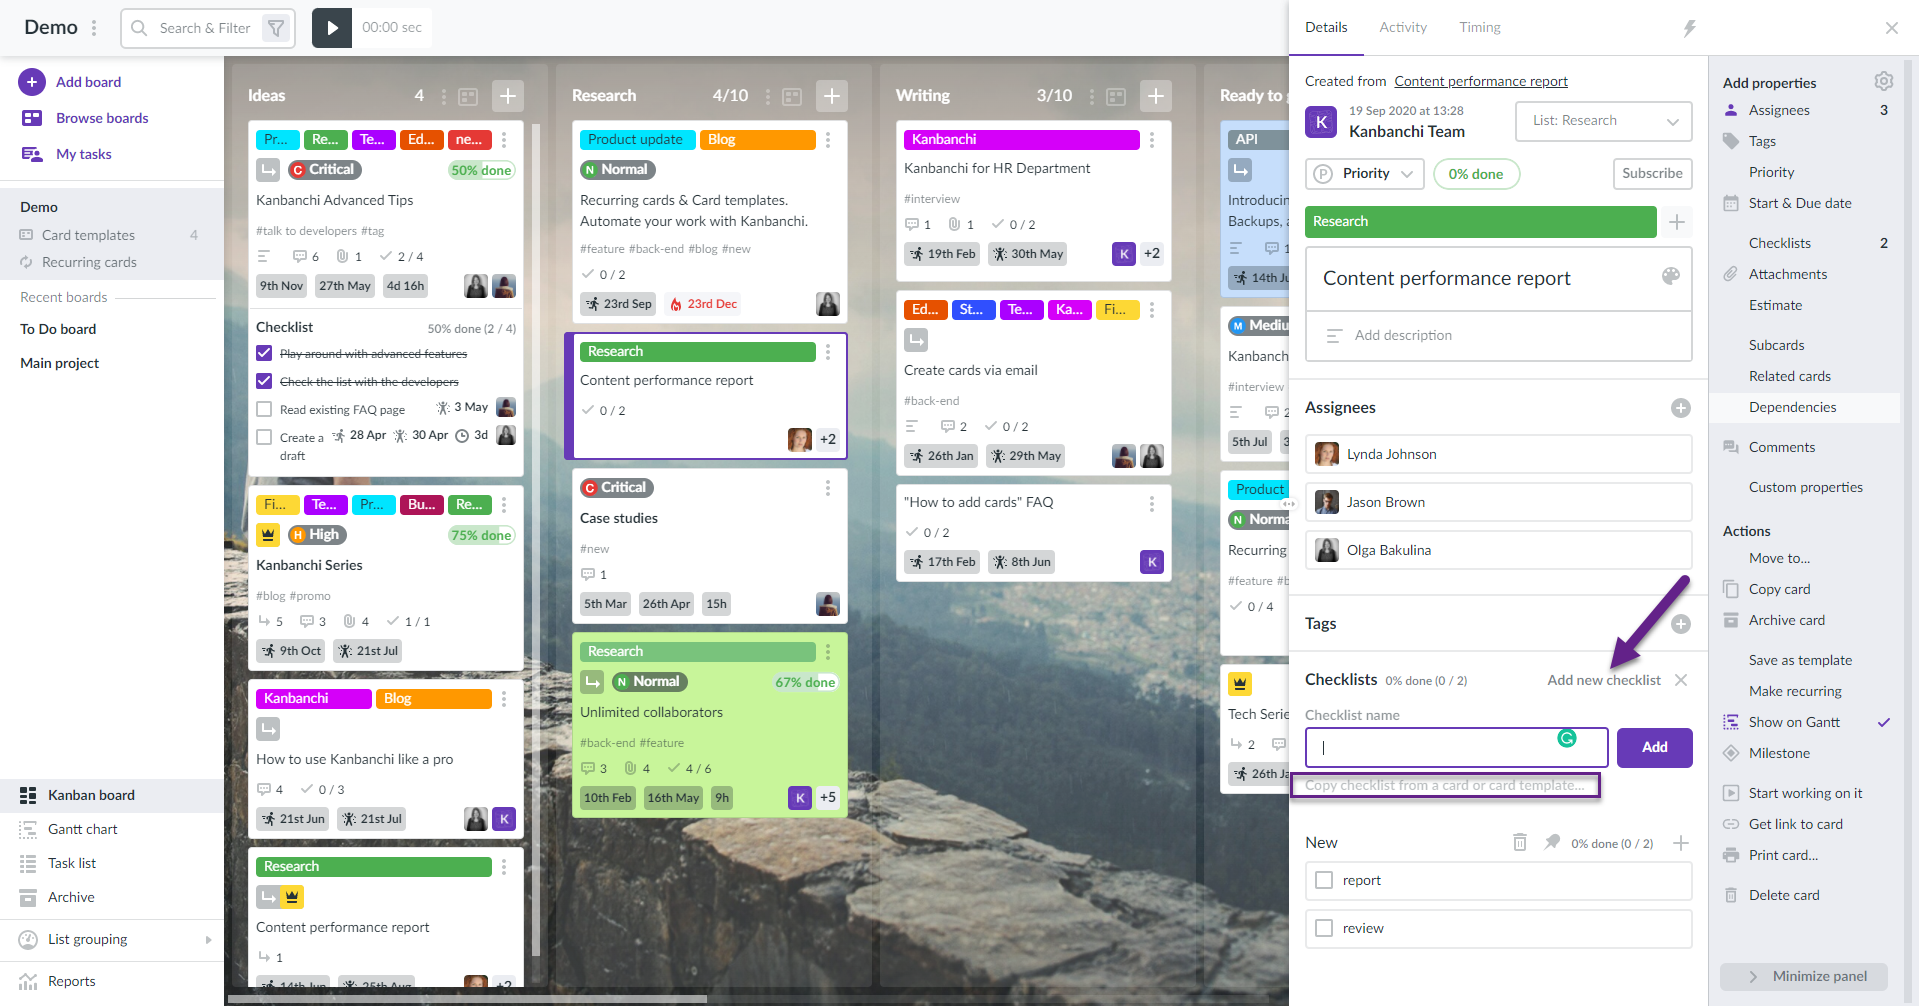
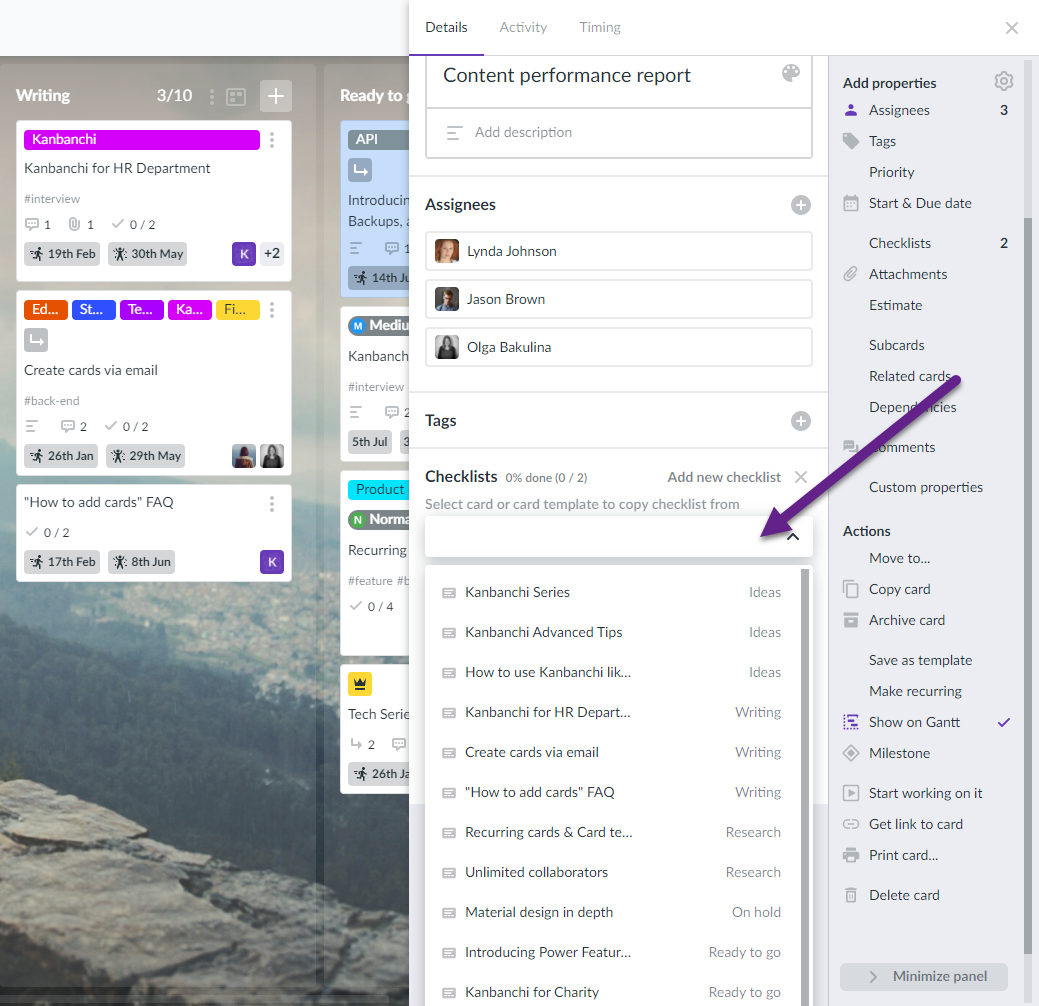
23. How to copy checklist from existing card or template?
To copy the existing checklist please choose the card that you'd like to add the checklist to and click Add new checklist in the right-side panel. You'll see Copy checklist from a card or Card template option.
Upon clicking this option you'll see the dropdown list of cards and templates that are available for copying checklists. Choose the necessary card or template, click Copy checklist from the card and the checklist will be copied.
To learn more about checklists please review this FAQ:
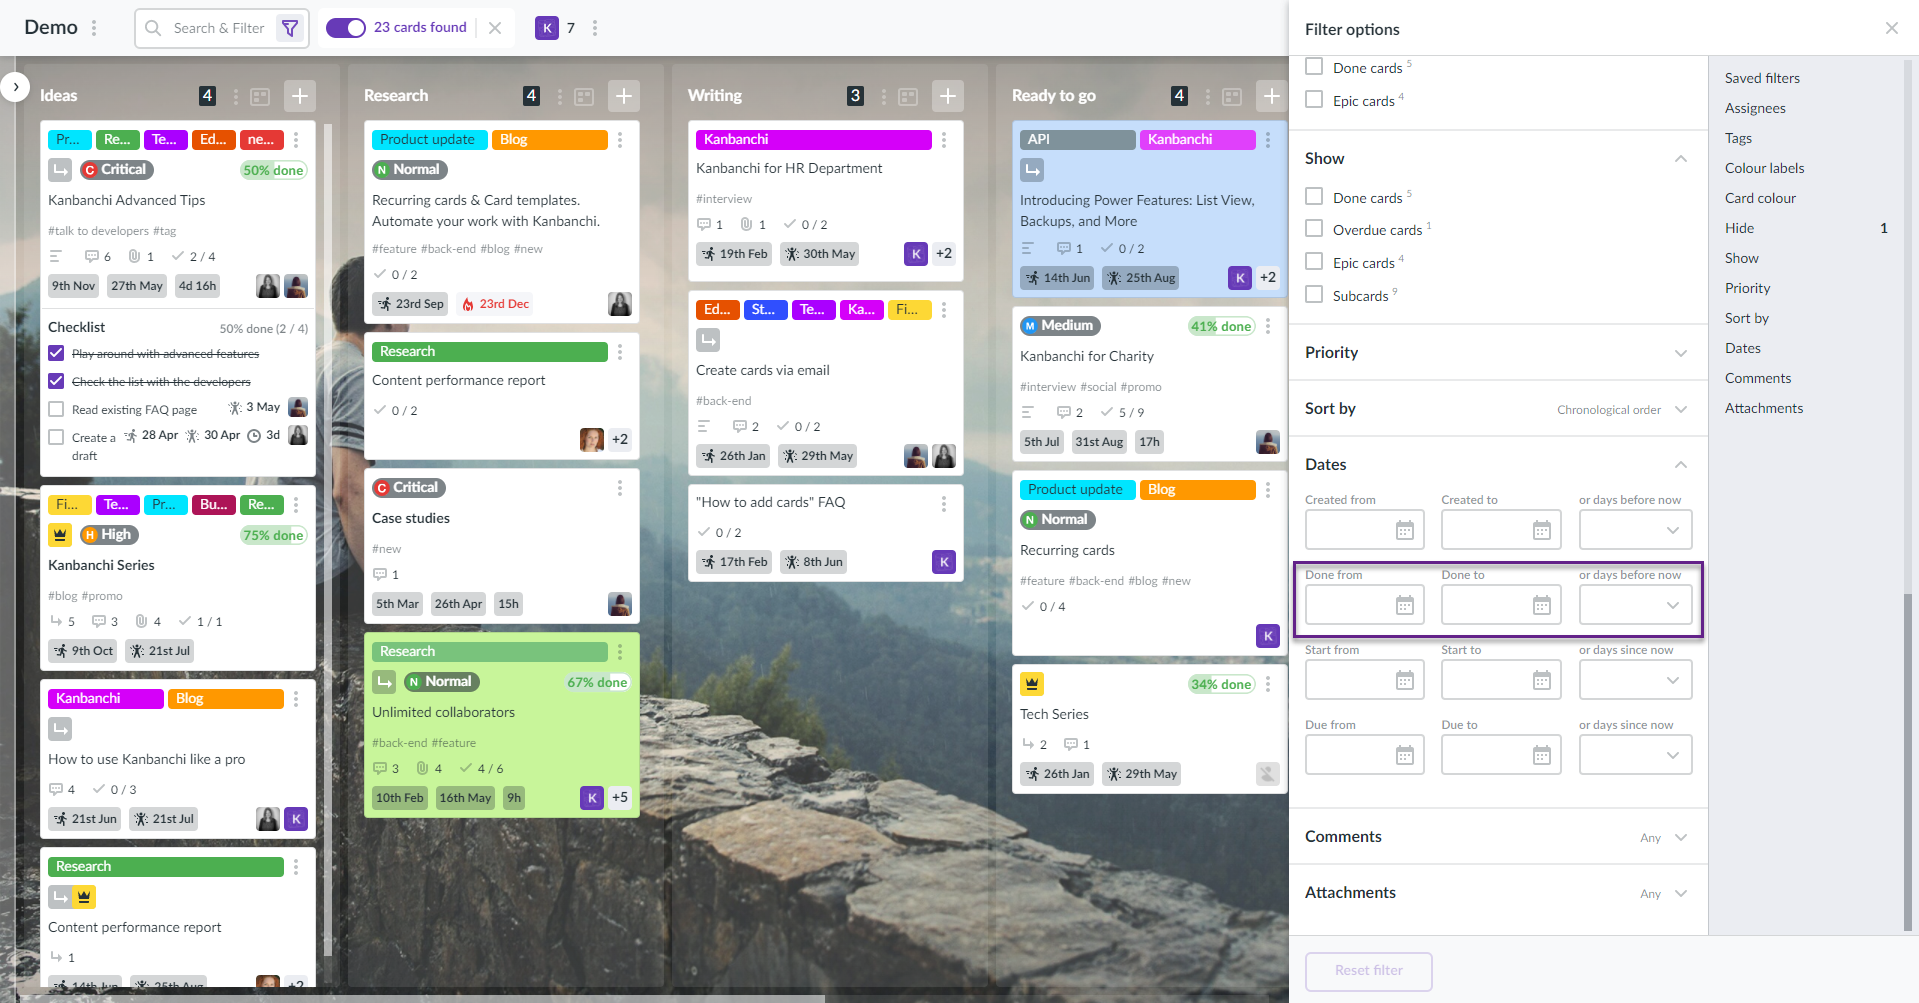
24. How to filter cards by the date when they were done?
To filter the cards on the board by the Done date please click the Filter icon. The Filter options in the right-side panel will open.
Scroll down to find the Dates parameter. Here you may choose the range of dates when the card was done or choose how many days before now it was done. After setting the parameter you'll see the necessary cards.
To learn more about filter options please review this FAQ:
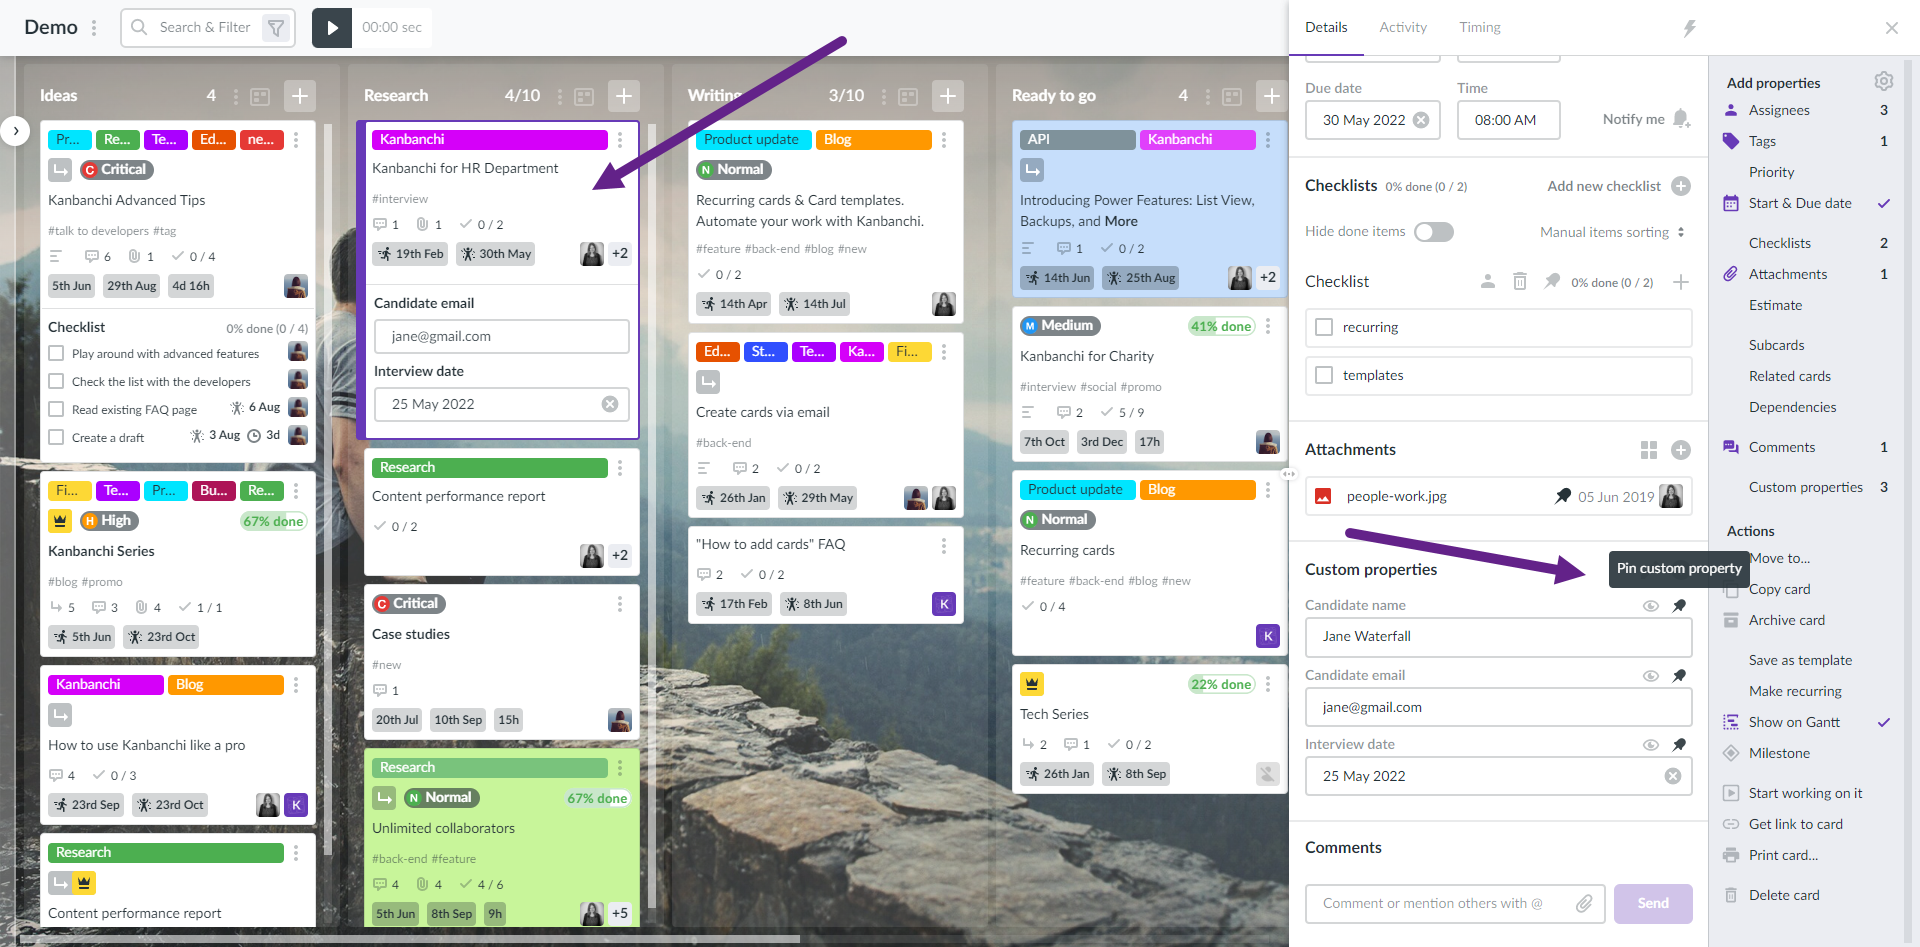
In case you need custom properties to be displayed on a card you may pin all of them or some of them to a card. To do it open the card and go to the Custom properties section. If the card has no custom properties, please, create them. Find the pin icon next to the property title and click it. To unpin the checklist from the card, open the card again and click.
Pinned custom properties will be visible on a card when it's not opened and you will be able to edit them from the board without the need to open the card as well. You can also save cards with pinned custom properties as templates to create a canvas for your tasks.
Replace the value of const recipient = in row 8 with your board email.
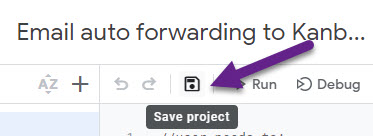
Save the project.
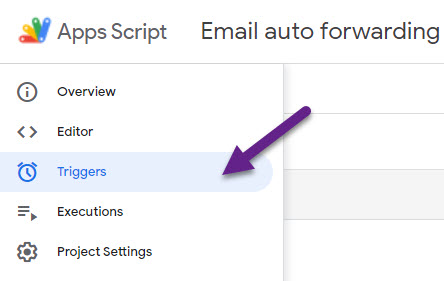
Click Triggers in the left-side panel.
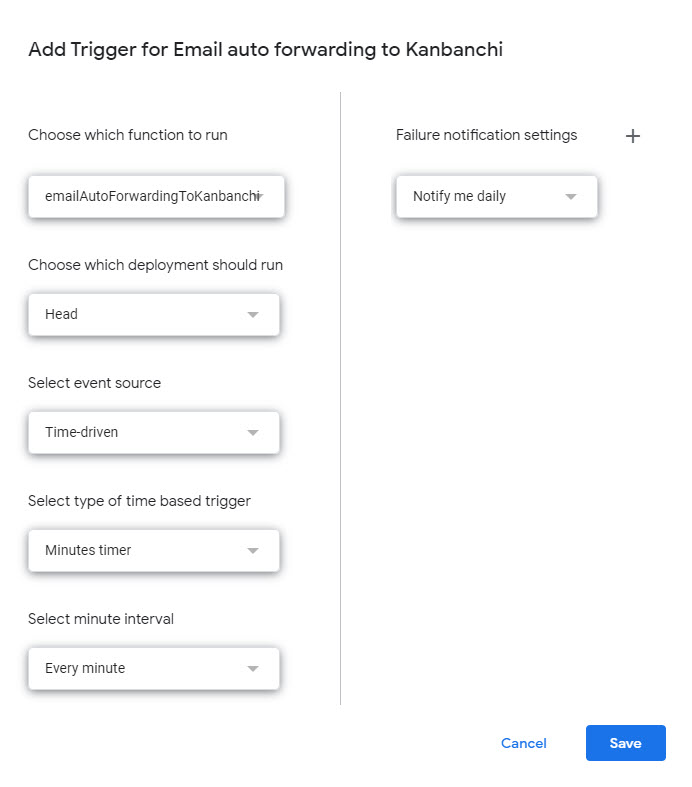
Set a trigger with the following settings and click Save:
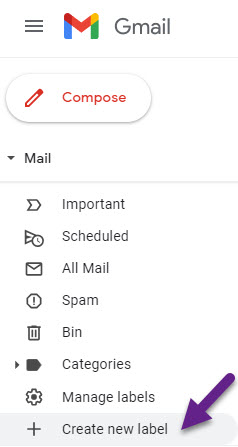
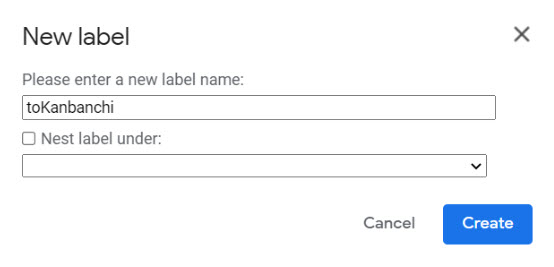
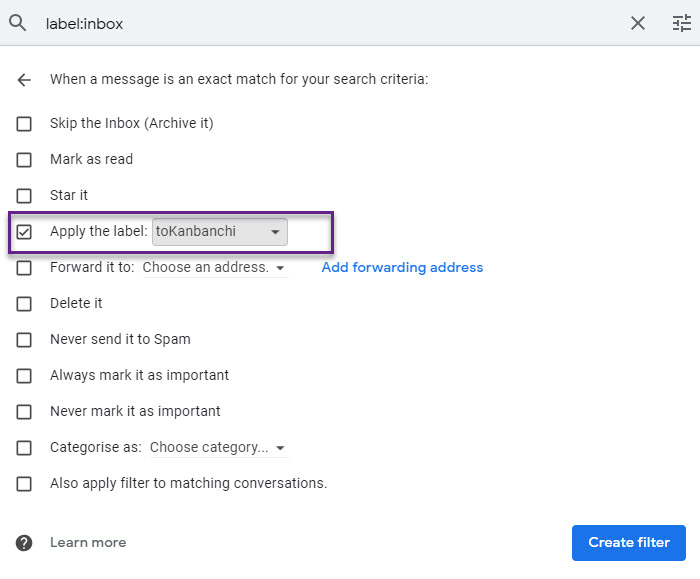
Go to Gmail and create a label for all new emails that you want to be forwarded to Kanbanchi.
Click +Create new label.
Enter toKanbanchi as a name and click Create.
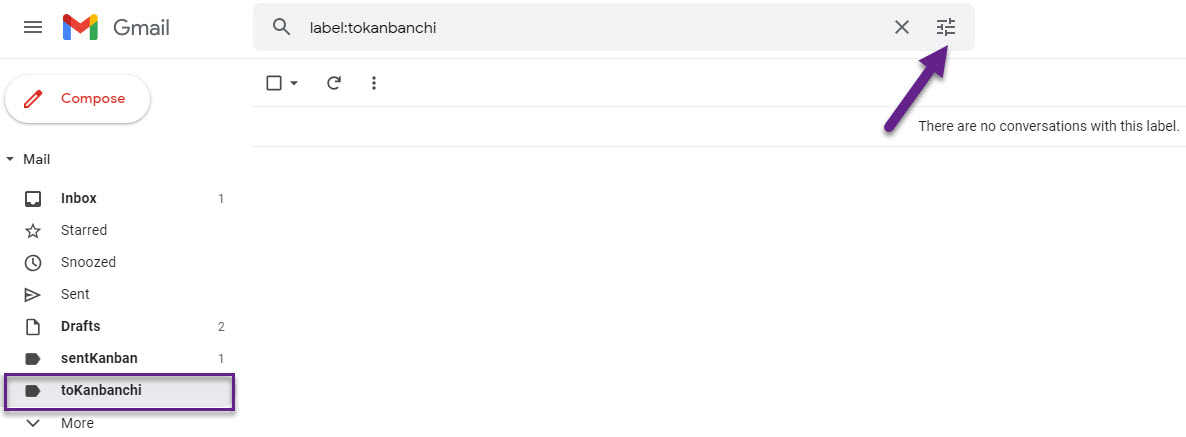
Choose the label on the left-side panel and click the filter icon.
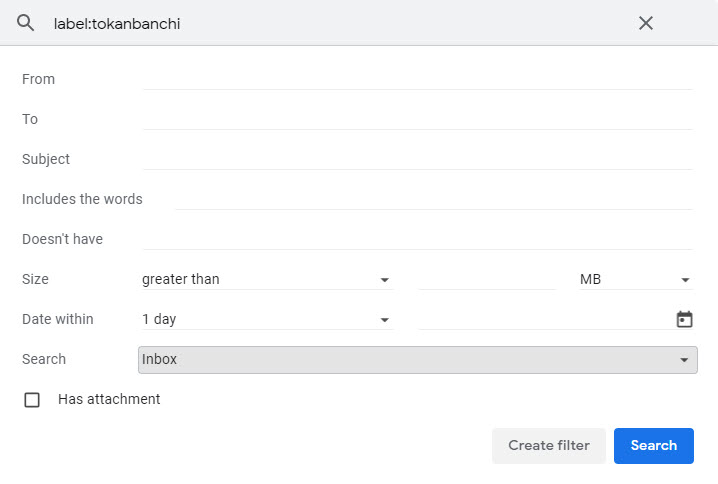
Choose Inbox in the Search field if you want all new emails to be forwarded or set up your custom filter. Click Create filter. Tick Apply the label option and choose toKanbanchi in the drop-down.
Now all inbox emails will be automatically forwarded to your Kanbanchi board.
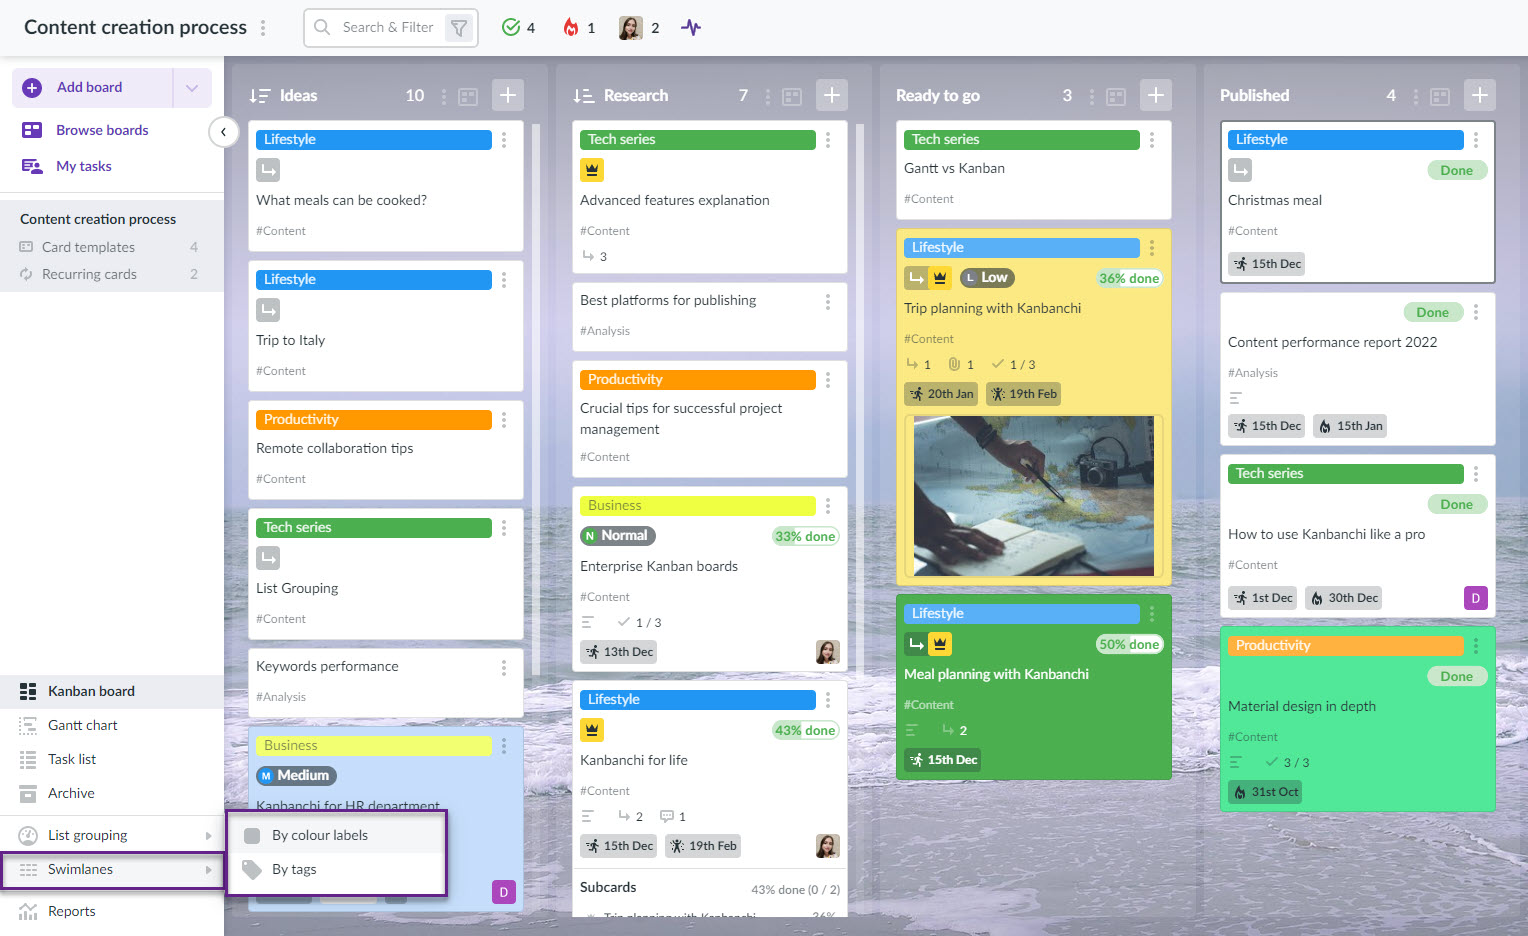
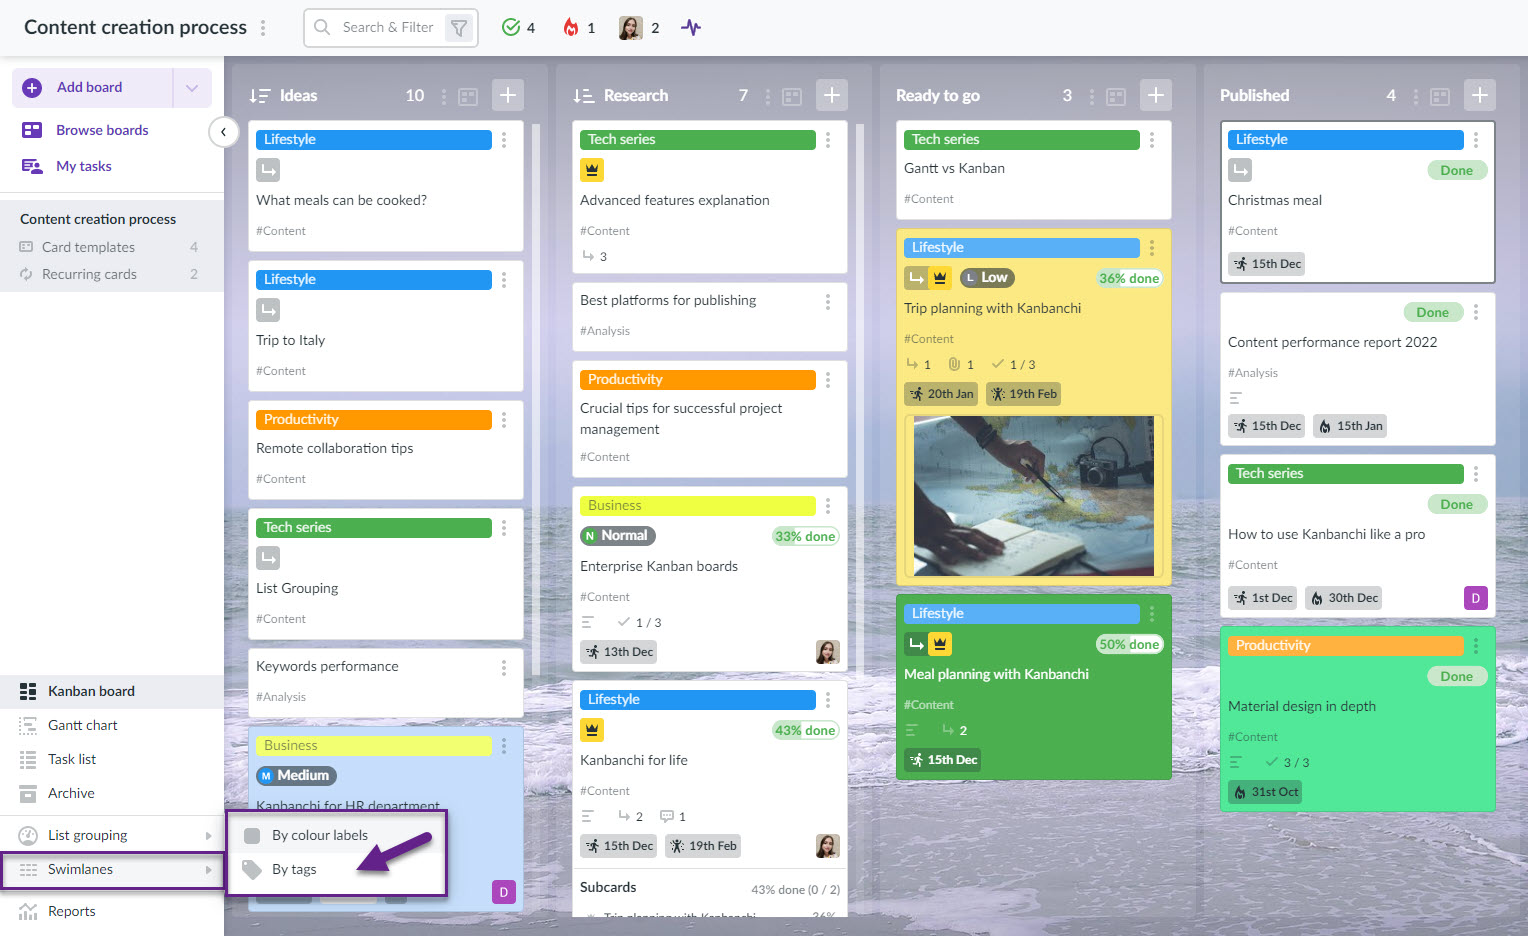
Kanbanchi swimlanes are closely tied with tags and colour labels. To build swimlanes by colour labels or tags, make sure you use them on cards. Once you have them, switch to Swimlanes. Then choose by which card property you would like them to be built.
How to build swimlanes by colour labels?
Choose Swimlanes in the left-side panel. Choose By colour labels.
How to build swimlanes by tags?
Choose Swimlanes in the left-side panel. Choose By tags.
For both colour labels and tags, swimlanes work the same way. You will see a separate lane for each colour label or tag you have on the board. Additionally, cards with no colour label/tag will be displayed in a separate lane.
Collapse the swimlanes by clicking to get an overview.
Also, there is an opportunity to switch to a specific swimlane quickly.
You may drag and drop cards among the rows to automatically change their tag or colour label.
30. How to use Kanbanchi’s two-column card view for faster task management?
Kanbanchi’s new two-column card view streamlines collaboration by displaying task details and comments side by side. This FAQ addresses common queries about accessing, using, and optimizing this feature.
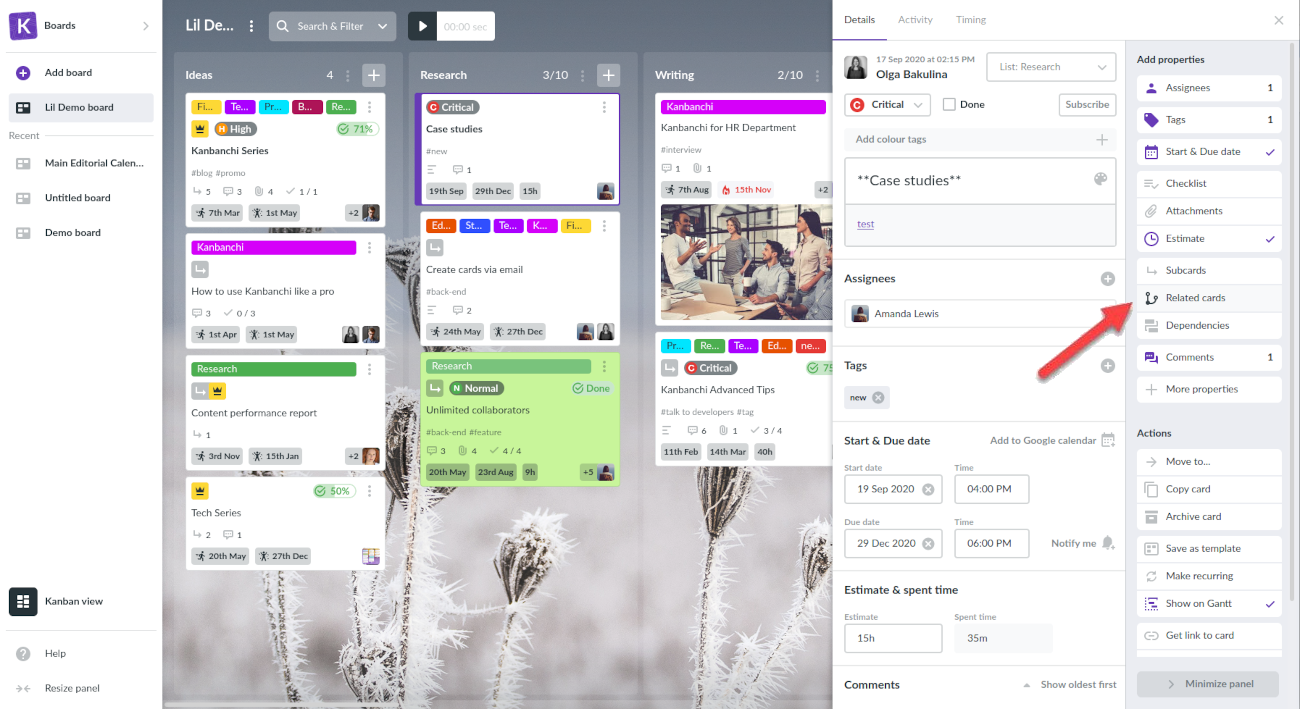
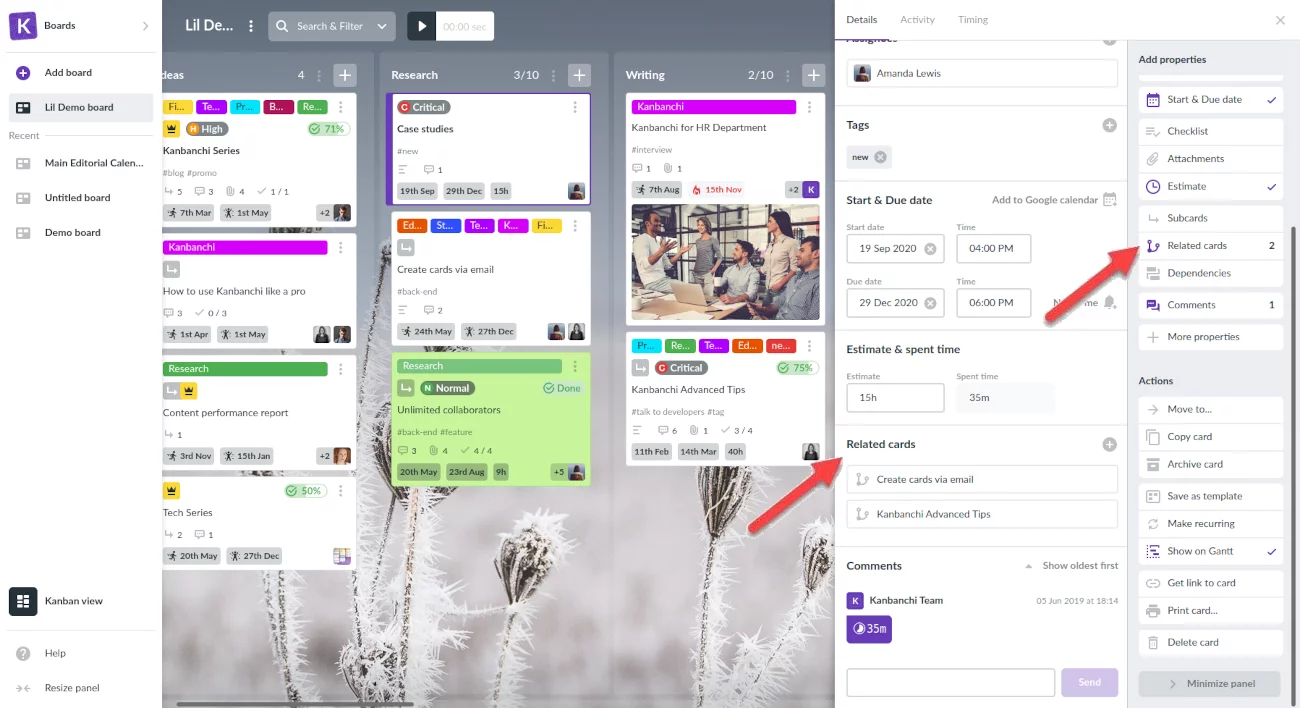
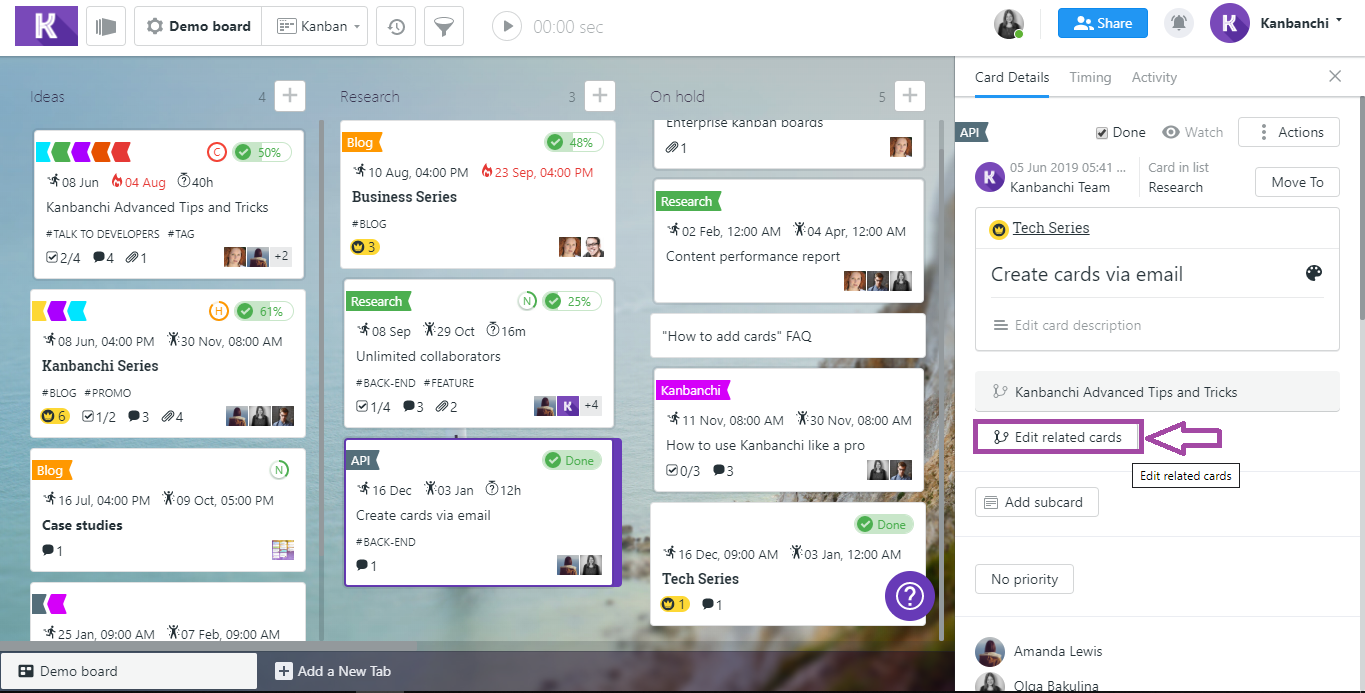
31. How do I create relations between cards in Kanbanchi?
If some of your tasks are related semantically, you can connect them with each other in Kanbanchi for quick reference. To do that, open a card and click the Related cards button in the Card Details panel.
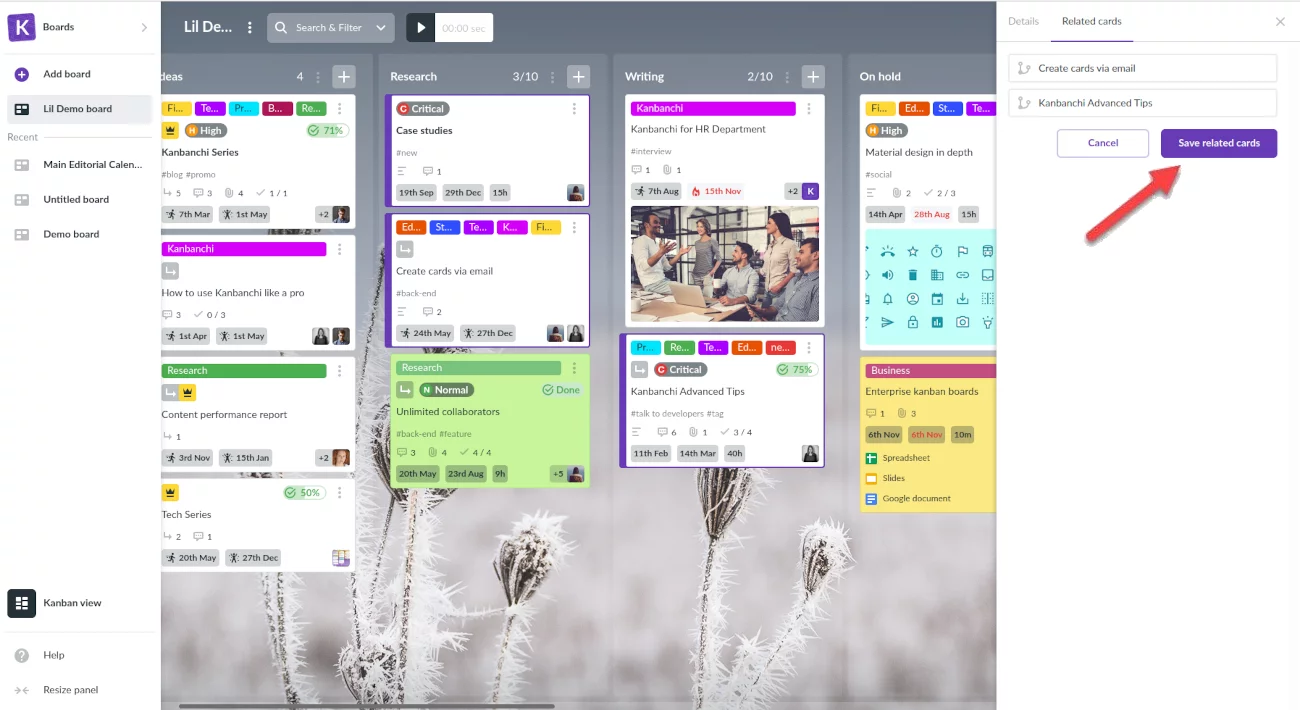
Select cards you want to connect with the active card by clicking them. You can choose as many cards as you wish including those from other boards (they need to be opened in the same browser tab, though). When you're done with the selection, click Save related cards button.
A list of related cards will appear under the card description and all collaborators will be able to view it. For quick reference scroll down a bit or just press the Related cards button. You can easily switch between related cards from here. Just click on the card you need in the list.
To add a card, click a plus button on the right from the list name in which you need to add the card. Then just type the name of your new card and hit Enter or click the "Add" button.
Editing cards
Click on a card to make changes. A popover window will appear on the right for editing the selected card.
You may edit the Card Title and Description from this window and also make other changes such as assigning people, adding a checklist, and so on.
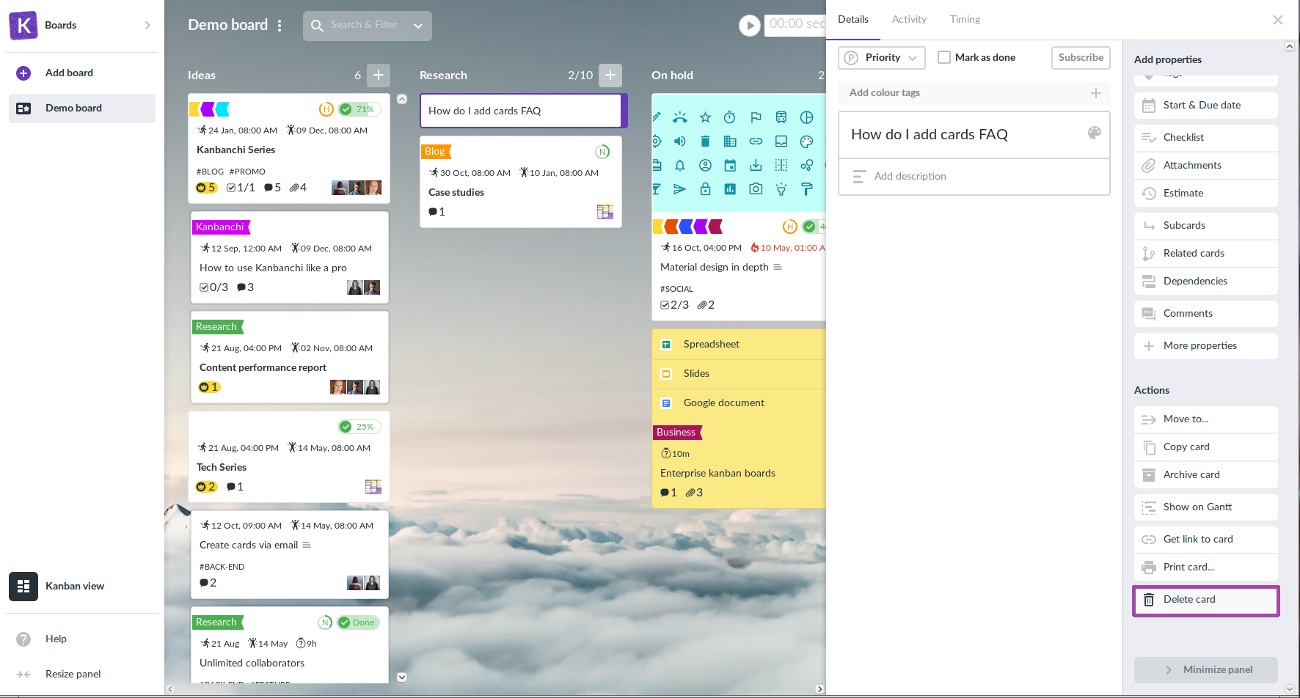
Deleting cards
You may delete cards by choosing this option in the "actions" section of Card Details.
One more easy way to delete a card is by using Delete (or Fn + backspace for Mac OS) on your keyboard.
After card removal, you have 10 seconds to restore it. To do it just click the Cancel button that appears at the bottom centre of a dashboard. After a card is deleted there is no way to restore it.
To make changes to a particular card, open the Card Details by clicking on a card. A popover window will appear for editing the selected card. After editing a card title, the change will be saved automatically.
If the card does not have a description click on Add description and type your text. Click on the Save Changes button to save the description.
To edit card description just click on the existing one and change the text. Then click on the Save Changes button to save the new description.
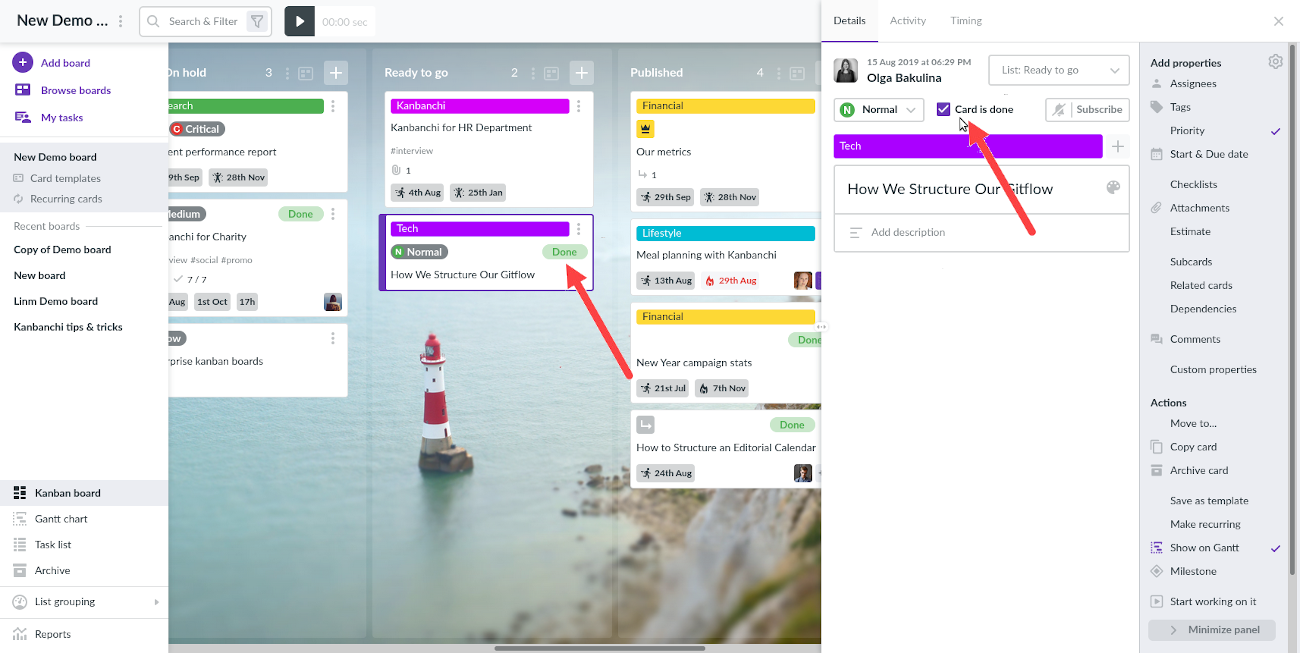
To change a card color you should click on the card to open the Card Details. Then just click on the button representing a palette, located near the card title and choose the color.
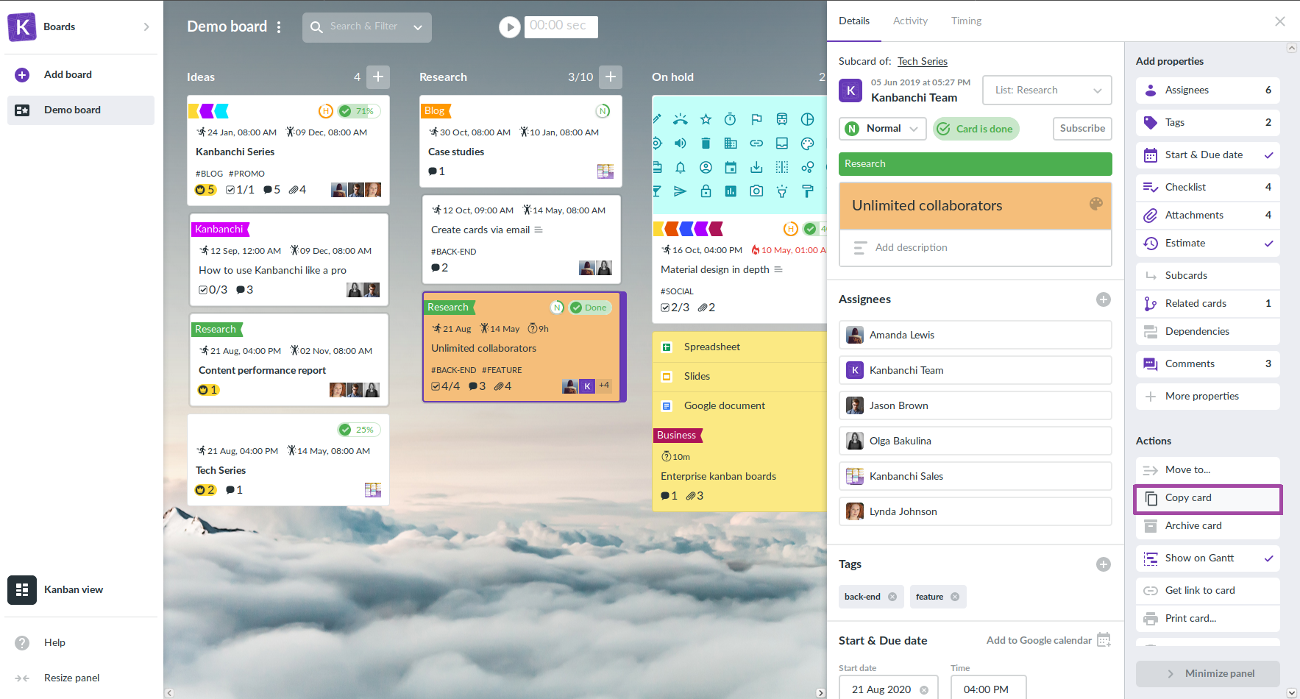
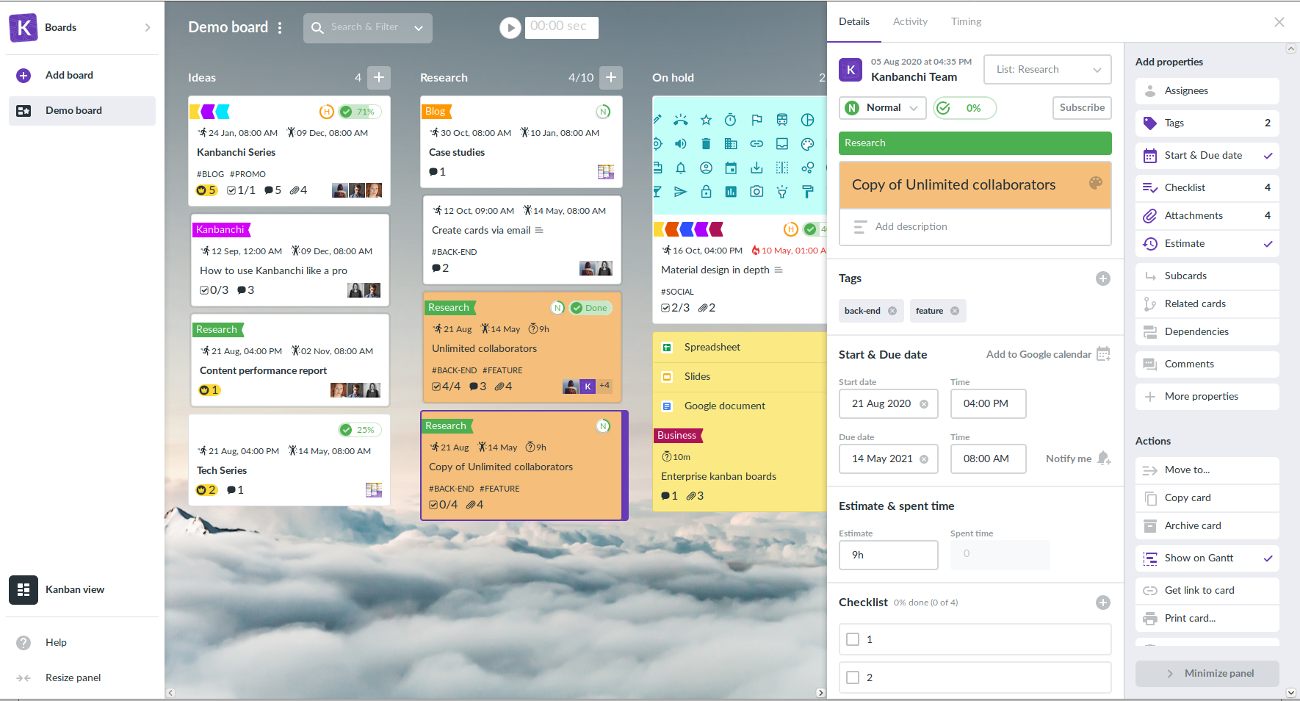
To create a copy of a card click on it to open Card Details. A popover window will appear on the right. Then click Copy card in the "actions" section of Card Details.
Now the card copy is ready to use. A new copy of a card is always located at the bottom of the list which contains the original card.
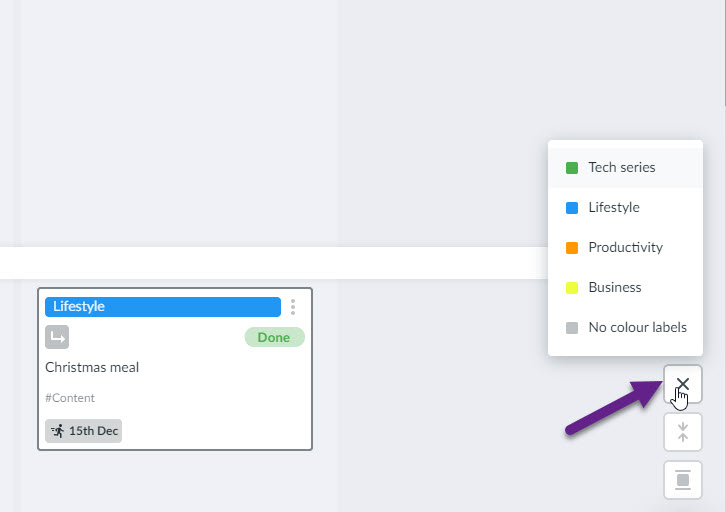
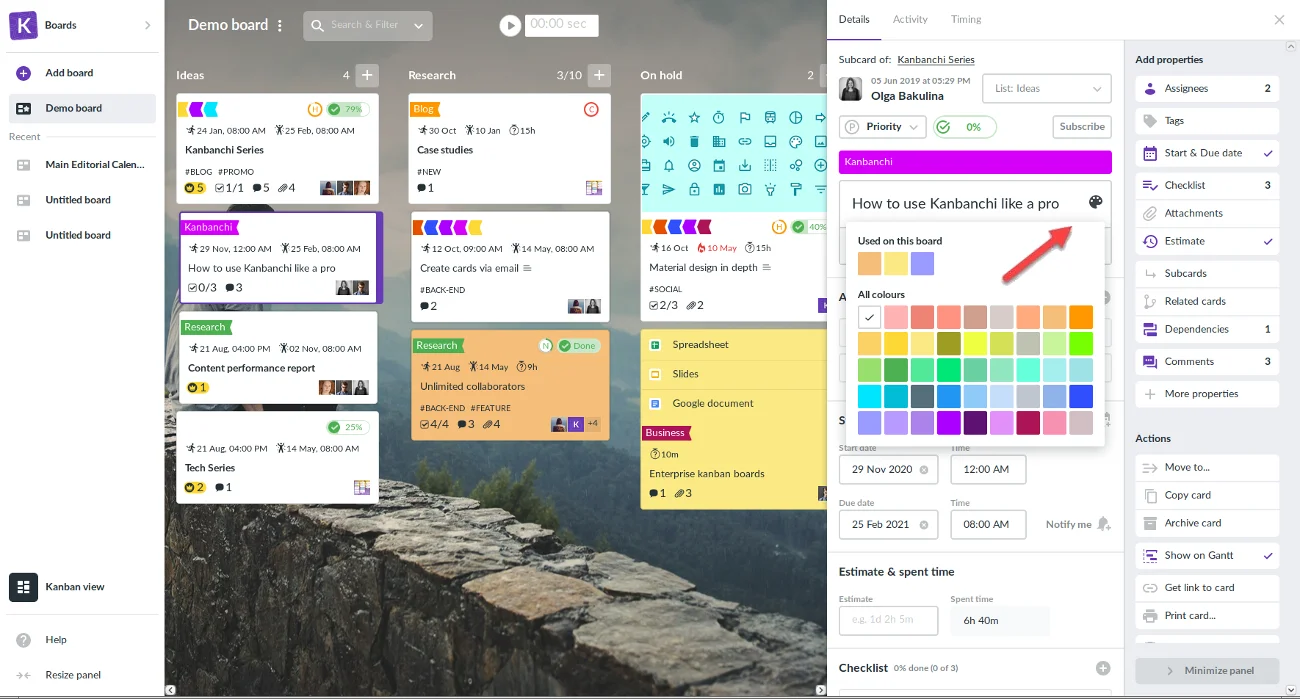
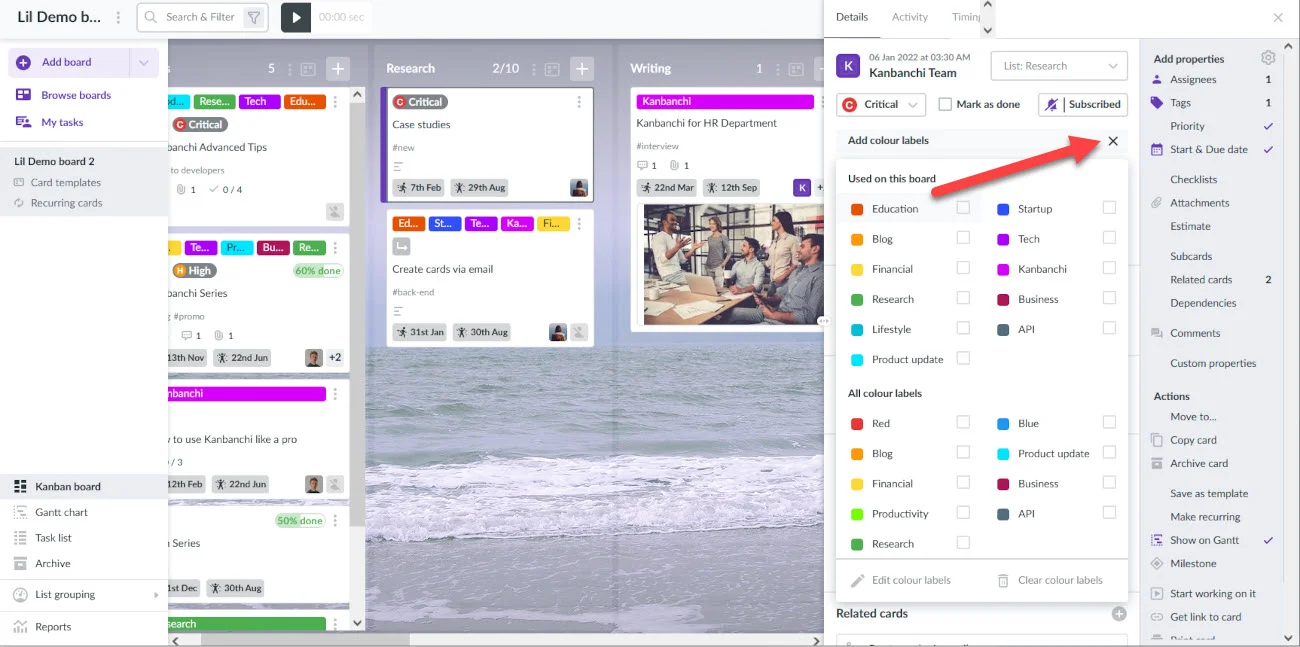
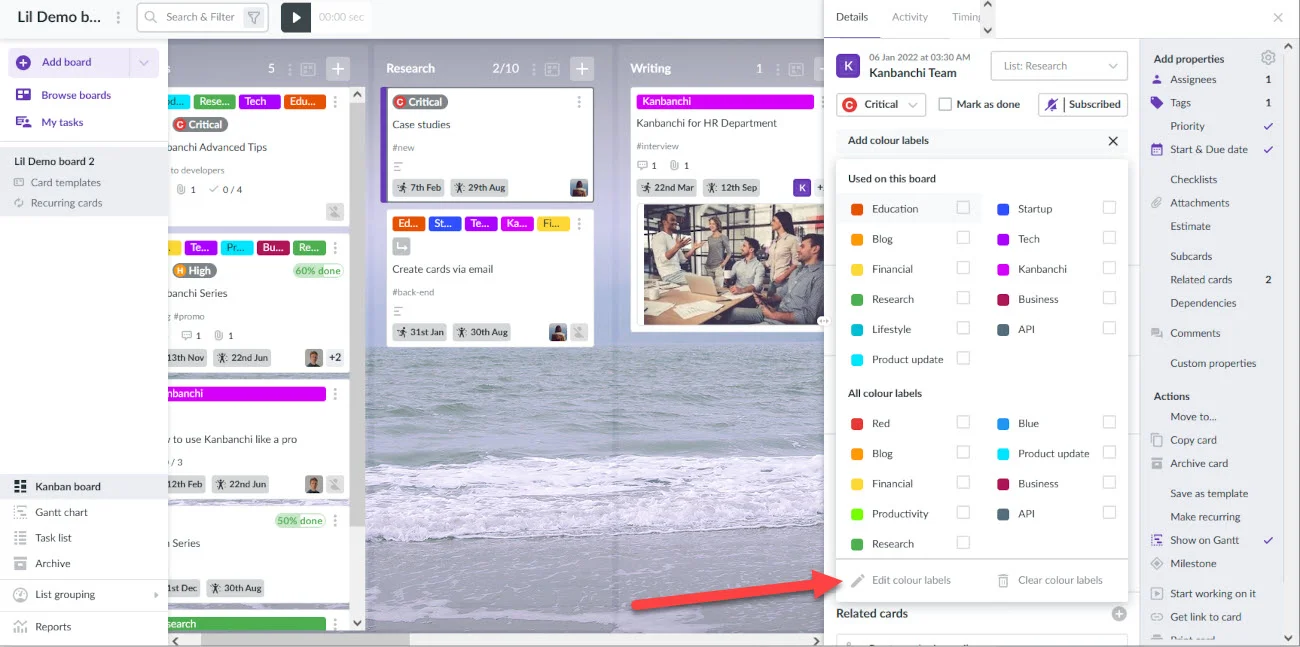
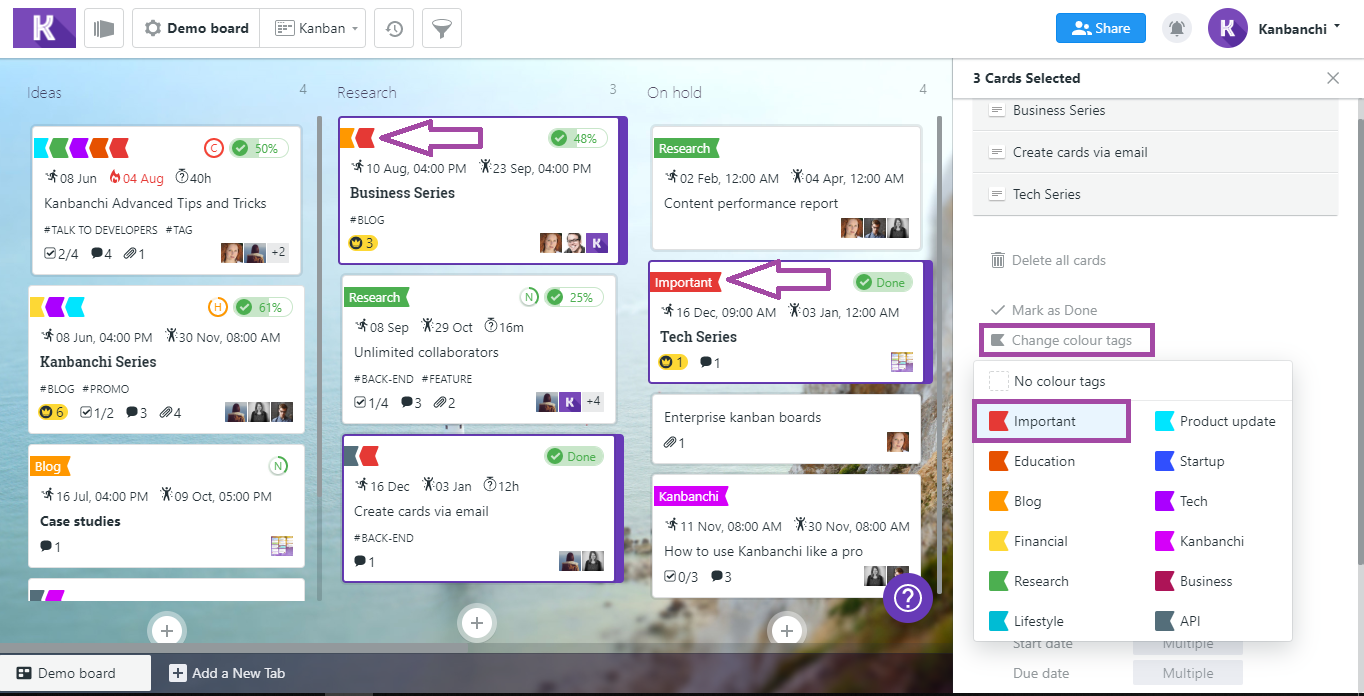
To set a colour label to a card, first, click on the card to open the Card Details. Then click Add colour label located at the top left corner of the panel. Here you can choose up to ten colour labels from the drop-down list.
To change the text of a label, click on the Edit colour labels button at the bottom of the drop-down list.
Click on the necessary label to change its text and then hit Enter on your keyboard. You can also remove text from the label and save it as empty.
Tip:Remove toggle from a checkbox opposite to colour if you do not want to use this colour on your board. This colour will not be displayed in the drop-down list of colour labels.
37. How to print a card or save it on my computer as PDF?
To print a card, open the Card Details and click on Actions in the provided popover window. Then select Print card from the drop-down menu. You will be directed to print preview. Click on Print card at the top right corner. In the Google Cloud Print popover window, customise print settings and click Print.
Tip:You can save your card as PDF to your Google Drive or to your computer. In the Google Cloud Print window,click on the Change button in the Destination section, Then choose Save as PDF under inscription Local Destination to save a card on your computer or choose Save to Google Drive.
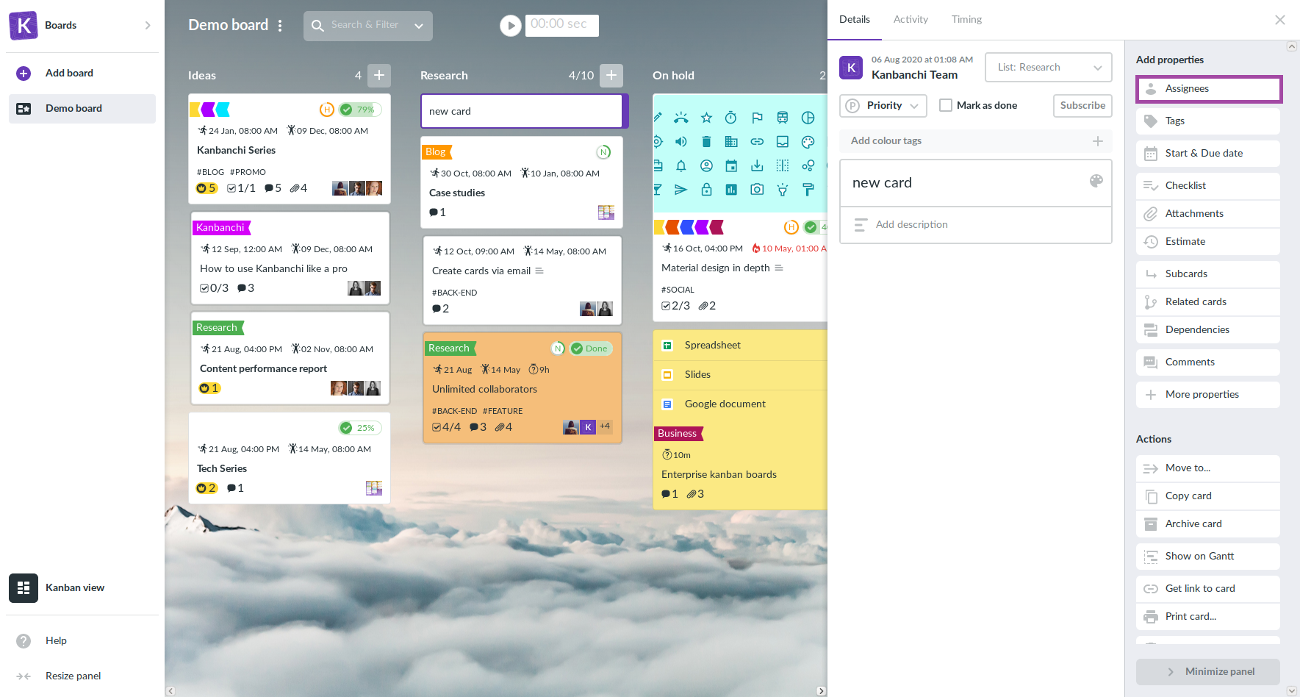
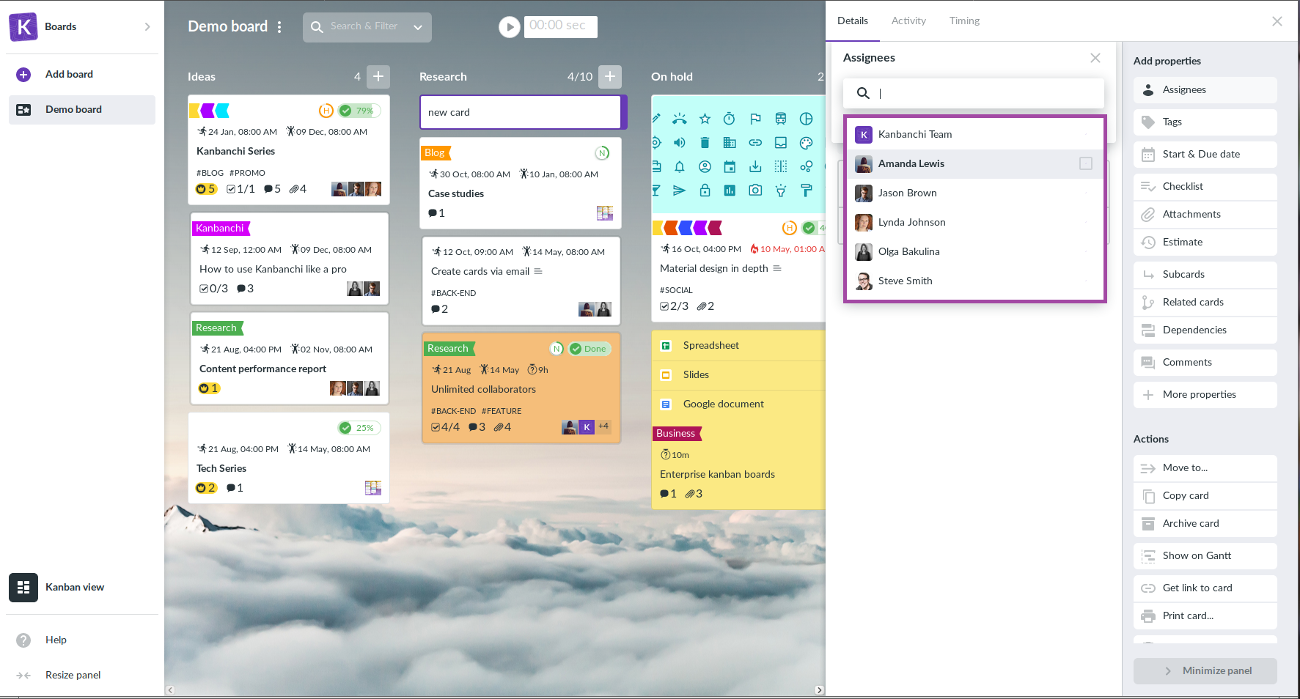
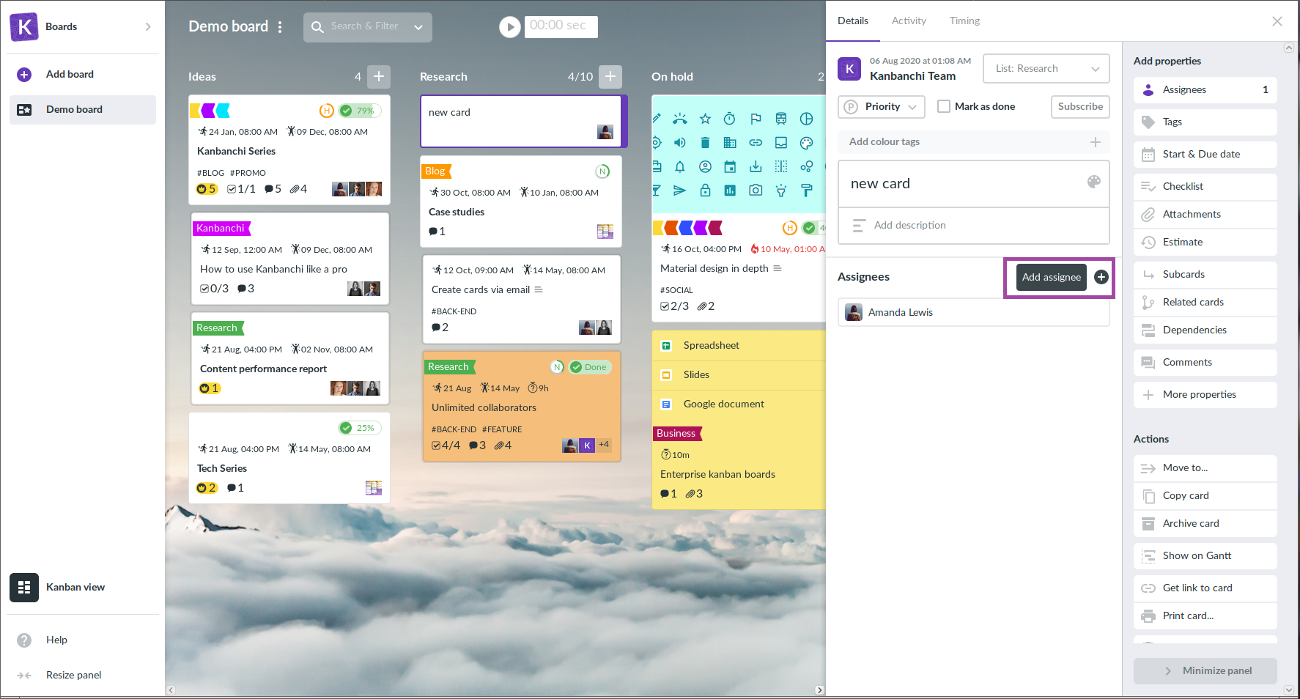
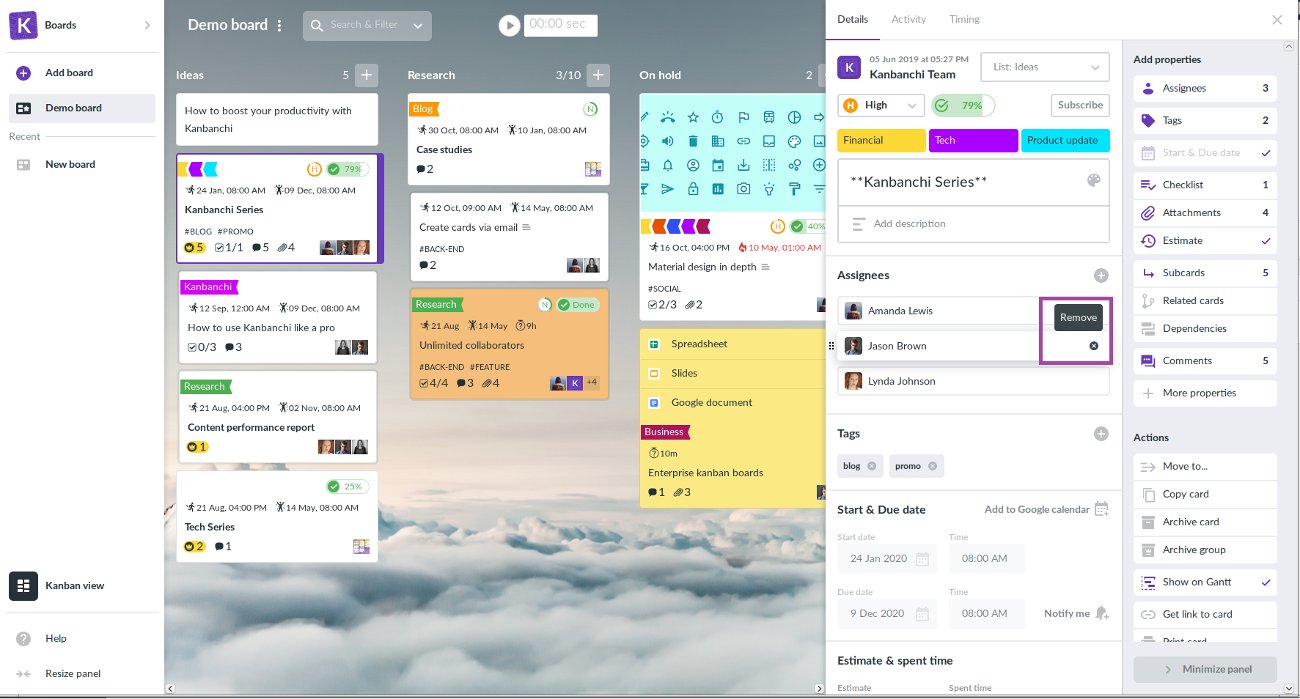
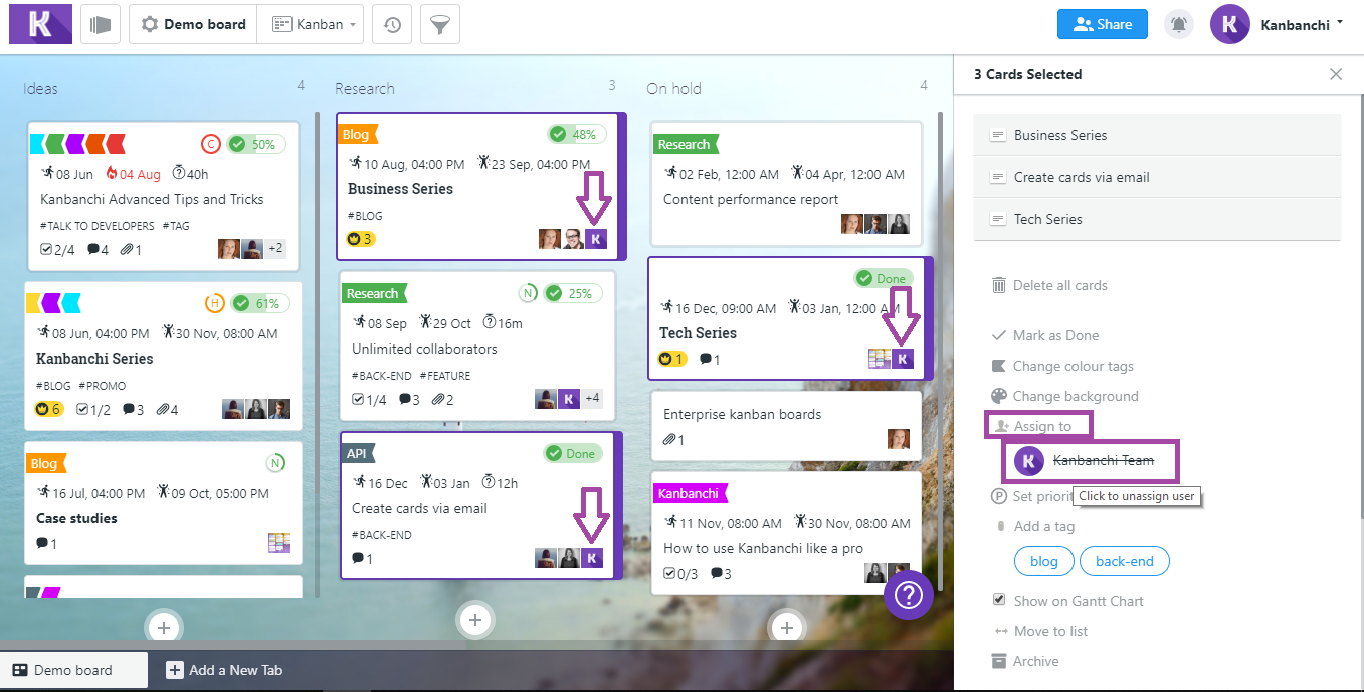
To assign a card to a person, click that card and look at Card Details in the popover window on the right. Then click Assignees button in the "Add properties" section of Card Details.
Choose a person from the drop-down list.
Note: In this list, you will see only those people with whom you have shared your board.
If you already have Assignees, adding next ones is even easier. Just click a plus button on the right from the "Assignees" property. Then choose a person you need to add from the drop-down list.
To remove an assigned person from the card, simply click on X on the right of the name of that person.
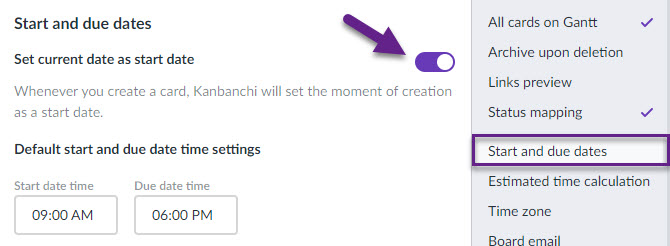
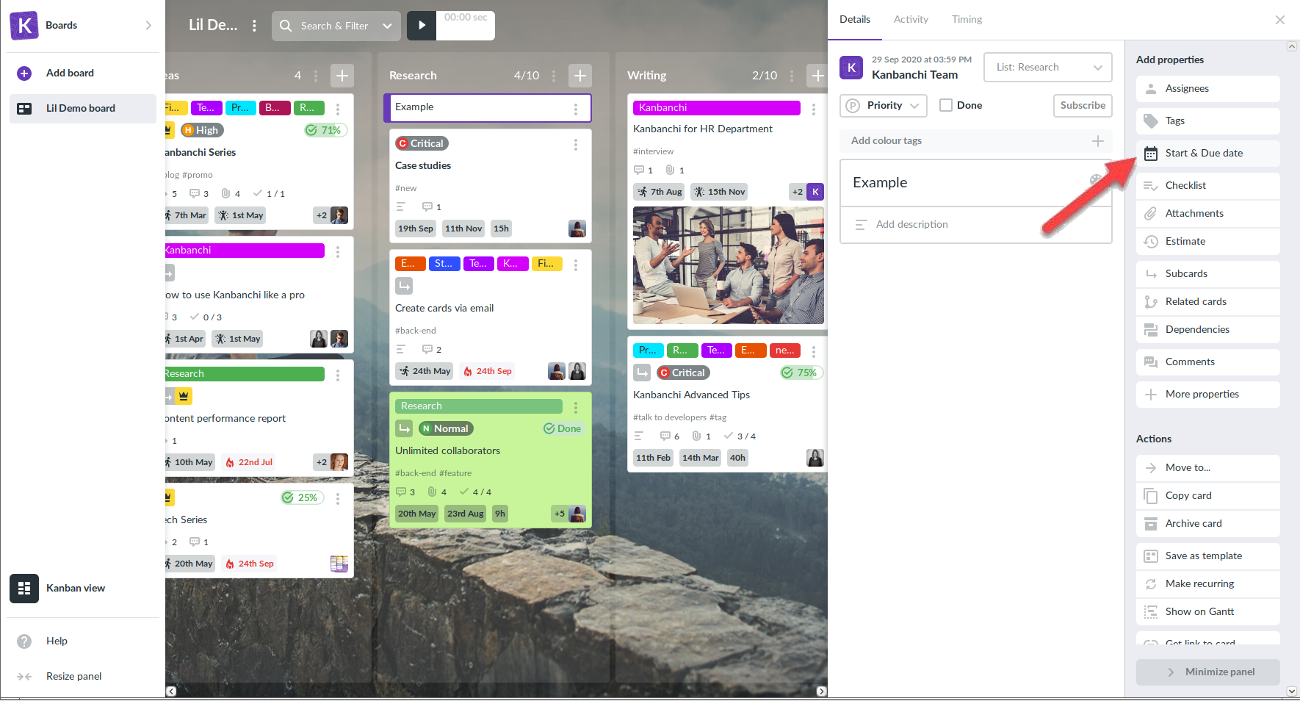
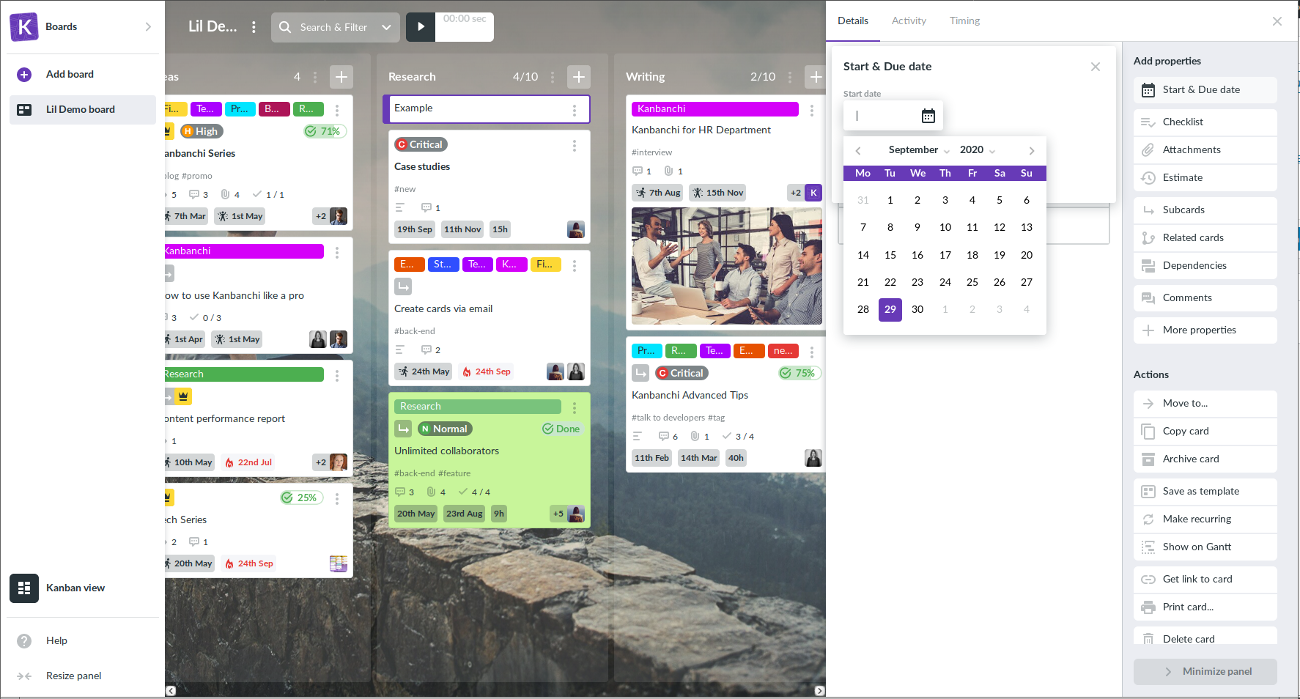
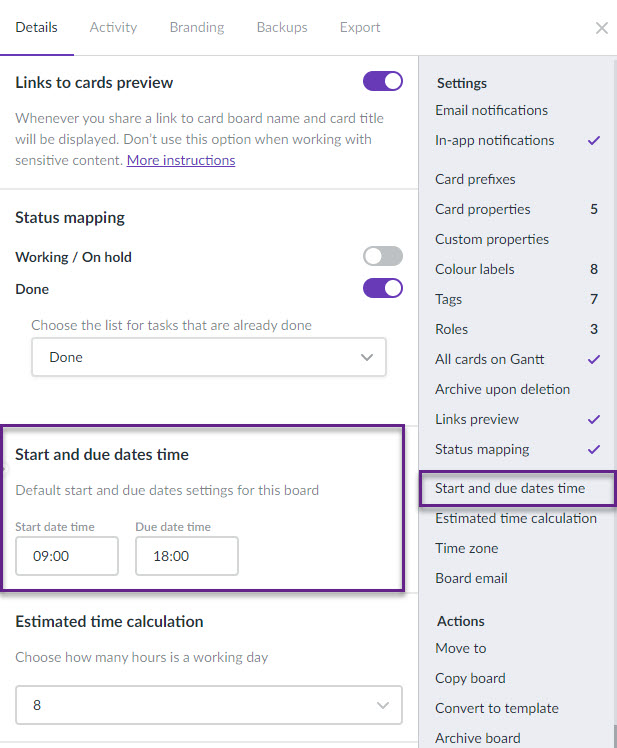
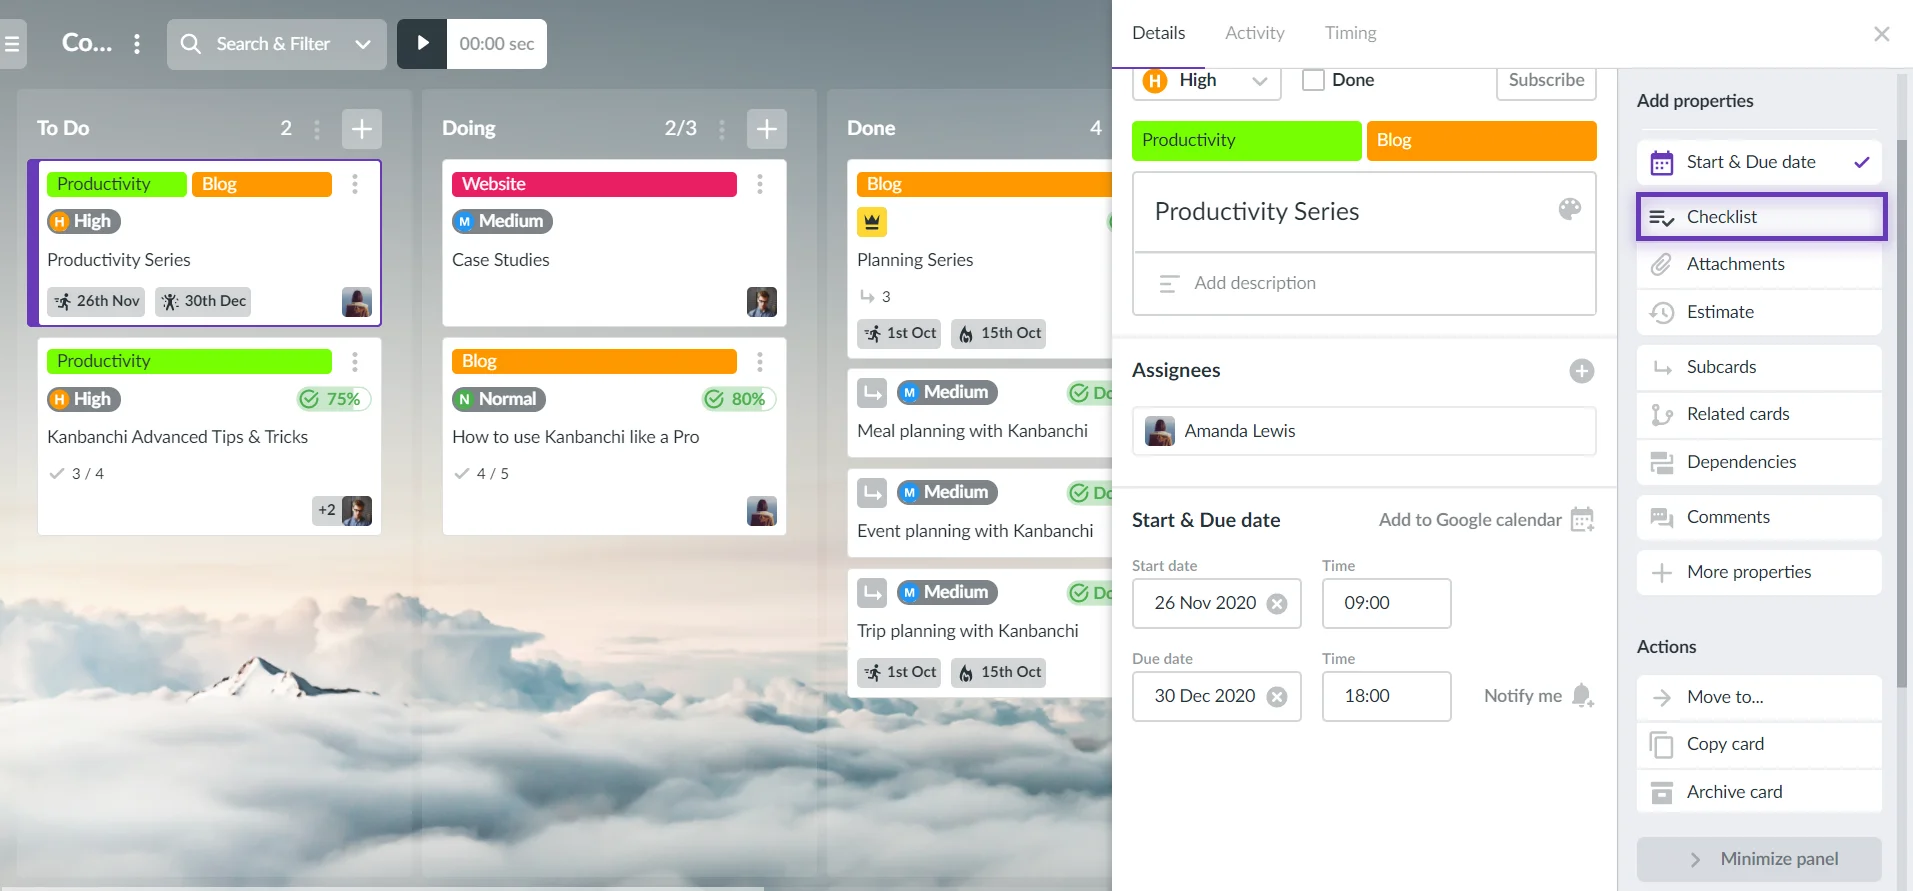
39. How to assign a Start Date, Due Date and set a time estimation?
To assign a date to a card, click on it to open the Card Details. Then click Start & Due Date button in the "Add properties" section of Card Details.
Choose the desired dates within the provided calendars. You may also set a time, which appears after selecting the date.
You may configure a specific time for start and due date. You may do it manually or set up default values in board details. Just click on the board title and select Start and due dates time and set the values.
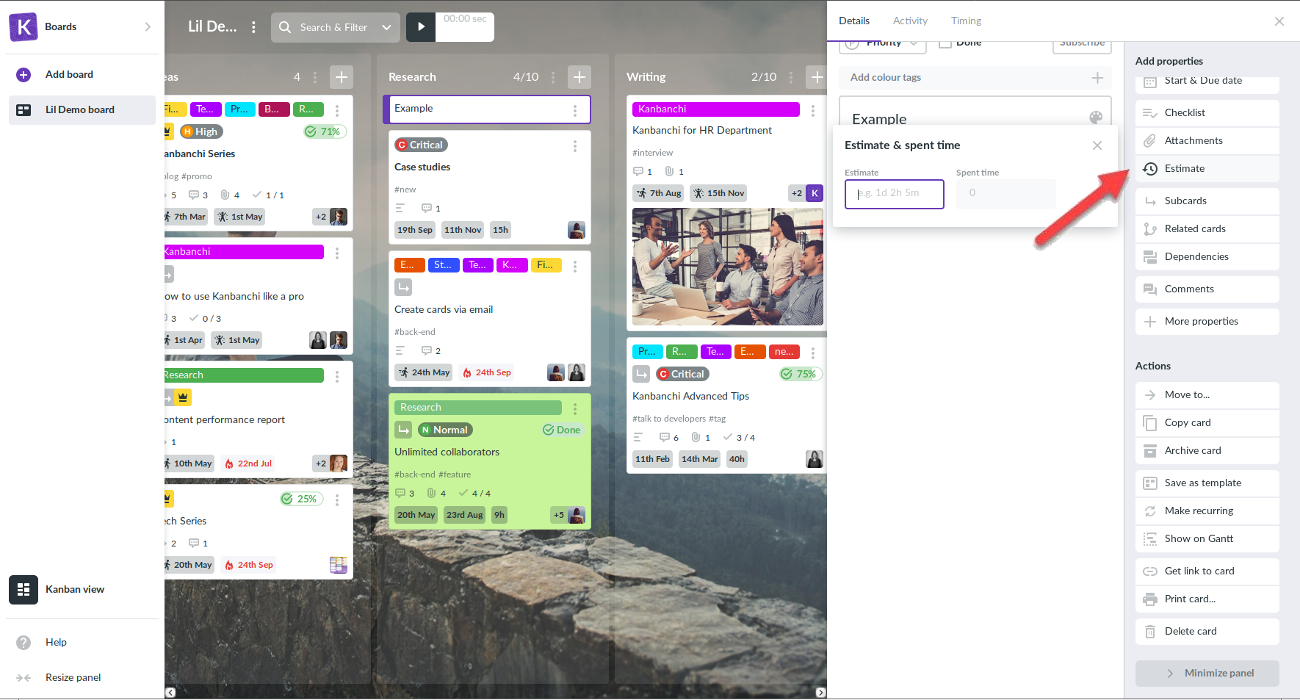
To set a time estimation, click Estimate button in the "Add properties" section and enter this information within the provided field.
40. How can I receive notifications about Google calendar events?
To receive notifications about Google calendar events, you need to create them first. Open the Card Details and click on the Push to Google Calendar option. You may push Start date, Due date or the Entire period.
Find the new event on your Google Calendar. Note, it will be opened in a new browser tab. In the opened window, you will see a wide range of settings. Find the Notification section and set them up. Choose a number of minutes/hours/days or weeks to configure how long before the event you want to receive notification.
Note: There is only one-way communication between the date on cards and Google Calendar. If you change the Start (Due) date in your calendar, the corresponding date on a card of Kanbanchi dashboard will not be changed. But if you remove or change the date within your card, this date will also be changed or removed from the calendar, no matter where in the calendar it is located.
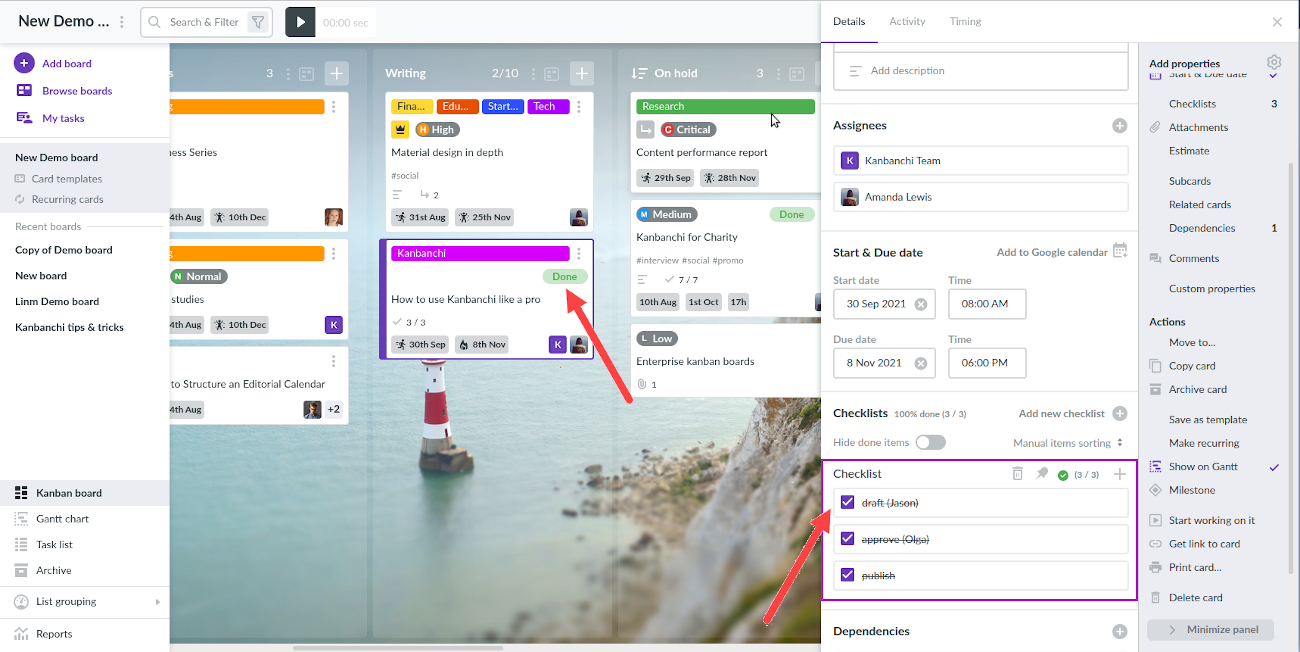
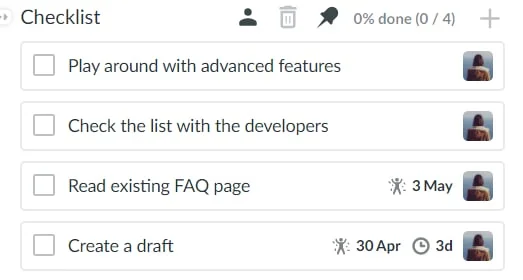
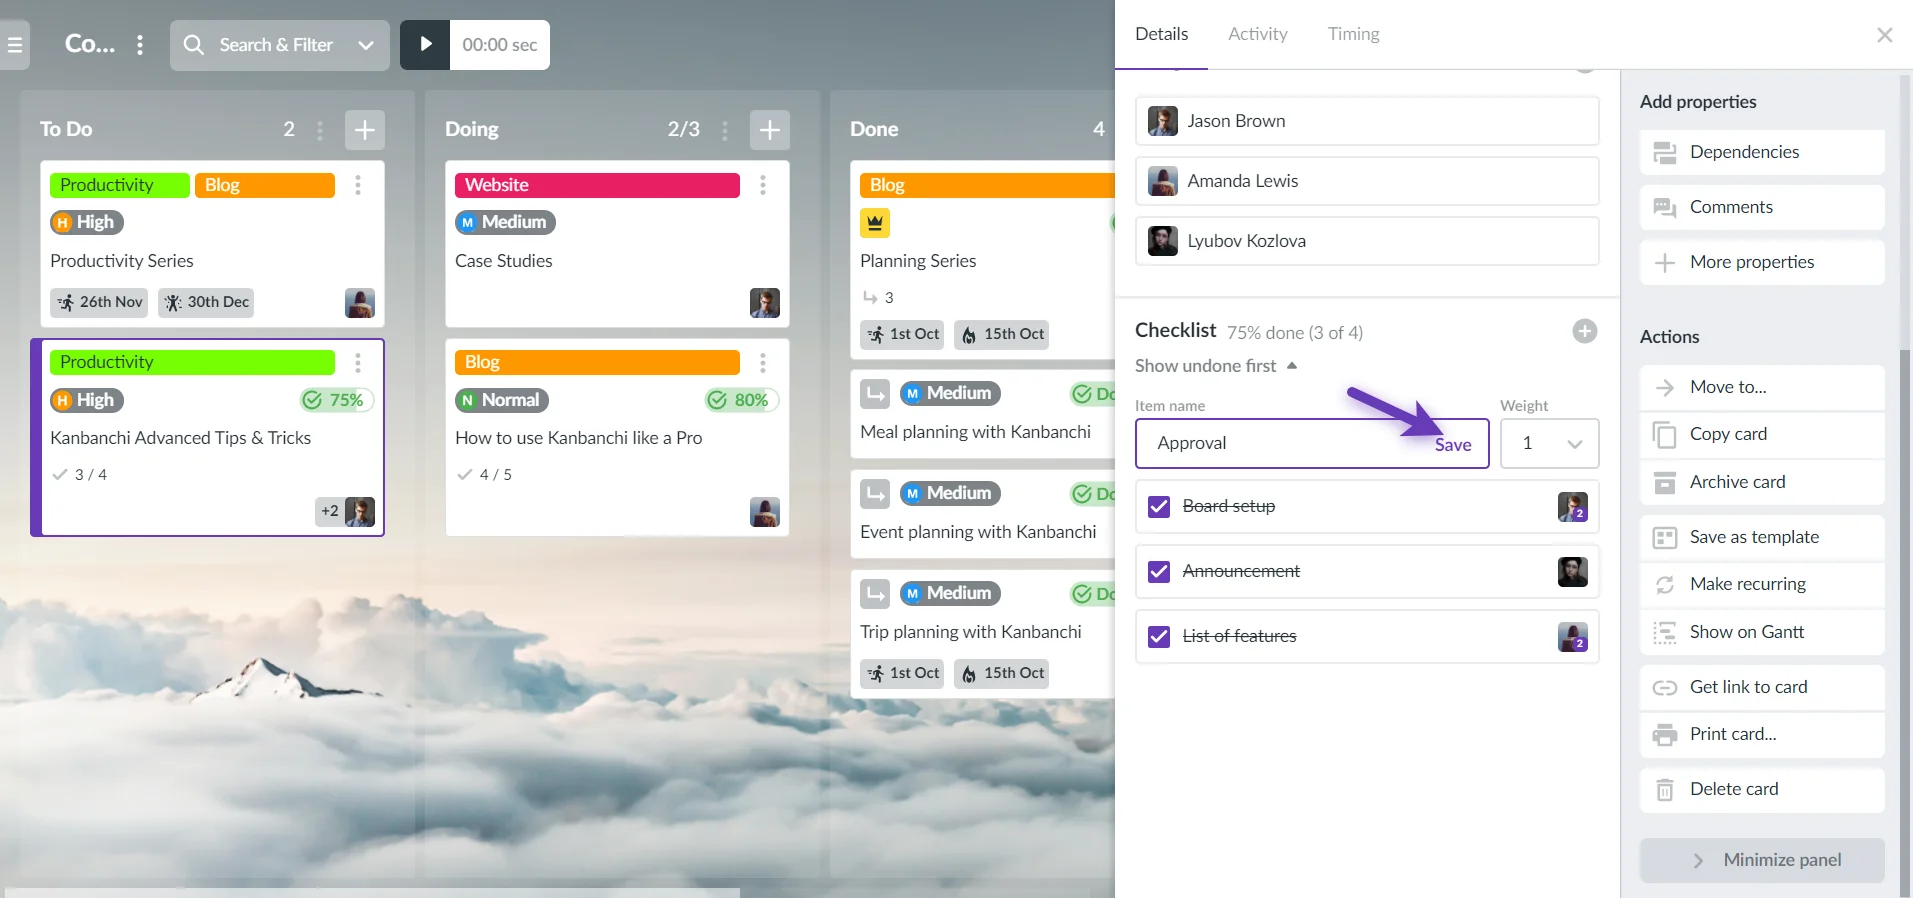
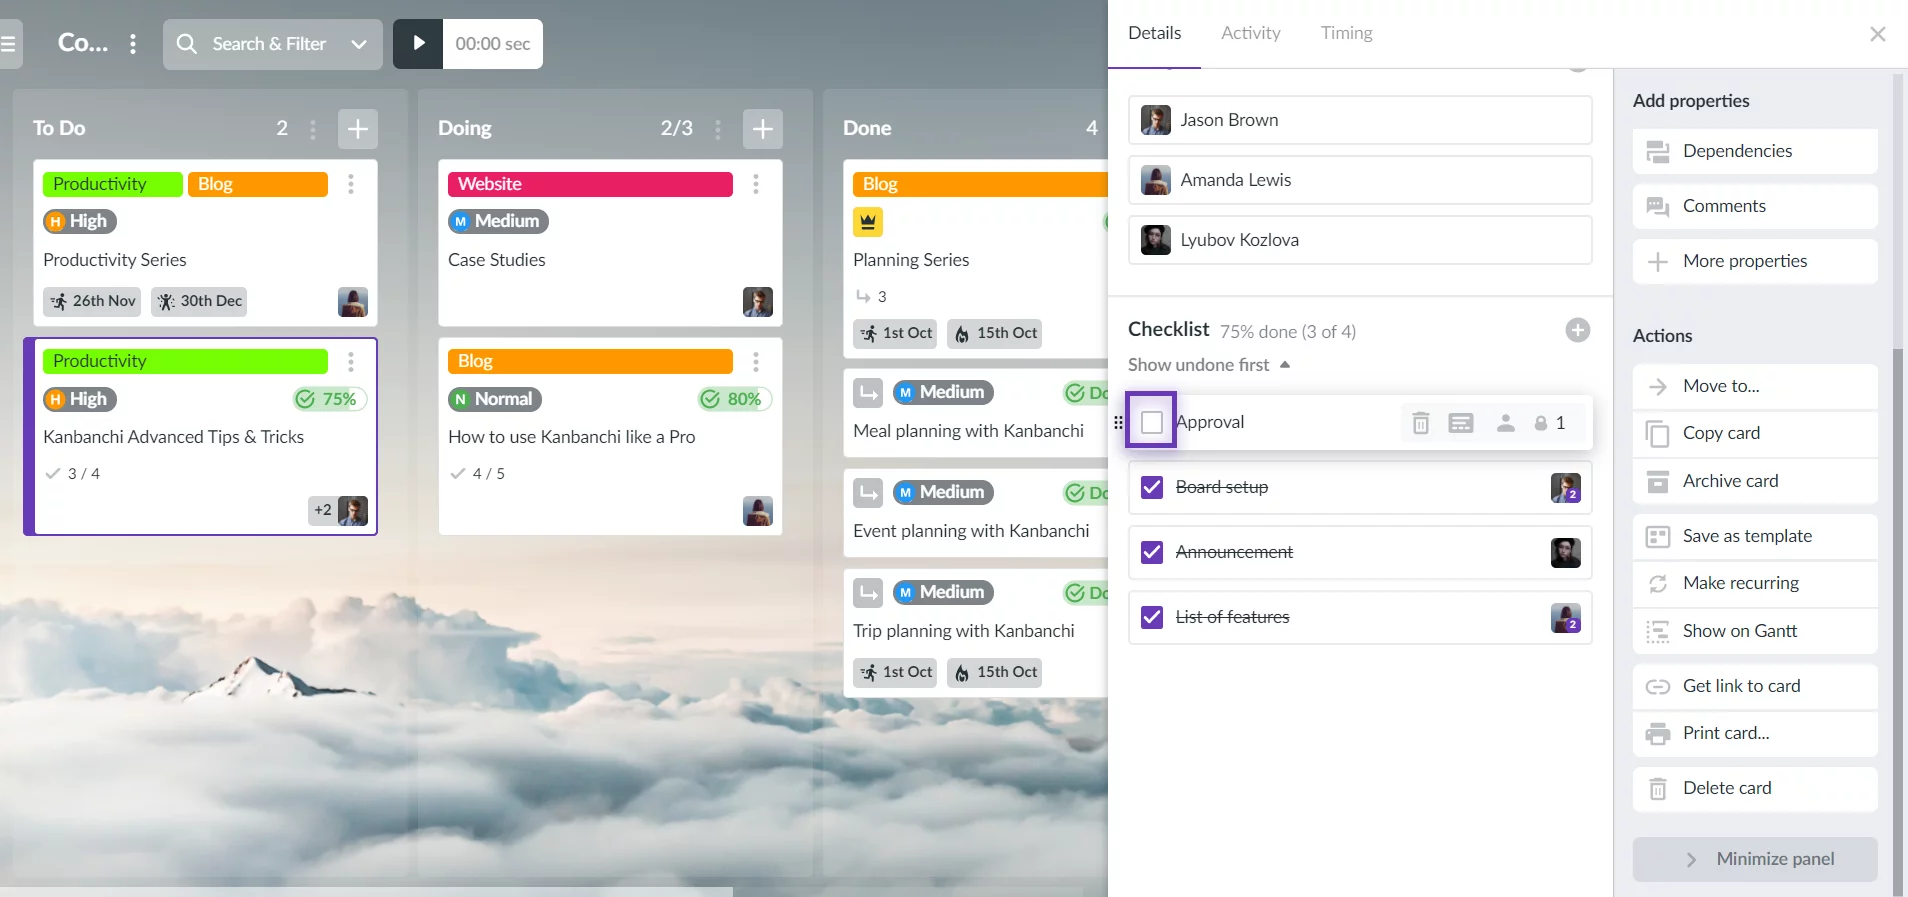
41. How to create and customise a checklist (list of subtasks)?
To create a checklist, open the Card Details and click the Checklistbutton in the right-side panel. Type an item in the field and then press Enter. You may add URLs in checklist items and they will be automatically transformed into hyperlinks. Also, you may copy and paste a list of tasks from a spreadsheet or a document.
To assign an item to a user, hover it and click
To bulk assign a checklist to a user or multiple users, click and select users from the drop-down list.
To edit a subtask, click on its title, make amendments, and then click Save.
To give various weight to subtasks,clickand choose the appropriate value.
To mark a subtask as complete, toggle the checkbox opposite to the task. When you mark checklist items as Done, you will see a progress change on the progress bar. Percents are calculated proportionally to item weight. When you mark the last checklist item as Done, card status changes to Done unless it doesn't have any subcards, which affect progress calculation.
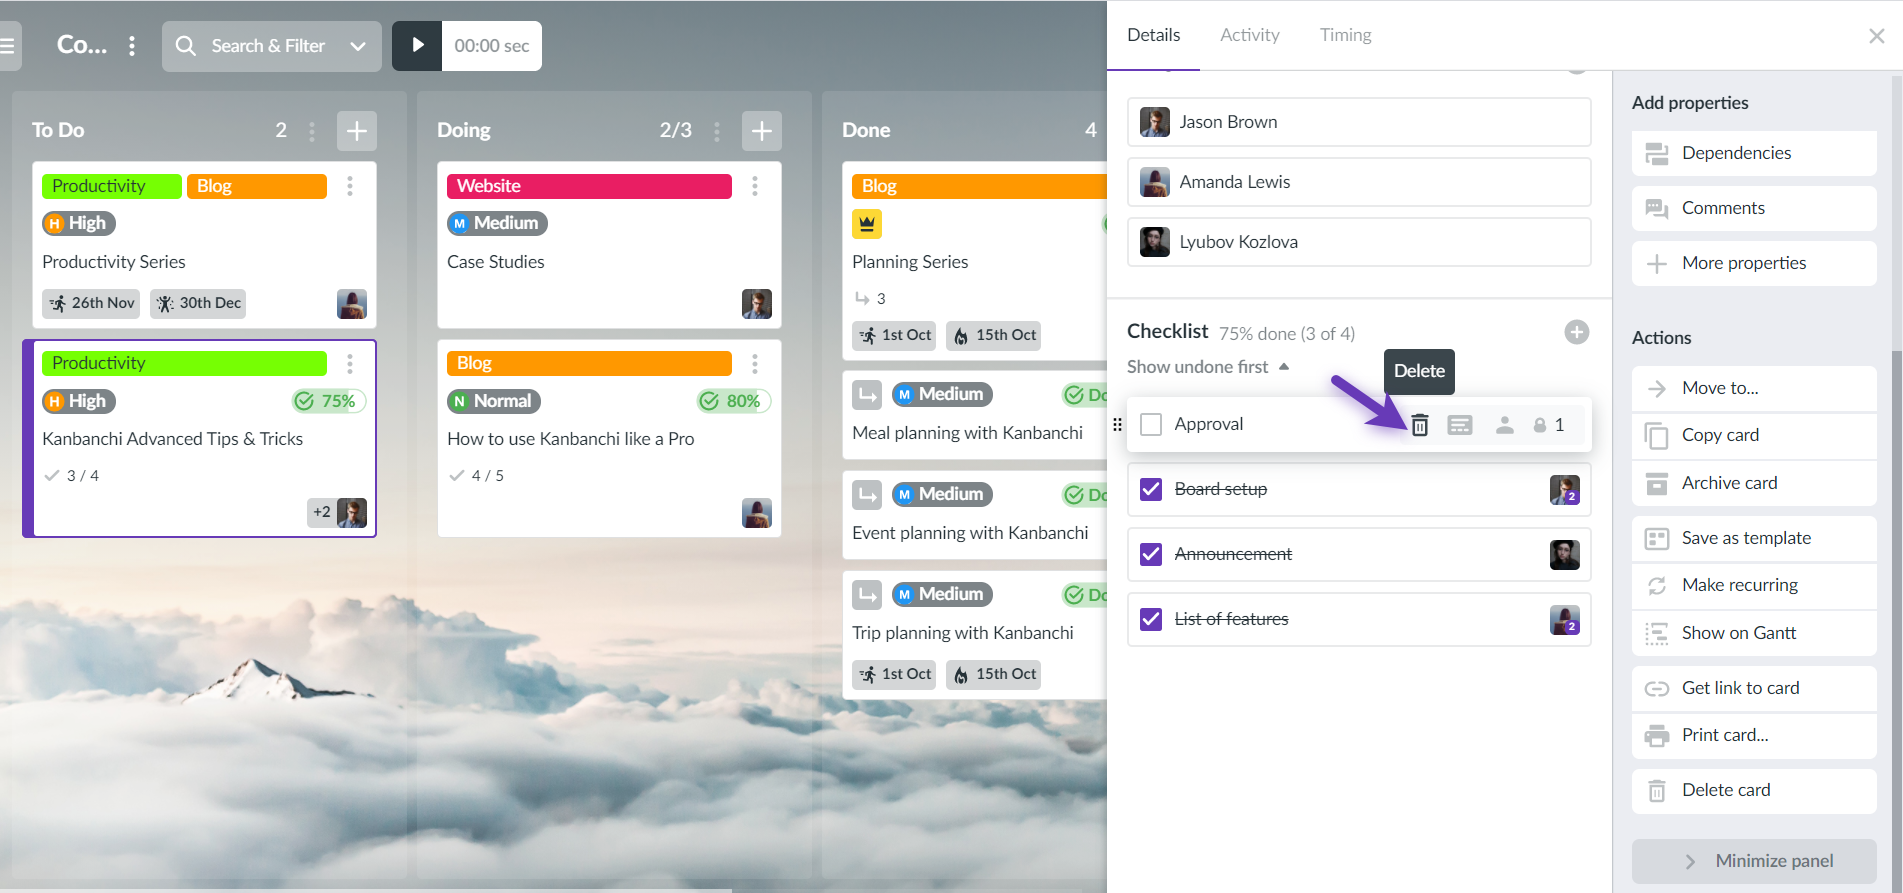
To remove a checklist item, click on the Trash button opposite to it.
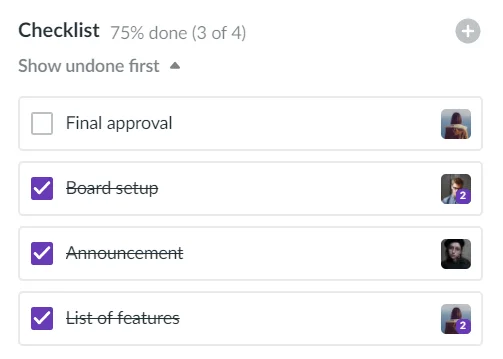
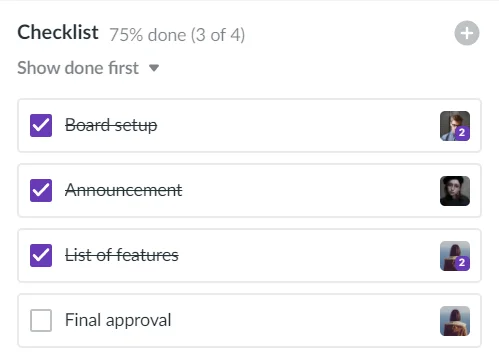
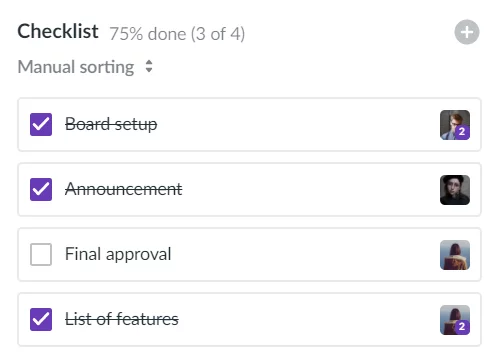
Three sorting options are available: undone items first, done items first and manual sorting. To reorder items, hover you mouse cursor on a particular item, click and hold a sign, then move your item.
To convert an item to a subcard, hover the item and click
Besides creating a new checklist, you may copy the existing one from the card or template, for more details review the following FAQ:
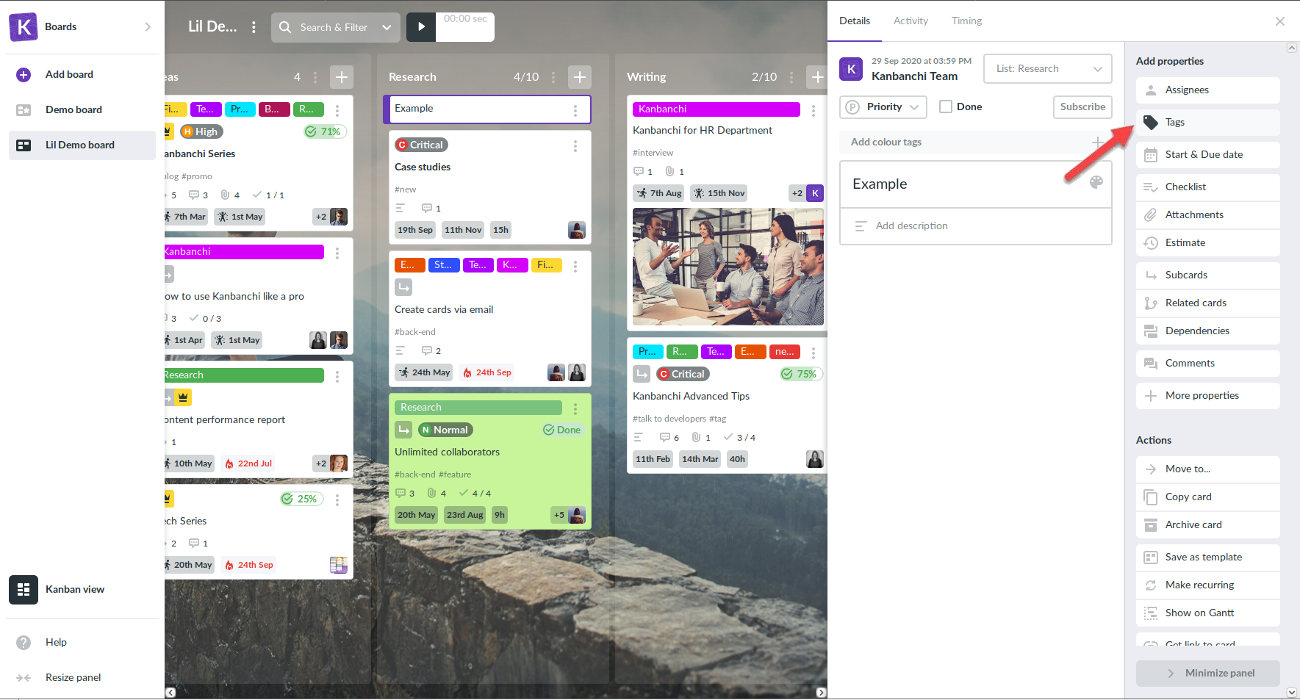
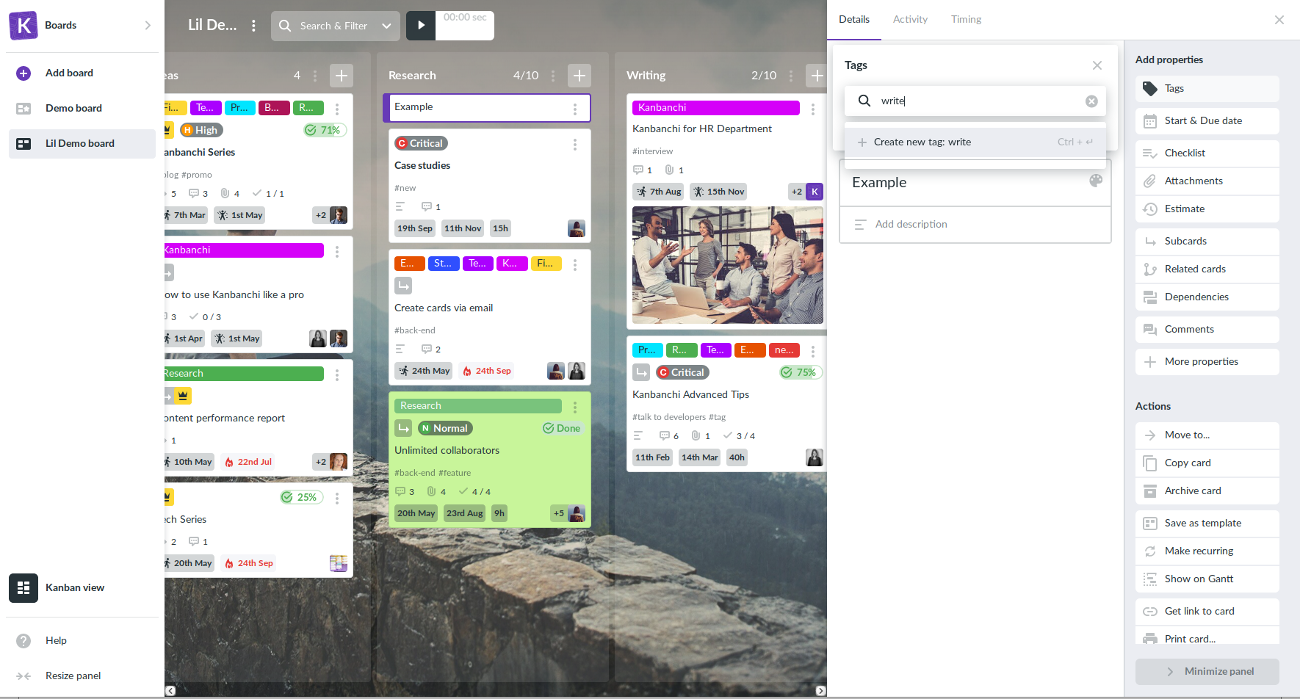
To add tags to a card, click the card to open the Card Details. Then click Tags button in the "Add properties" section of the popover window on the right.
Now type in the tag and hit Enter.
When you click on the Tags button you can also see a list of tags already linked to cards on this board. To choose one of them, just hover over it and tick the box on the right. You can add several tags.
There is no way to edit a Tag or remove it from the list while the Tag is attached to at least one card. Once the Tag is removed from all the cards, it disappears from the list automatically.
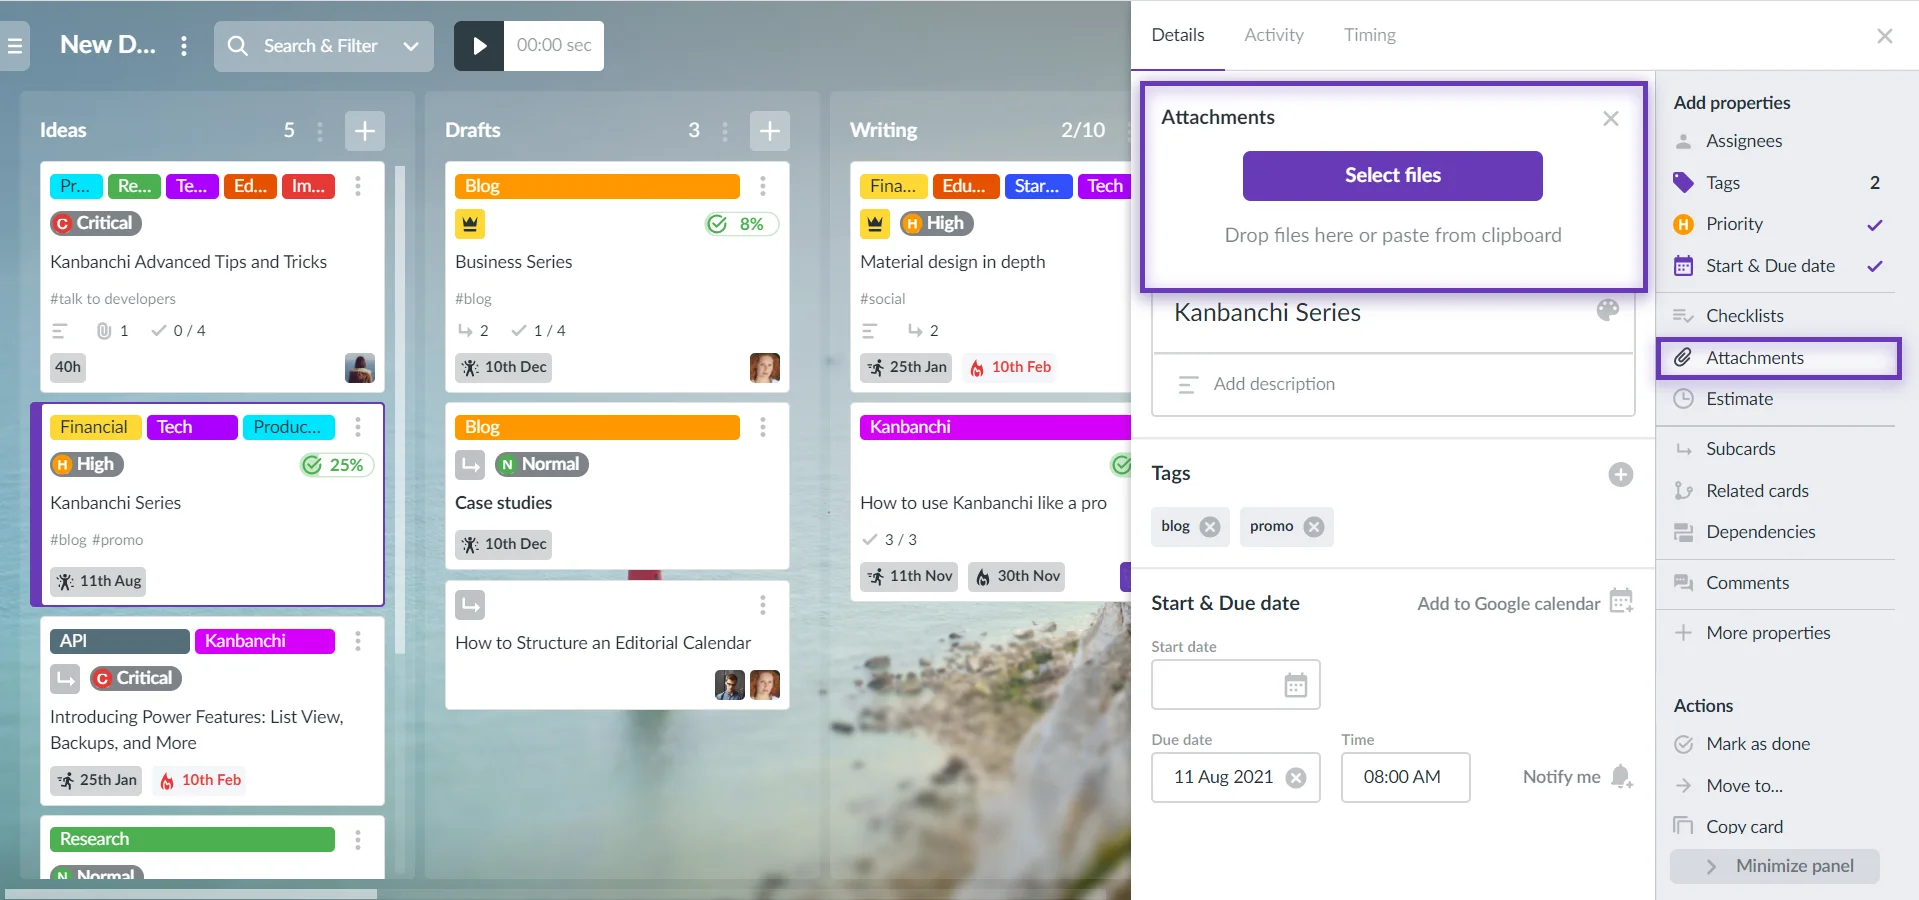
43. How can I attach files from Google Drive, Shared Drive and my computer?
You may attach different files to Kanbanchi cards.
To attach files to a card, click on the card to open the Card Details, choose Attachments and click Select files. You may also drop files to the area or paste them from the clipboard.
A request for permission will be shown to you. Accept it if you trust Kanbanchi to view your Google Drive and attach files to cards.
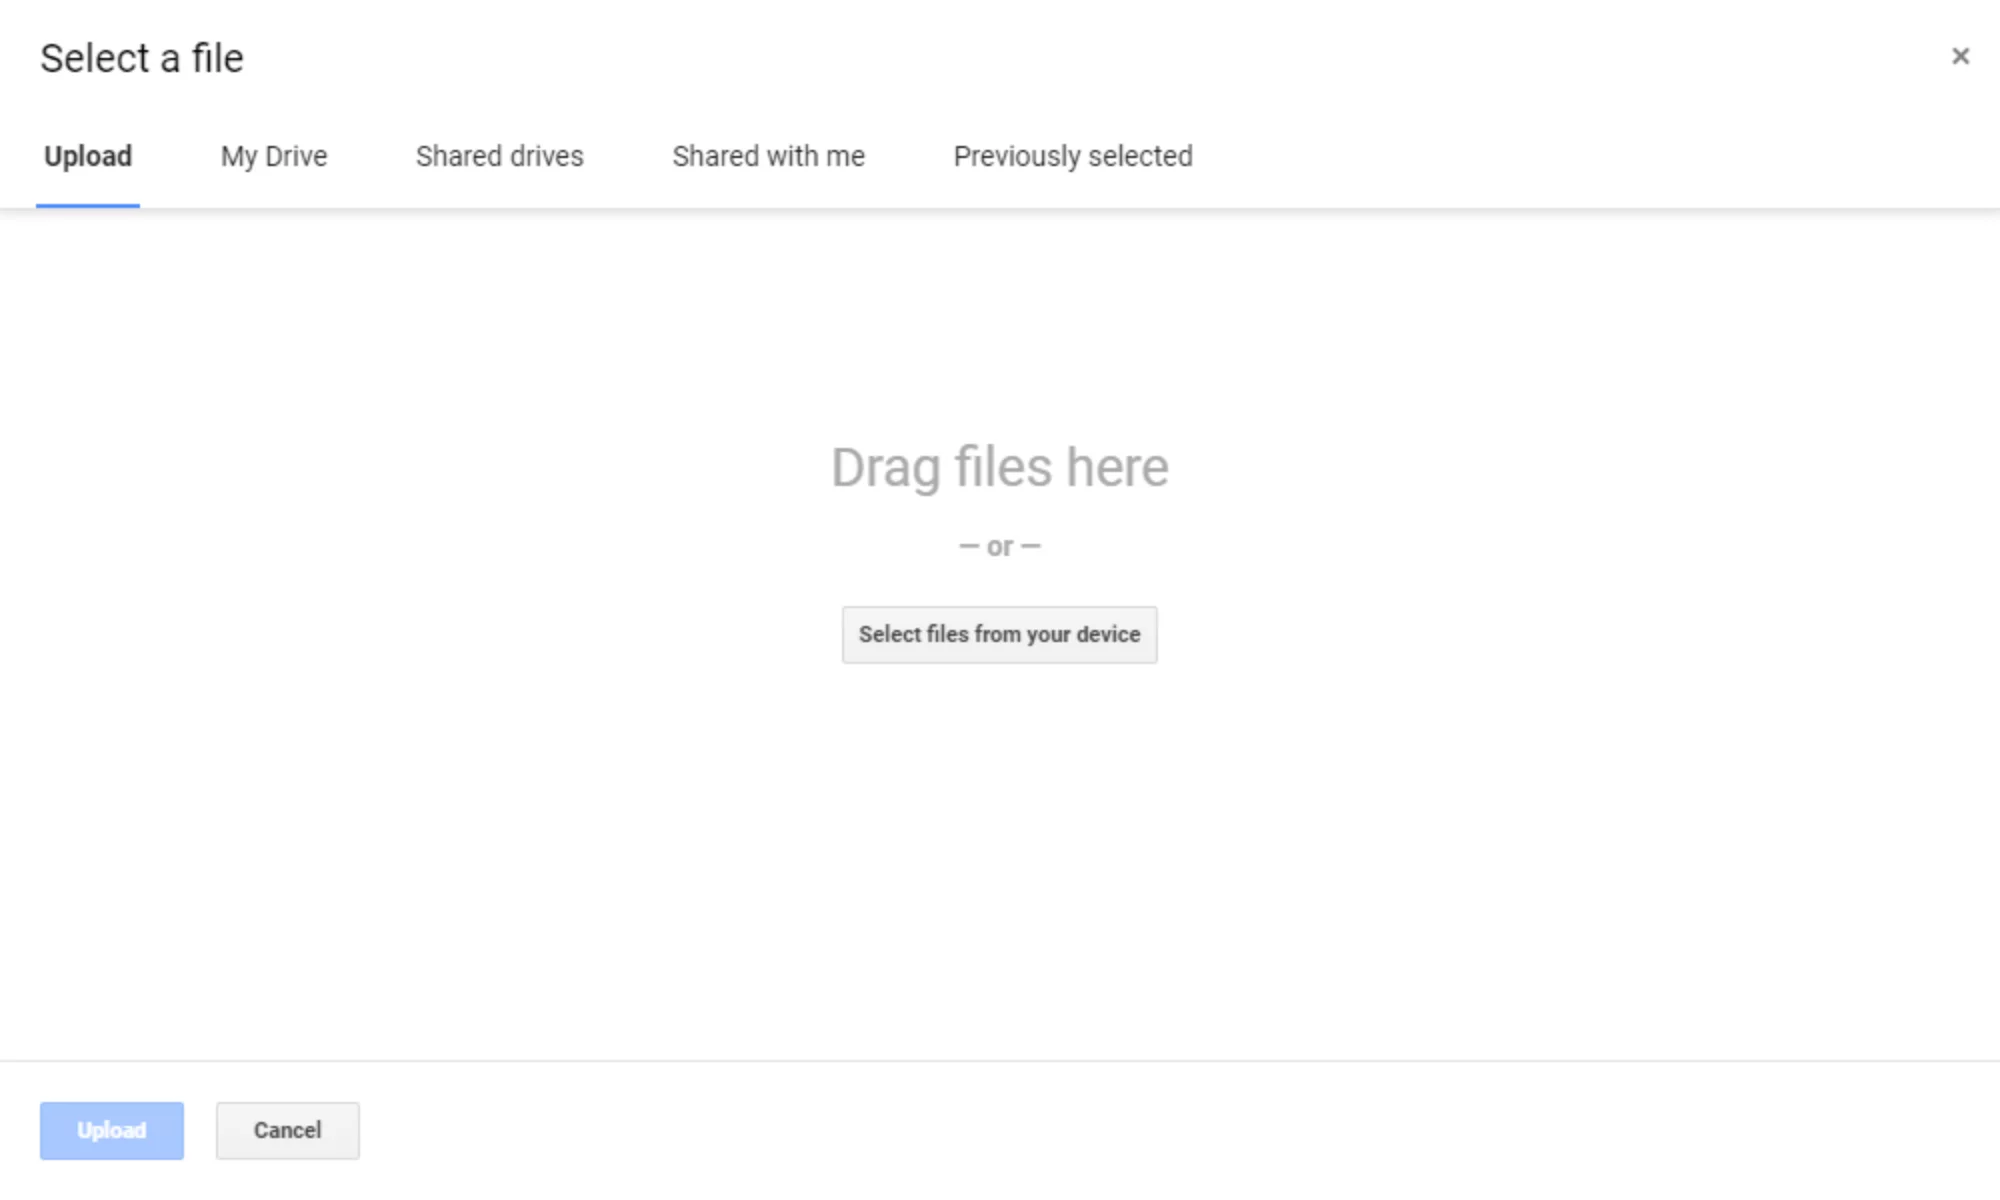
Uploading files from computer
By default, you see the Upload tab. Drag files right there or click on the Select files from your computer button and hit Upload.
Note: Files uploaded from your computer will be uploaded to your board folder inside the Kanbanchi folder of your Google Drive. Therefore, files will have the same sharing settings as the entire board, and your collaborators will have access to uploaded files instantly.
Attaching files from Google Drive & Shared Drive
My Drive tab shows the files you own. The Shared Drives tab shows the content of shared drives, that are available to you. Select one or several files you want to attach and press the Select button. Use Shared with me and Previously selected tabs to find a file more quickly.
Note: When attaching a file from your personal Google Drive, please, make sure the file is shared with your collaborators, otherwise, they won't be able to open it and will have to send you an additional request for sharing.
Actions with attached files
Open the Card Details and hover the mouse cursor on a file. You will see additional file options opposite to the file:
Change the order of files
Pin multiple attached files on a board
Download the file to your computer You must have permission from the file owner to the file.
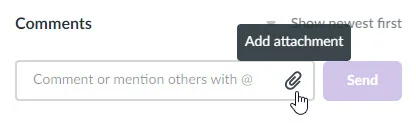
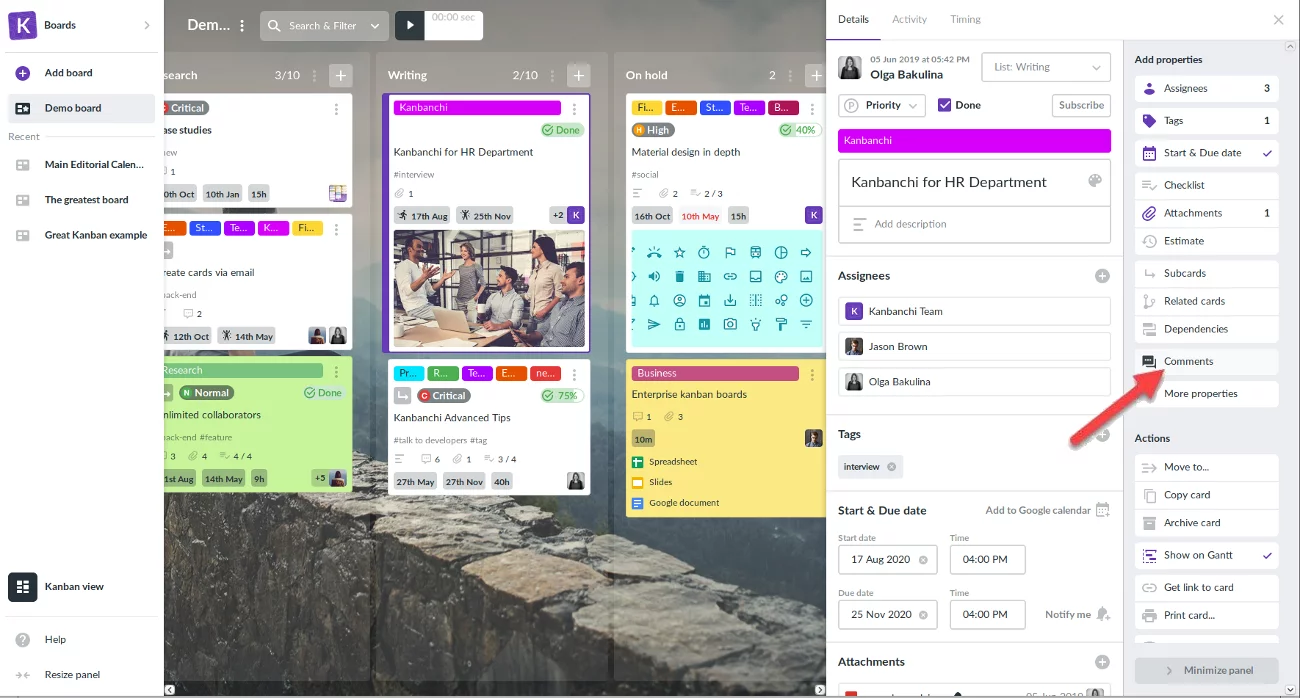
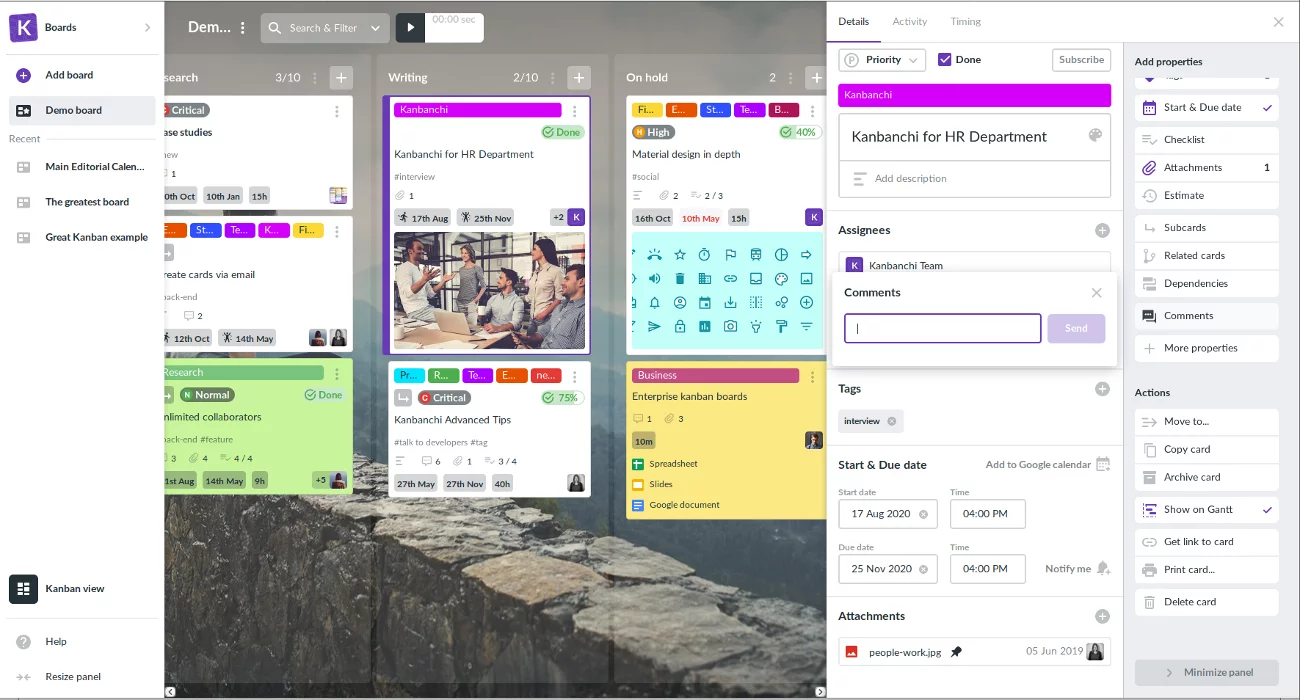
To leave comments on a card, click the card to open the Card Details. Then click Comments button in the "Add properties" section of the popover window on the right.
Now you can enter your comment in the provided field and click on Send.
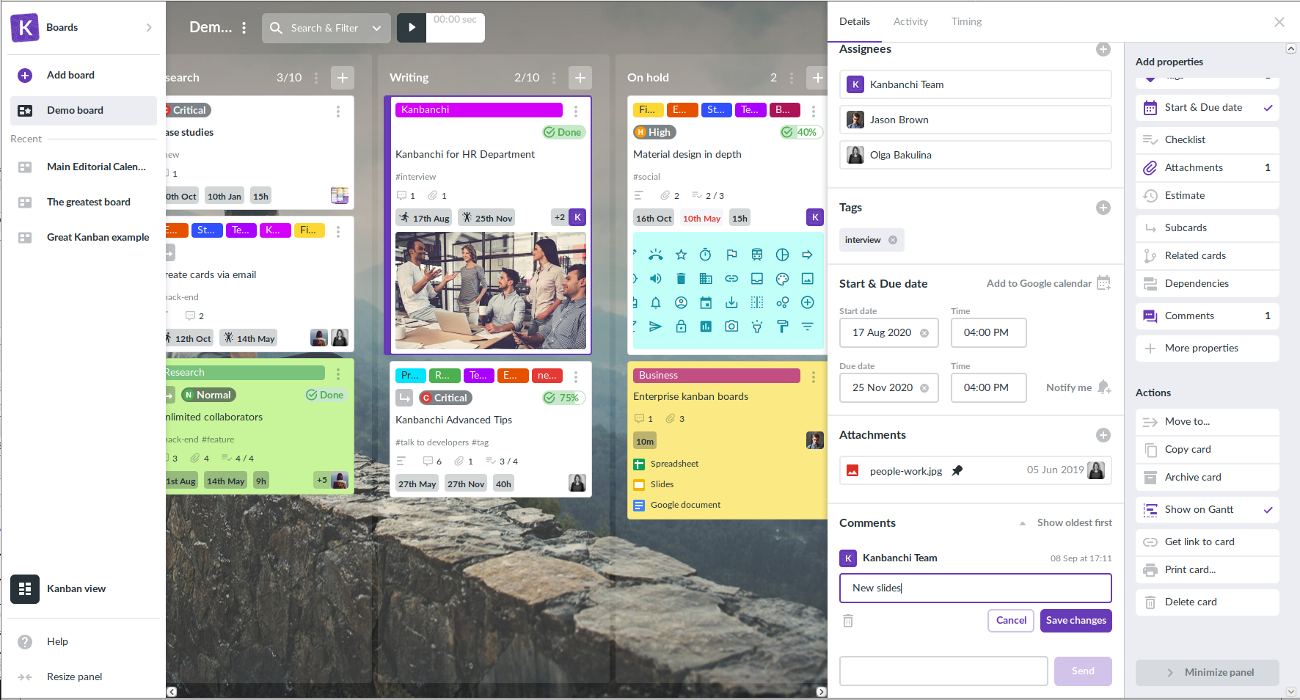
You can edit or remove your comment any time after it has been sent. Click on the text of your comment, make amendments, and then click on Save changes or click on the Trash button to remove it.
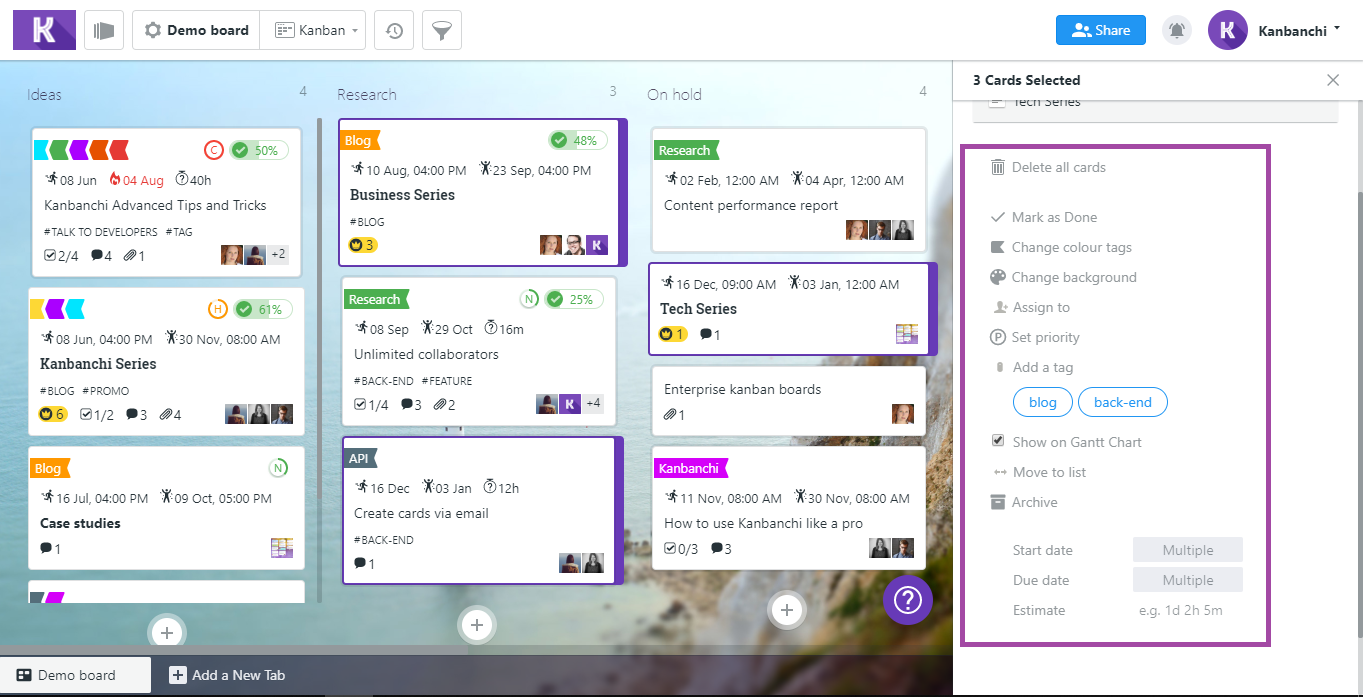
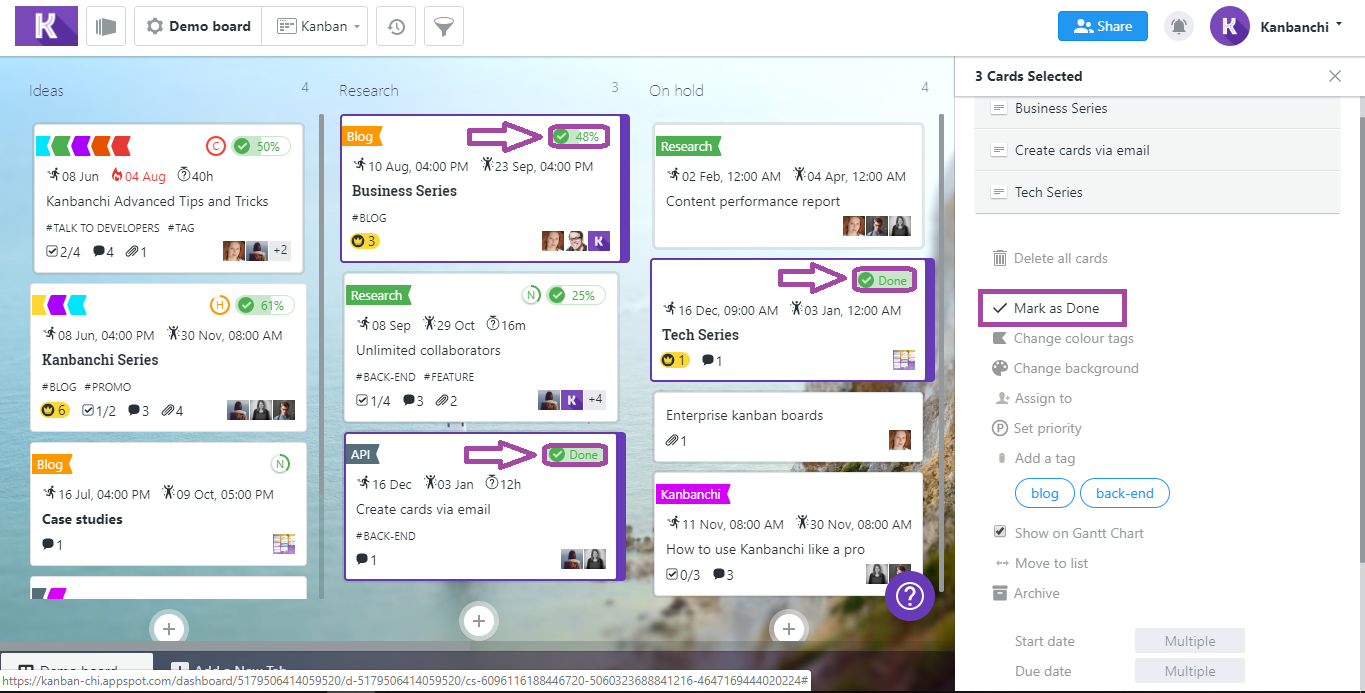
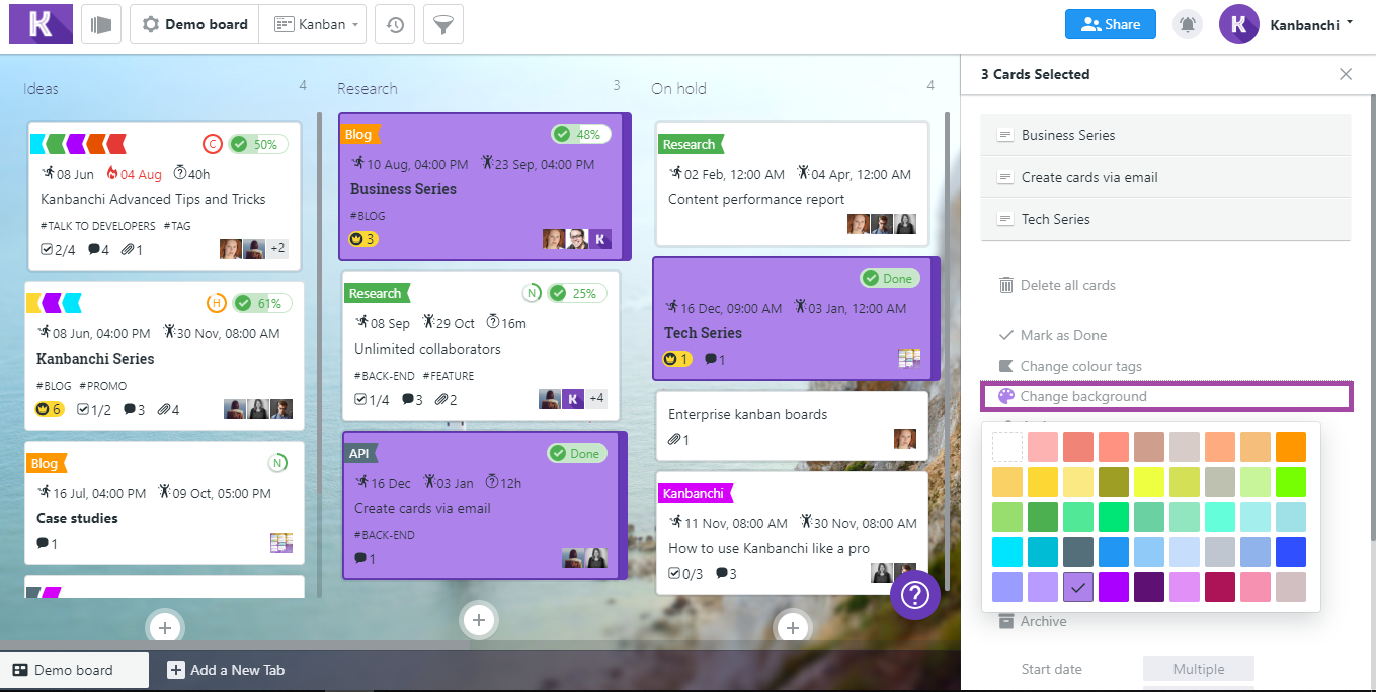
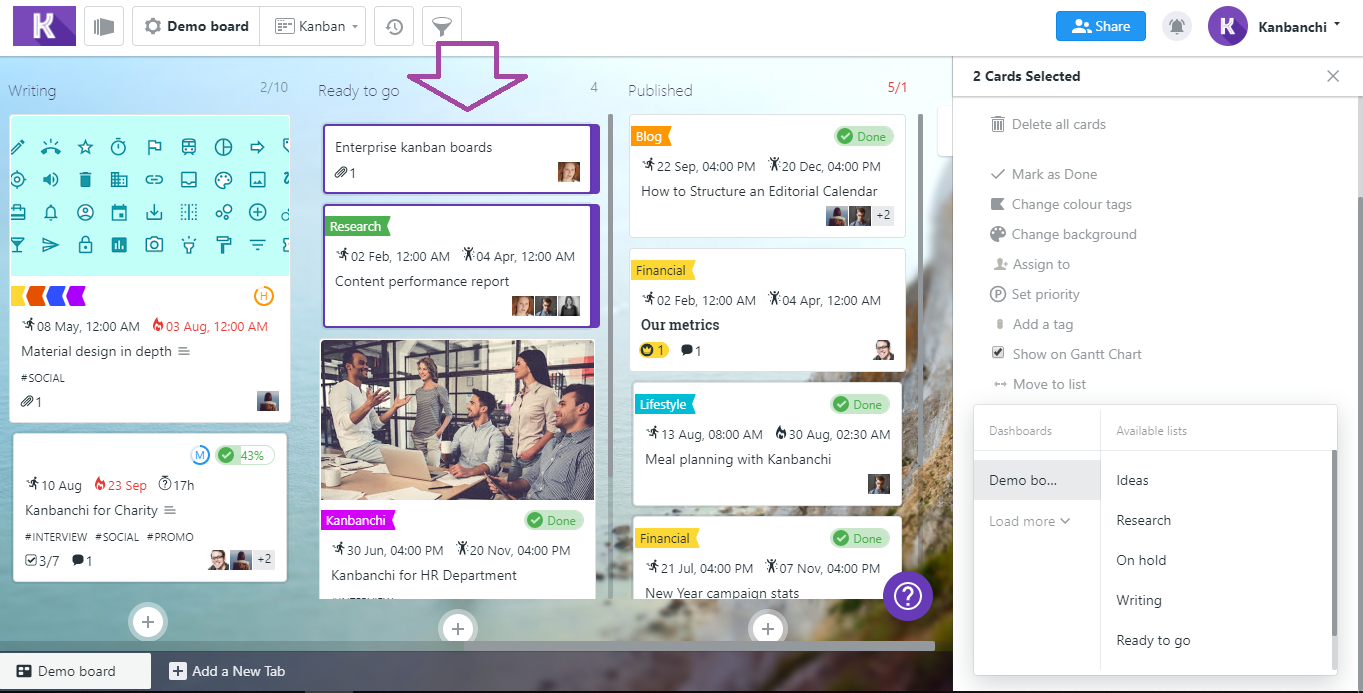
45. How can I choose multiple cards and what actions can I do with them?
If you want to choose several cards in a row within one list, click on thefirst card in the list, hold down Shift Key on your keyboard and click on thelast card you need.To select all cards in the list, click on a list title to open the List Details. In the provided popover window, click on Actions and choose Select all cards in list.
If you want to select cards from different lists you should hold down Ctrl Key and choose several needed cards. Then choose the required option to all these cards.
There are several actions you can perform with multiple cards:
Delete all cards
Mark as done
Change the background
Assign to
Set priority
Change colour tag
Add a tag
Show on Gantt chart or remove from it
Move to list
Archive
Change due/start date
Dragging multiple cards is also possible. You can just select multiple cards and drag and drop them as if it was one card. All selected cards will move together to one list.
Tip:When you move cards to another list, all your cards will be placed at the beginning of this list.
To remove related cards, click Edit related cards button. You will see a list of related cards. To delete any of them, put the cursor on its title and click on the trash icon. After that, click Save related cards button.
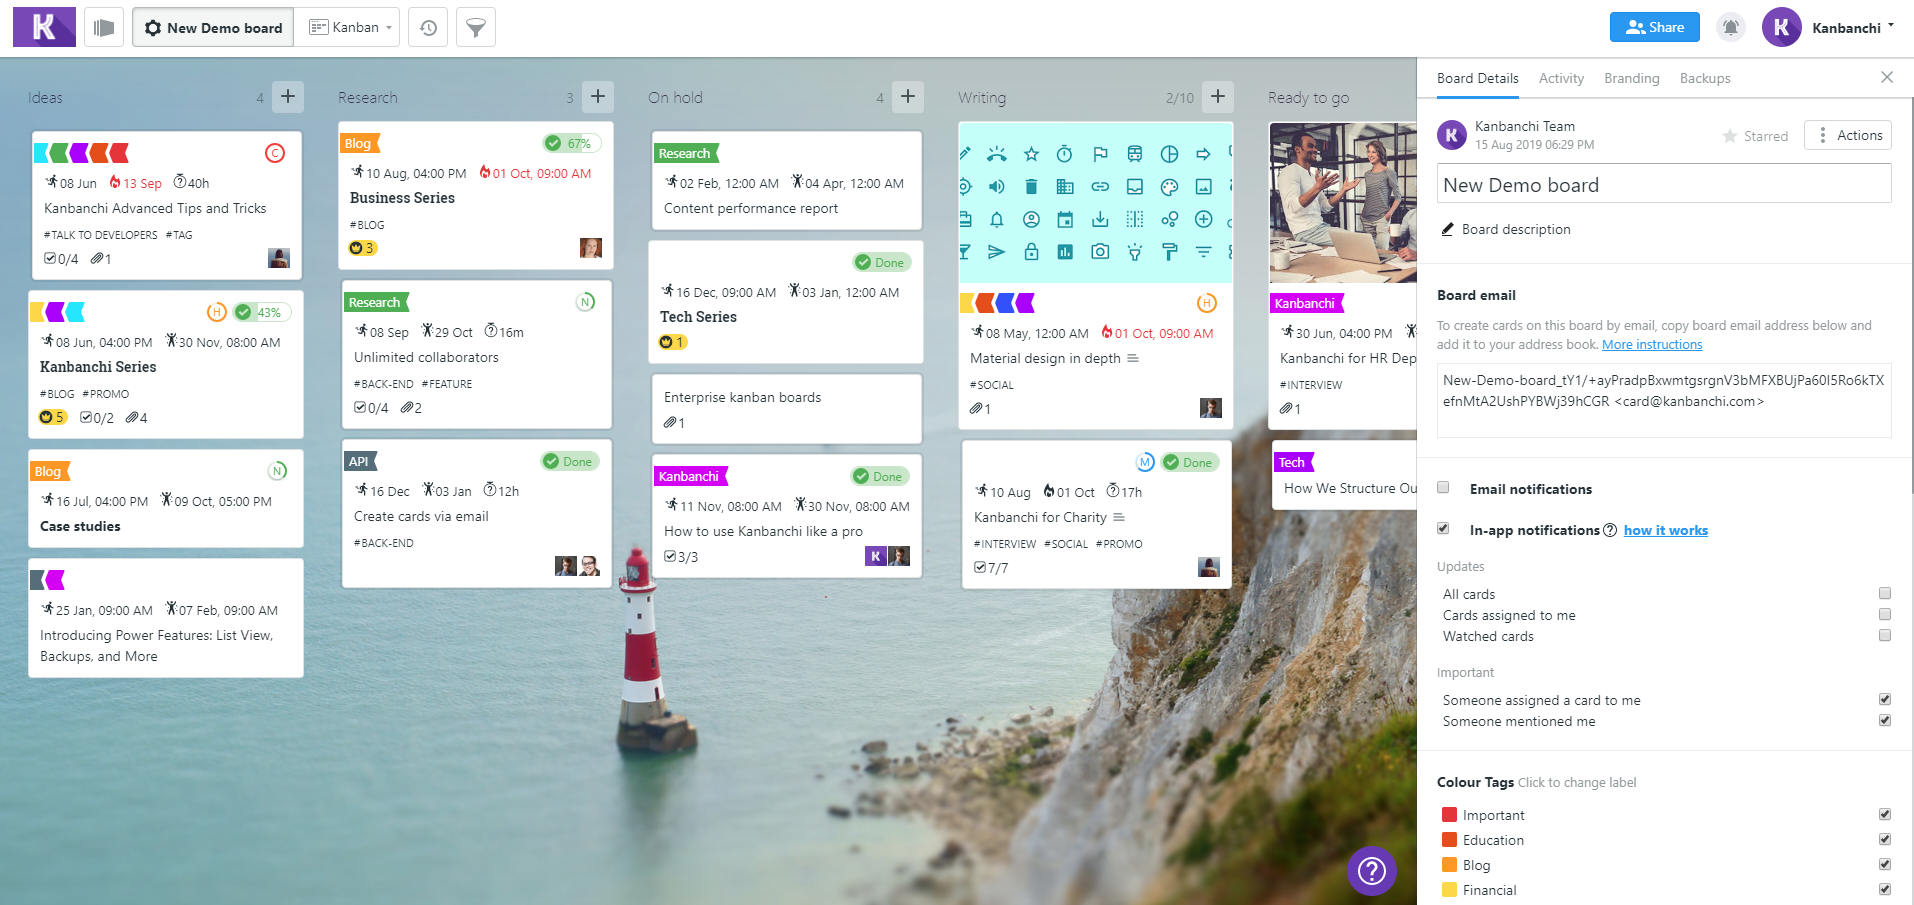
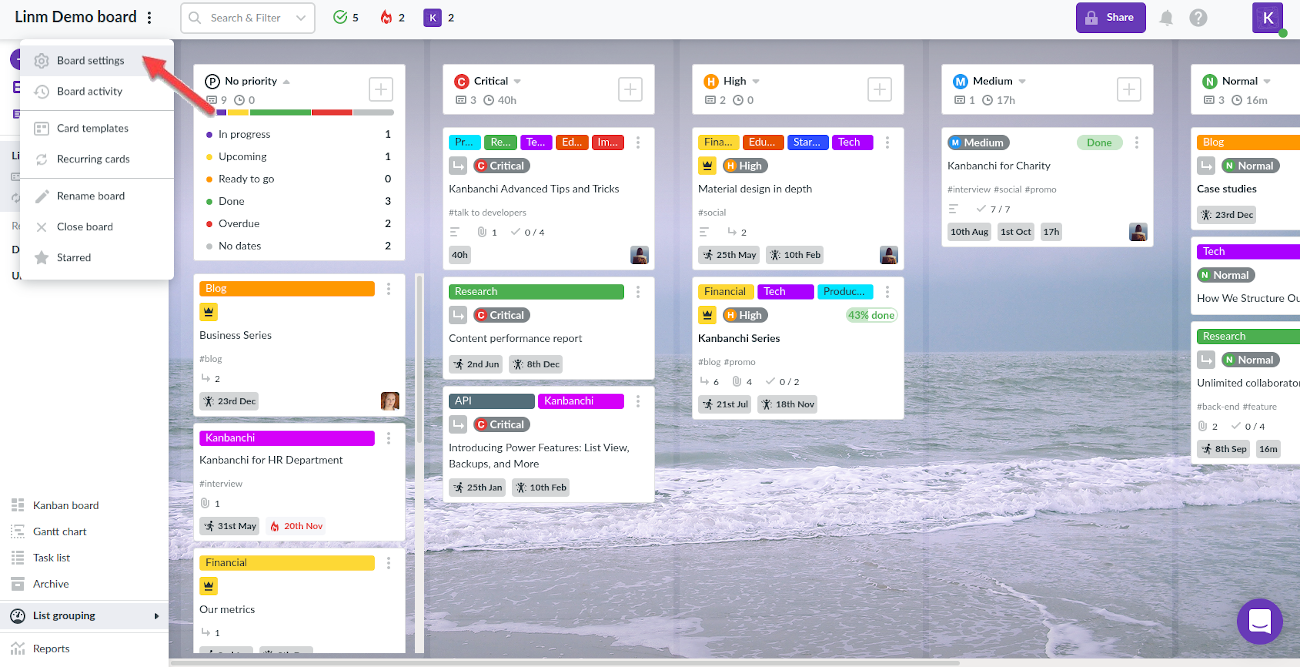
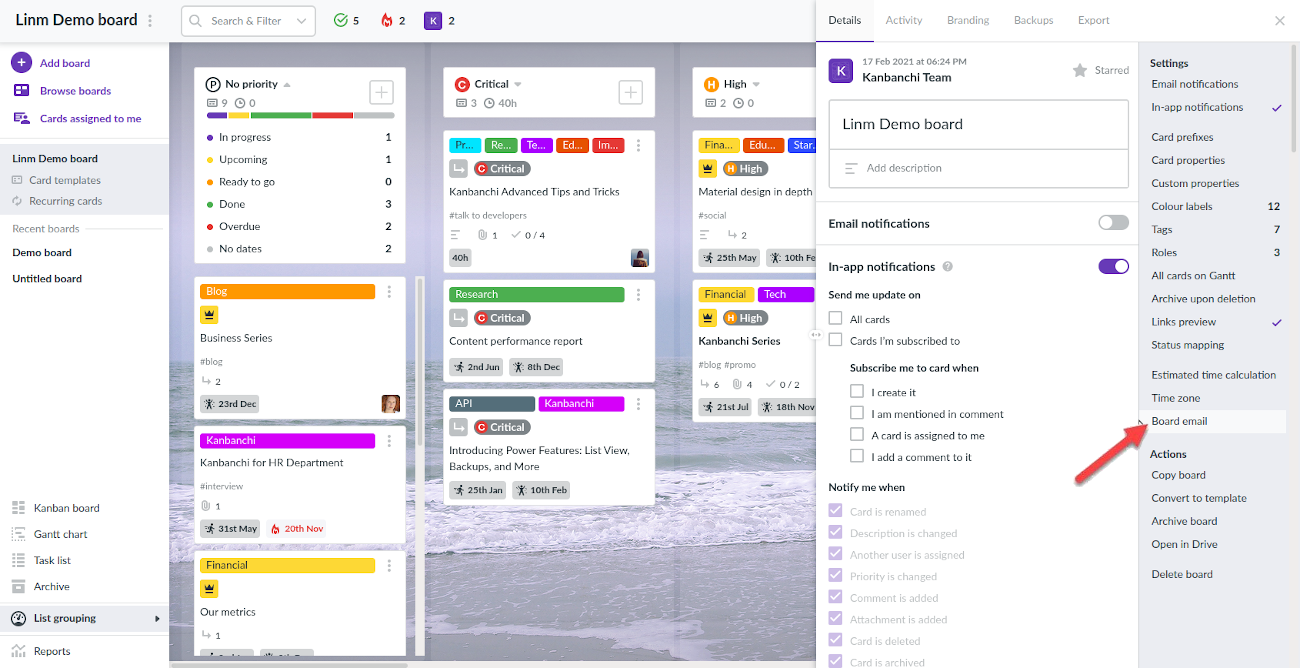
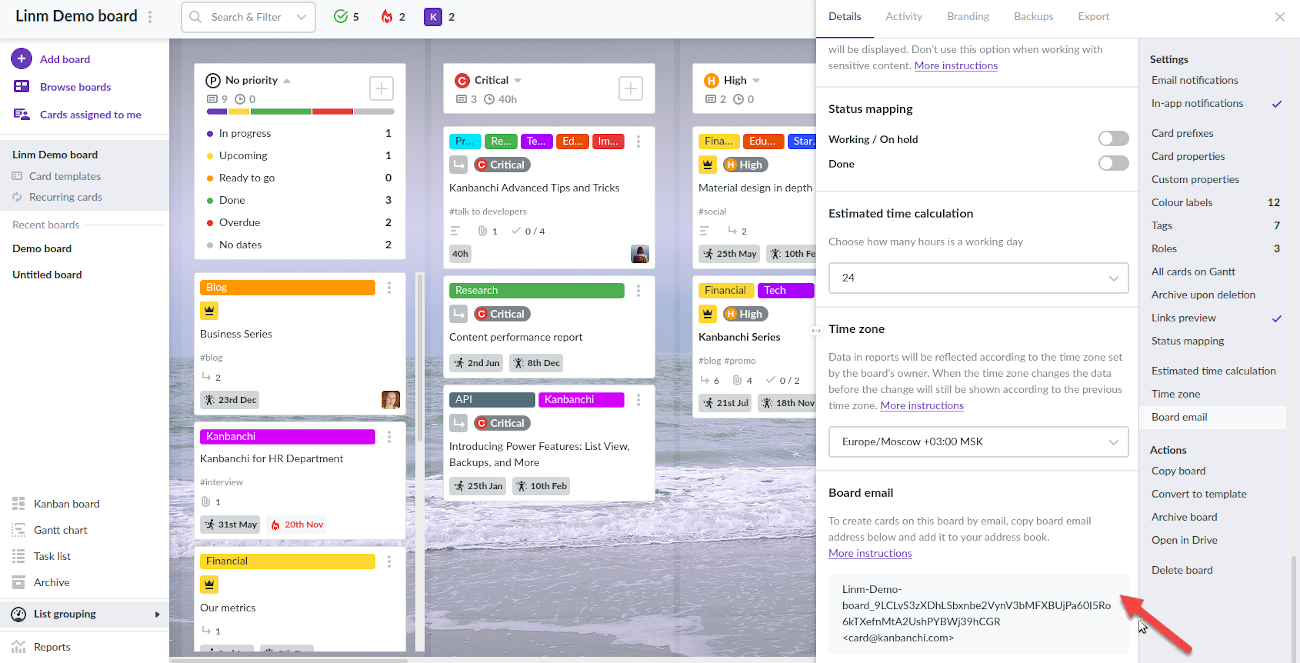
You can create new cards on your boards by email. First, decide what board you want to send cards to by email. Click its title on the top panel to access Board settings.
Once there, find and click Board email on the right panel.
Copy the email address associated with this particular board.
Note: It’s a unique email address for your account, so when you create cards by email, they appear on the board as created by you. Keep it secret and don’t share it with others!
When you send a message using the copied email address, a new card will be created with card title being the subject of your message, and card description – the body of your message. You may add tags to the card placing tag names in the square brackets in the subject of the message and attach files to the message.
Card, that was sent to the board by email will have a tag “from email”.
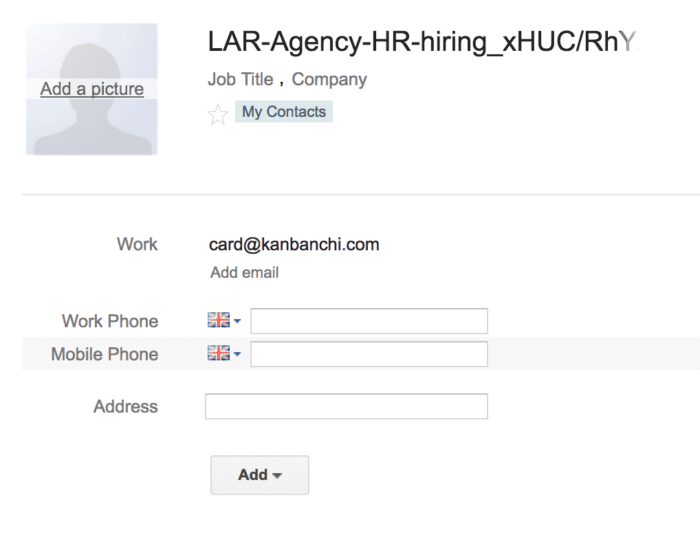
Saving board's email address as a contact
If you're going to use this feature frequently, we recommend saving the board's email address as a contact in Gmail.
Add the first part as a name, and card@kanbanchi.com as an email address.
It shouldn't be any problem, as you can still star such contact and find it in the search field by typing the name of your board.
Please note: some email clients, e.g., Outlook, don't let save contacts with the same email address. These contacts are detected as duplicates. Saving multiple board emails as contacts in Outlook will lead to incorrect card creation.
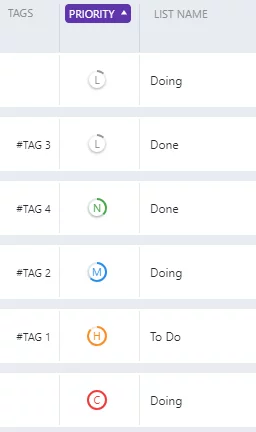
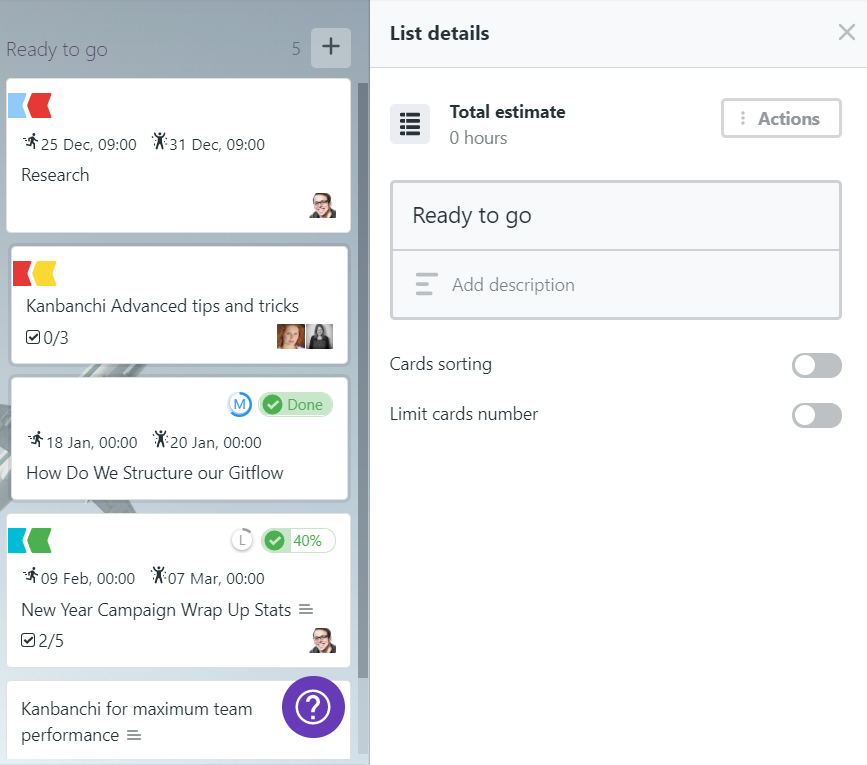
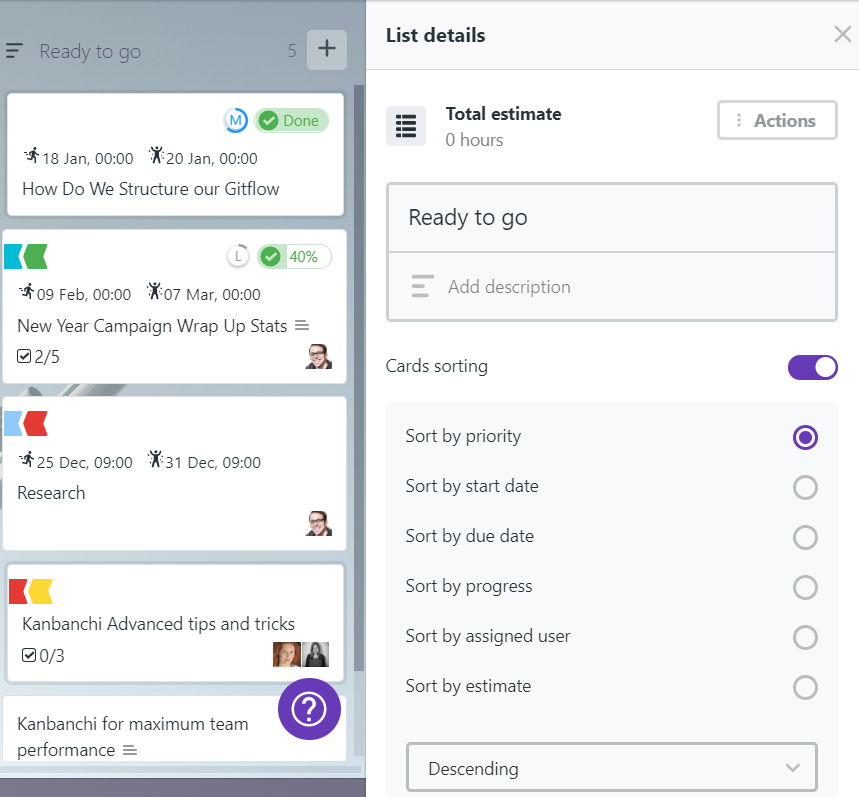
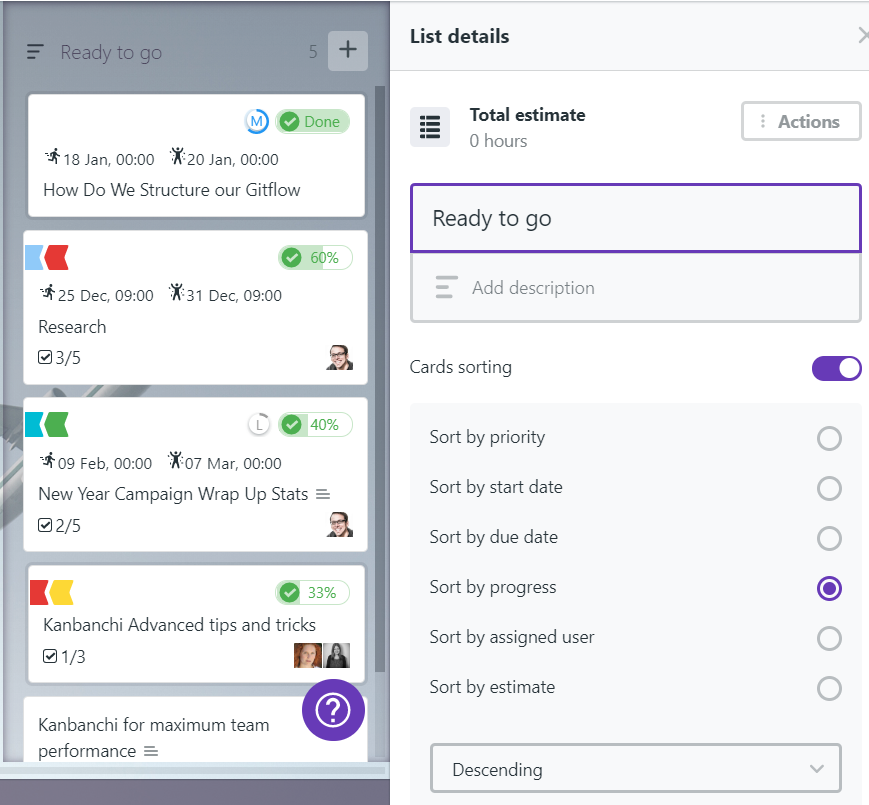
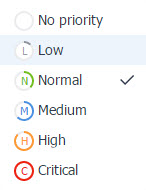
You can set priority to every card that you create. Priorities vary from low to critical.
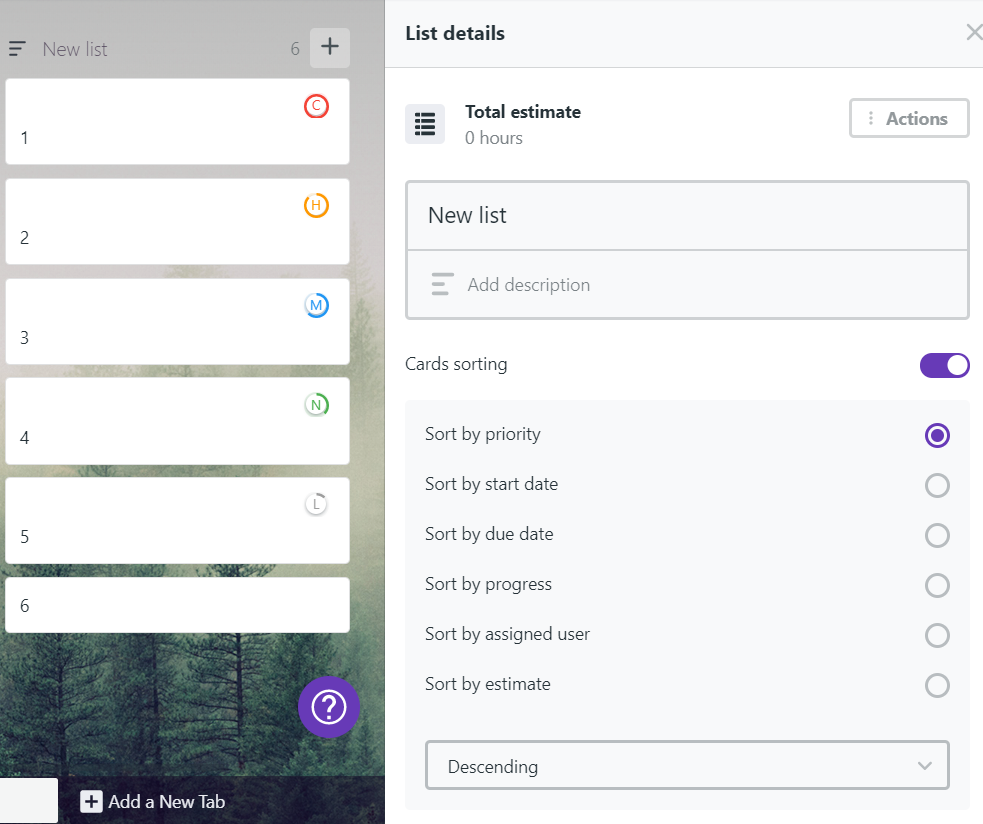
Cards in a particular list can be automatically sorted by priority for you to see the most important cards always on top of the list. Kanbanchi will sort them automatically, without any drag-and-dropping and reordering on your side.
To activate Sorting by priority for a list, go to list settings, turn the cards sorting toggle on and choose Sort by priority.
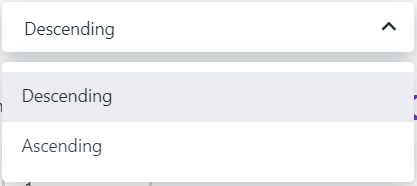
You may also choose the order: descending or ascending.
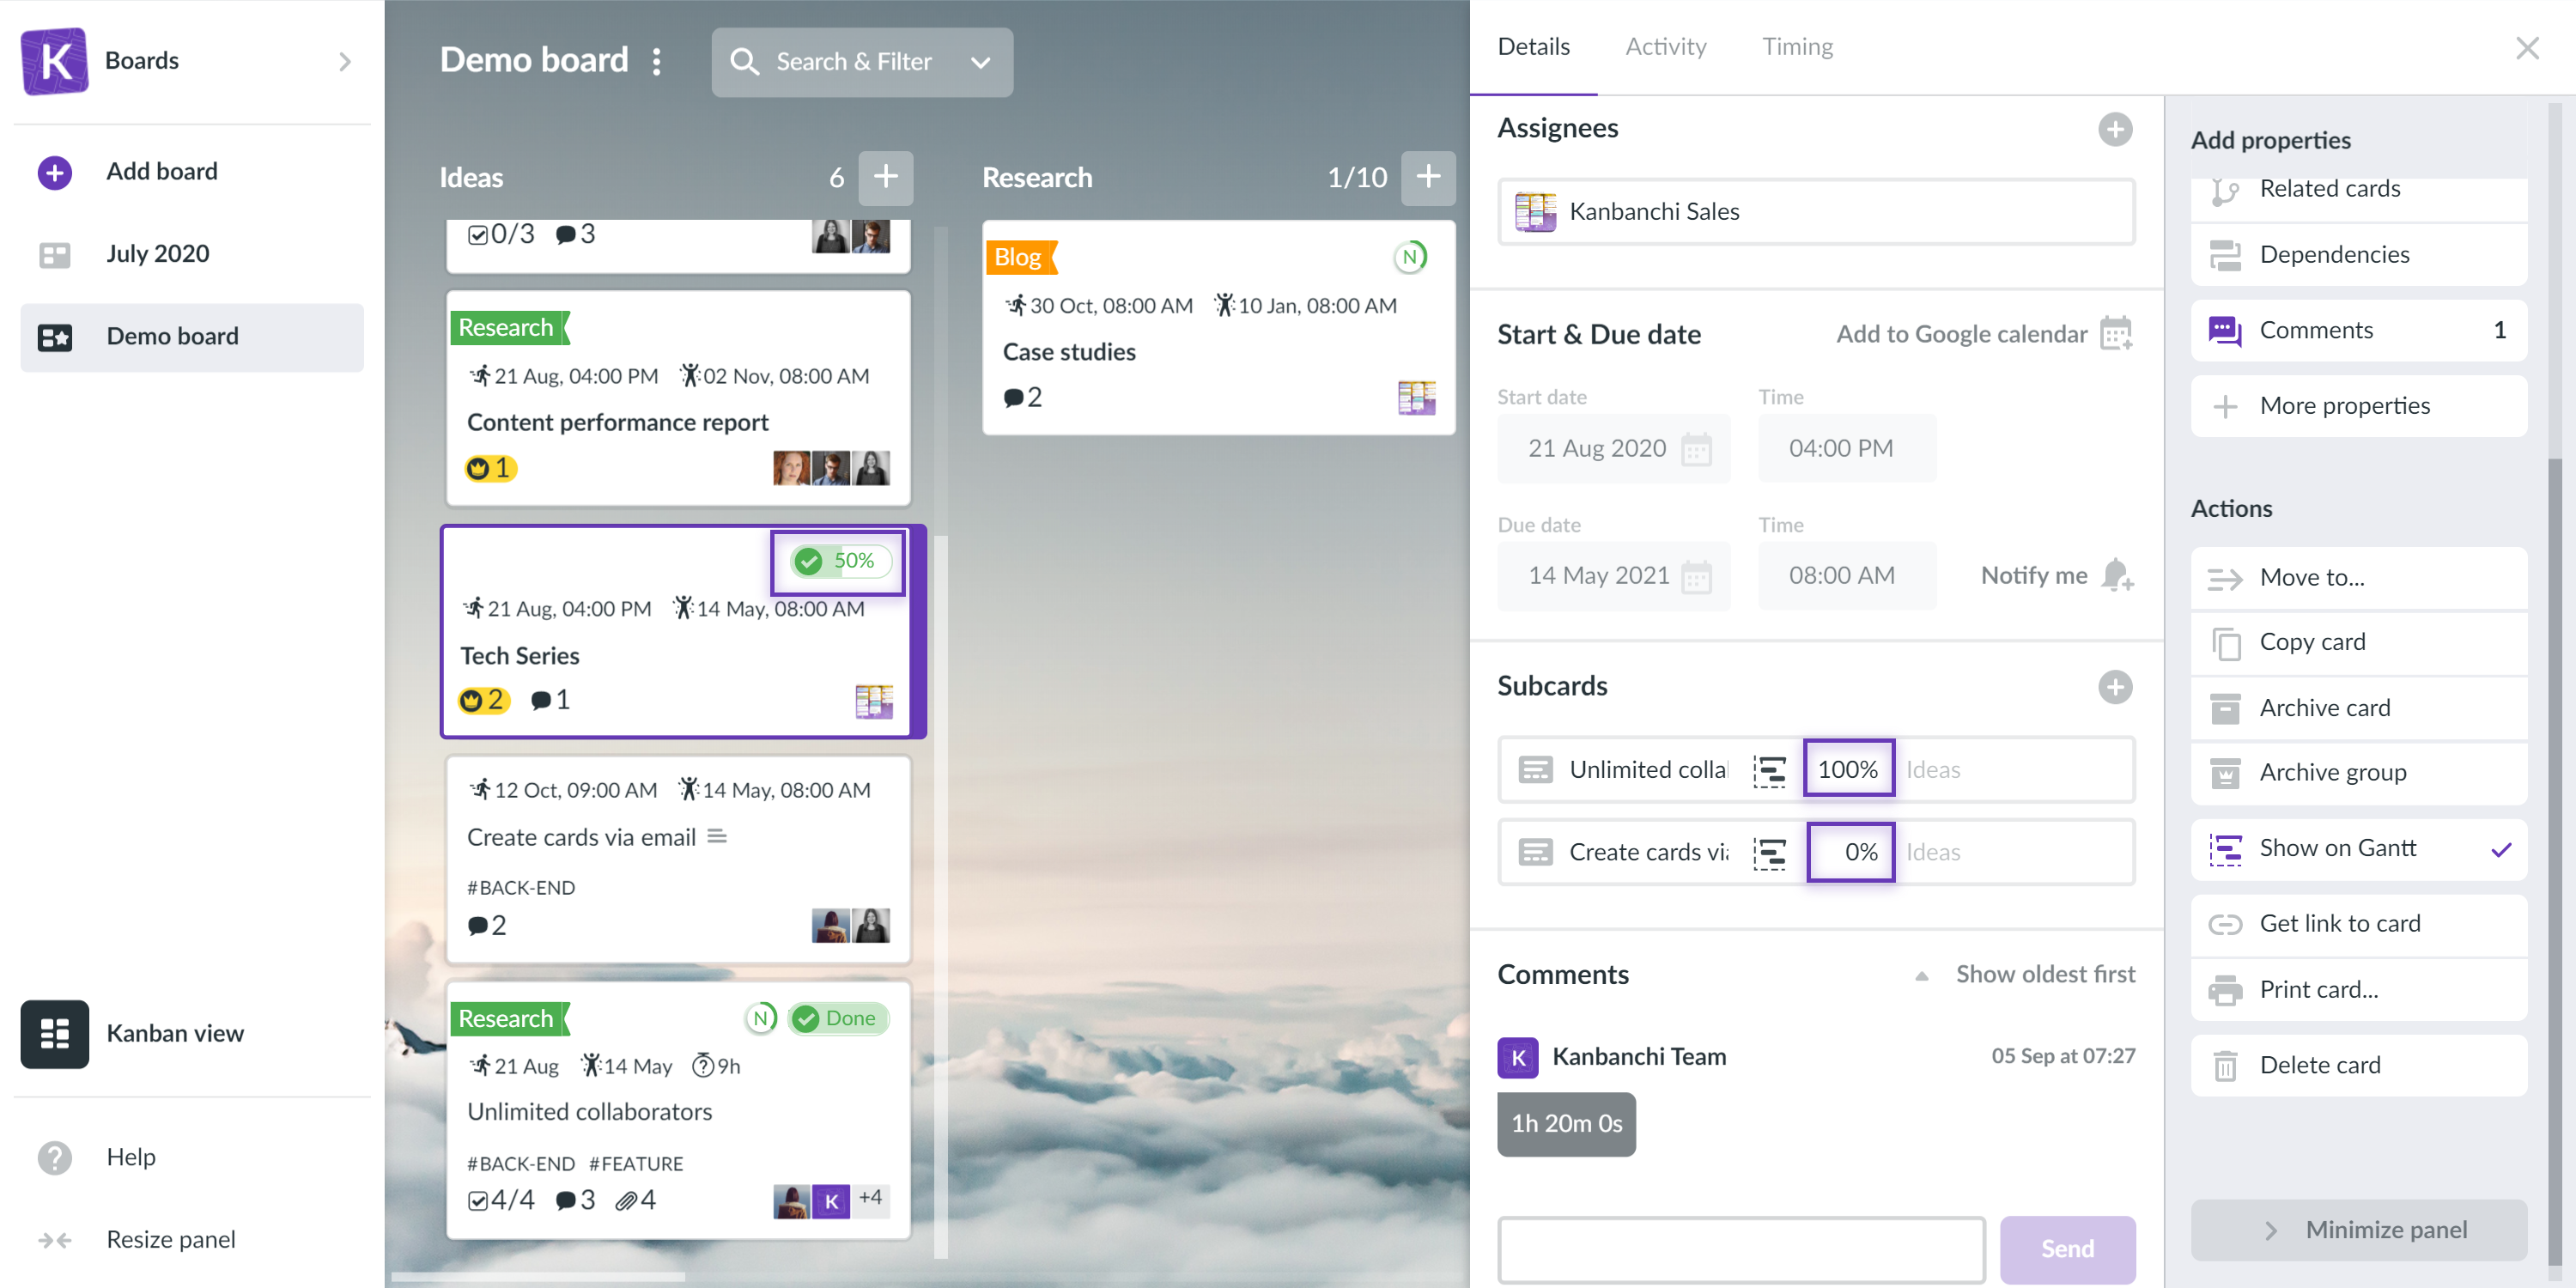
Subcards let you specify your tasks to the level of granularity that you need.
They enhance a simple checklist – each Subcard is a real Kanbanchi card with assignees, due date, comments and all other properties.
The first way to use Subcards is to create subtasks for each of the individual steps in a task. Secondly, you can assign different parts of a task to each person – simply identify the parts of a task each person has responsibility for, and assign those subtasks to their respective owners.
Terminology
Epic Card (Parent Card) — a card, that is broken down into smaller tasks/pieces of information – subcards.
Subcard – a card, that is a part of a larger process. For example, there's one task – release a new version of the product. A product manager has to define requirements, designers – to develop an interface, developers – to code and testers – to report all bugs. Maybe marketing people shall write a relevant Facebook post? Great – that’s another subcard! :)
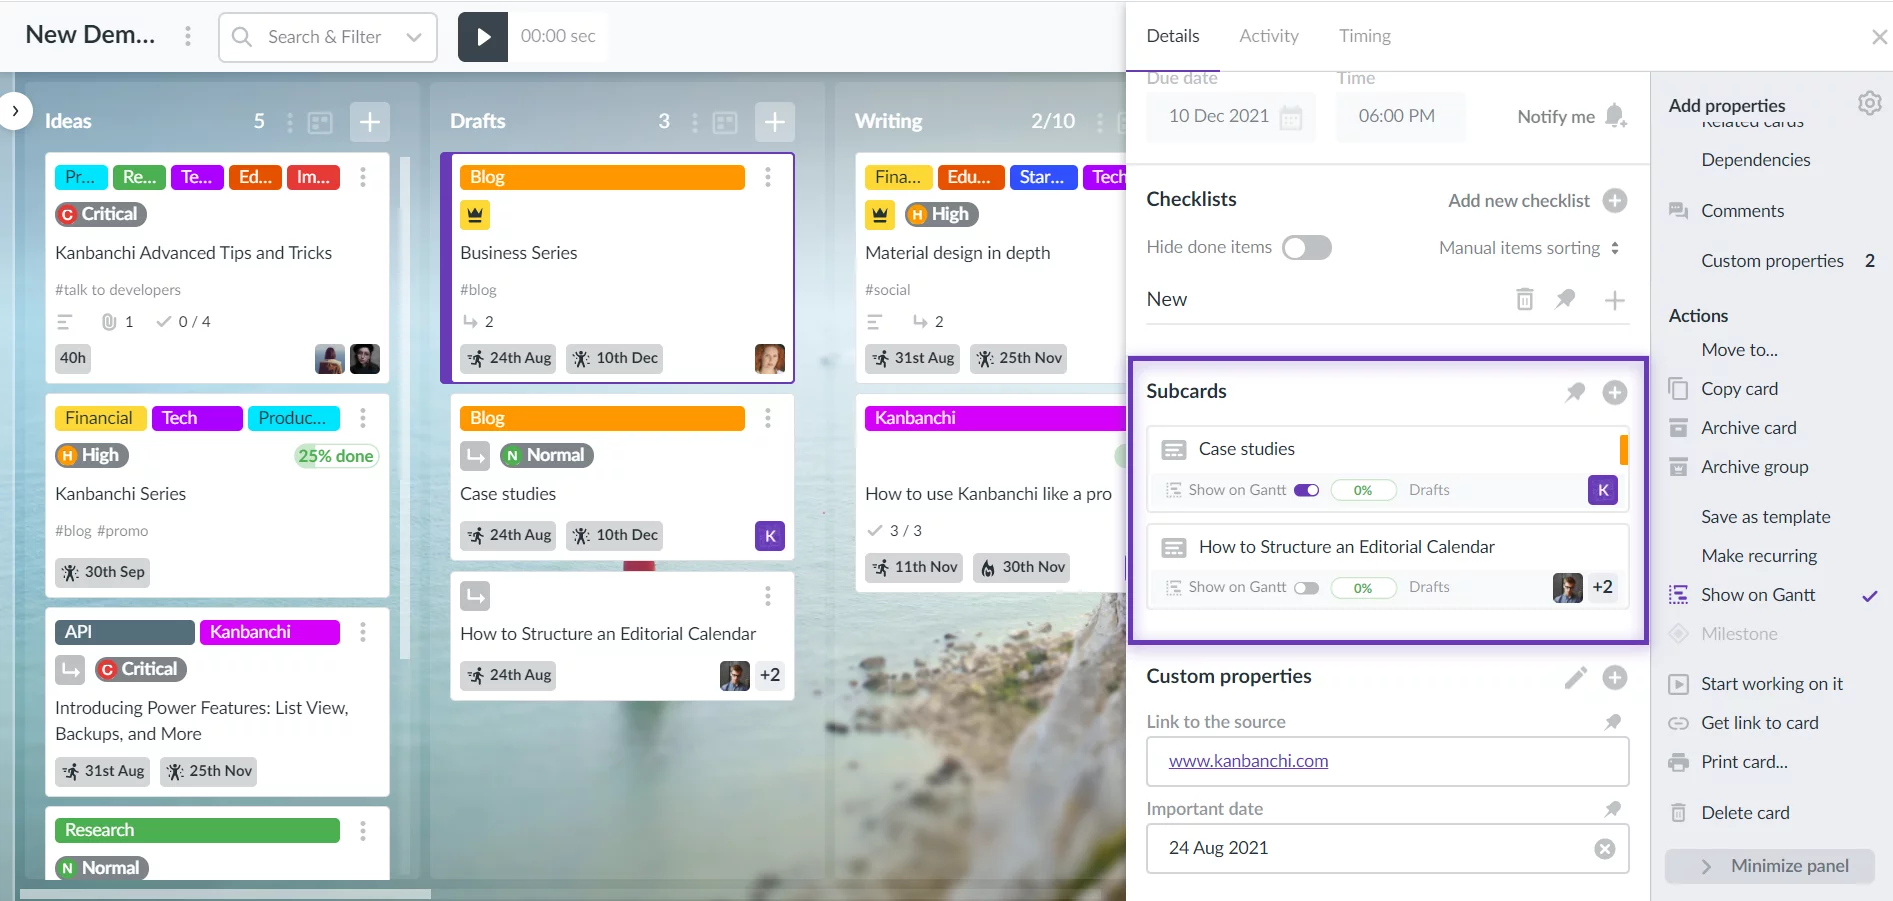
Add Subcards
To add a subcard click Subcards button in the card details panel. Start typing to choose subcard from existing dashboard cards, or type and hit Ctrl+Enter to create a new card. A new card will be created in the same list, where epic (parent) card is located.
Subcard Details
Subcards function like independent cards in Kanbanchi with all the same fields and properties, the only difference is that they’re embedded within an epic (parent) card.
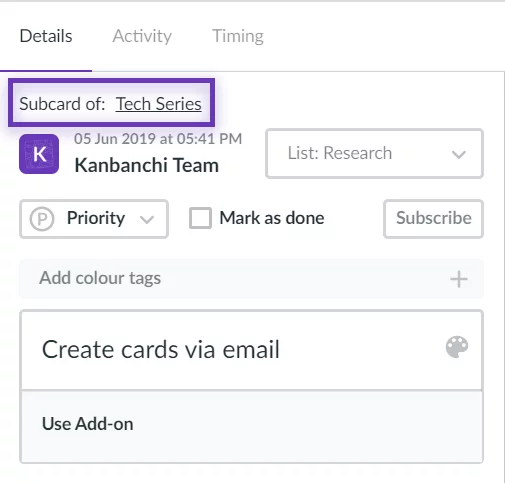
You can access its epic (parent) card quickly by clicking the link to its epic card, located above the card title.
Completing an epic card will not complete the subcards within it, and vice versa, so they will need to be marked as done separately.
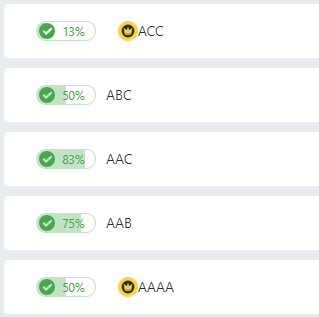
Epics and Subcards Appearance
Epic (parent) card has a special crown icon, which can help you easily identify it on the dashboard. It is followed by the number of subcards it has. You can see epic cards instantly also because they have a different font and larger font size. Subcards, in turn, look like ordinary cards but have a grey border.
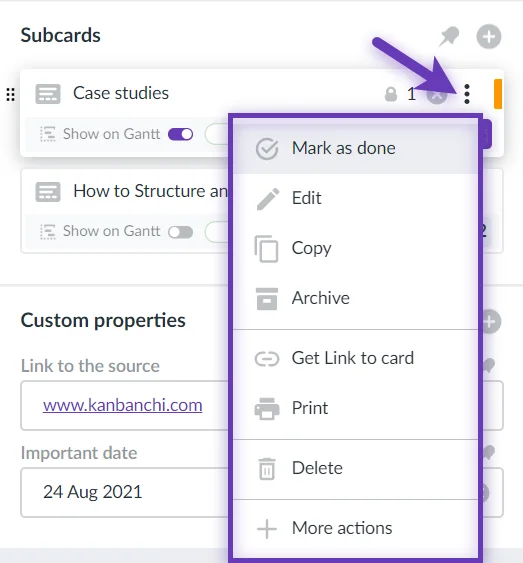
Editing and Removing Subcards
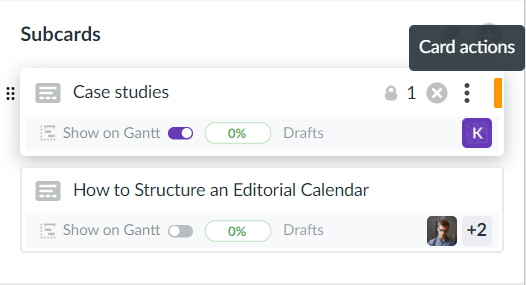
In the card details panel of the epic card, you can see its Subcards, and title of the list each subcard is located at the moment.
You can change the position of the subcard within the subcards list by drag-and-drop.
Additionally, you may hover a subcard and click the three-dots icon to see the actions you may perform to the card.
To remove a subcard, click hover it and click . The connection will be broken and that subcard will become an ordinary Kanbanchi card. If you remove all subcards from the epic card, it will turn into an ordinary Kanbanchi card.
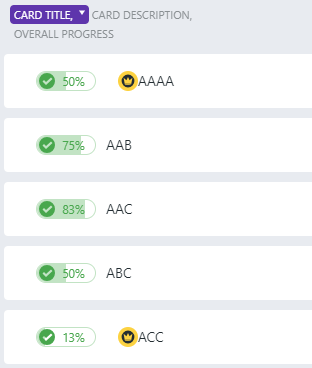
How is progress calculated?
Epic progress is determined by its checklist and the progress of its subcards. Monitor easily how the task goes by looking at the epic card progress.
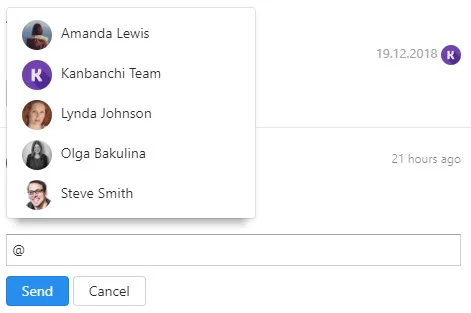
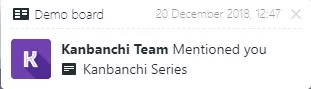
If you want to make sure your colleague will surely see your comment, you can mention them using @ and then typing their name. Just as you used to do it on Facebook or Twitter ;-)
When you insert @ symbol you will see a drop-down list of all users on board. Choose the person you want to mention.
If your colleague turns on notifications, they will receive it and will quickly respond to your comment.
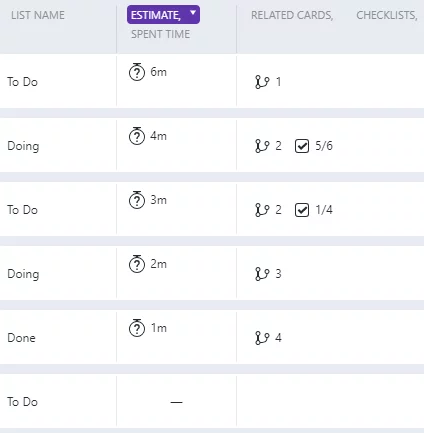
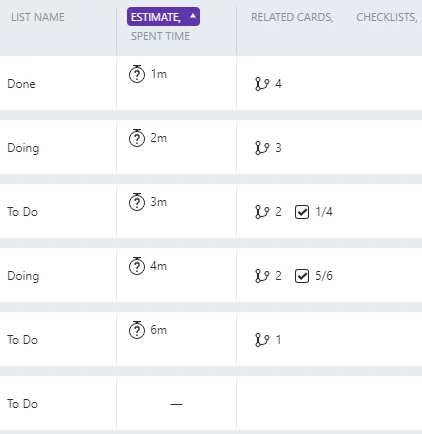
55. How can I sort cards by priority in the List View?
To sort cards by priority in List view click Priority. The first click enables sorting from Critical to Low priority; cards without priority indication are shown as well.
The second click enables sorting from Low to Critical priority; cards without priority indication are shown as well.
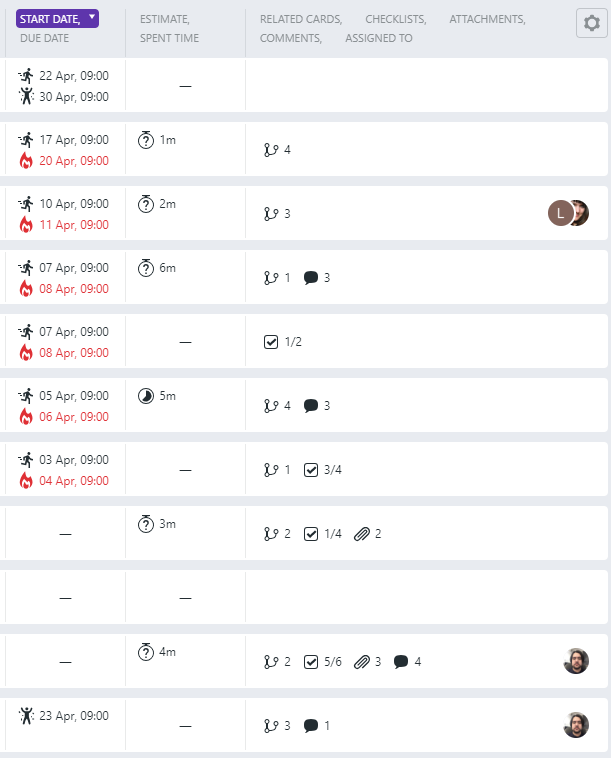
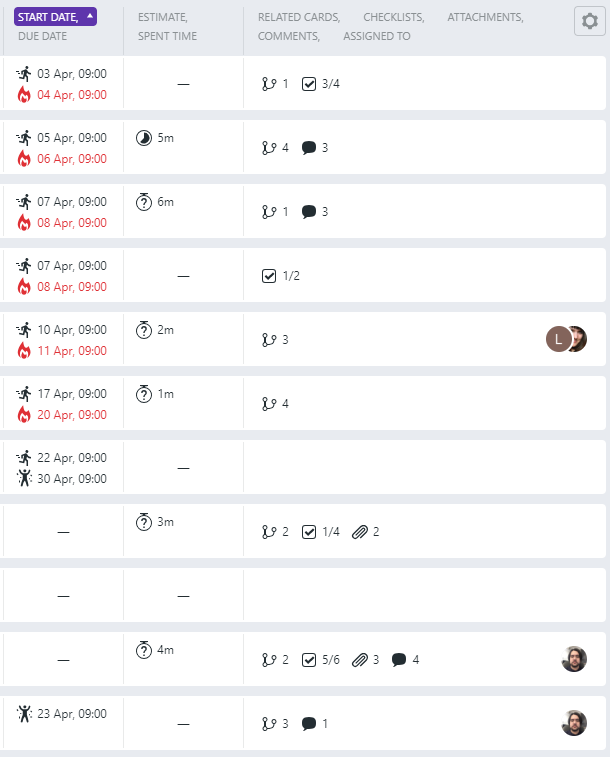
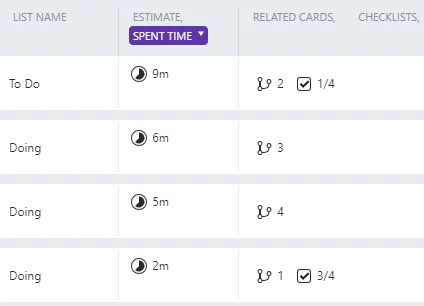
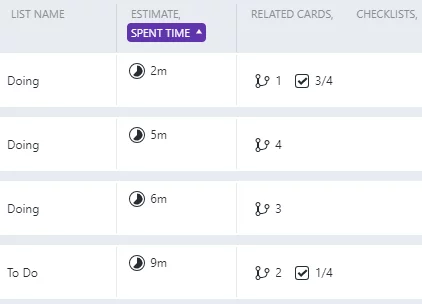
56. How can I sort cards by start/due date in the List View?
To sort cards by the start date in the List view click Start date. Cards will be sorted according to the start dates set in them. The first click enables sorting from the remotest date to the closest date.
The second click enables sorting from the closest date to the remotest date.
The third click disables sorting.
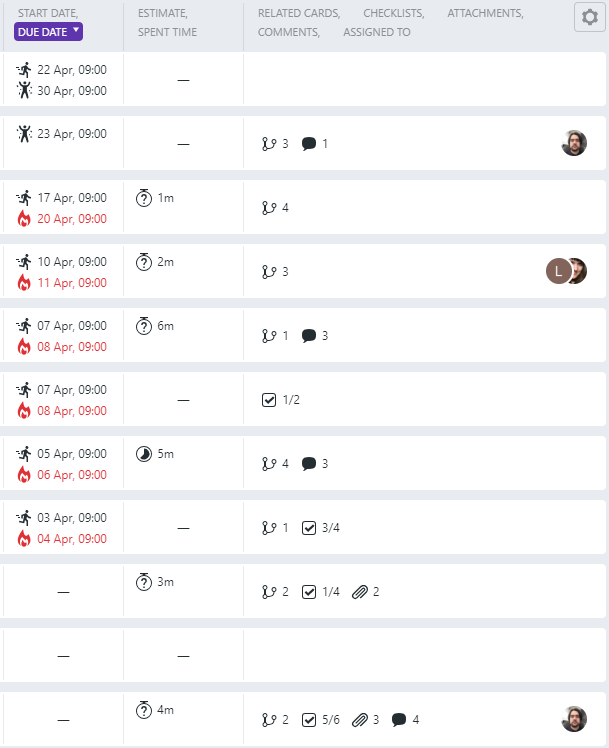
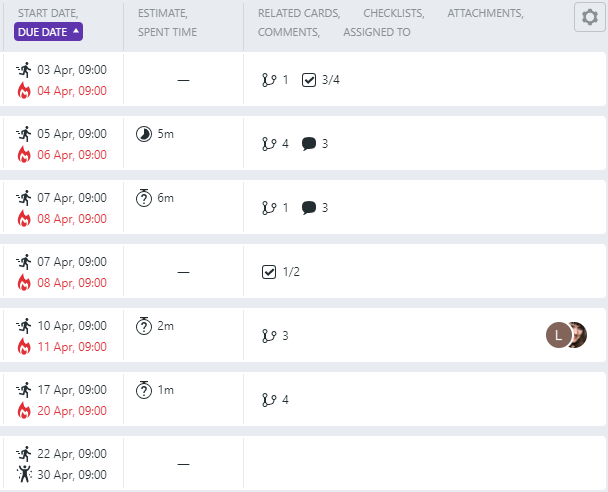
To sort cards by the due date in the List View click Due date. Cards will be sorted according to the due dates set in them.
The first click enables sorting from the remotest date to the closest date.
The second click enables sorting from the closest date to the remotest date.
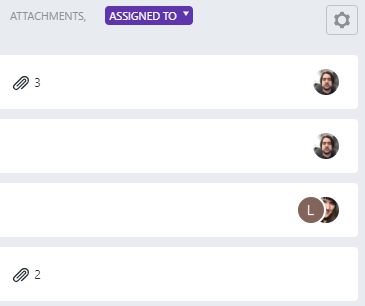
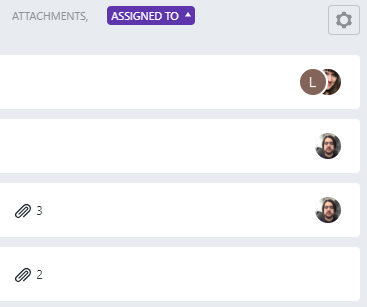
59. How can I sort cards by person they are assigned to in the List View?
To sort cards by “Assigned to” criteria in the List View click Assigned to. Cards will be sorted in alphabetical order. The first click enables sorting in A-Z order. Unassigned cards are shown as well.
The second click will enable sorting in Z-A order. Unassigned cards are shown right after.


 Marketplace apps.
 .
.


 and select users from the drop-down list.
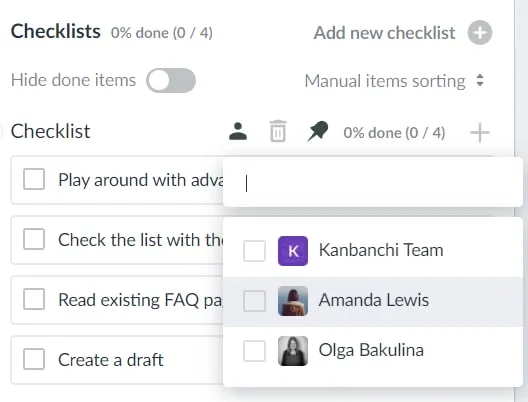

 and choose the appropriate value.
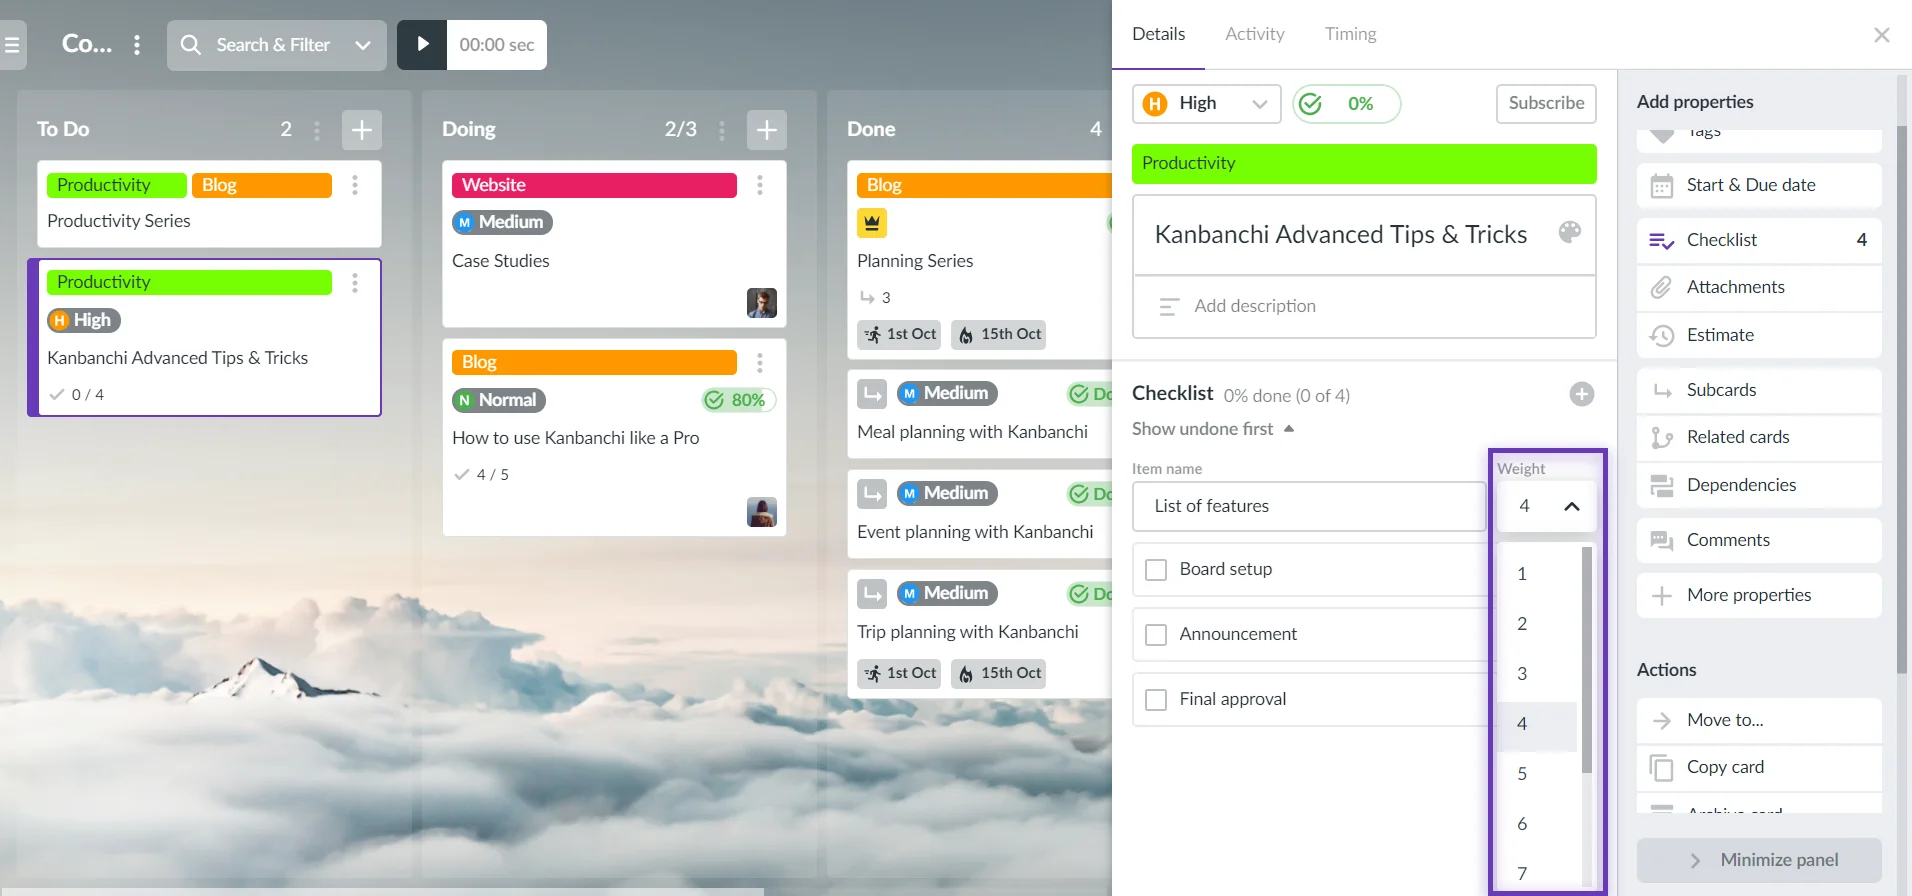


 You must have permission from the file owner to the file.


 . The connection will be broken and that subcard will become an ordinary Kanbanchi card. If you remove all subcards from the epic card, it will turn into an ordinary Kanbanchi card.