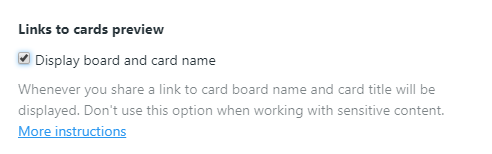
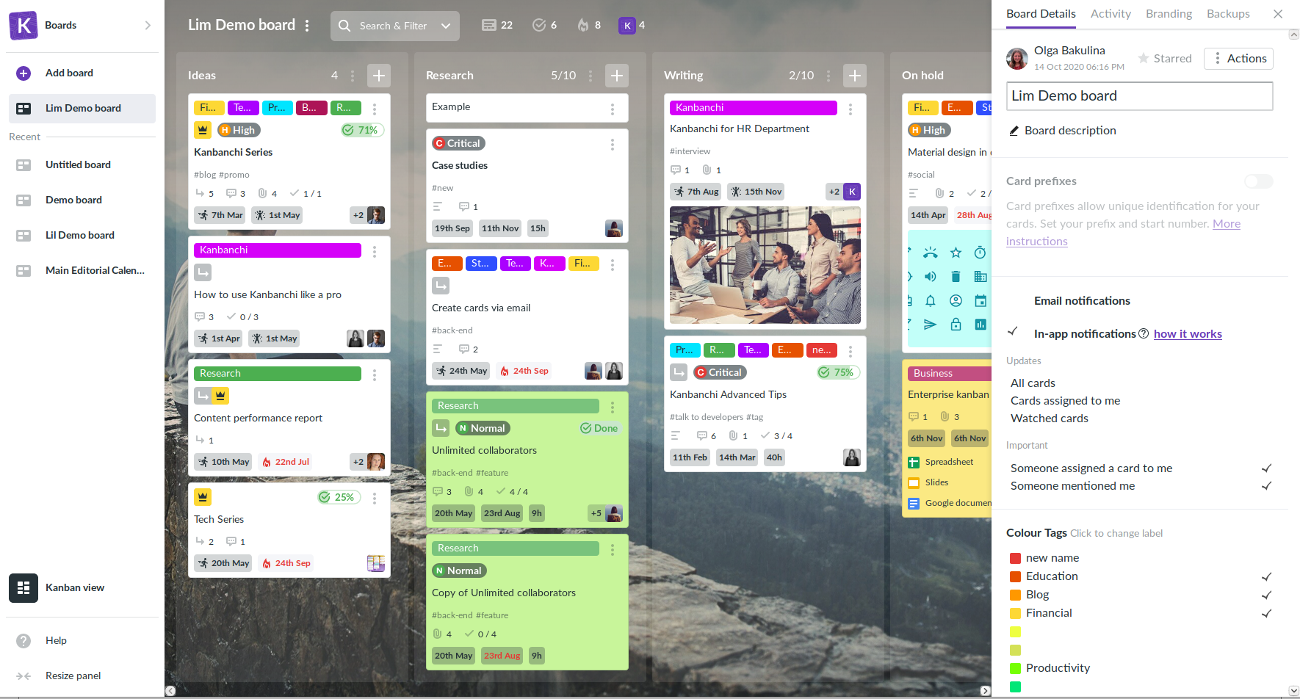
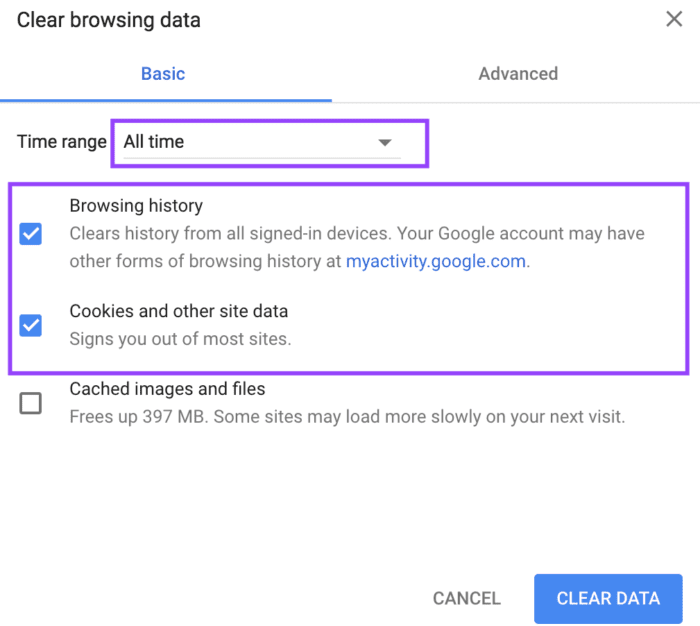
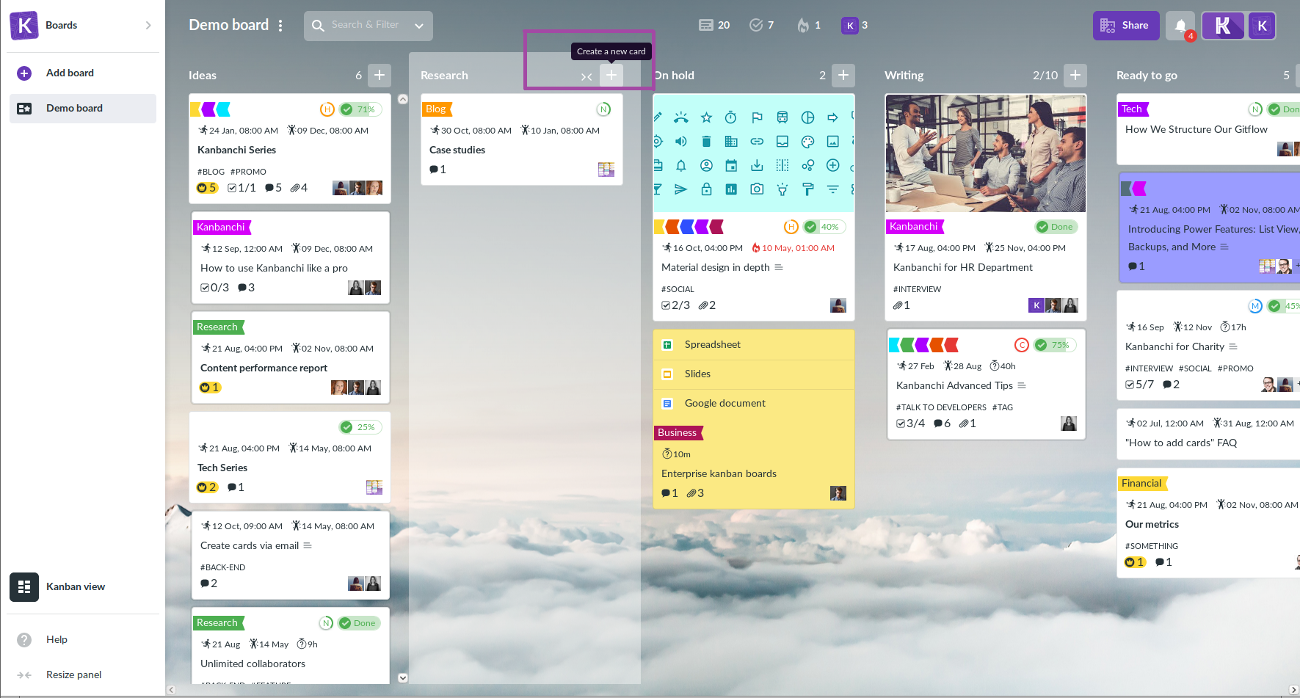
If you are a board's owner you may decide what data links to cards will contain. By default, no data is represented while sharing a link to card. But in case you want your team to preview the link's content you may use the links to cards preview setting in boards setting.
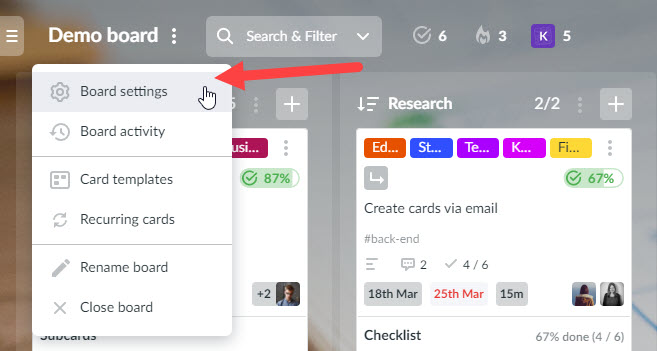
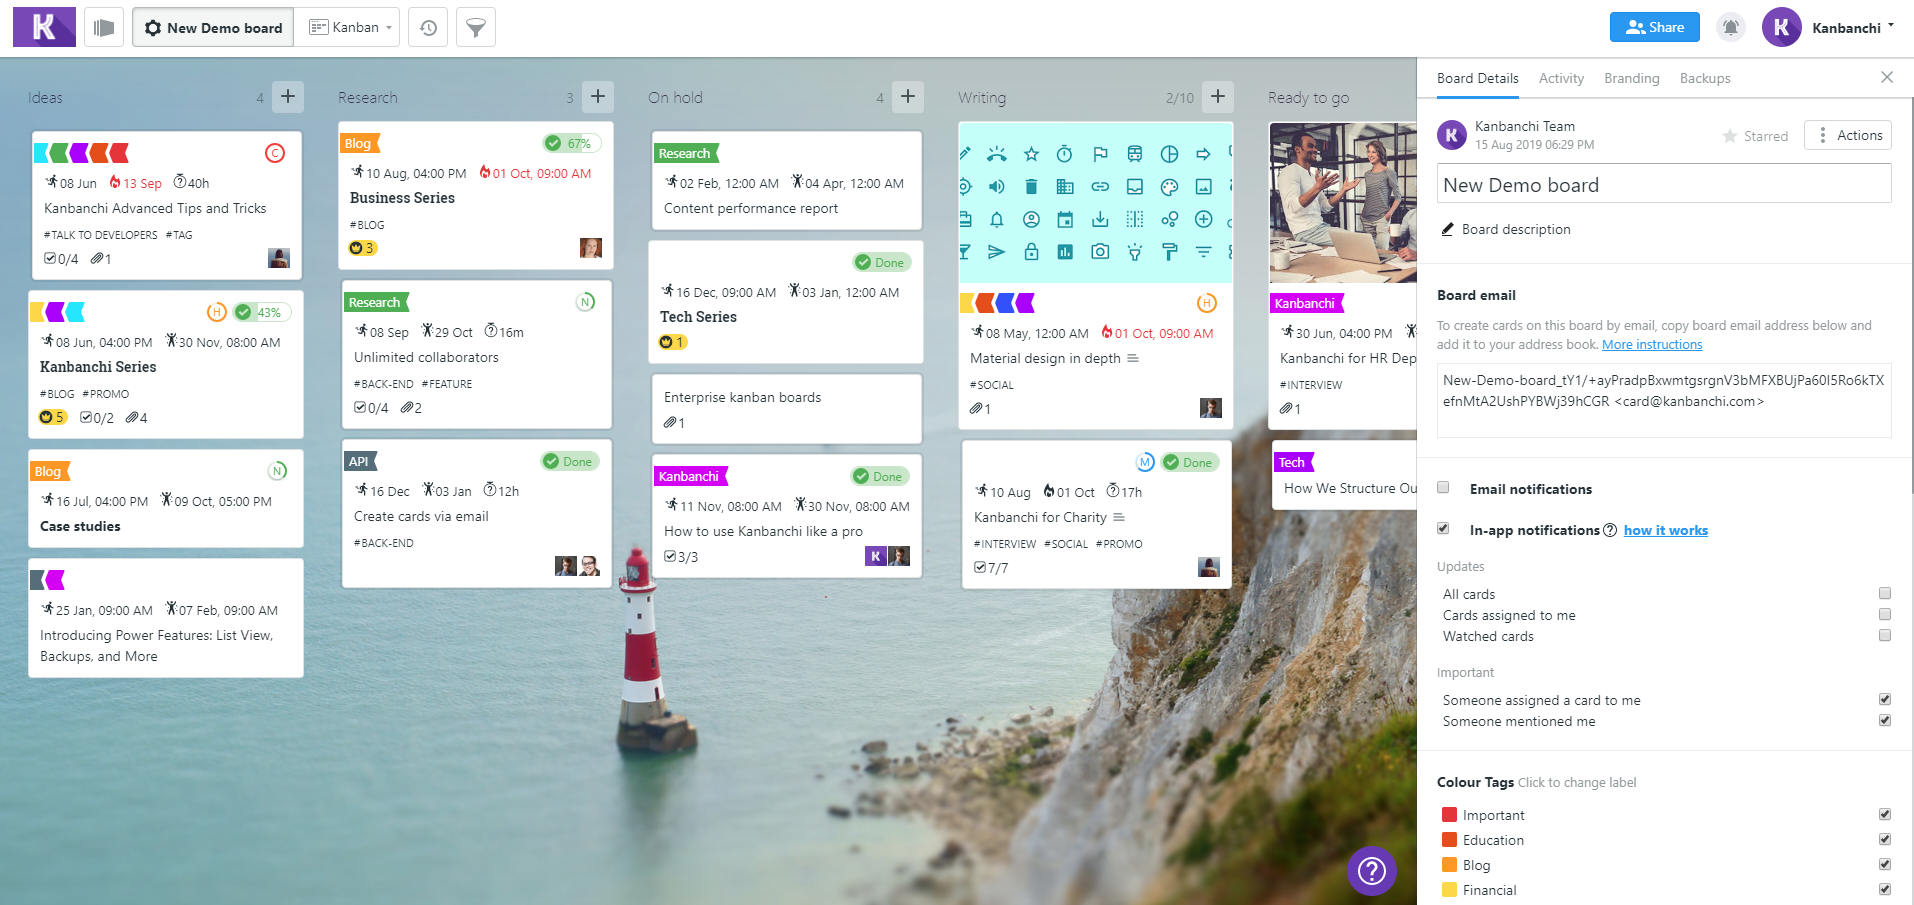
Open the board's settings by clicking the board's name.
The right-side panel with board's setting is opened.
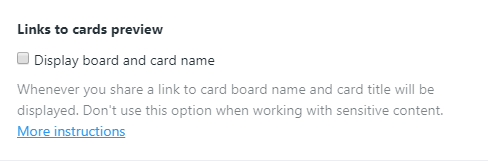
Scroll down to the bottom of the panel. Find Links to cards preview option.
Check the checkbox.
Note, don't use this option when working with sensitive content.
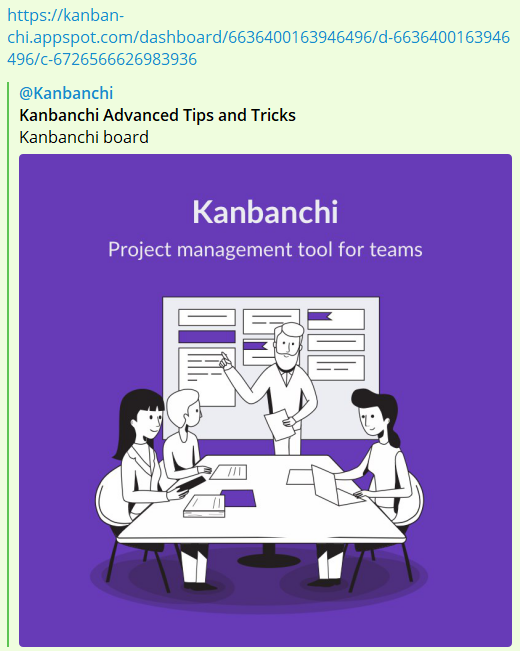
What information the link will contain?
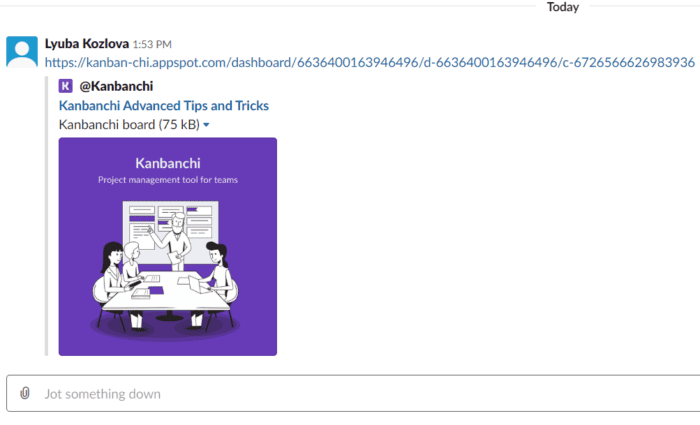
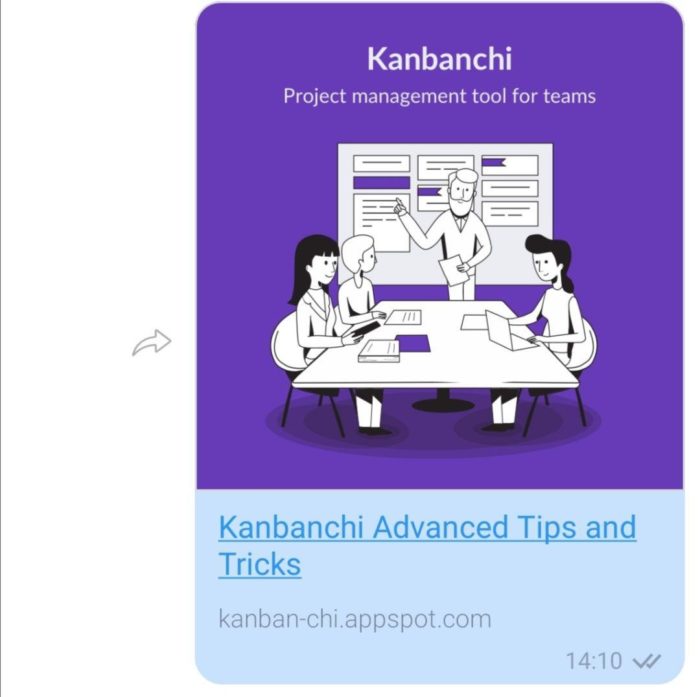
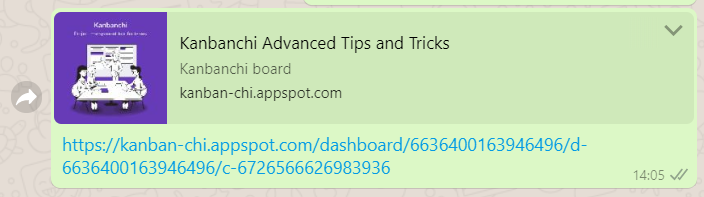
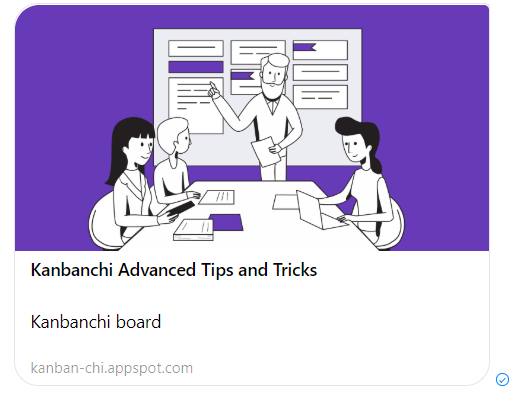
Sharing the link you will let your teammates preview the card's name and the board's name. Here are screenshots from different social media chats and messengers:
Telegram
Slack
Viber
WhatsApp
Facebook
LinkedIn
Please, contact us indicating what social media or messenger you've used if the feature doesn't work for you.
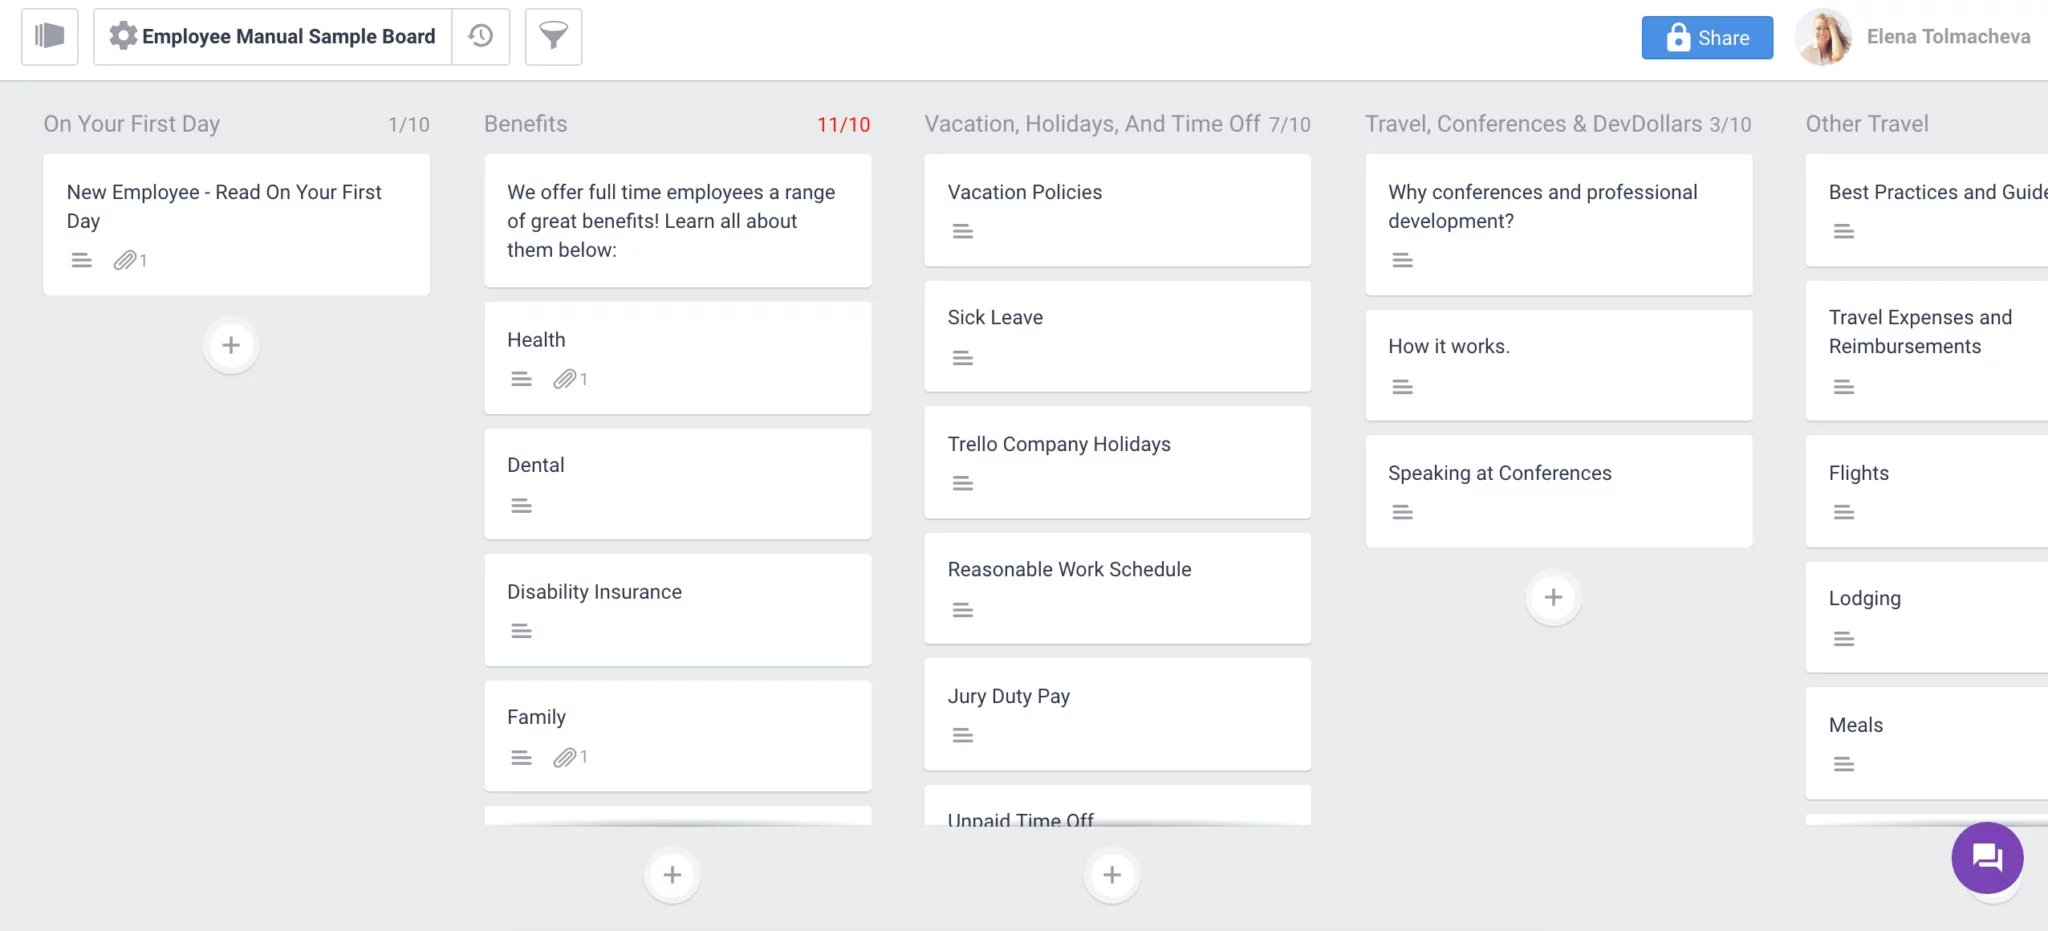
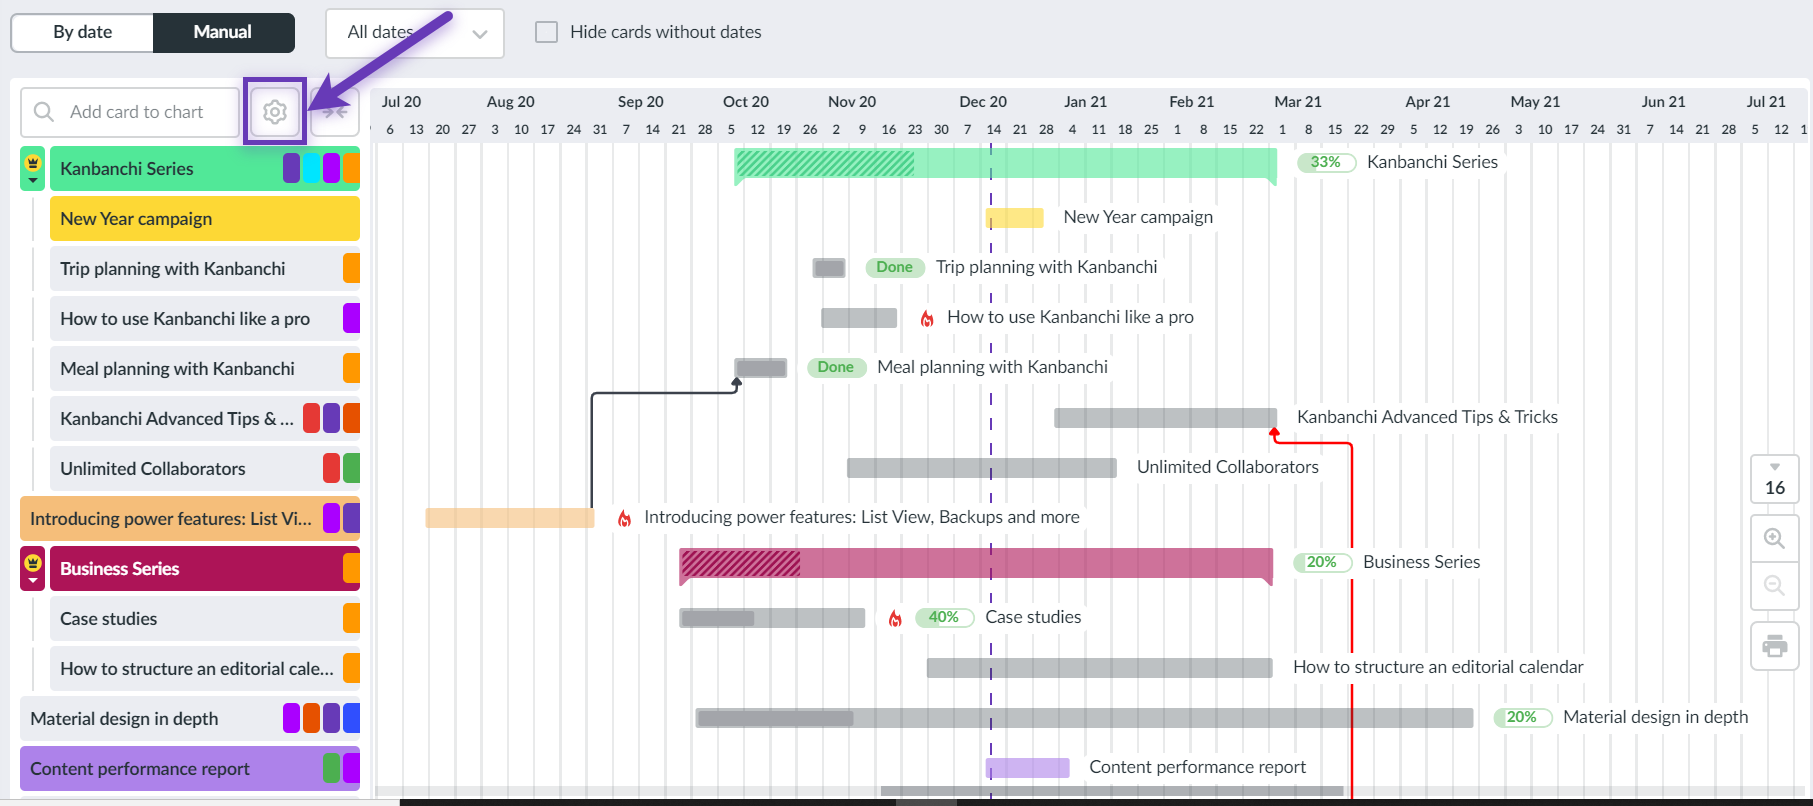
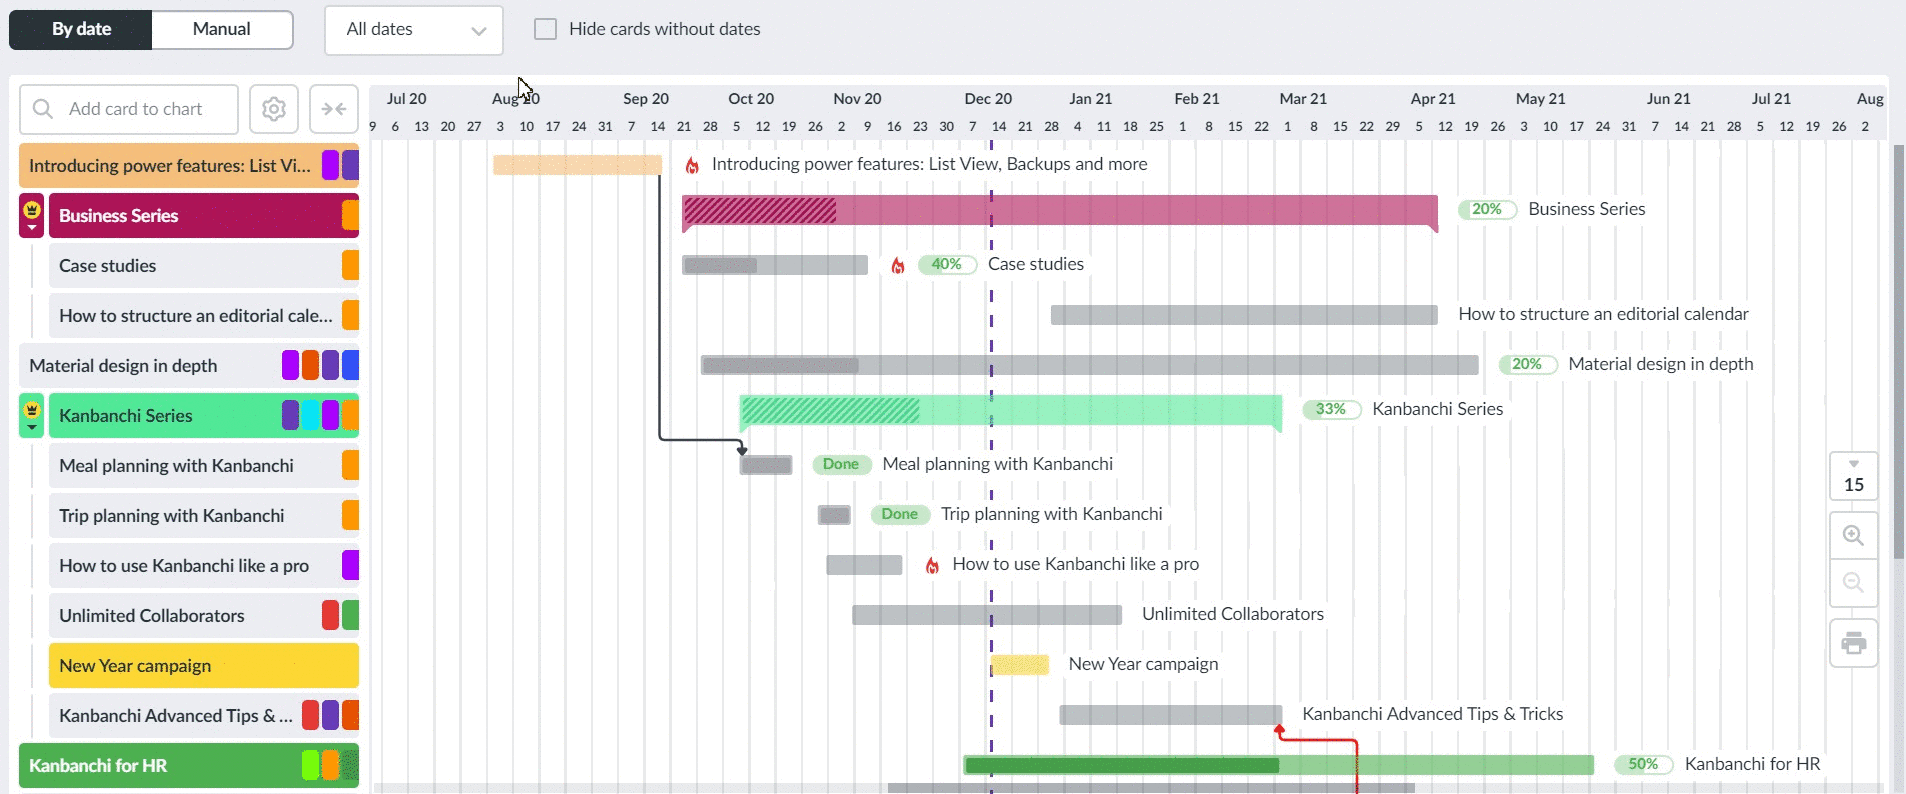
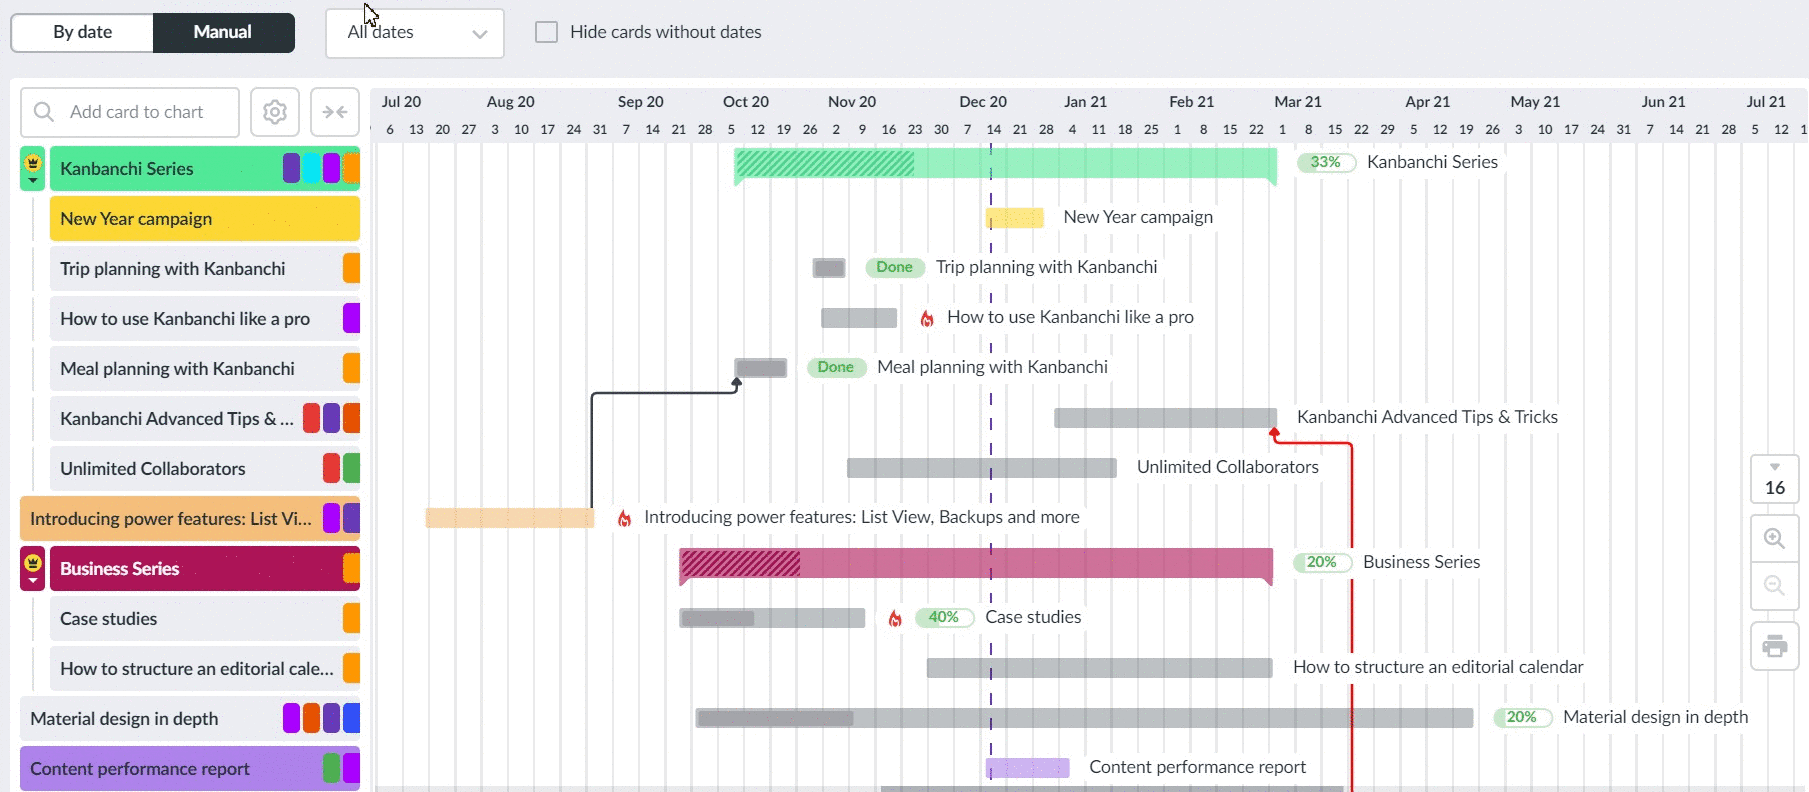
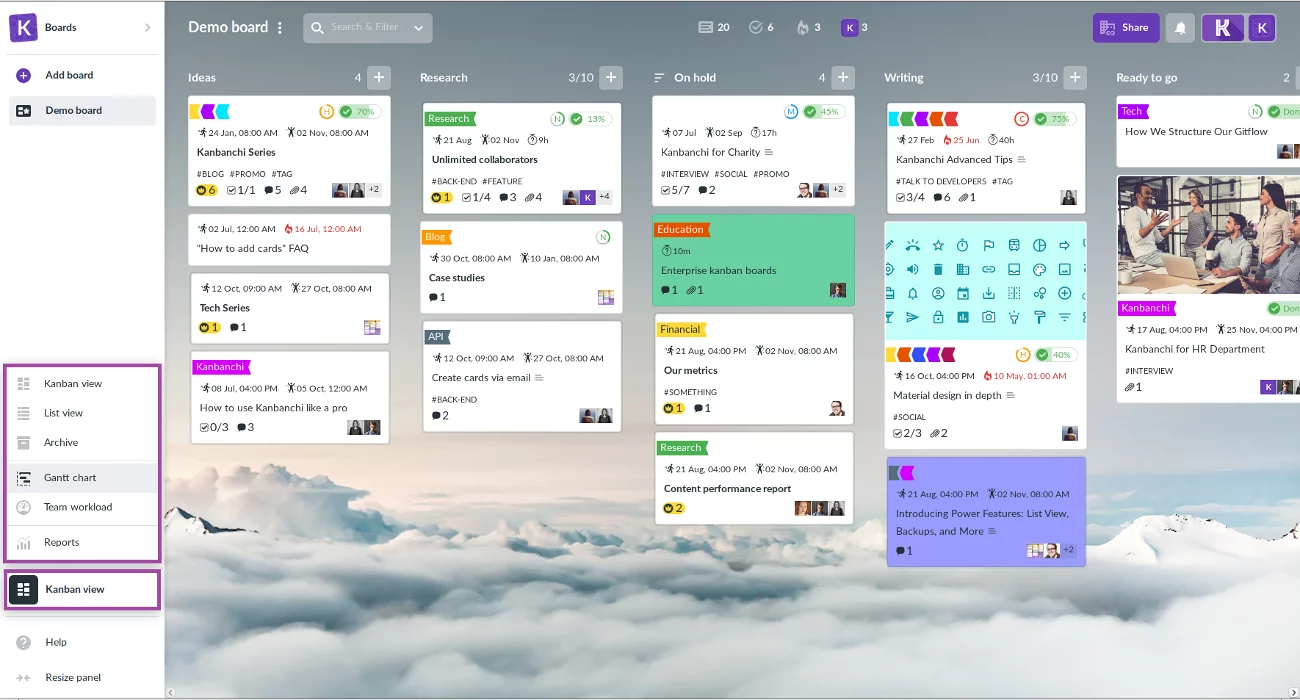
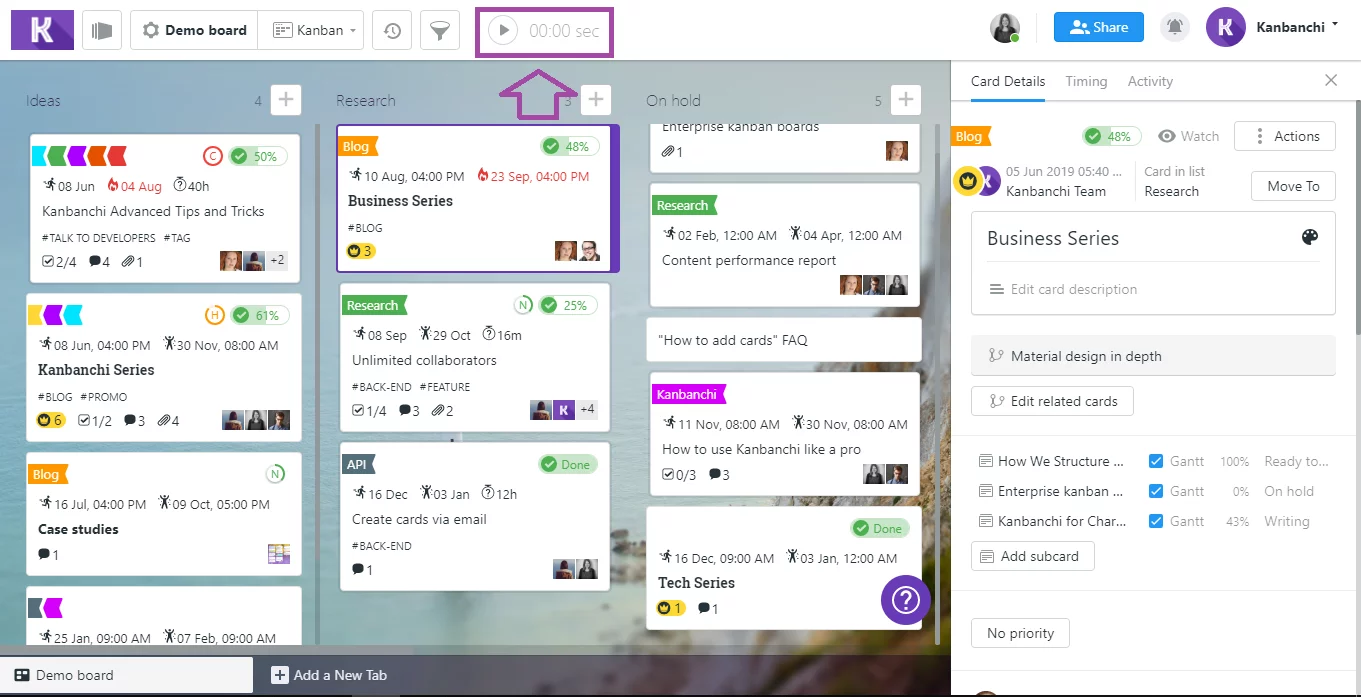
When you switch to the Gantt chart in Kanbanchi you will see a left-side panel with the list of your cards. The panel is customisable. You may select to display the following information:
Card description
Priority
Progress
List
Tags
Estimate
Spent time
Assignees
Click the gear wheel icon to see the list of options. Check the ones that you would like to be displayed.
You may collapse the panel completely by clicking
In case you don't want cards without dates to be displayed, please, check the Hide cards without dates option.
Cards in the panel are shown in groups - an epic card has a list of its subcards below. You may collapse or expand the groups by clicking the crown icon next to the epic card.
4. How can I flag a card as a milestone in Kanbanchi?
To make a card a milestone in Kanbanchi, please, create a new card or open an existing one. Find Milestone in card actions and click it. Don't forget to set a date. Also, you should make sure the Show on Gantt option is chosen.
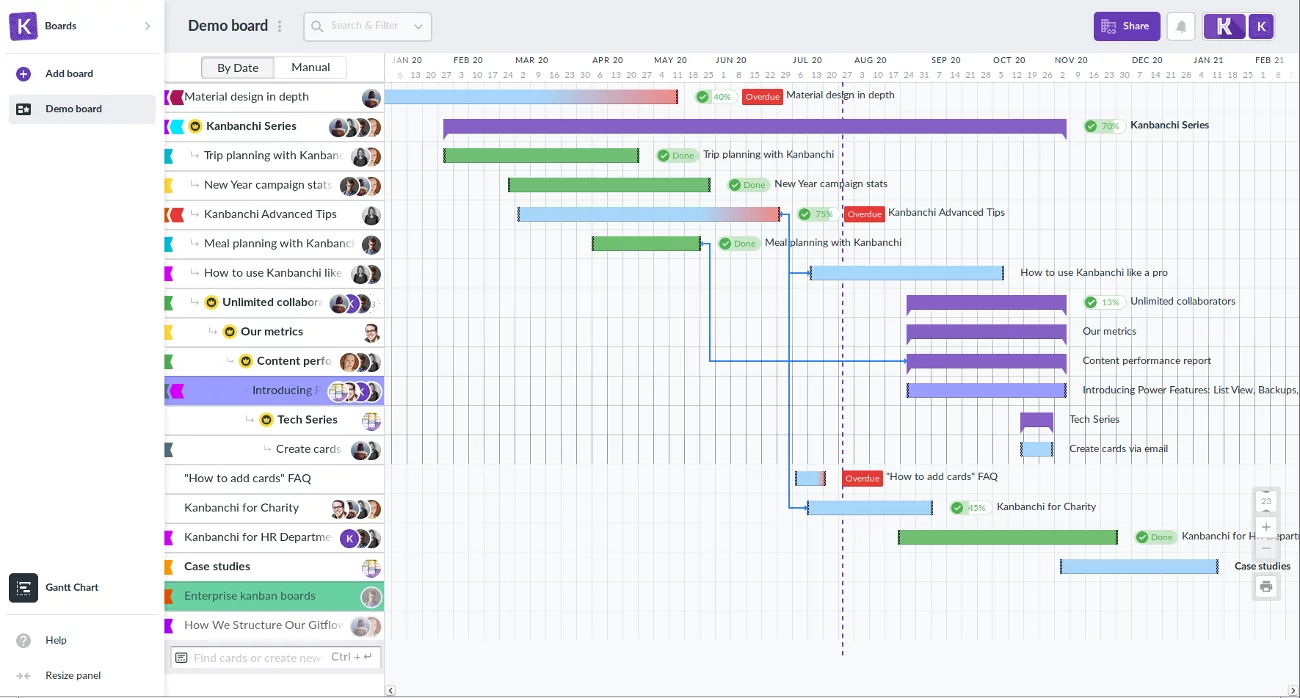
When you switch to the Gantt chart you will see the milestone displayed as a diamond symbol -
Please, note:
-Milestone can have only one date - the start date.
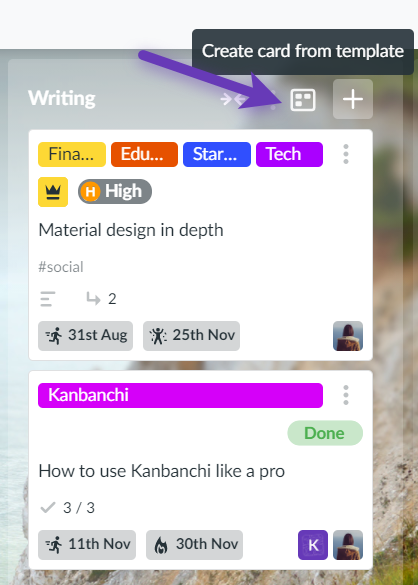
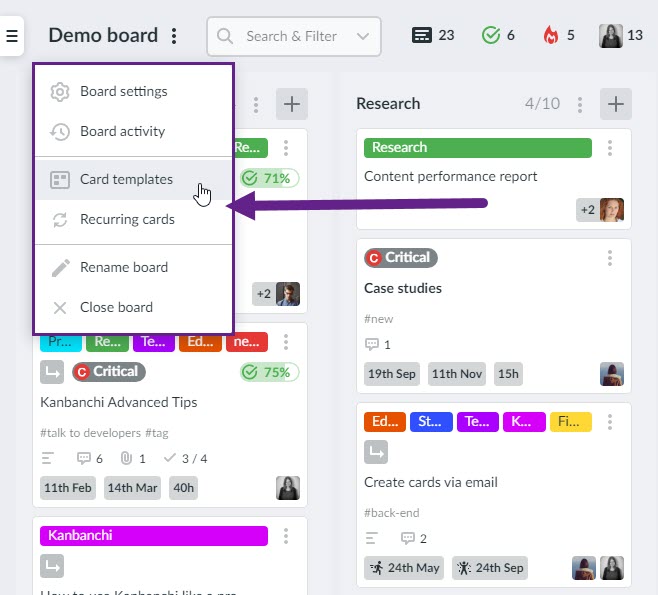
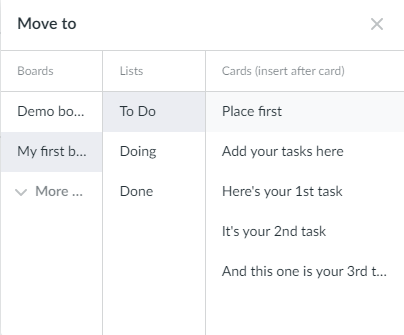
Creating card templates saves much time when you have tasks that repeat from time to time. Instead of adding the details or checklists every time, use card templates.
Choose a card that will become a template, and click the three-dots icon and choose Save as a template. The template will be instantly created.
To add a card from the template to your board, click Add to the board
Alternatively, you may click the template icon right next to the list title and choose a template from the drop-down menu.
To access the list of all your templates, edit or delete them, click on the board title and choose Card templates.
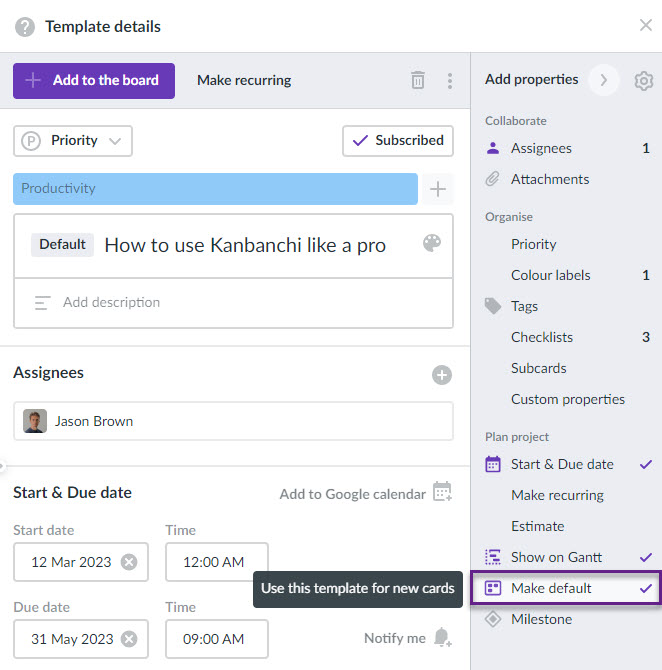
You may choose a default template for your board. All new cards will be created from the selected template.
We are super excited that you want to invite your friends to use Kanbanchi! It's good to know that people like our app. There are several ways to invite your friends depending on the nature of the invitation:
You are working on the same project(s), in the same company and need to collaborate
You don't need to collaborate but just want to let your friends know about Kanbanchi
Your friends haven't yet tried the app or they are registered
For each case, we have the best and quickest way of invitation.
Kanbanchi has a referral program that allows every user to gift their friends with a 10% discount for the first purchase and get a reward in return. Additionally, we reward affiliates that aren't our users but want to share one of the best-rated project management apps with their audience.
9. How to add all cards to the Gantt chart automatically?
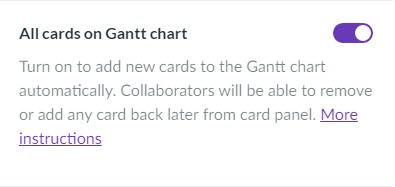
Kanbanchi default setting for all new boards is to choose cards you want to see on the Gantt chart when switching to this view. It helps to have only necessary cards on your timeline leaving all the cards that represent side tasks or contain descriptive information on kanban and list views.
However, if the nature of your project requires all cards to be on the Gantt chart, you can change your board setting to adding cards automatically. This option may be found in board settings.
If there's a need to remove any card from the Gantt chart, board collaborators may do it in card panel.
You can have different settings for different boards for your convenience.
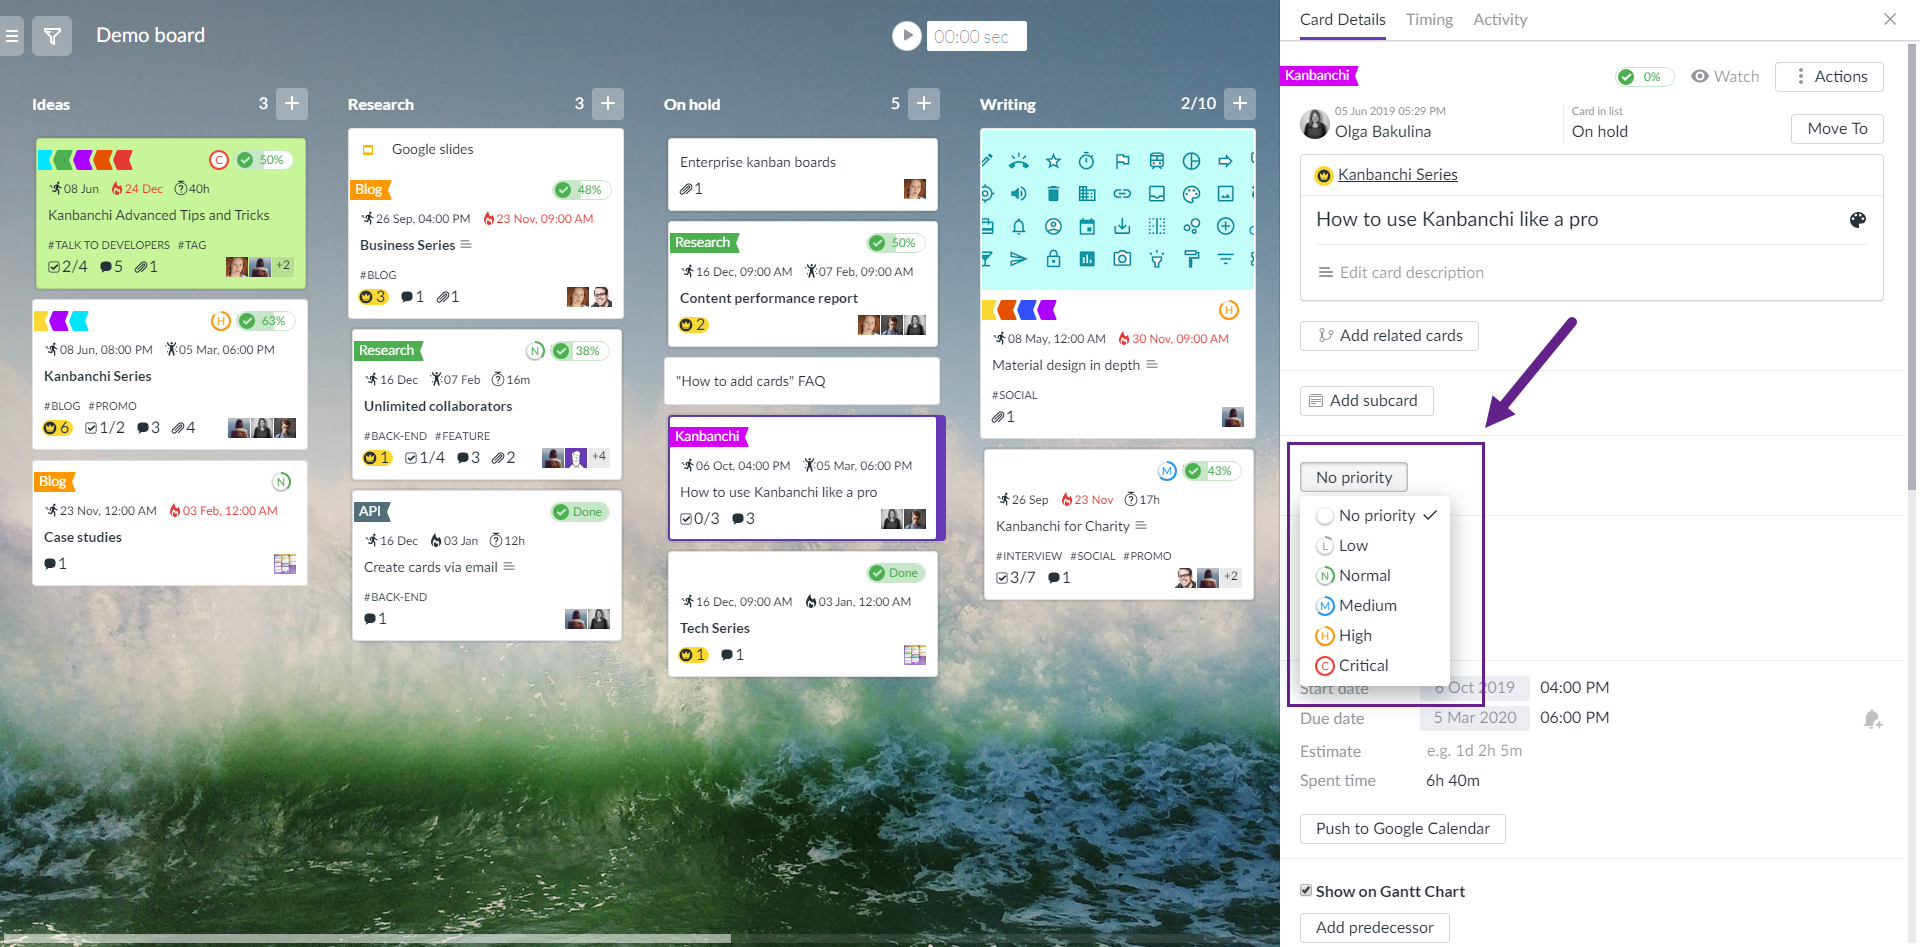
Visualise your priorities on boards. To add priority to cards, open Card details and hover your mouse cursor to No priority button. Choose the necessary priority from the drop-down.
Kanbanchi is not in general intended for resource management but it provides features to support it while managing projects. Our team understands that it's very important to manage resources when leading any kind of projects. That's why we created the Team Workload view.
In case you'd like to import your Jira data to Kanbanchi, please, follow the steps below.
Step 1. Export your Jira data
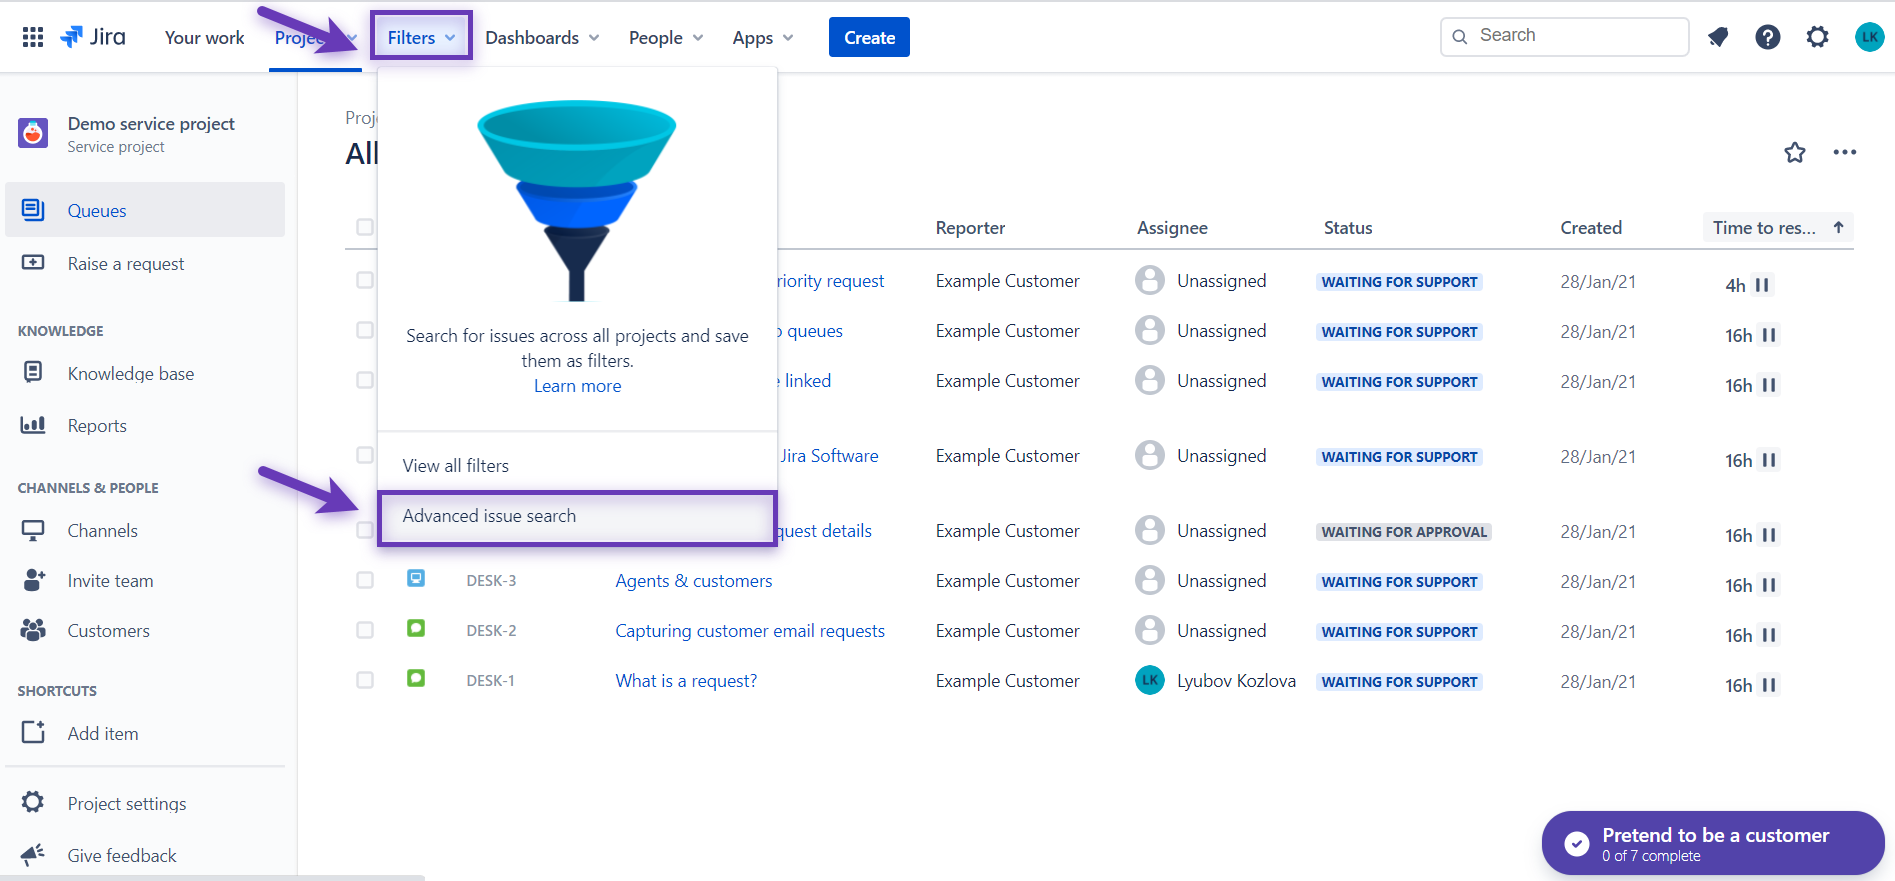
Log into Jira and open the project you'd like to export. Click Filters and choose Advanced issue search.
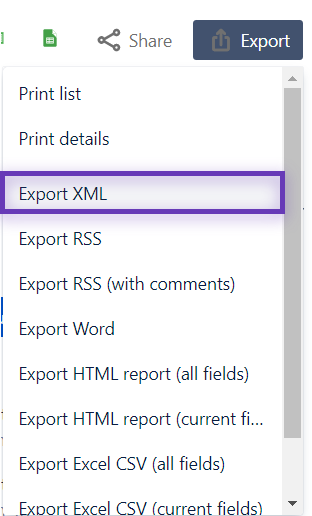
You will be redirected to the Search. Click Export.
Choose Export XML.
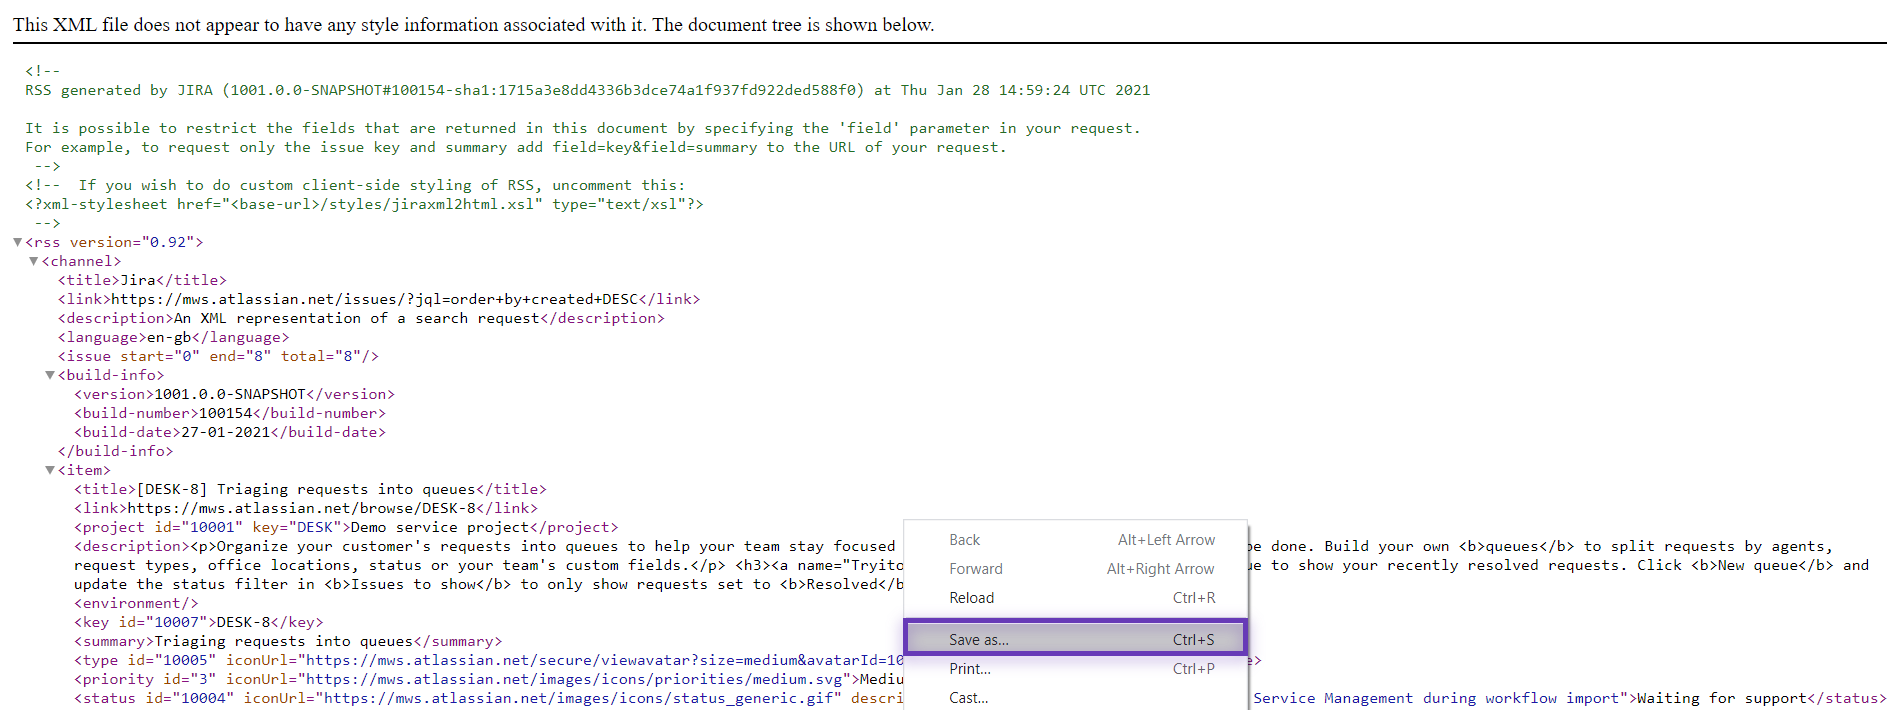
The data will be opened in a separate browser in the XML format. Click with the right button of your mouse and choose Save as... in the menu. Save the file to your computer.
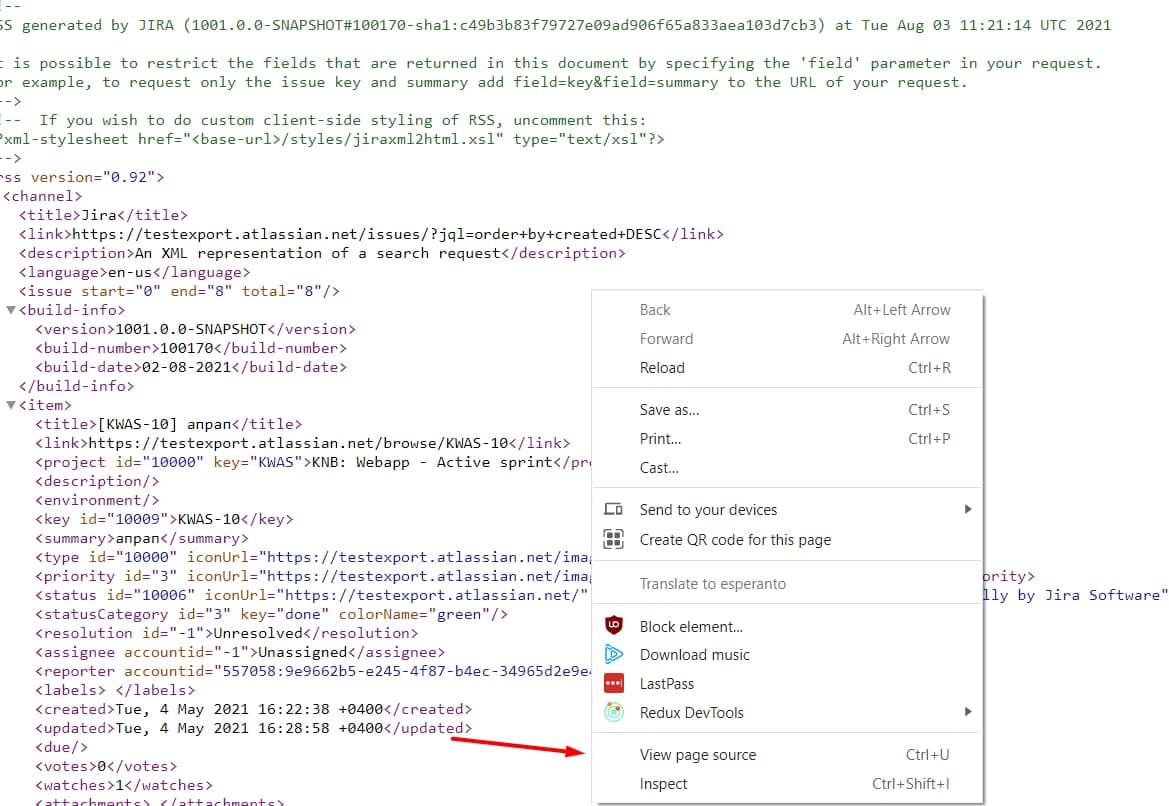
There is another very slightly different export procedure for very complex boards. After you have chosen Export XML and the data opened in a separate browser in the XML format click with the right button of your mouse and first select View page source.
And only after that use Save as... to save the file to your computer.
Step 2. Import Jira data to Kanbanchi
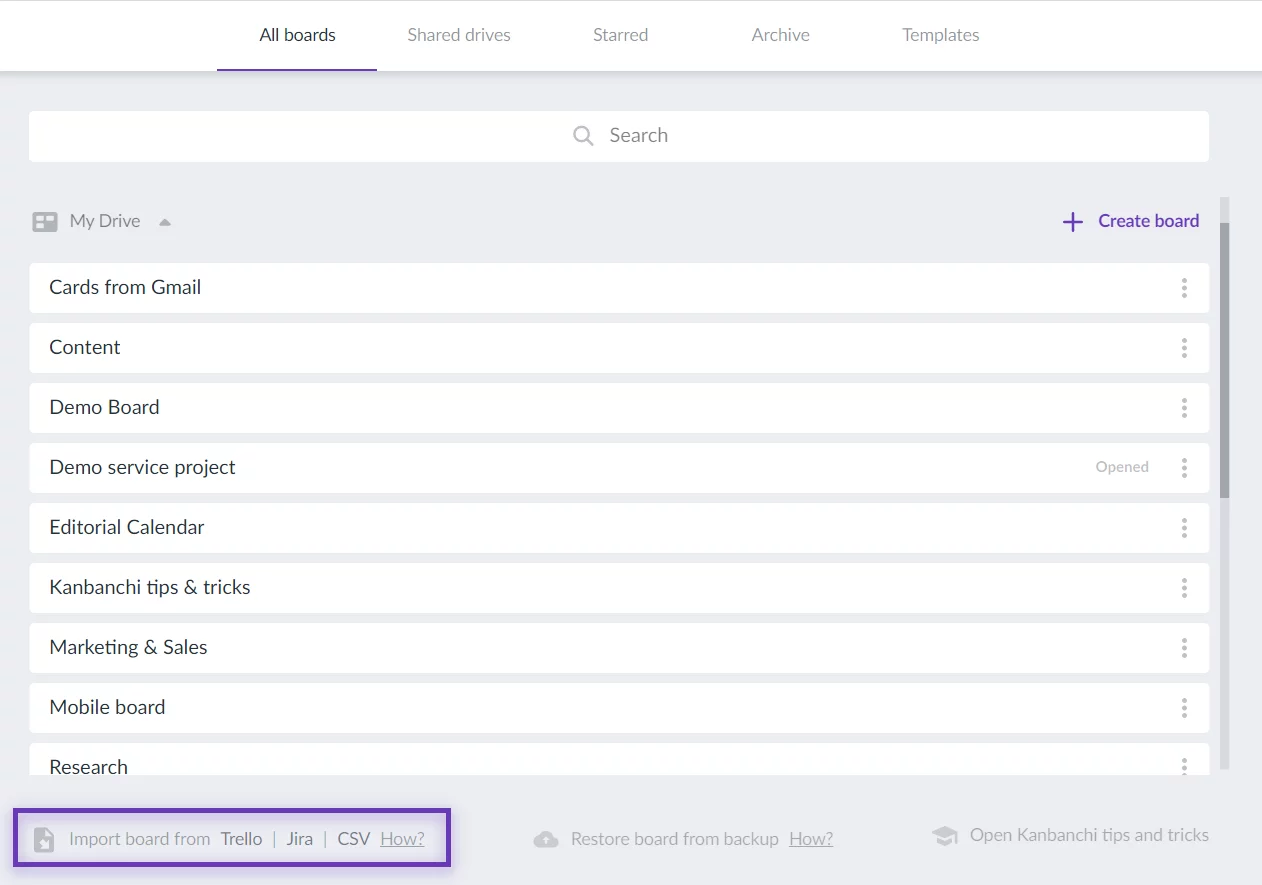
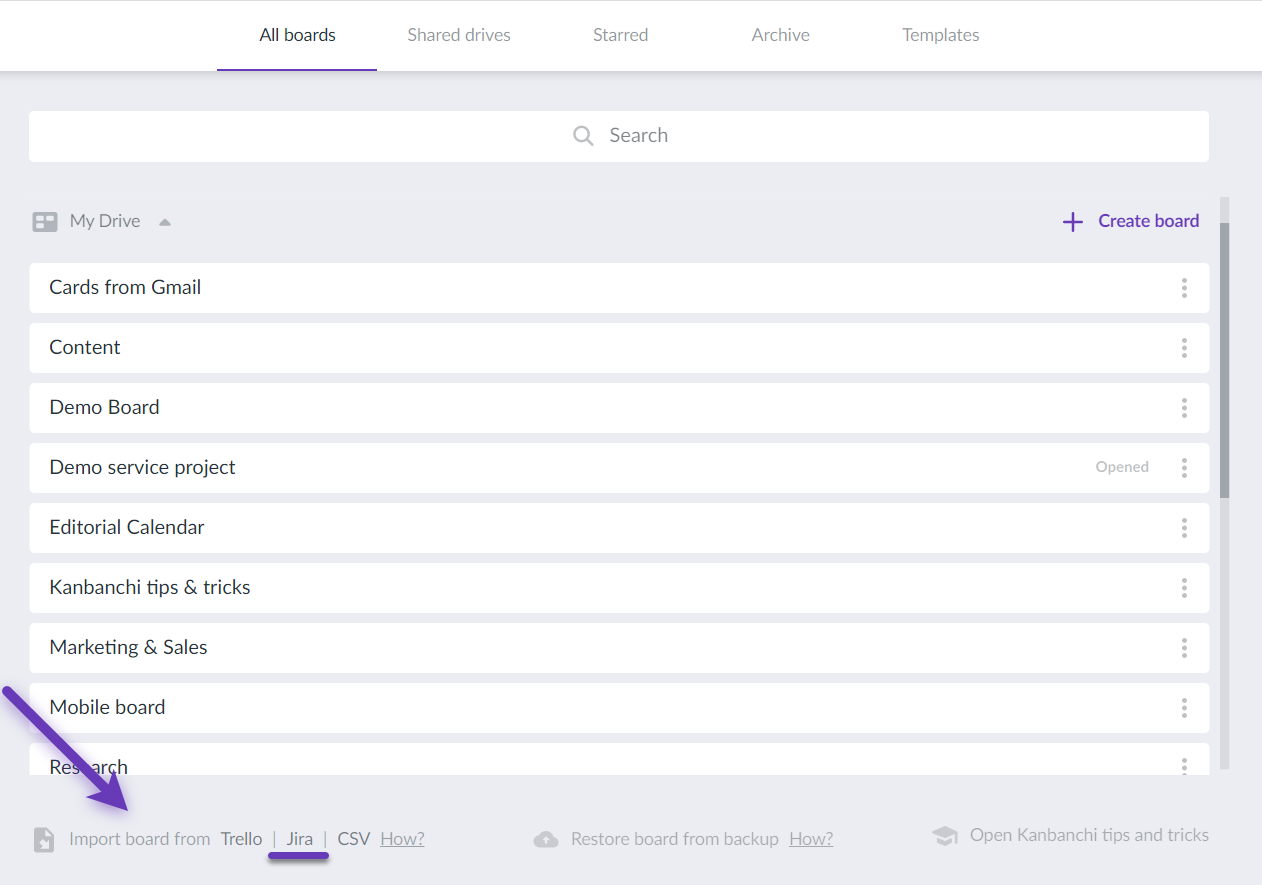
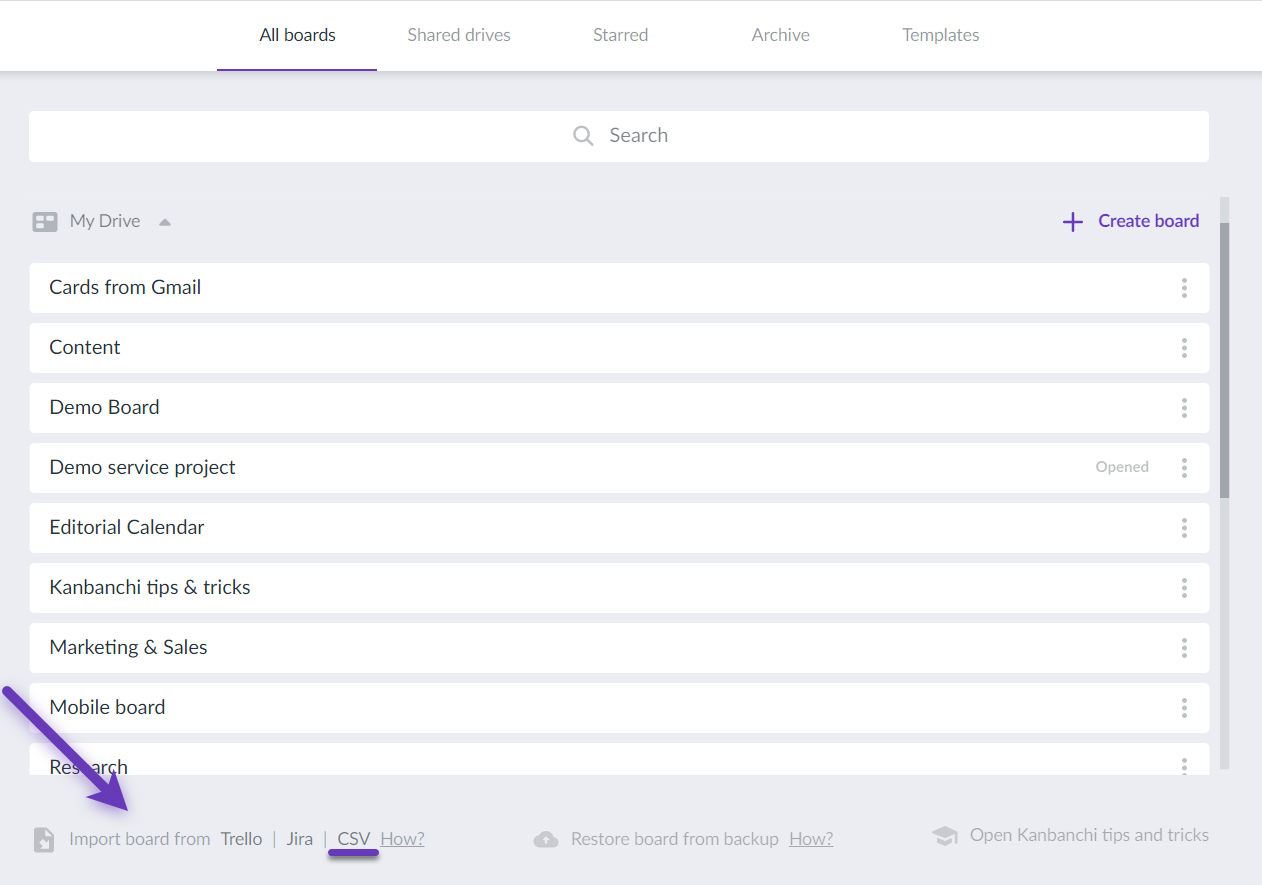
Open the list of your Kanbanchi boards. You will see the Import board from option at the bottom of the page. Please, click Jira and upload the file.
Kanbanchi will create a new board using imported data.
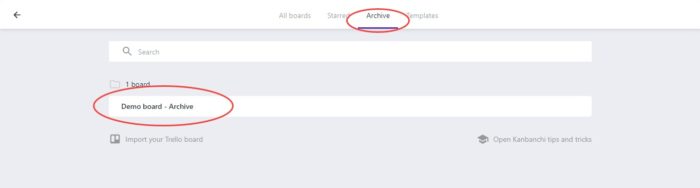
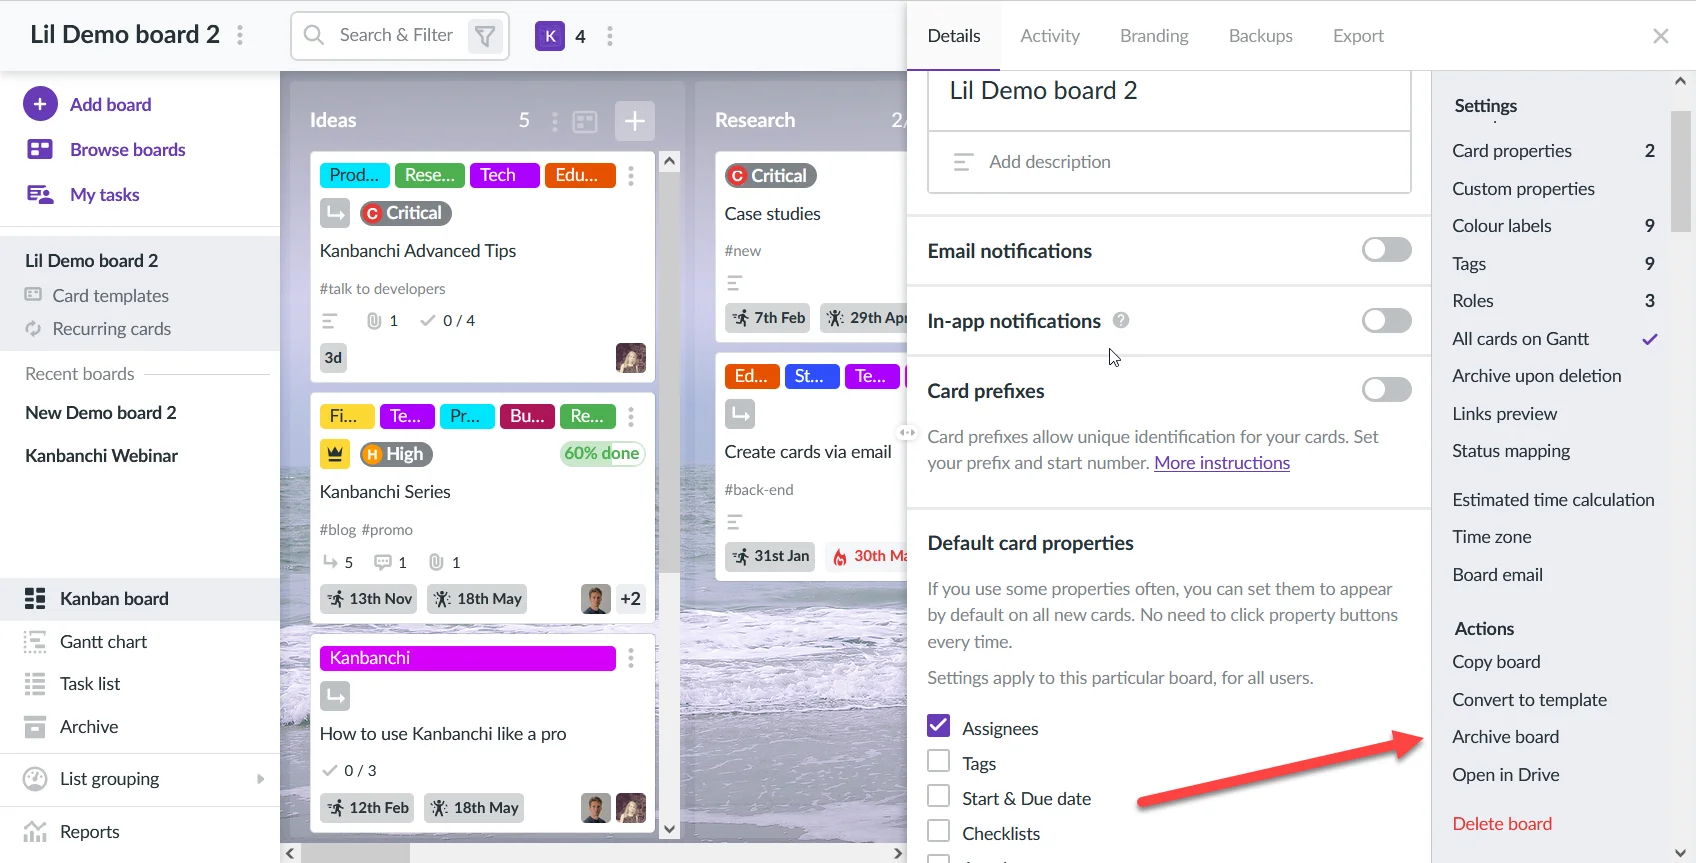
To archive a board, open its details and choose Archive board from the Actions menu.
The boards will be moved to a special tab on the start screen. All the collaborators will find it there.
The Archive is available to all users on the Professional and Enterprise plan. If you are on Premium and need Archive, please, consider upgrading your account.
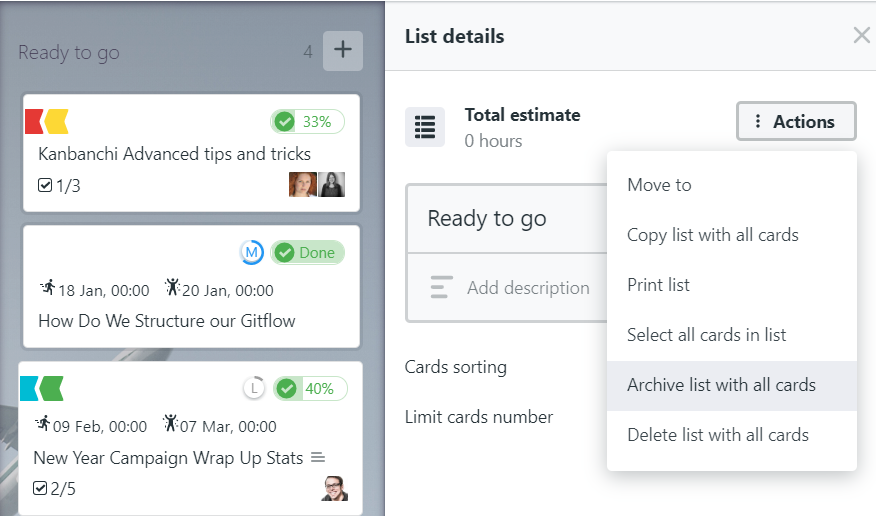
To archive a list, open its details and choose Archive list with all cards from the Actions menu.
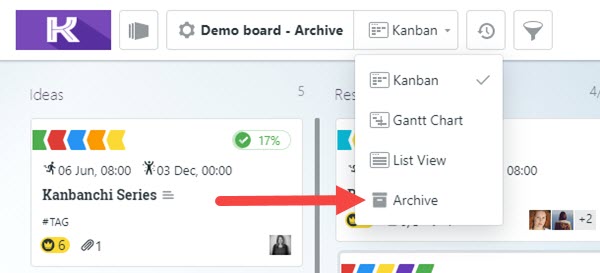
The list will be moved to the archive of the board it belongs to. To switch to the Archive, use the drop-down list near the board name.
The Archive is available to all users on the Professional and Enterprise plan. If you are on Premium and need Archive, please, consider upgrading your account.
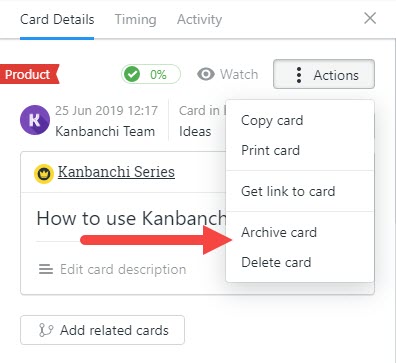
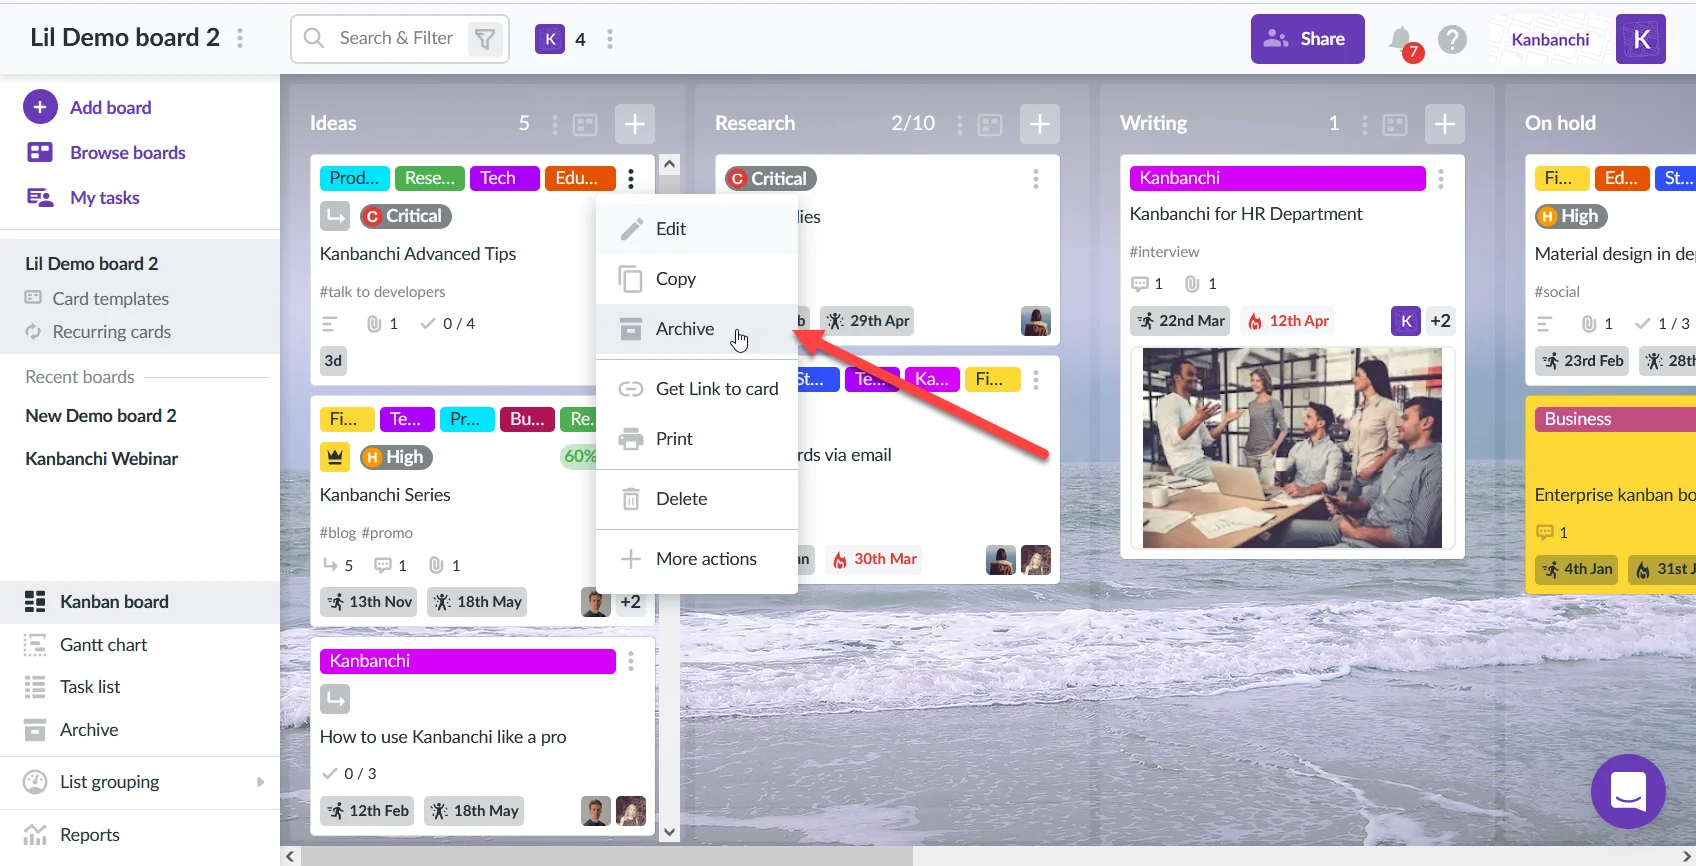
To archive a card, open its details and choose Archive card from the Actions menu.
The card will be moved to the archive of the board it belongs to. To switch to the Archive, use the drop-down list near the board name.
The Archive is available to all users on the Professional and Enterprise plan. If you are on Premium and need Archive, please, consider upgrading your account.
The Archive feature includes archiving cards, lists and boards. To archive a board, open its details and choose Archive board from the Actions menu.
When you archive a board, it moves to a special tab on the start screen. All the collaborators will find it there.
When you archive cards or lists they move to the archive of the same board. To archive a card click on the three dots menu on the top right of the card and choose Archive from the drop-down list
Each board has its own archive. You may switch to this Archive at the bottom of the left panel.
You may easily unarchive cards, lists or boards and they will return to where they have been before.
The Archive is available to all users on the Professional and Enterprise plan. If you are on Starter and need Archive, please, consider upgrading your account.
17. How can I sort cards by attachments in the List View?
To sort cards by attachments in the List View click Attachments. Cards will be sorted according to the number of files attached to cards. The first click enables sorting in descending order.
The second click initiates sorting in ascending order.
19. Is there a way to change the owner of a board? Or can we have more than one owner of a board?
There can be only one owner of a board. The sharing settings in Kanbanchi are provided by Google Drive. Unfortunately, Google Drive does not allow more than one owner.
Within Google Workspace / G Suite domain, Google Workspace / G Suite Admin can move ownership of all files, including Kanbanchi boards, to other members of the organisation. This option is very useful when one user leaves, and another comes in his place.
The board owner can transfer ownership to another user by clicking Share in the app or within Google Drive.
Note: ownership can only be transferred to another user in the same domain as the current owner.
Click the Share button on the top panel on the right and the "Share with people and groups" window will appear.
Start entering the new owner’s email in the "Add people and groups" line. Then choose the email and click Send.
The user will appear in the list of those who have access to the board.
Click on "Editor" on the right from the new user and choose Make owner from the drop-down list.
Confirm the transferring by clicking Yes in the "Make this person the owner?" pop-up window and the owner will be changed.
In order to transfer ownership within Google Drive find the folder containing the board file. Click on it with the right mouse button. Choose Share in the pop-up window. Repeat the actions that are described above.
We advise waiting a couple of minutes (up to 10) to make sure the transfer is completed. You may also check if the transfer has been completed by visiting the board. Open the Board setting panel. The new owner's name should appear in Board details.
Personal users (gmail.com) cannot pass ownership of their boards to other users (unlike with Docs and Sheets). A quick workaround would be to share the board with a colleague, who you want to see as the owner. Then the colleague should сopy your board into his or her Google Drive, thus becoming the owner of this copied board. All settings will be copied, excluding comments, sharing settings, notifications and dates in Google Calendar. Permissions of attached files also must be checked, because original files belong to you and are placed in your Google Drive.
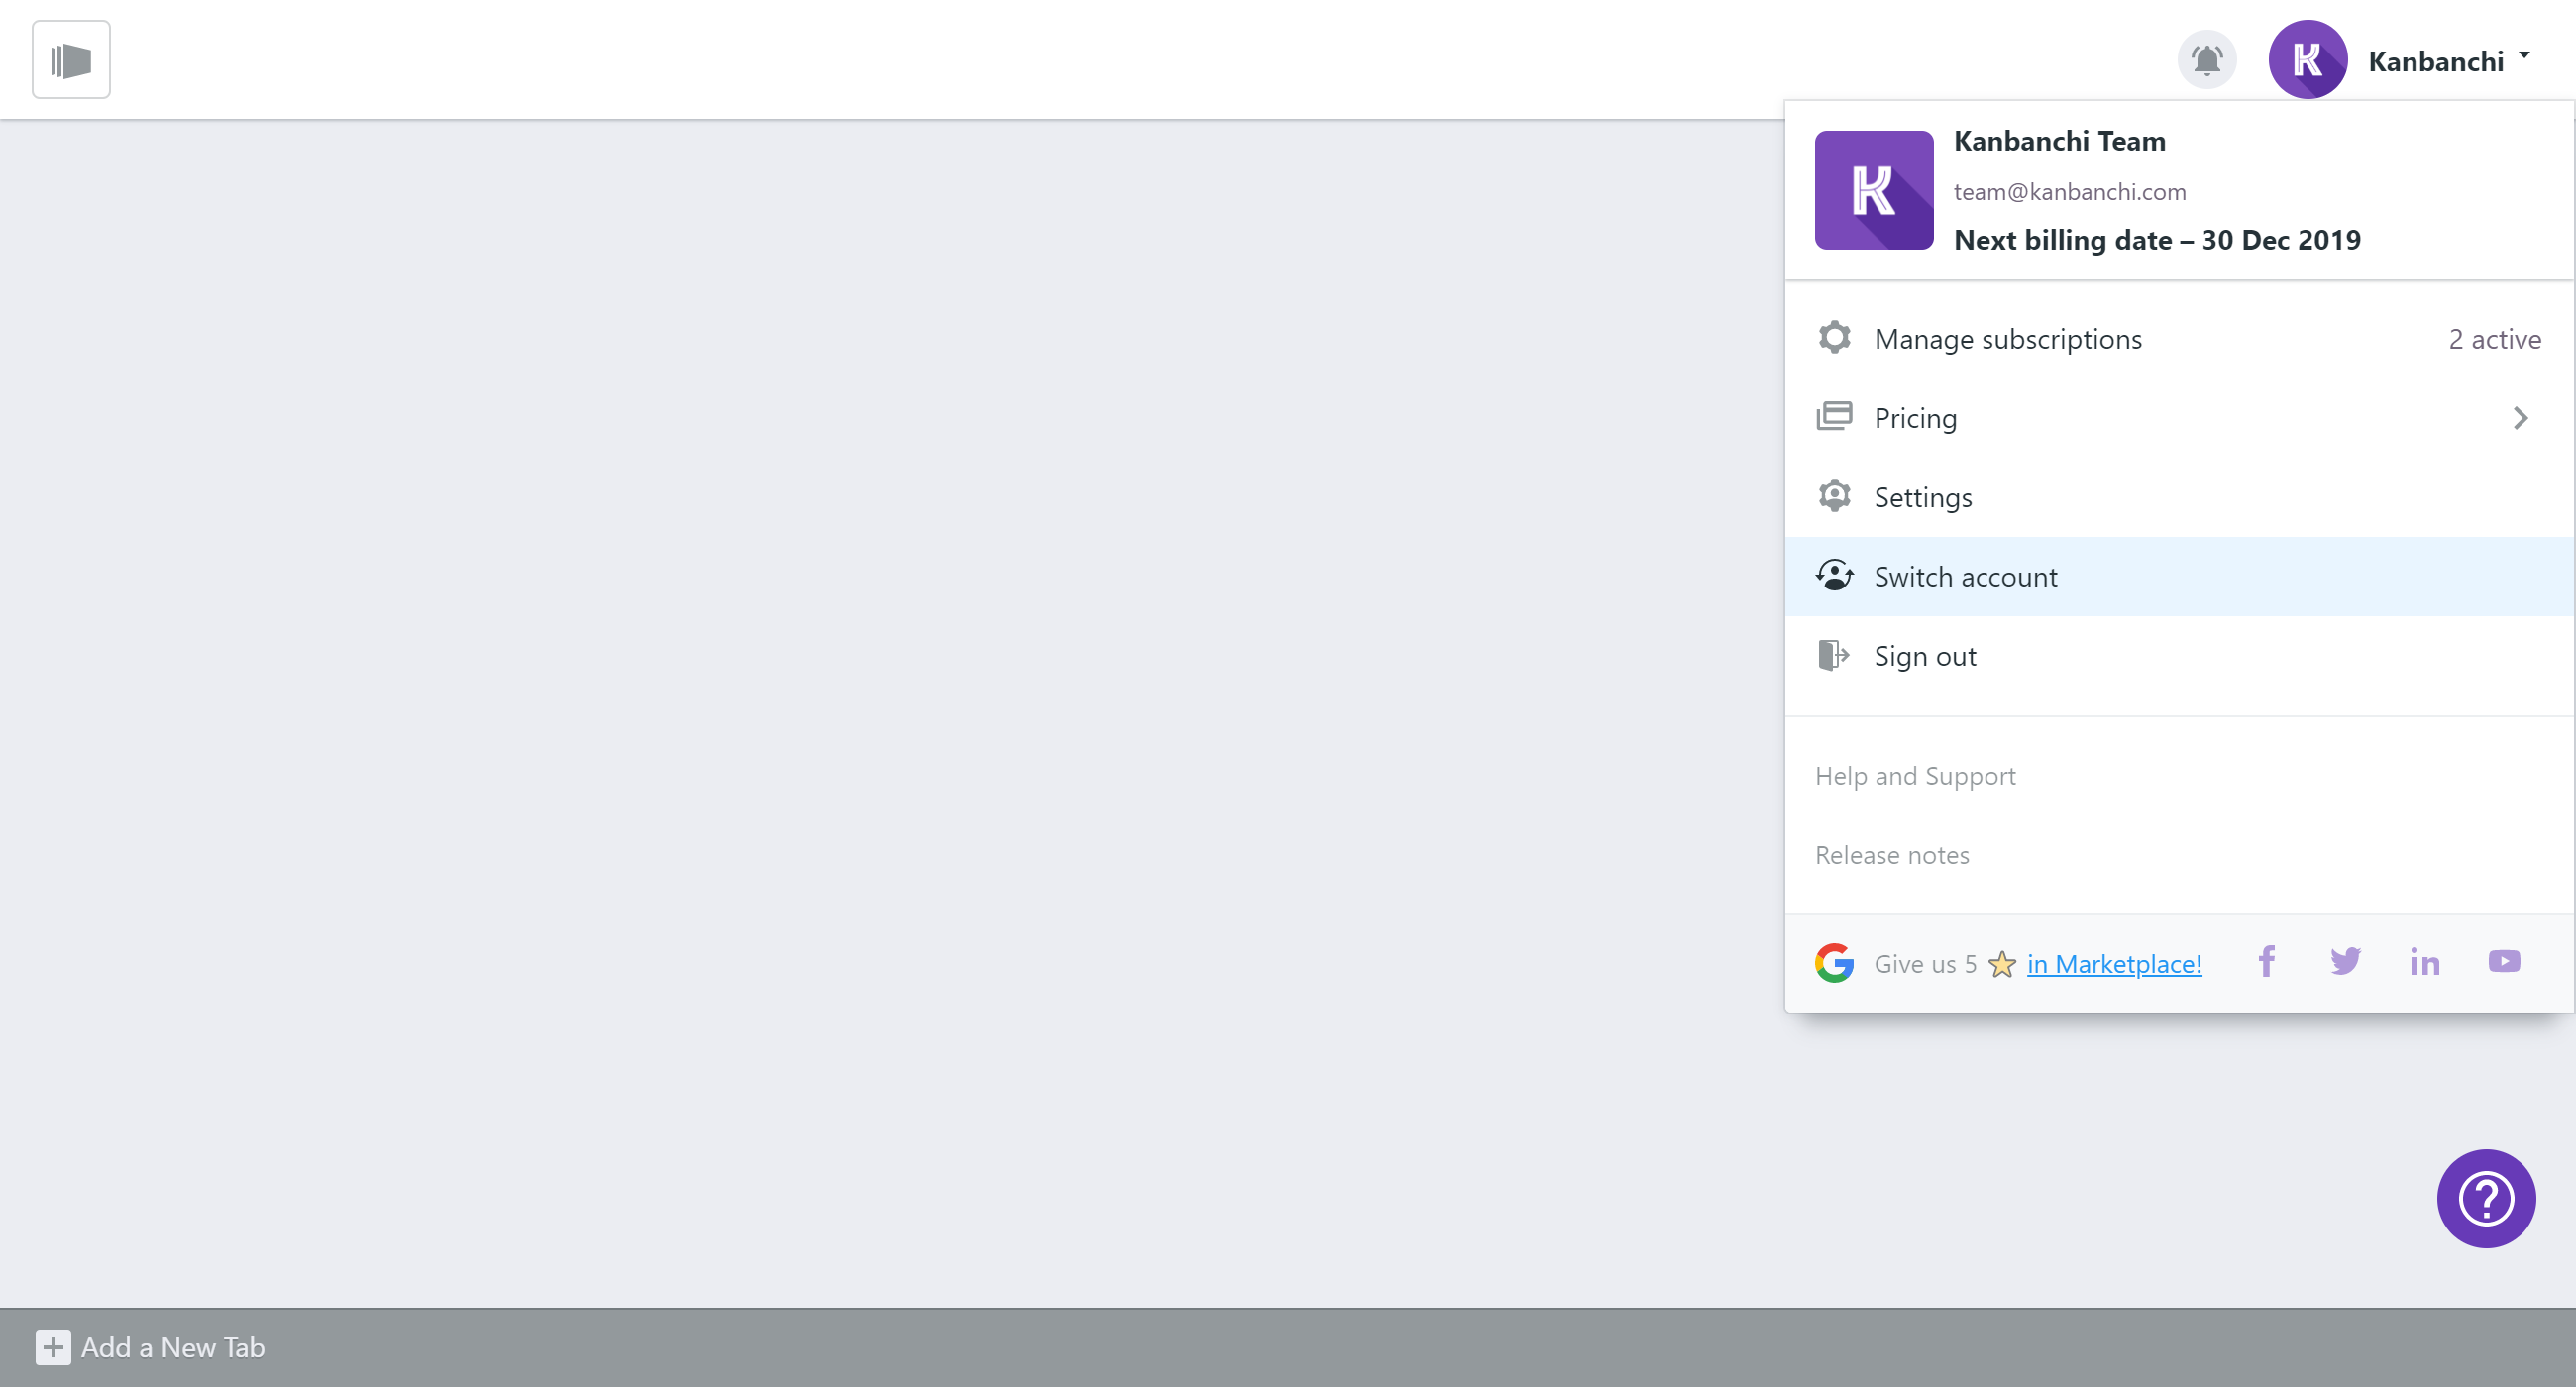
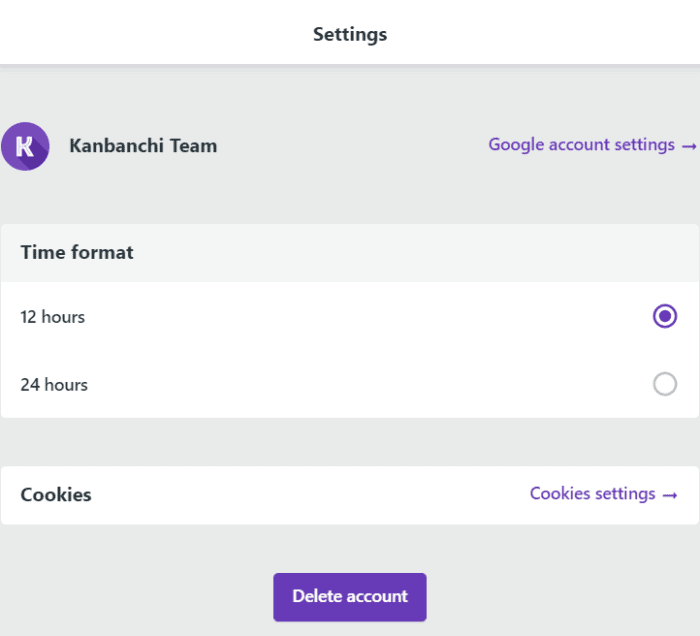
22. How can I manage my subscription in the application?
You can manage your subscription right in the application. You can manage your subscription status (number of allocated and available seats and expiration date) in Kanbanchi.
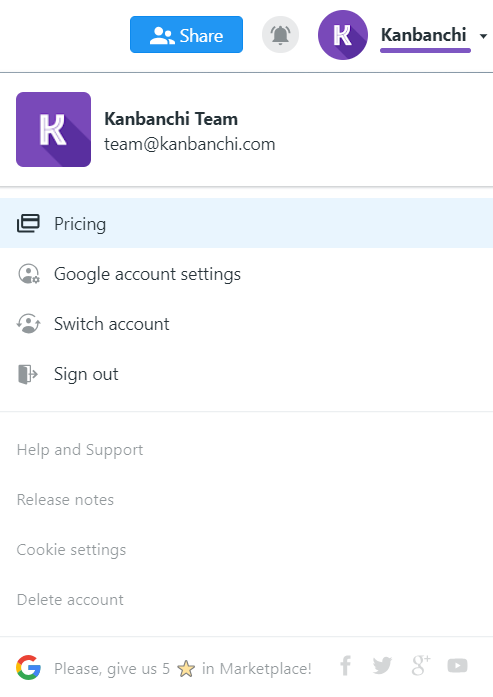
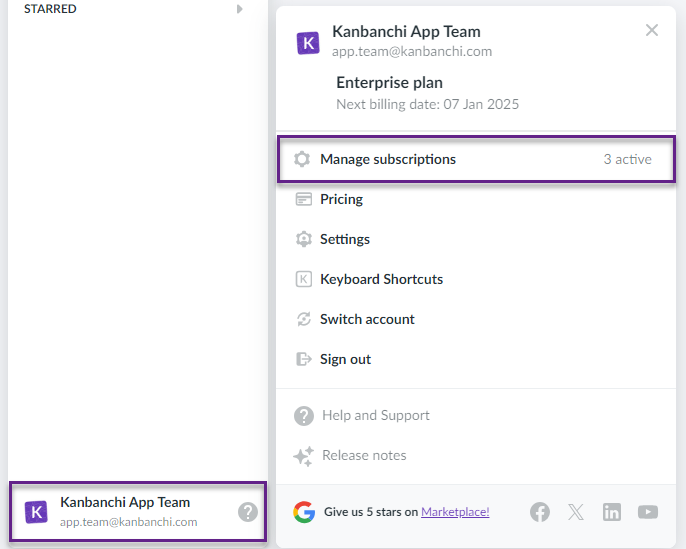
Click your profile picture or company logo in the lower left corner. Click Manage subscriptions in the pop-up menu.
You will see the information about the plan and billing type you’ve chosen, the number of available and used seats, and the subscription's expiration date.
Click the Add membersbutton to add your team members. Use name@domain.com format. You can add them one by one or by a list. Click Add.
If you would like to manage a Kanbanchi subscription but you don’t need the application for yourself, delete your email from the list of users by clicking the trash can icon. You may transfer your seat to another team member.
After you have distributed seats, your subscription is set up. It will activate immediately or on the scheduled day.
Subscription Administrators
A subscription administrator is a user who enters billing information, adds a payment method, and distributes seats. The subscription admin can give the right to distribute seats to extra admins. So several users may manage the same subscription.
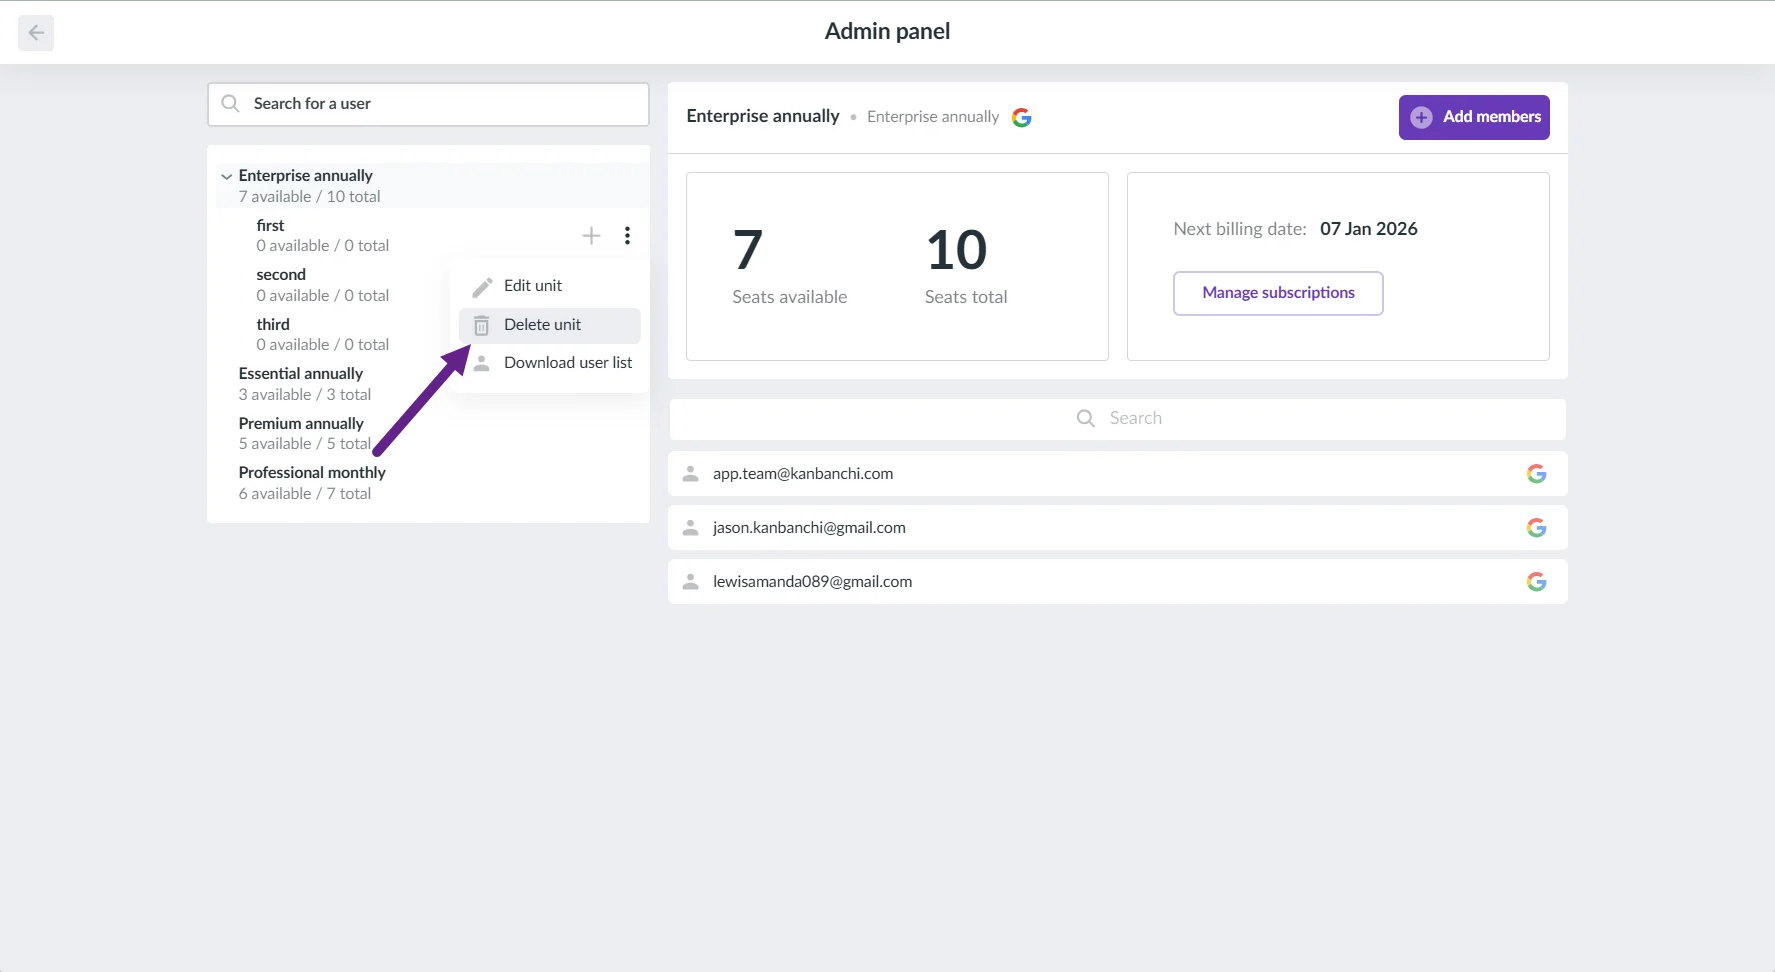
To add an extra admin to a subscription, open the Admin panel, choose the subscription, click the three-dots icon, and choose Edit unit.
Please note that subunit admins cannot add/change admins. You may contact the subscription's super admins and ask them to add additional admins to the subunit. If you would like to set everything up on your own, you can create a subunit and add more admins.
You will see a pop-up window. Type the email of the additional admin in the Admins field and click Add. This will activate the Save button. Click it to confirm the changes.
I don't need admin rights anymore. What should I do?
Please make sure the subscription has another user as an admin. Ask the user to delete your account from the list.
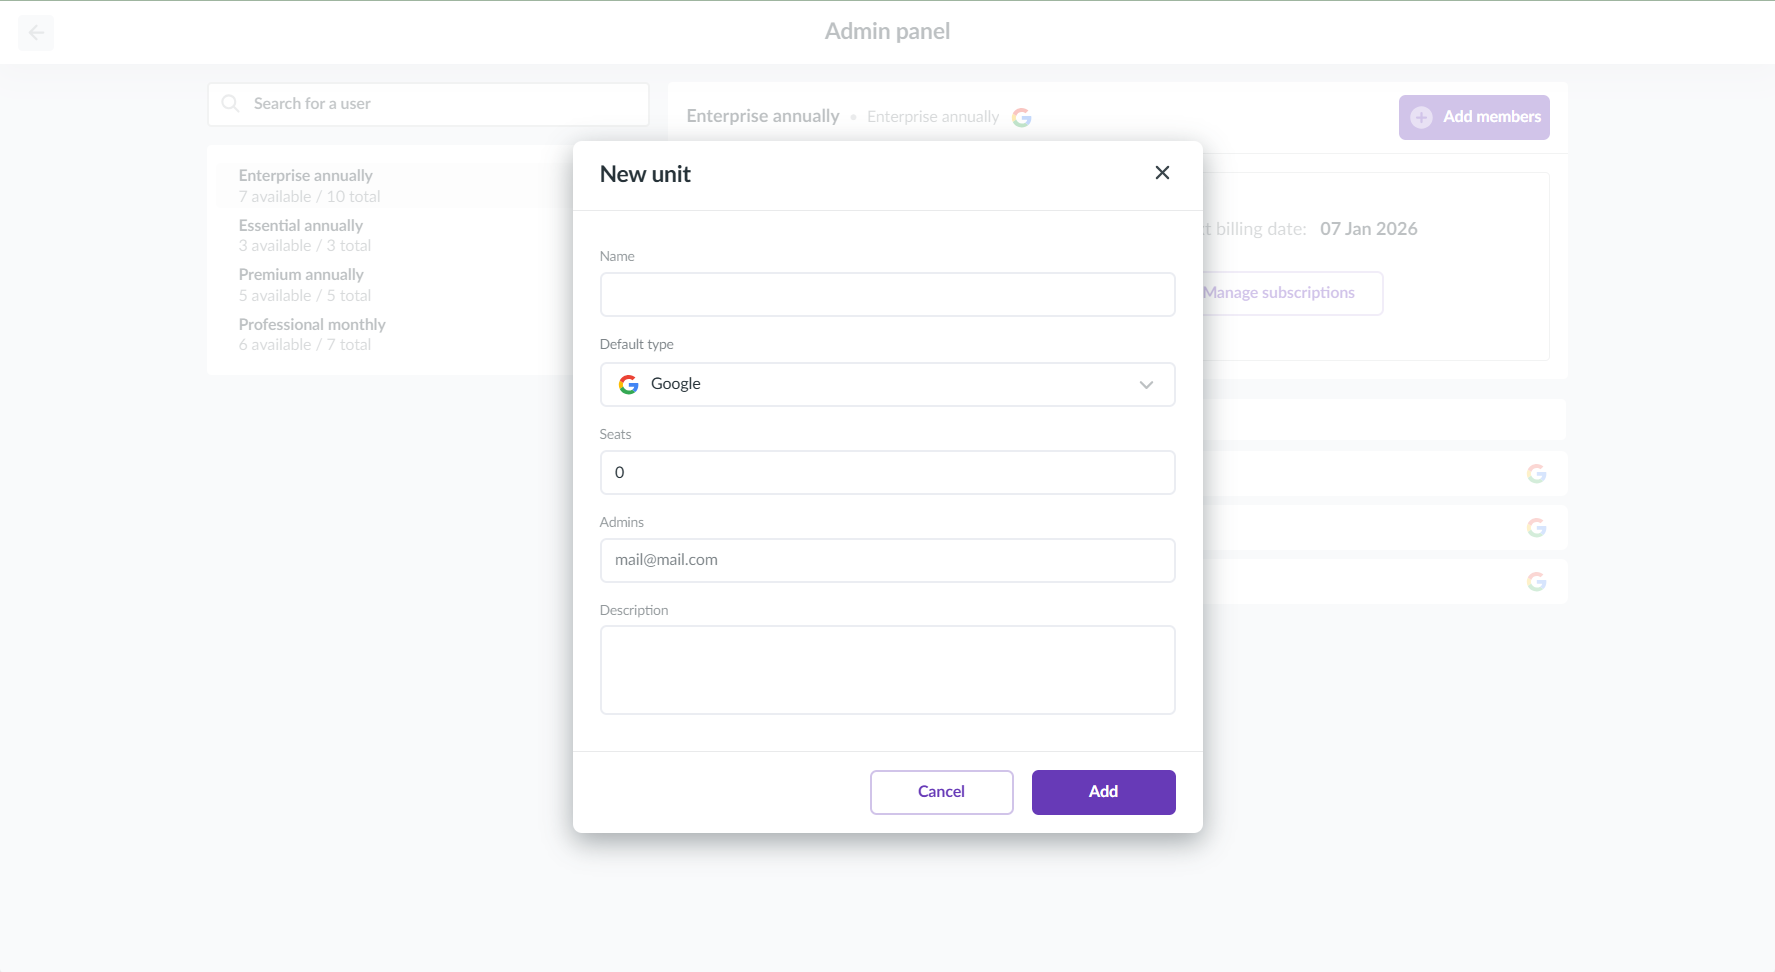
How to add subunits to the subscription?
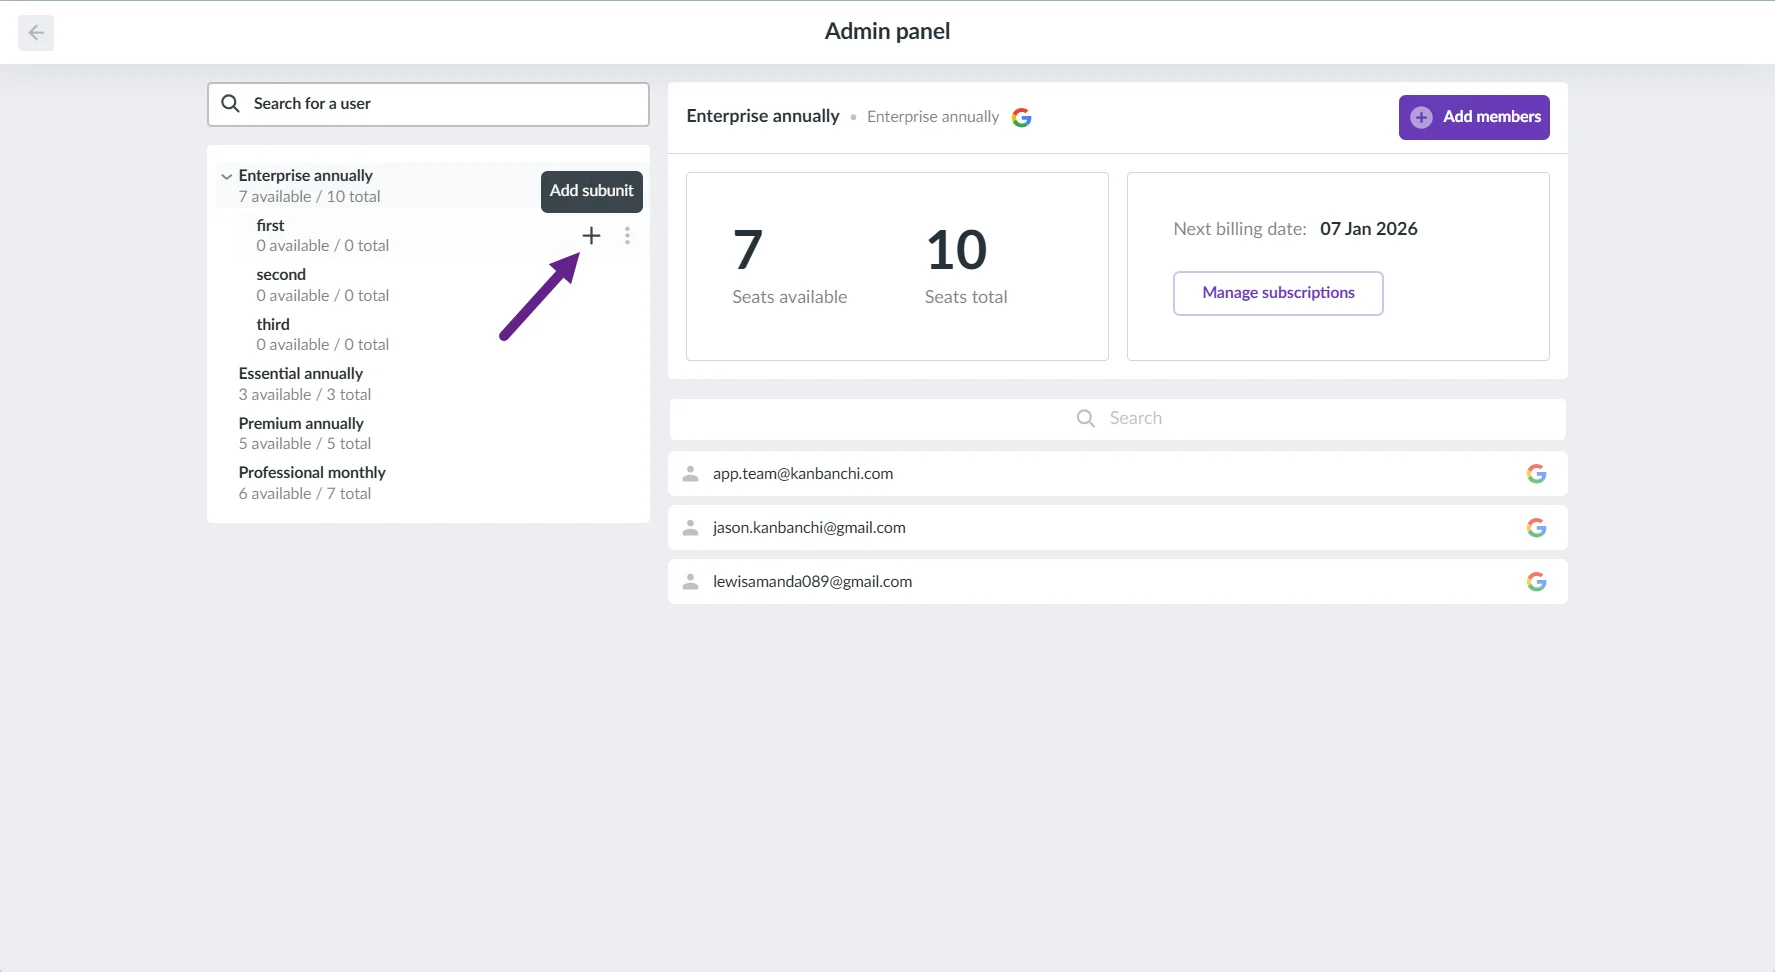
To add a subunit to a subscription, open the Admin panel, choose the subscription, and click the plus button.
Type in the name and number of seats for the new subunit. You may also add admins and a description. Then click the Add button to save the changes.
Each subunit may have its own subunits. Just click the plusbutton on the right to add them.
You may also edit or delete a subunit. To do it, click the three-dots icon on the right and choose the desired action.
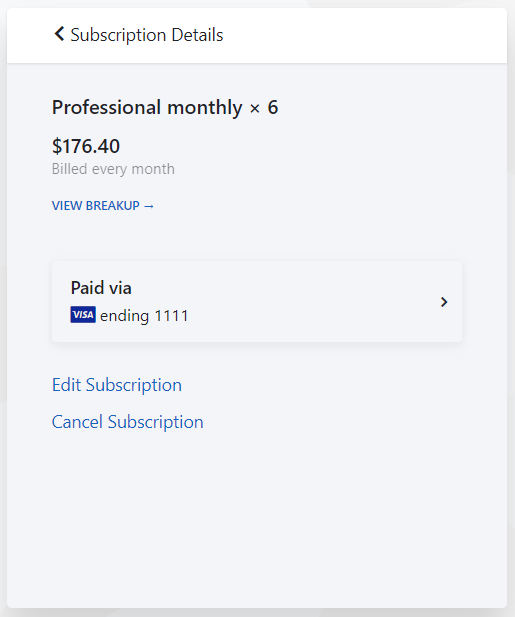
How to add seats to the subscription?
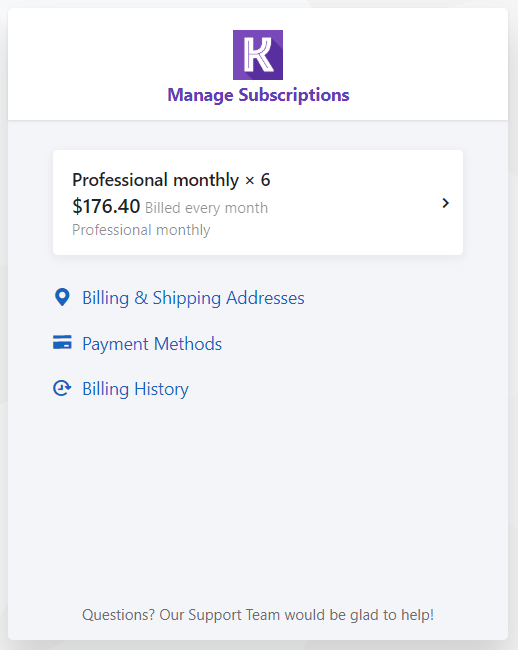
If you would like to add seats to the subscription, click Manage Subscription. The Customer Portal is open.
Click on the subscription information (e.g., Professional monthly x 6).
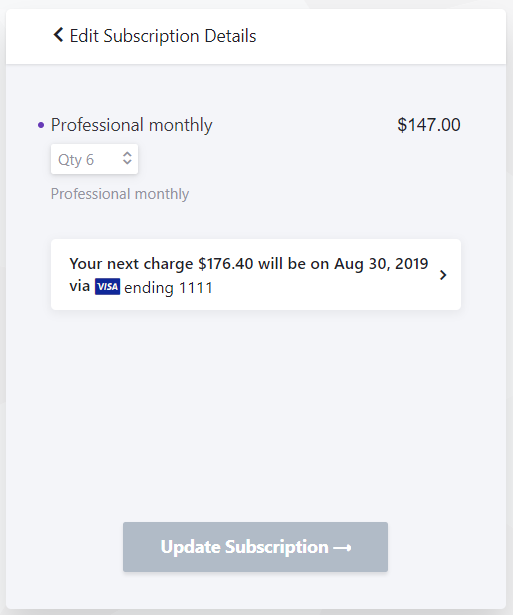
Click Edit Subscription. You see the number of seats available in the subscription now.
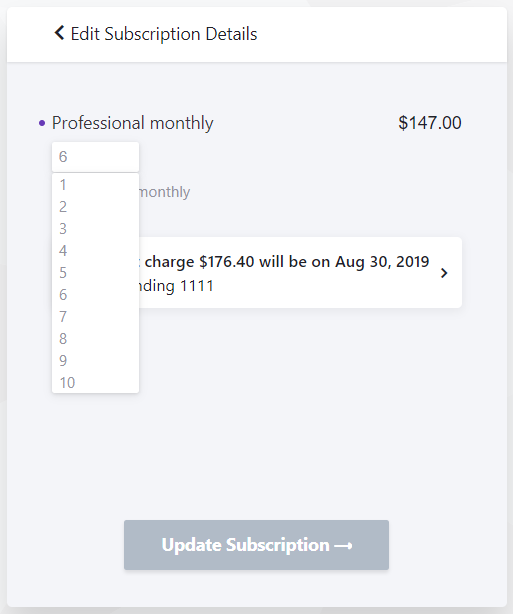
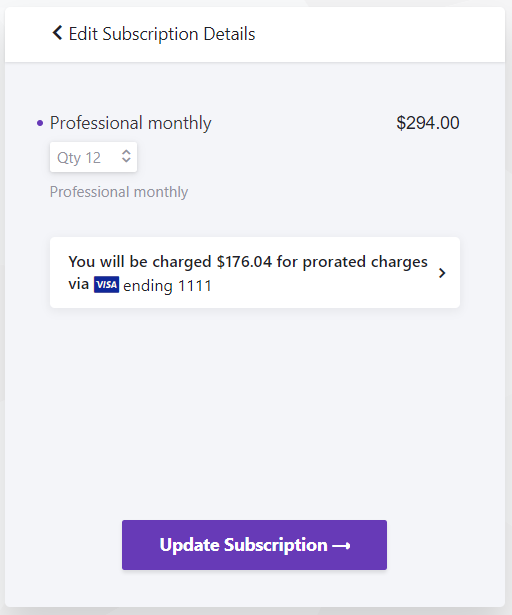
Click the button to change the number of seats. Please note that if the number is more than 10, you should enter it manually.
Click Update Subscription.
You may reduce the number of seats in the same way.
Please note: if the Kanbanchi team created your subscription, you should add billing details and a payment method to the account first.
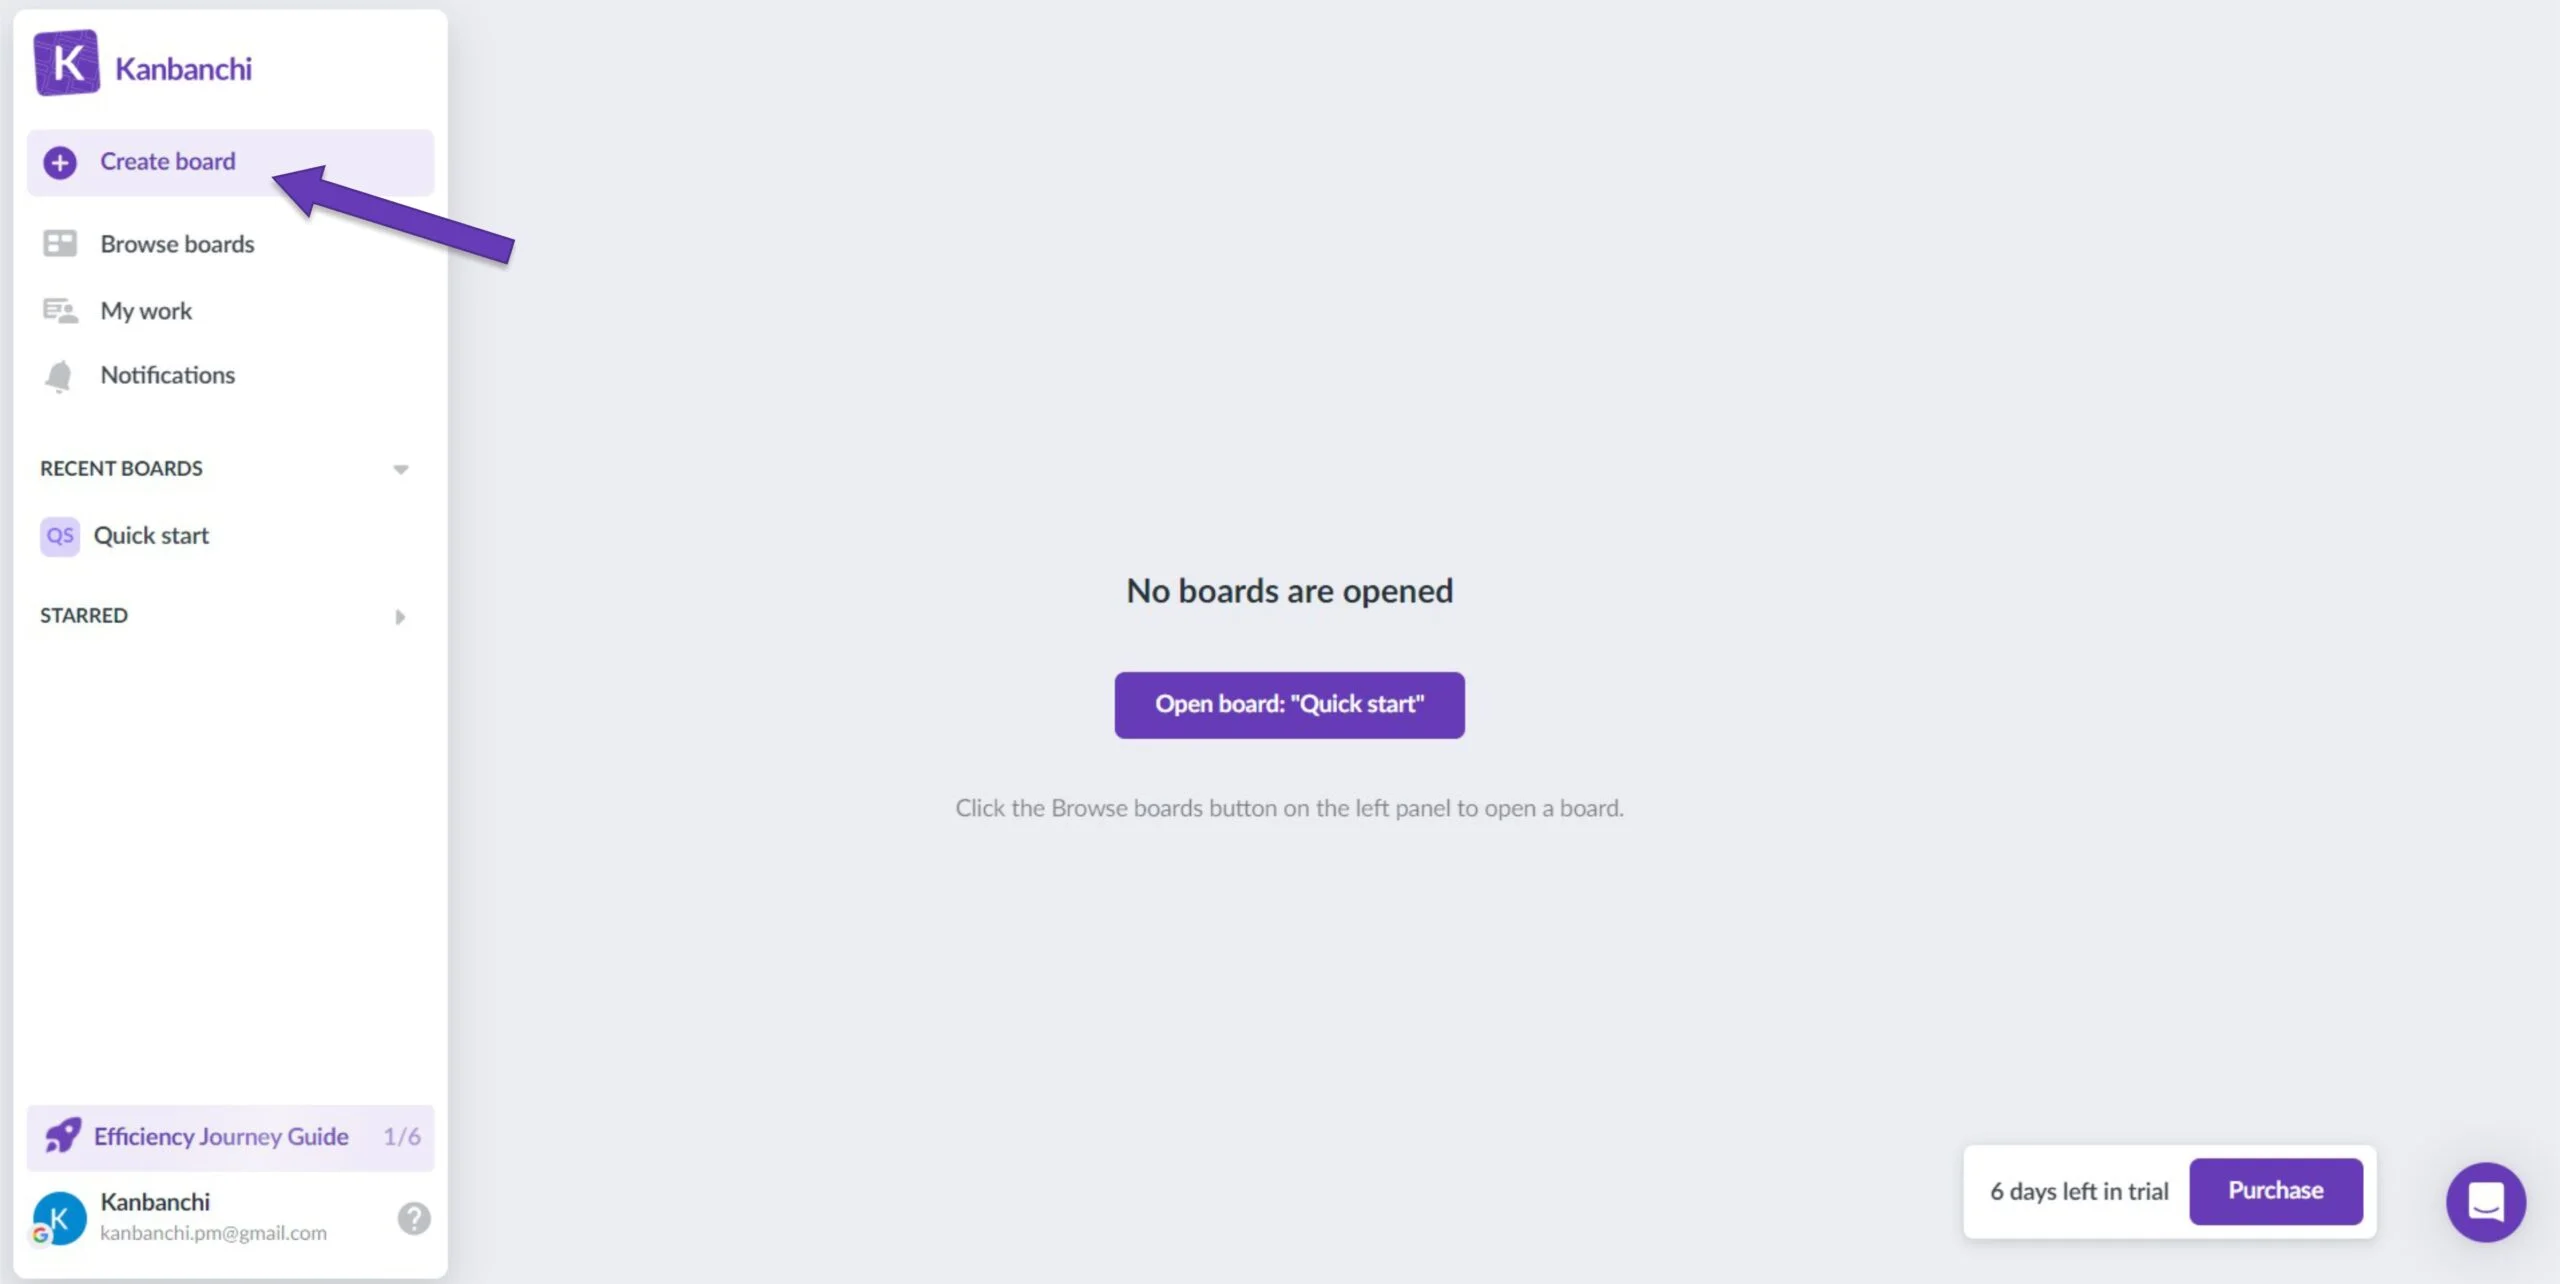
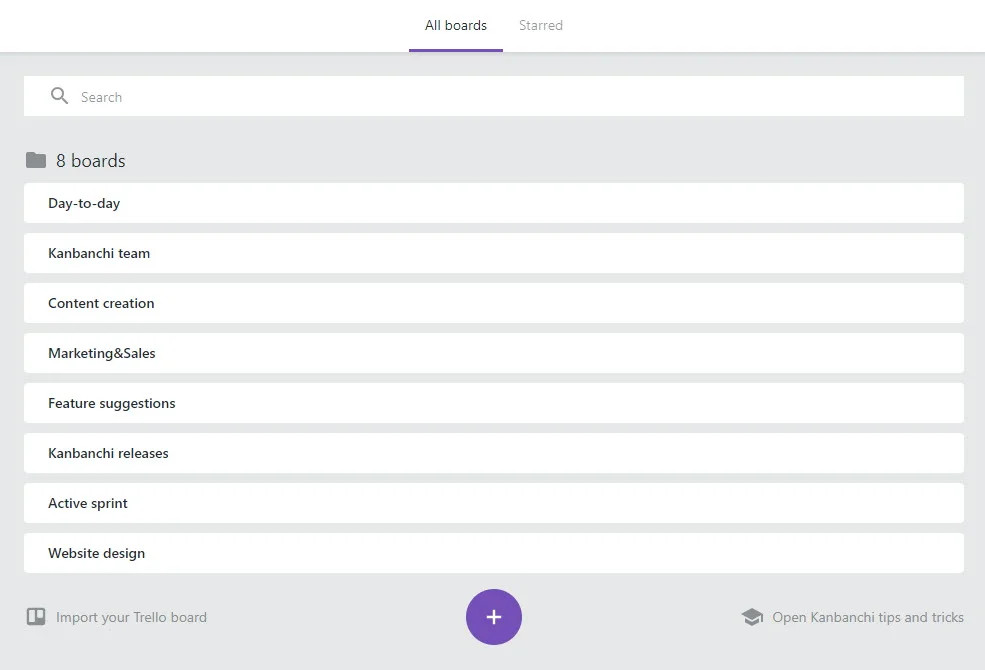
You may create and use as many Kanbanchi boards as you need. The number of boards is not limited. You may learn how to create a new Kanbanchi board in the following article.
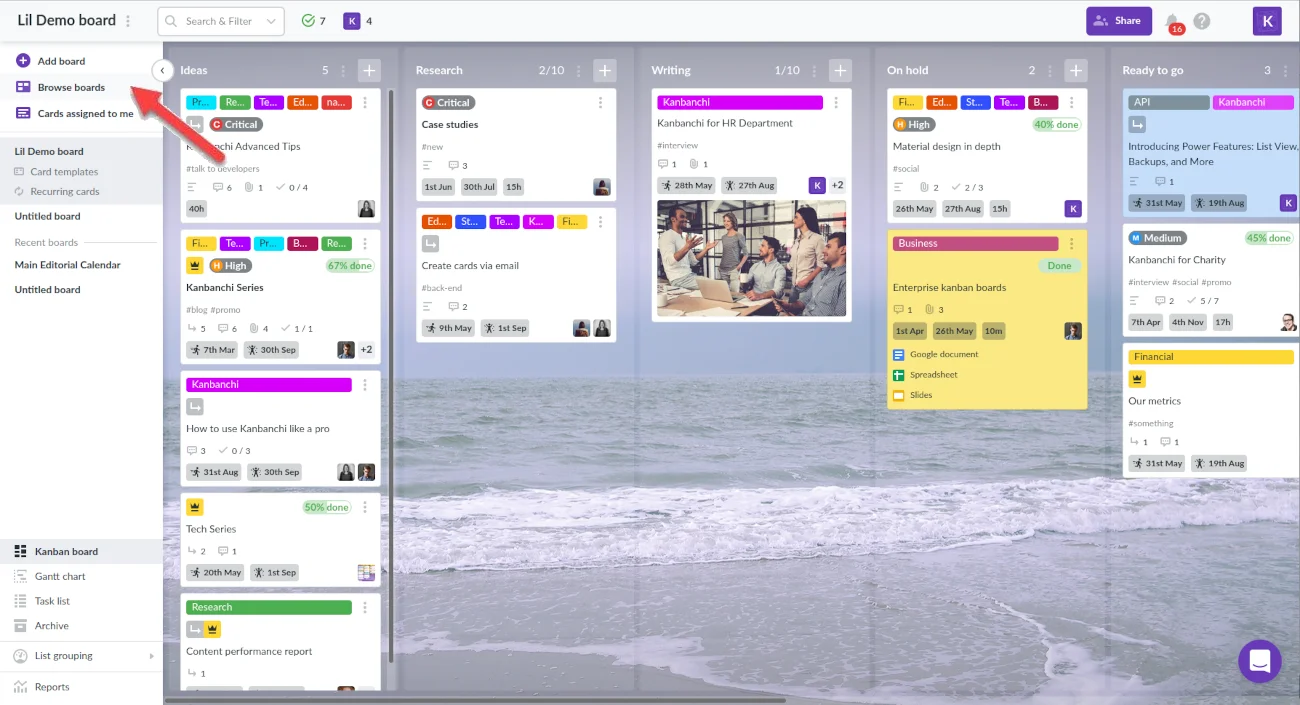
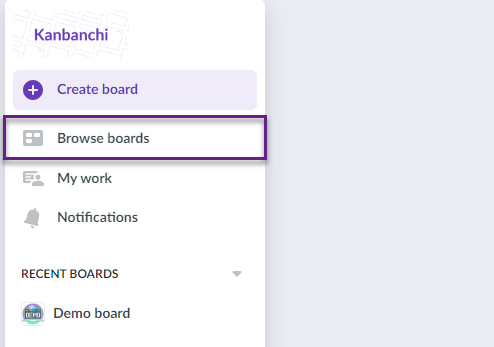
To open an already existing board you just need to click the "Browse boards" button at the top left panel and choose the board from the board manager.
You can also open your boards from your Drive. Opening of often used boards is even easier as you can see all recently opened boards on the left.
24. How to migrate from Kanbanchi for Google Workspace to Kanbanchi for Microsoft 365?
Kanbanchi is now available for Google Workspace and Microsoft users. When you sign up, you may choose which platform to proceed with. If you decide to migrate from Google Workspace to Microsoft, you may transfer your Kanbanchi data.
How do I migrate my board data to Kanbanchi for Microsoft 365?
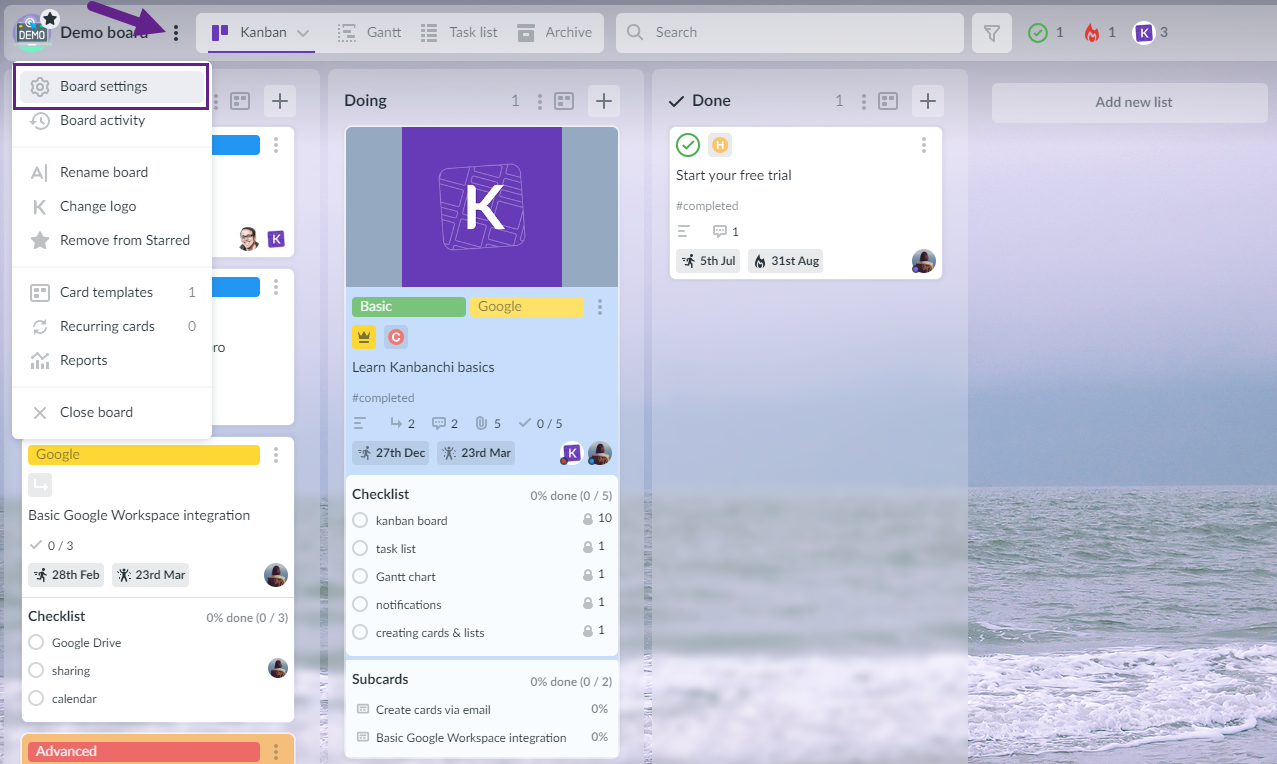
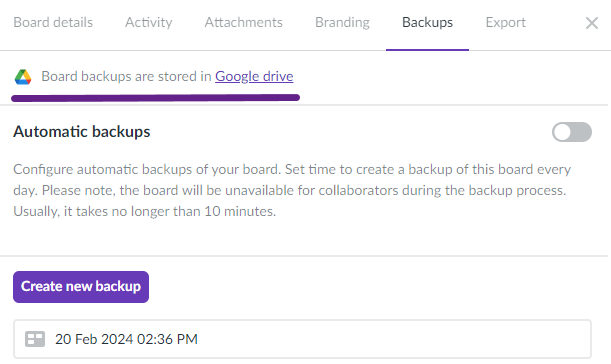
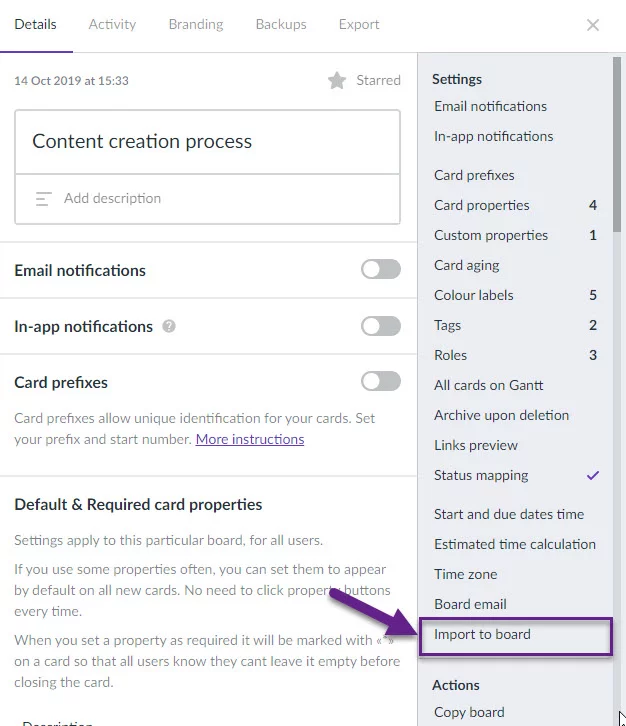
This can be done with the help of the Backups feature. Click the three-dots icon next to the board title and choose Board settings.
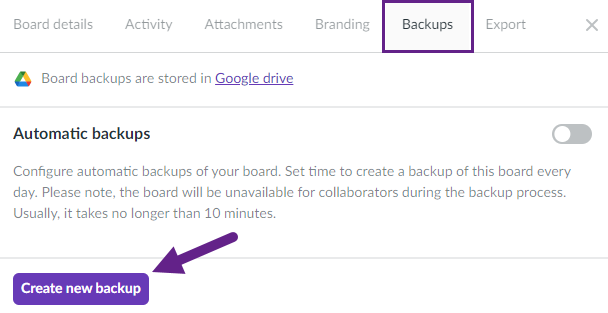
You will see the right-side panel. Please, navigate to the Backups tab and click the Create new backup button.
Kanbanchi will need some time to create the backup. You will see the progress. When the backup is ready, you will see it in the tab. Board backups are stored in Google Drive. You may navigate to the destination by clicking the link in the Backups tab.
You will be redirected to the backups folder of the board. Please, download the backup file to your computer.
Upload the .xml file to OneDrive.
Important: If you are a paid Kanbanchi user, you need to change the subscription platform type before proceeding with the next step. If you are the subscription Admin, you may do it yourself. Otherwise, please ask your Admin to make the change.
After that, please sign out. Instead, sign in with Microsoft.
Please, click the Browse boards button on the left-side navigation panel.
At the bottom of the screen, you will see the Restore board from backup option.
Click it and choose the .xml file from OneDrive. Kanbanchi will restore the board from the backup. Thus, the board you used in Kanbanchi for Google Workspace will become available in Kanbanchi for Microsoft, and you will migrate from Kanbanchi for Google Workspace to Kanbanchi for Microsoft.
How do I switch the platform type for Kanbanchi subscription?
Subscription Admins can change the platform type in the Admin panel. Please click your profile name in the lower left corner and choose Manage subscriptions.
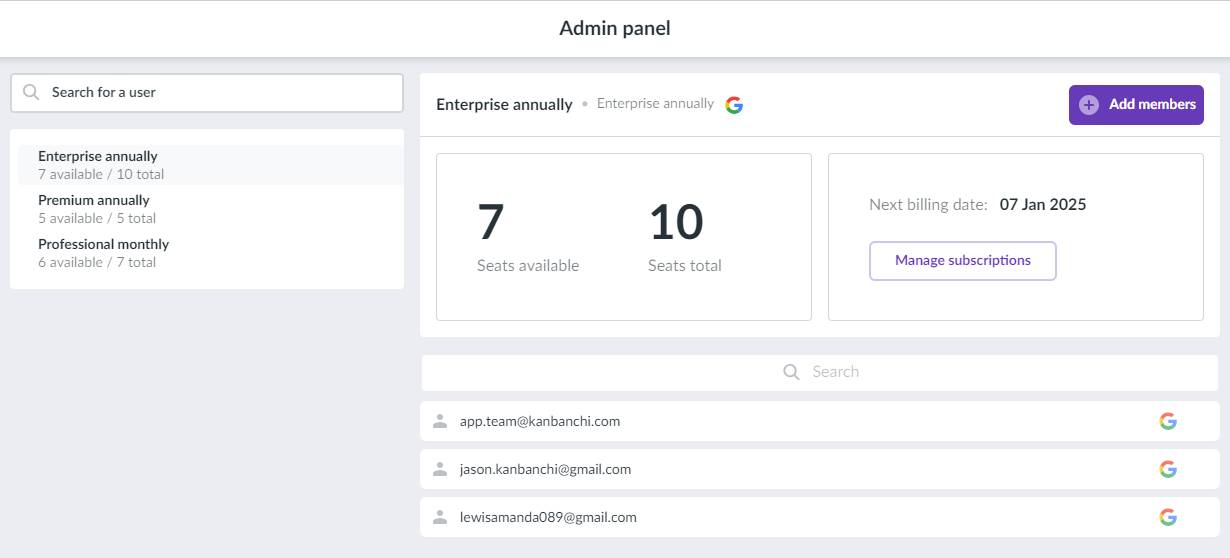
You will be redirected to the Admin panel.
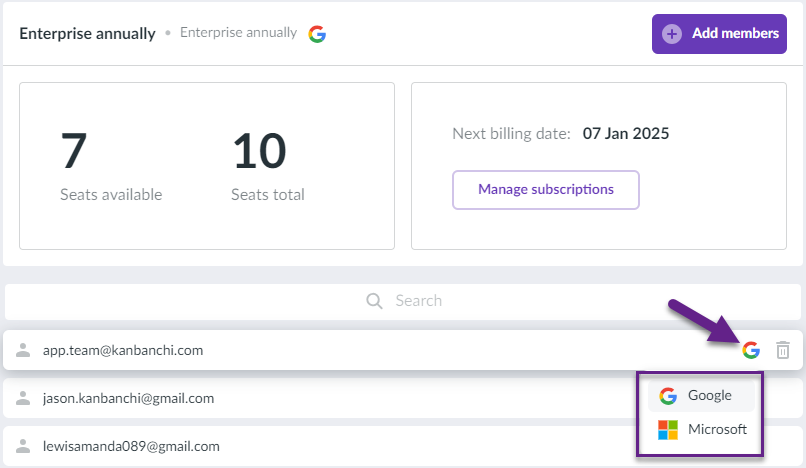
You can change the platform type for a specific user. Find their email in the list and click the Google icon. Choose Microsoft instead. Now, the subscription for this user has been converted to Microsoft.
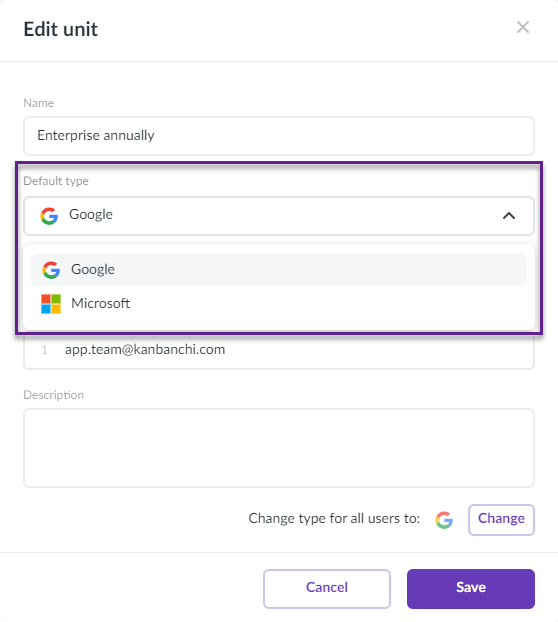
You may choose the default platform type for your subscription. Thus, all the new users added to the subscription will have the chosen platform type. To do it, please, click the three-dots icon and choose Edit unit.
Choose the platform in the Default type field and click the Save button.
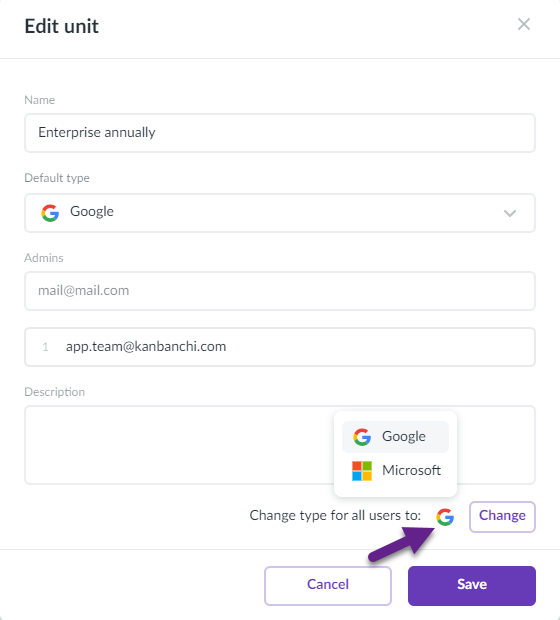
You may also change the platform type for all users in the subscription. Please, click the platform icon next to the "Change type for all users to:" option. Choose the needed platform and click Change.
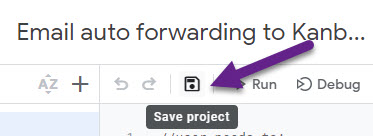
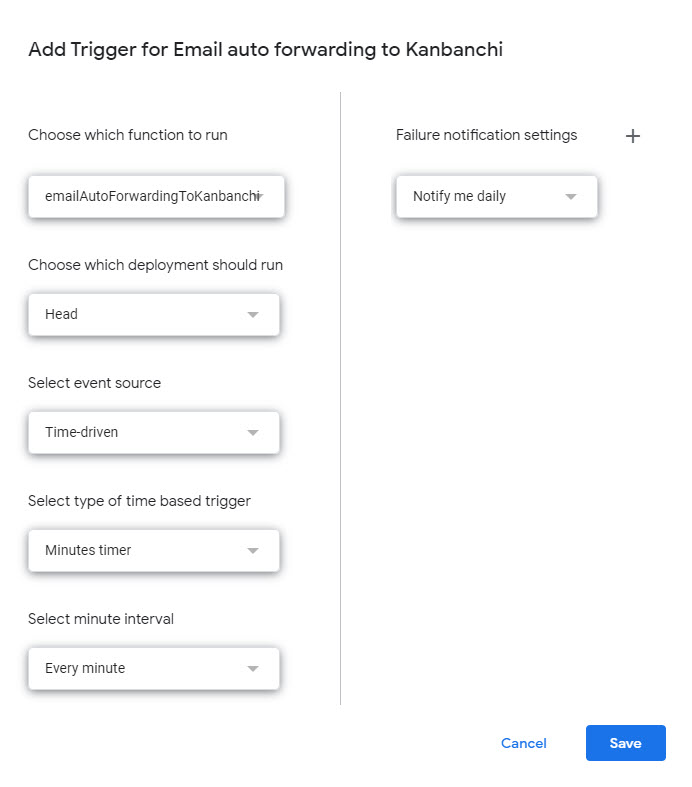
Replace the value of const recipient = in row 8 with your board email.
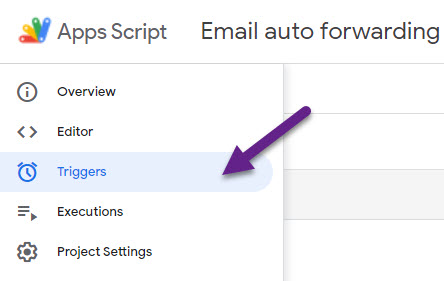
Save the project.
Click Triggers in the left-side panel.
Set a trigger with the following settings and click Save:
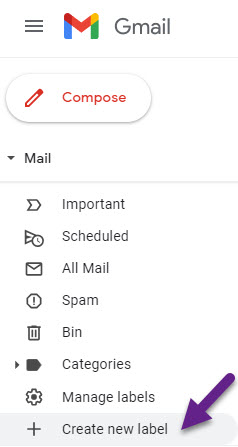
Go to Gmail and create a label for all new emails that you want to be forwarded to Kanbanchi.
Click +Create new label.
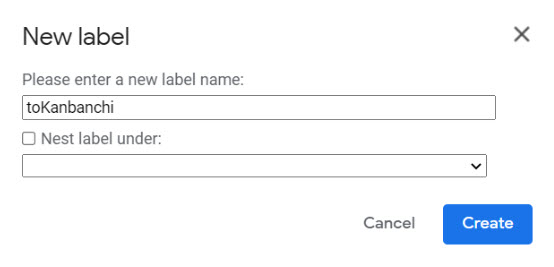
Enter toKanbanchi as a name and click Create.
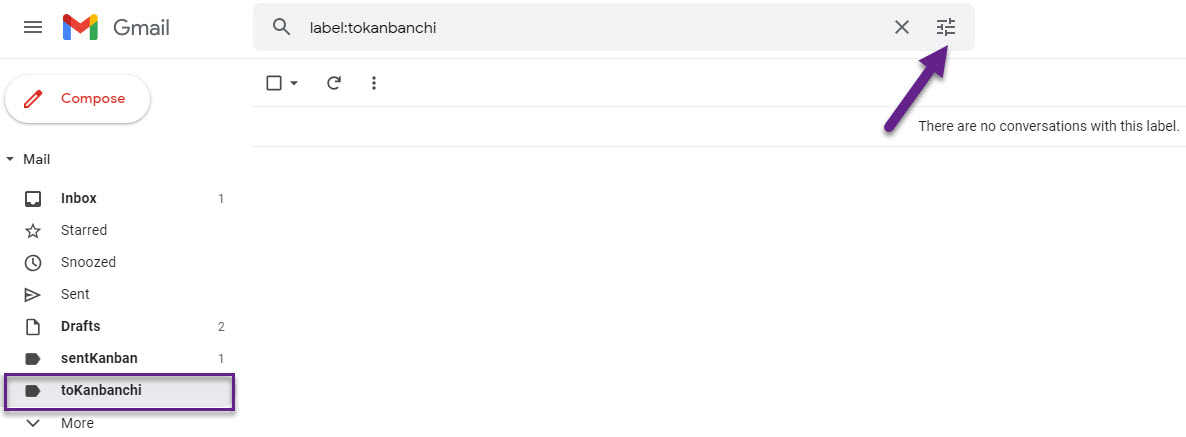
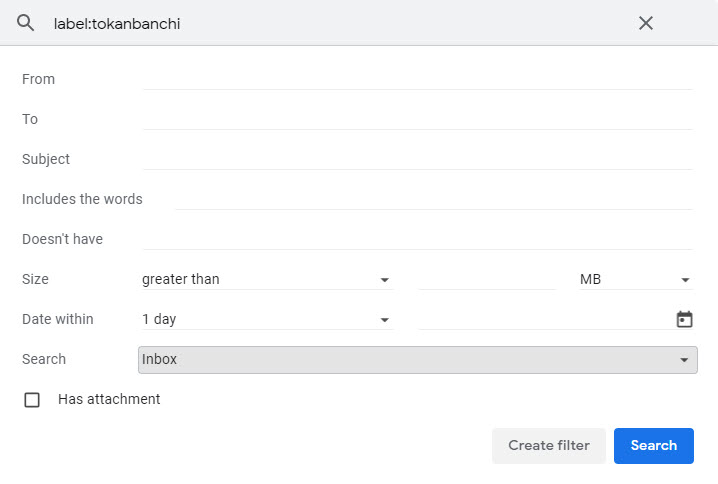
Choose the label on the left-side panel and click the filter icon.
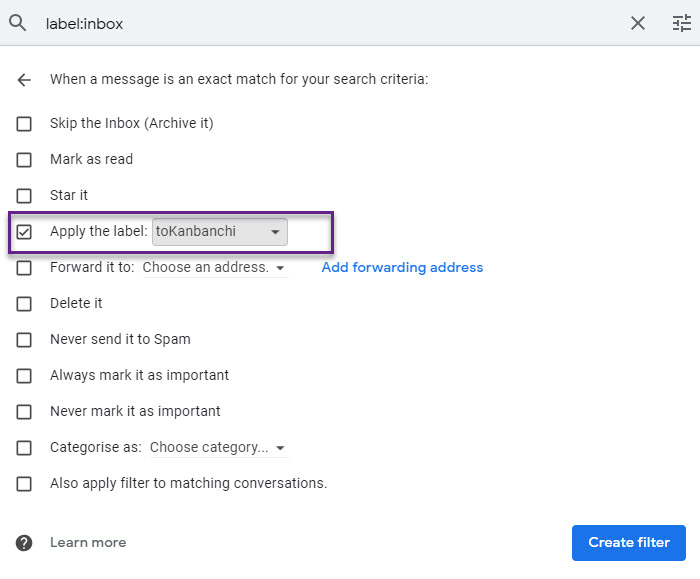
Choose Inbox in the Search field if you want all new emails to be forwarded or set up your custom filter. Click Create filter. Tick Apply the label option and choose toKanbanchi in the drop-down.
Now all inbox emails will be automatically forwarded to your Kanbanchi board.
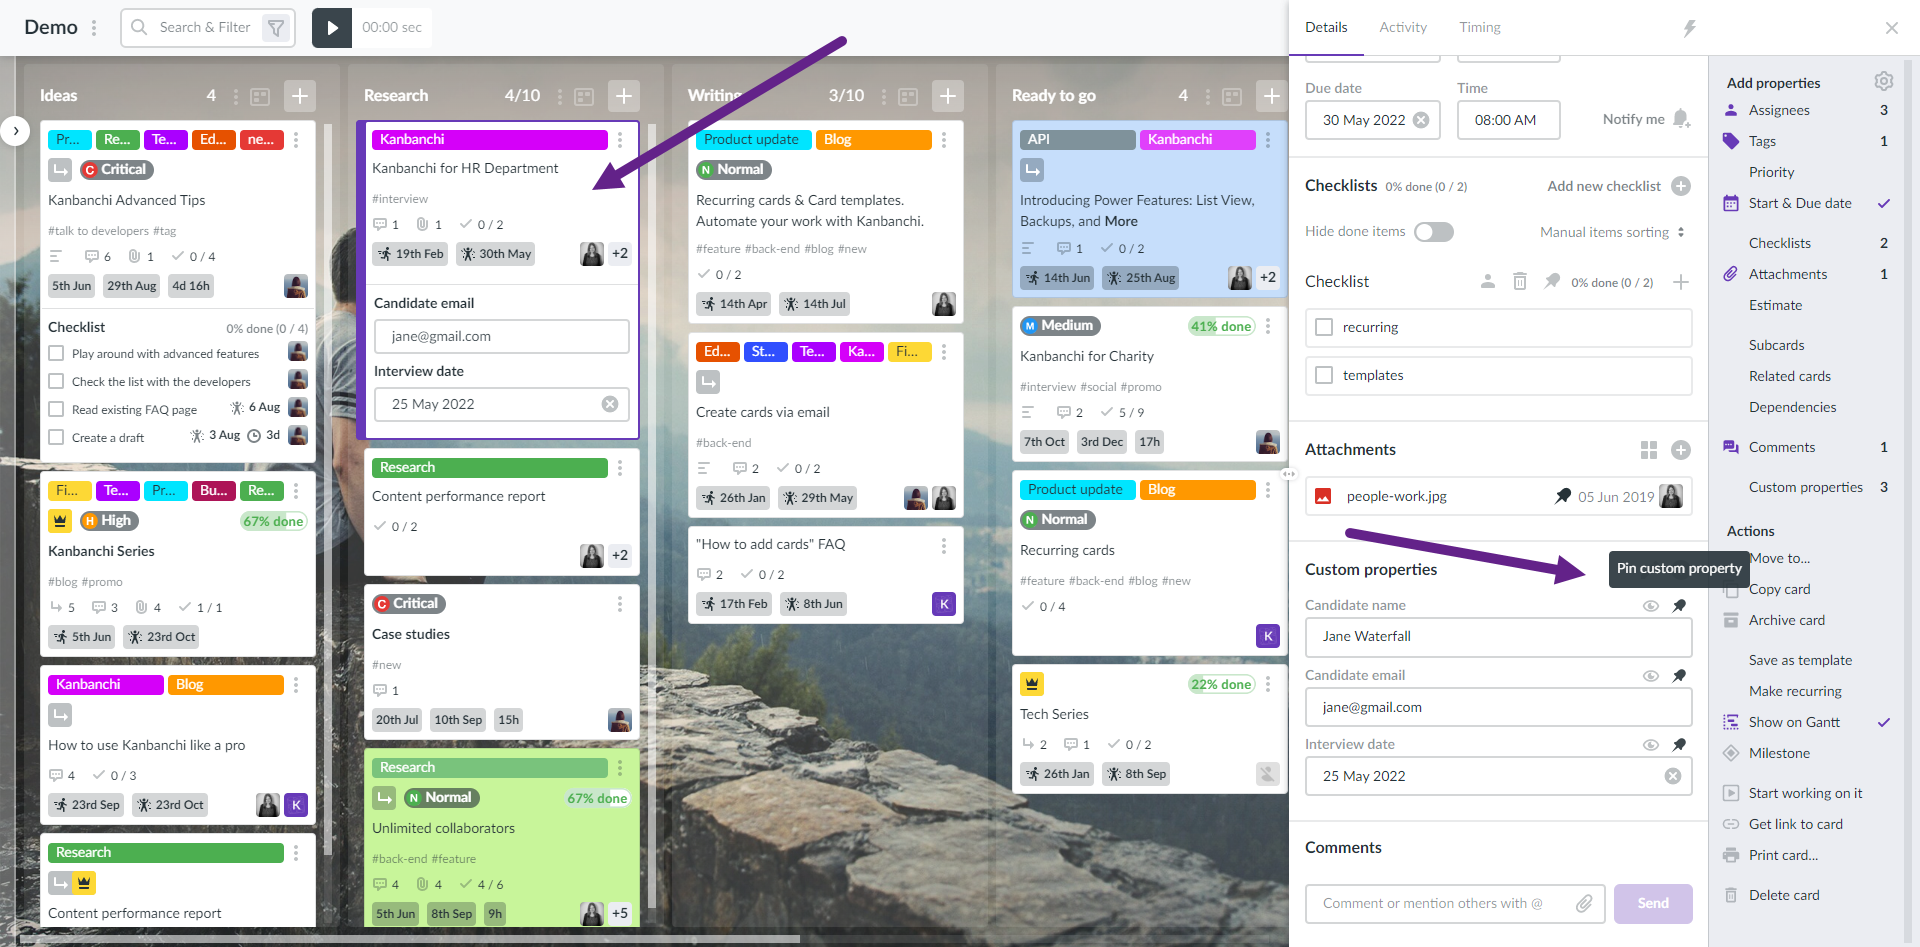
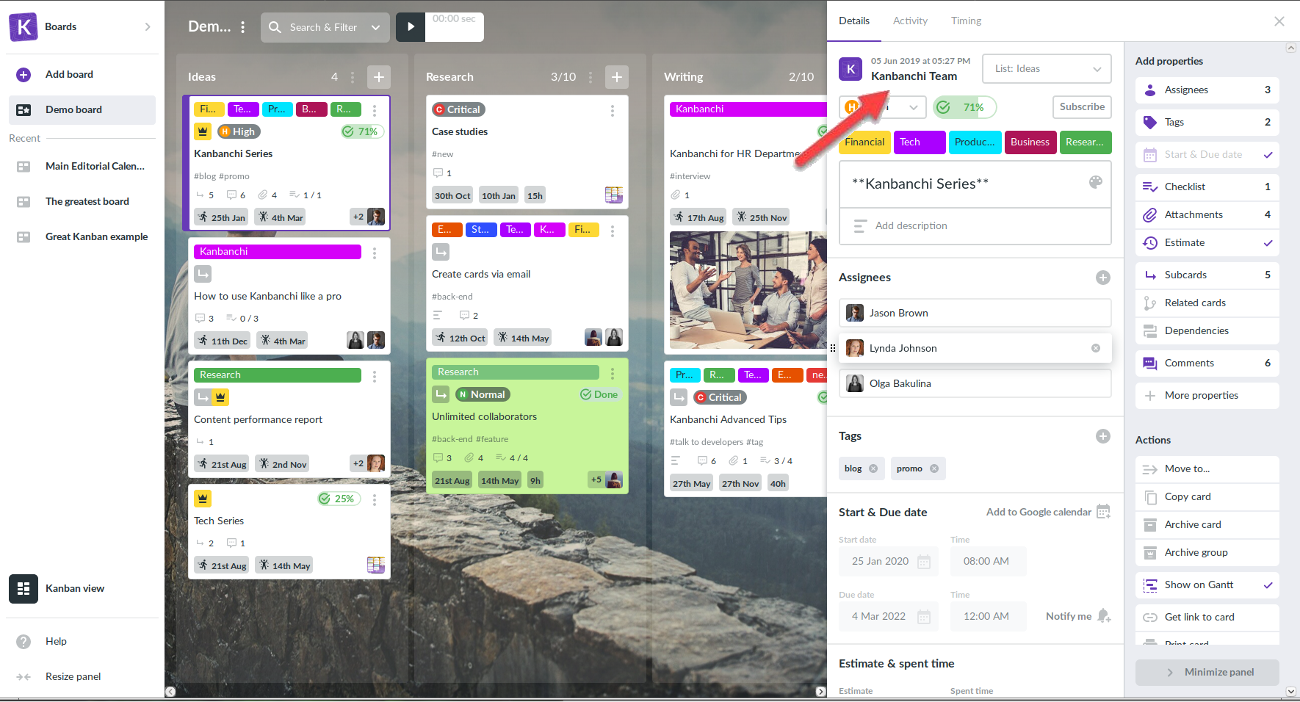
In case you need custom properties to be displayed on a card you may pin all of them or some of them to a card. To do it open the card and go to the Custom properties section. If the card has no custom properties, please, create them. Find the pin icon next to the property title and click it. To unpin the checklist from the card, open the card again and click.
Pinned custom properties will be visible on a card when it's not opened and you will be able to edit them from the board without the need to open the card as well. You can also save cards with pinned custom properties as templates to create a canvas for your tasks.
No matter what the pros and cons of mobile working are, this is clearly something that is here to stay. People now want to use their smartphones and their tablets to carry out their work in a way that suits them better, so it makes sense to find out how to do this in the most suitable way. This means that you may want to know whether you can use a Kanbanchi mobile app or if there is some other way of getting the benefits of this powerful tool on your smartphone or tablet.
What Are the Kanbanchi Mobile Options?
The good news is that there is more than one way of getting into the Kanbanchi tool and using it to improve your productivity and collaboration.
Use the Kanbanchi Mobile App
There are a couple of different ways you can add the app.
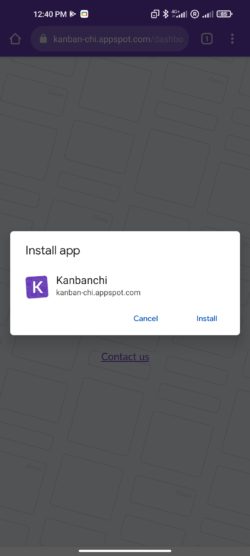
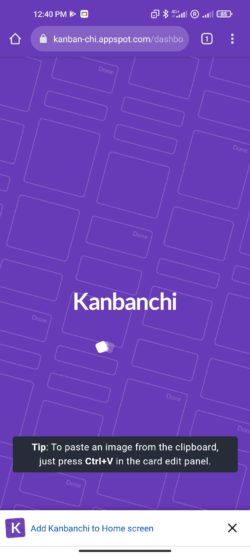
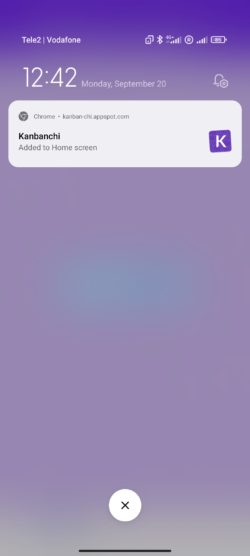
The first one is to accept the suggestion to add Kanbanchi to your home screen. You will see this option offered if you visit the Kanbanchi site using your mobile browser. Just accept it and then install the app directly onto your device.
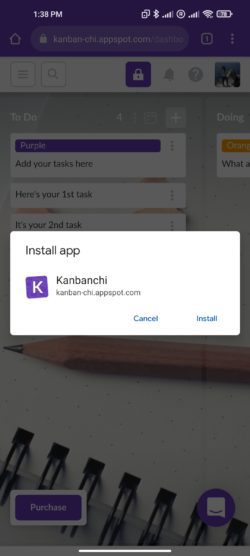
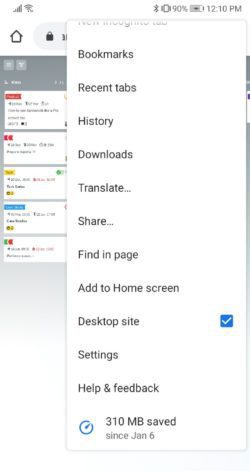
Another way of downloading the app comes when you are already logged into the mobile website on your phone or tablet. In this case, you only need to click on the three dots in the top right corner. You will see the option to install the Kanbanchi mobile app appears and just need to confirm that this is what you want to do.
Once you have carried out either of these approaches, you will get a notification that the app has been successfully installed.
Use a Mobile Browser
There is no doubt that installing the mobile app is the best way to have Kanbanchi’s wide range of features at your fingertips wherever you go. However, what about those occasions when it perhaps doesn’t suit you to download the app?
In these cases, you can navigate to kanban-chi.appspot.com on any mobile browser. Once it opens, you will be able to operate the software in exactly the same way you do when using the desktop site.
What is the Difference Between These Methods?
You will get the same great task management and project management features regardless of whether you enter on a laptop, use the Kanbanchi mobile app, or enter the site using a mobile browser. So, you can choose whatever suits you best.
Want to give Kanbanchi a try on your chosen devices?
30. What are additional notifications in Kanbanchi?
You may ask why you need additional notifications when there are so many options that you may set up in Kanbanchi. However, sometimes it happens, accidentally or deliberately, that your colleagues may turn their notifications off. As a result, they miss something very important and you may discover it at the very worst moment. We hope you've never had such situations but those who have had will be so excited to hear that Kanbanchi now has additional notifications. You may notify your colleagues right after an important action that you have done or later when discovering that someone missed their notifications.
31. How do I make sure my colleagues get notifications about all important actions?
Being informed is vital when collaborating with a team. That's why you don't want your colleagues to miss important notifications about the changes on your shared boards. The good news is that Kanbanchi won't let it happen.
32. How does Kanbanchi card progress automation work?
Kanbanchi card progress automation is a perfect way to streamline processes of keeping boards updated. Depending on a card status, Kanbanchi will move it to a specific list, or the other way round, Kanbanchi will mark a card as a done card when you move it to a particular list.
33. How can I automate my workflow with Kanbanchi?
To automate your workflow you may use the following Kanbanchi features:
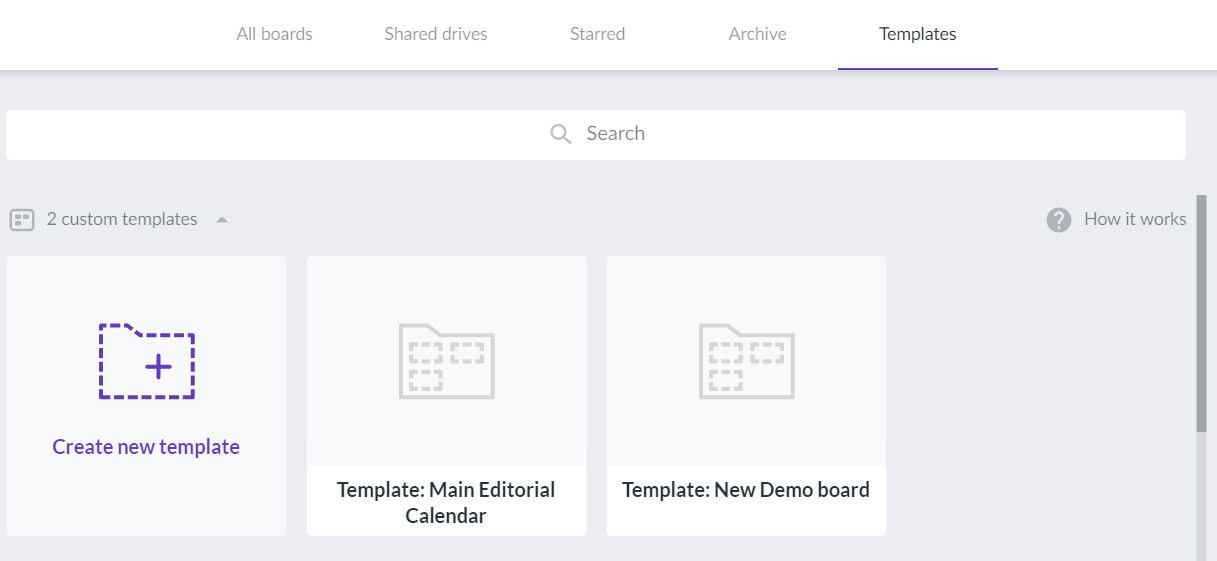
Board templates: you may choose one of the defaults Kanbanchi templates to adopt the app easily and start project planning right away. Additionally, you may save an existing board as a template and use the same structure for another department.
Card templates: in case most of your cards are of the same structure, you may use card templates and perform fewer actions while setting your board up.
Recurring cards: tasks of recurring nature are common for most types of workflows. Set up the schedule and parameters and Kanbanchi will create the cards for you.
Dependency chain shift on the Gantt chart: you may change dates for the group of dependent tasks at once.
Card progress automation: depending on the status of a card, it will be put into a specific list of your board or the other way round, when you move a card to a specific list, it will merked as done.
You may create as many boards in Kanbanchi as you need. To create a new board click "Add board" in the top left corner.
Then choose "Create new board" from the drop-down list.
And you will get a standard Kanbanchi board ready to be customized.
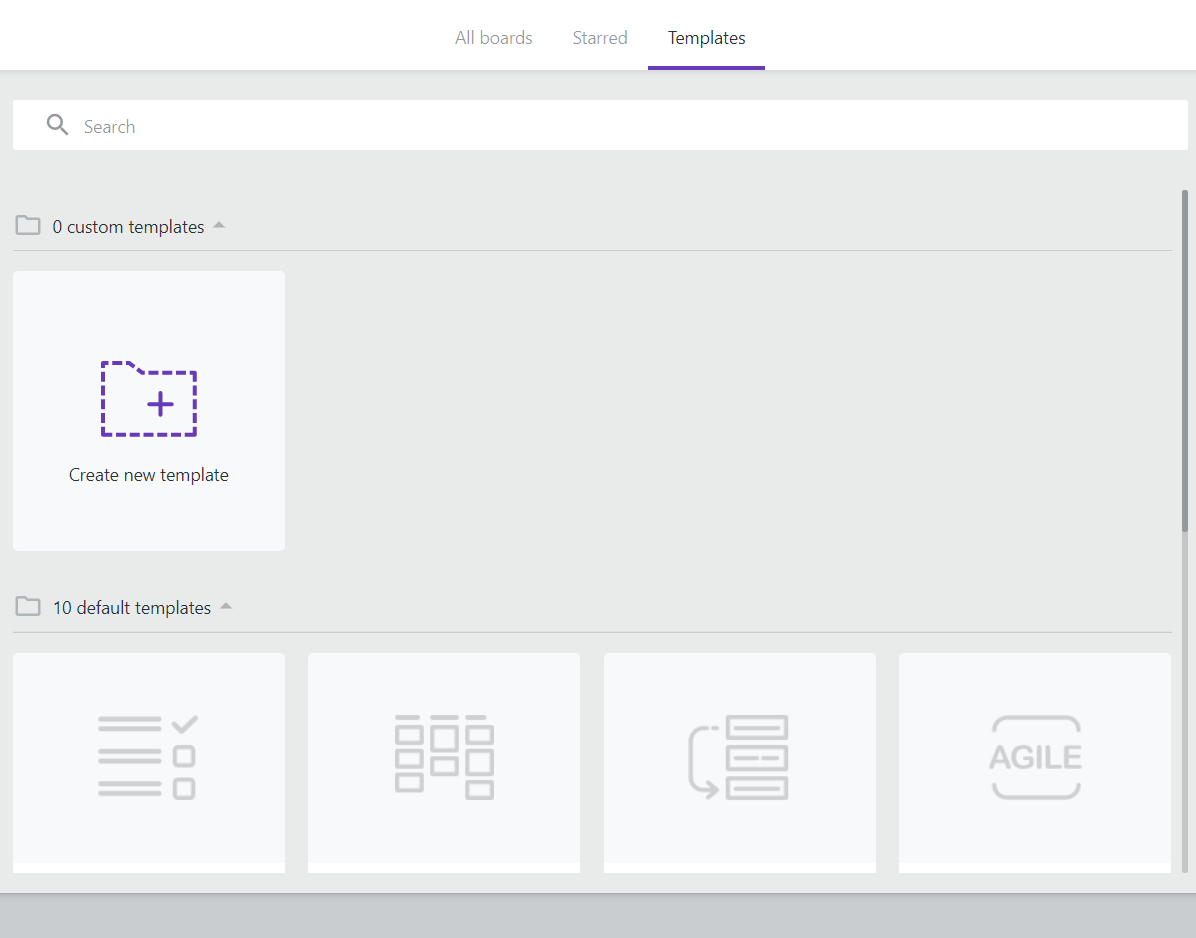
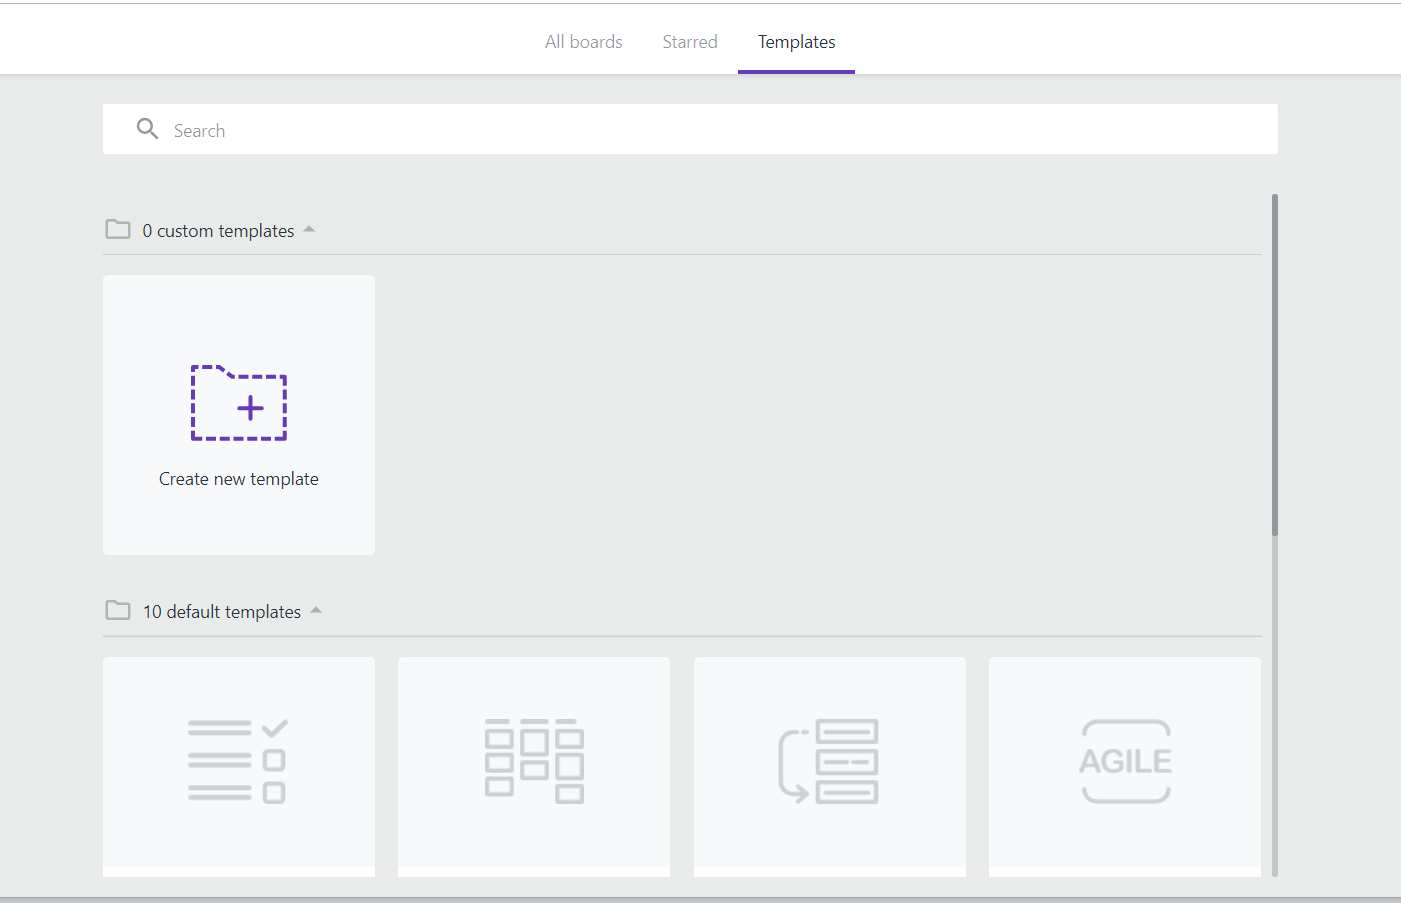
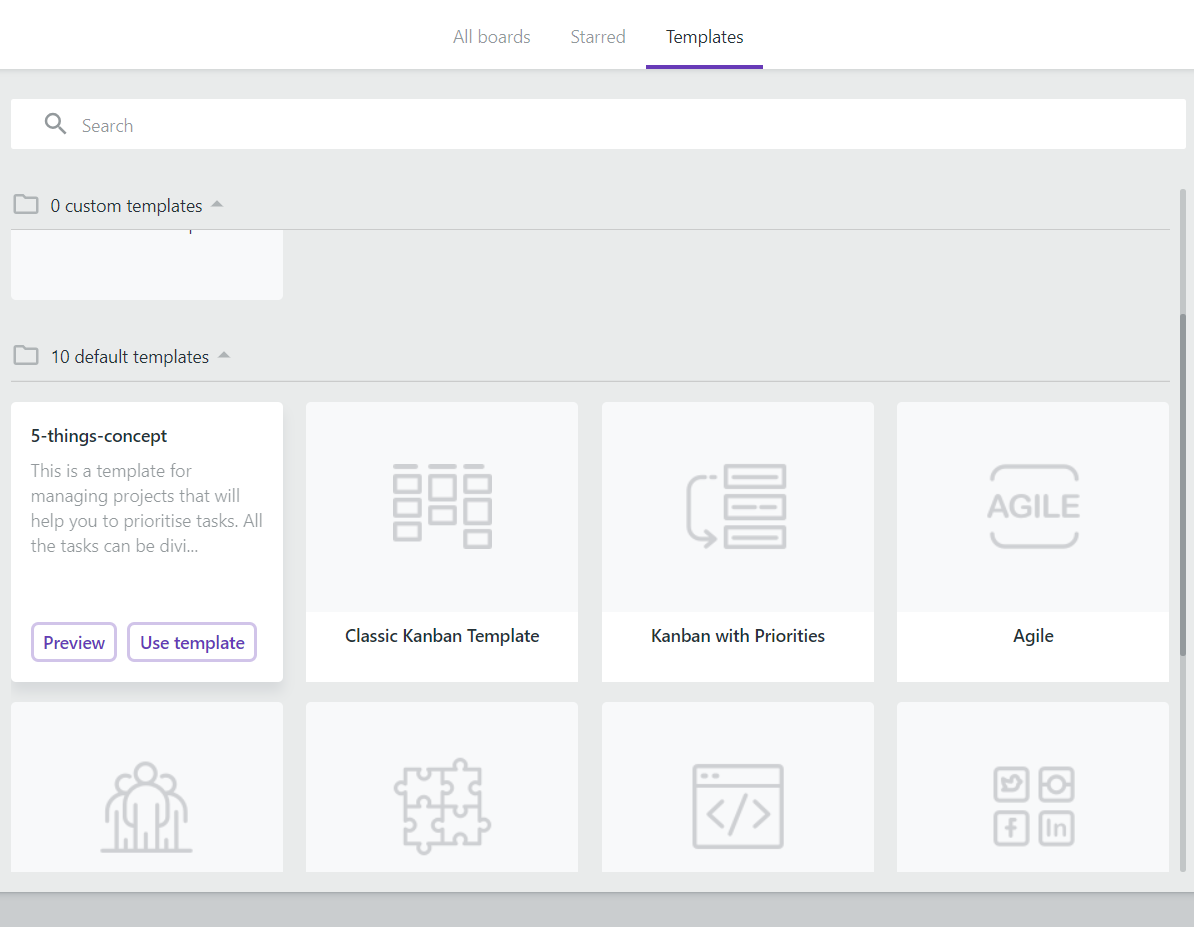
You can also use board templates in Kanbanchi. Just click "Add board" in the top left corner, choose "Create board from template" and find the template most suitable for your needs.
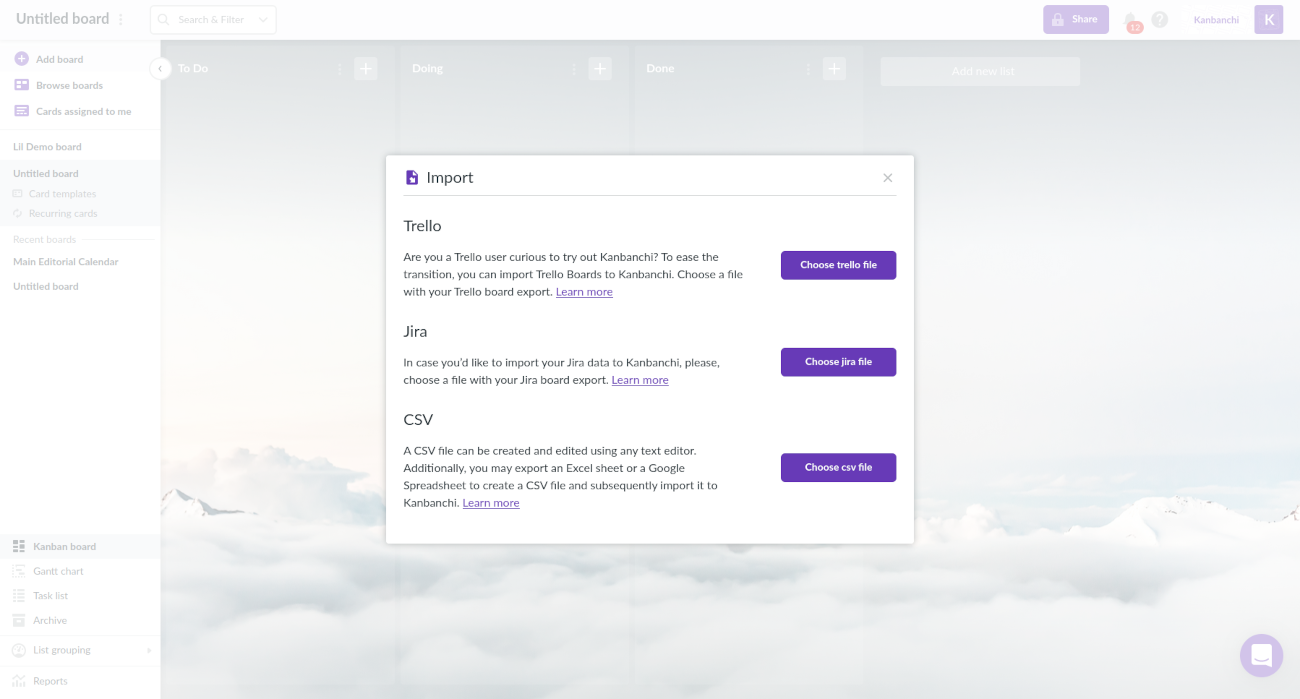
Also, you can import Trello, Jira, and CSV files to Kanbanchi and Kanbanchi will create a new board using imported data. Just choose "Import board" and follow the detailed instructions.
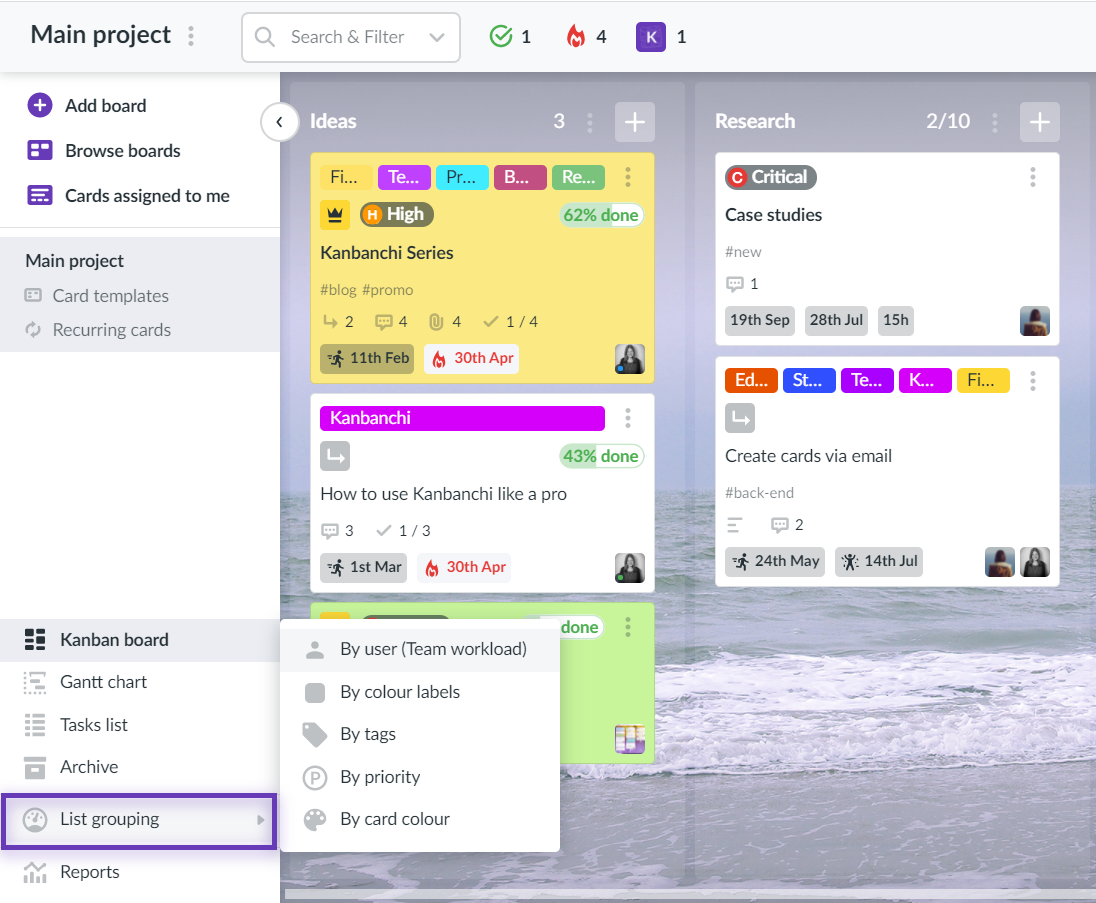
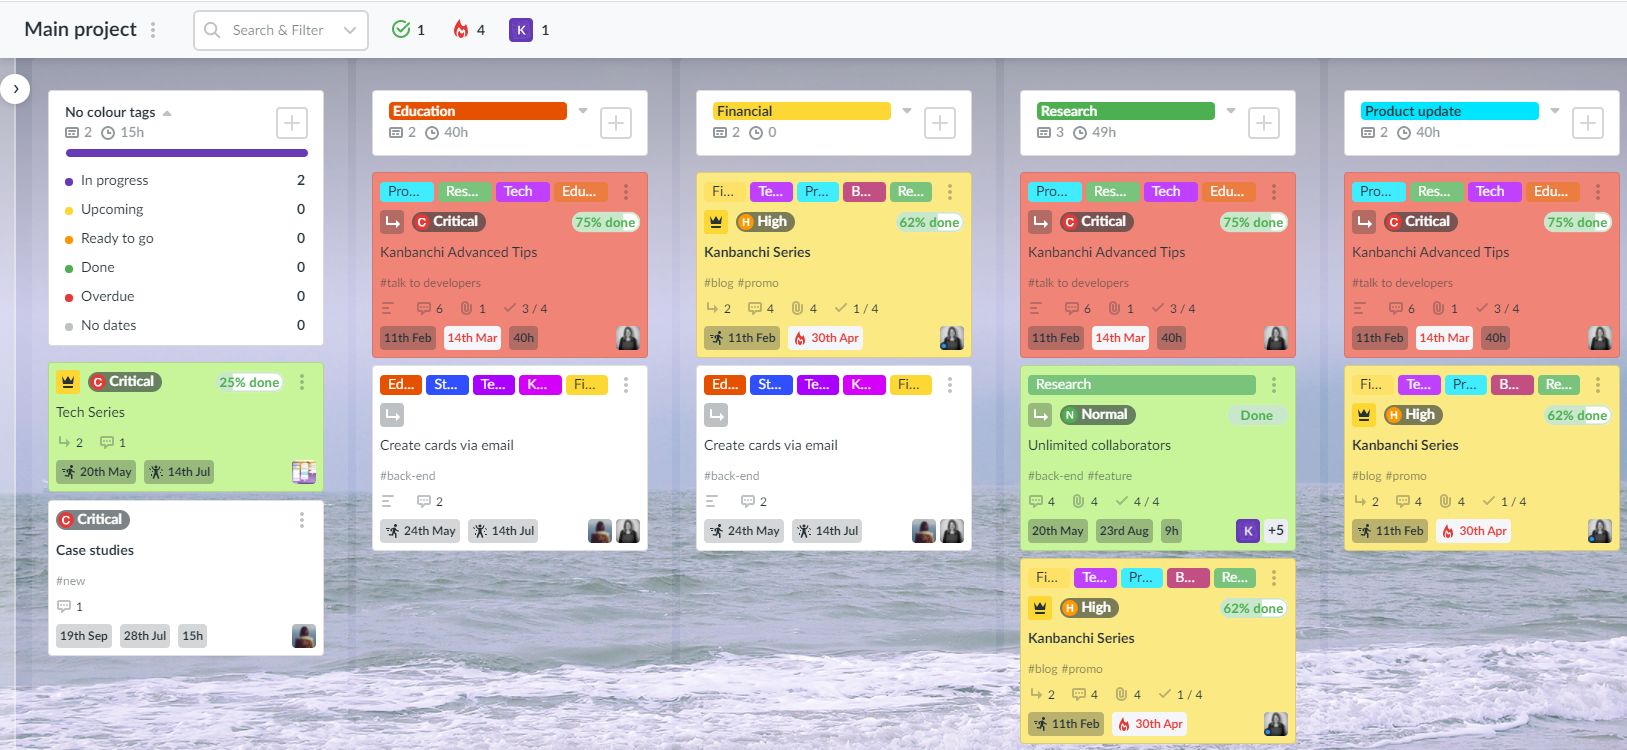
List grouping is Kanbanchi view that can be used to see Kanbanchi cards grouped in lists by a specific property. To switch to the view click List grouping and choose one of the available options.
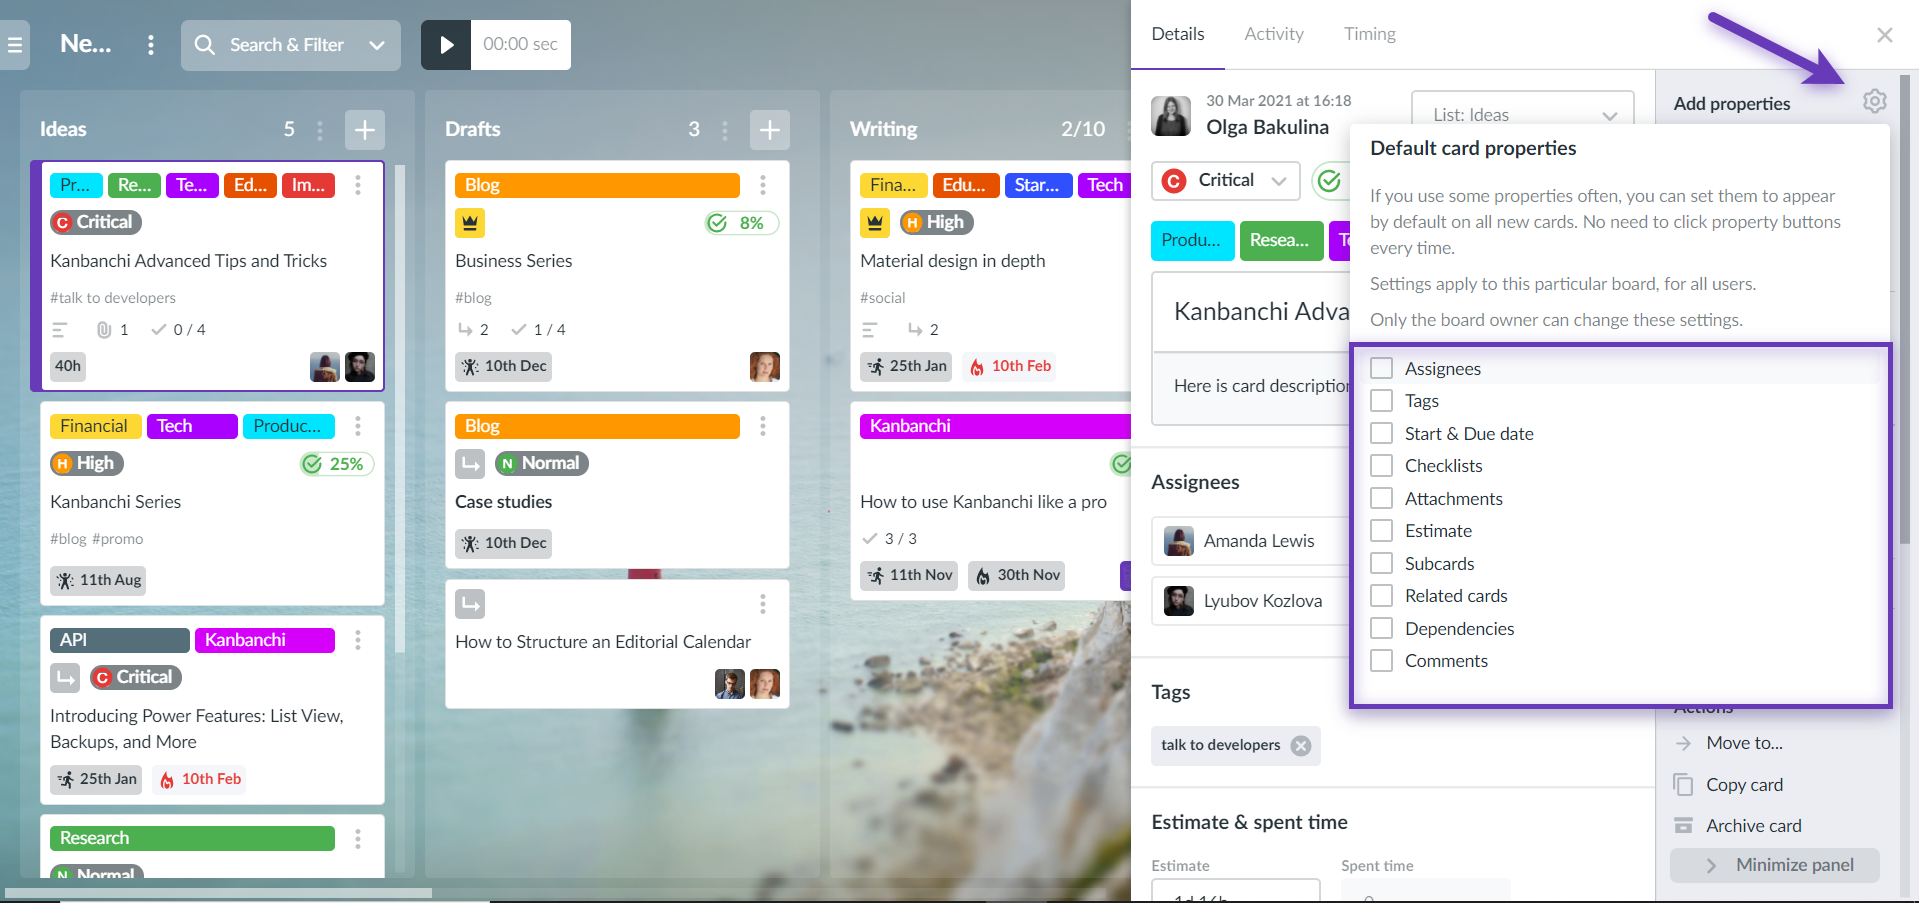
40. How do I set default properties for Kanbanchi cards on a specific board?
You may set default card properties in Kanbanchi. It is a helpful feature for those who use pretty much the same properties for almost all cards. This setting is board specific. Thus you may set default card properties on different boards depending on the nature of the project.
To set default properties open a card and click the nut icon in the right-side menu. Click the corresponding checkboxes. When you create a new card on the board, it will automatically have these properties preset in card details.
Please, note: only the board owner can set default card properties. The settings apply to a particular board, for all users.
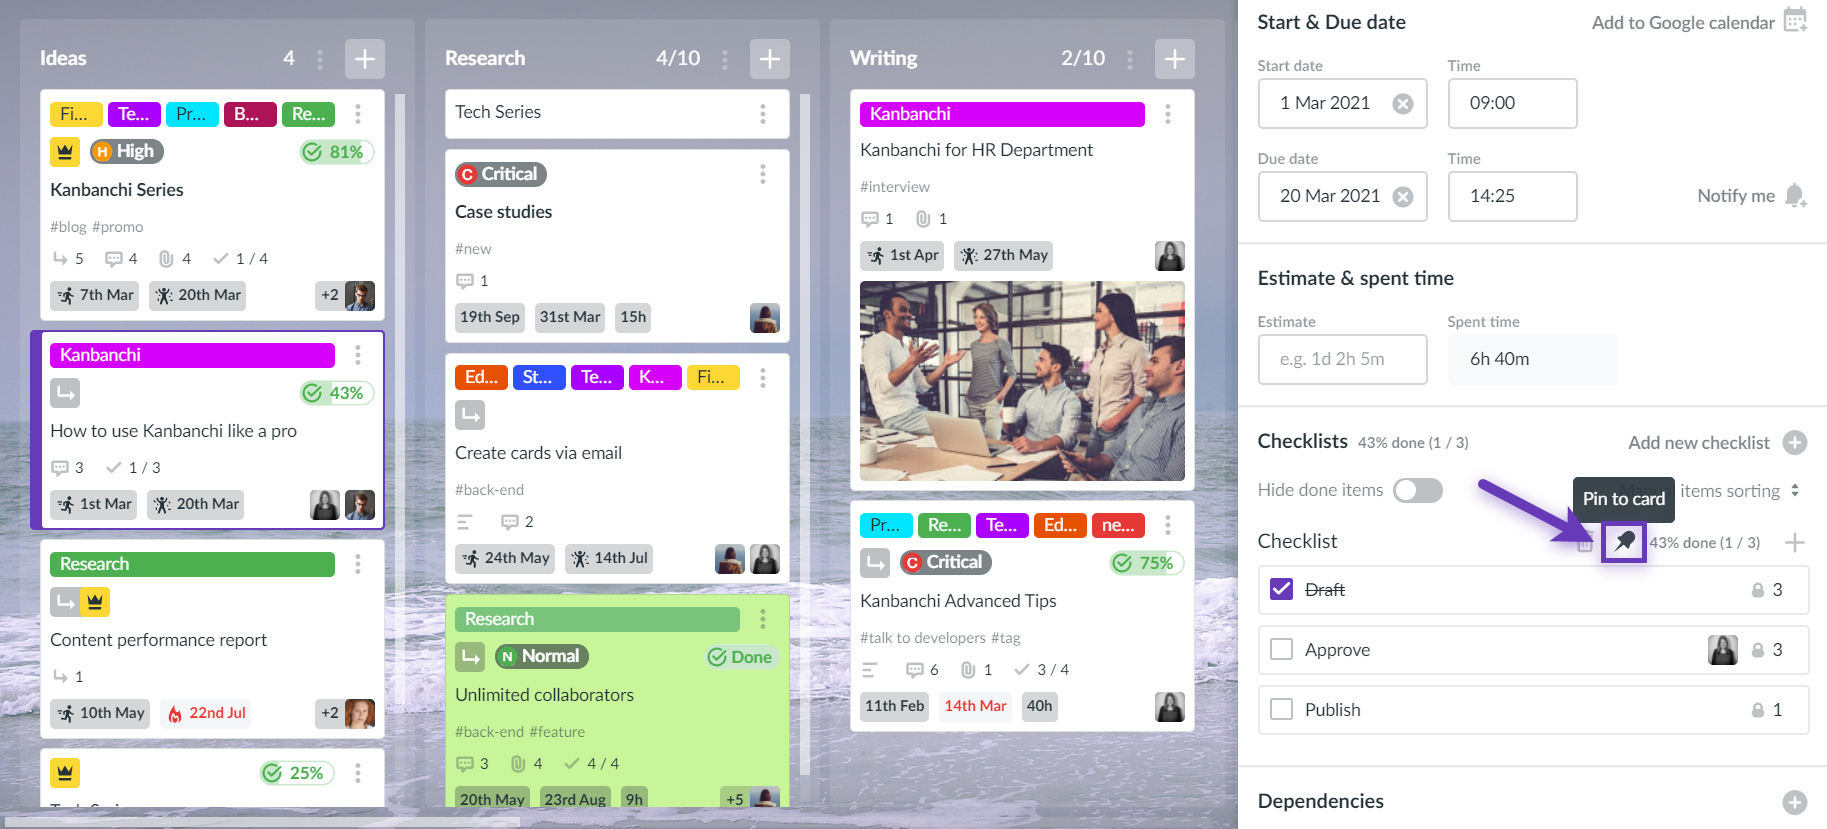
In case you need checklist items to be displayed on a card you may pin a checklist to a card. To do it open the card and go to the Checklists section. If the card has no checklist, please create it. Find the pin icon next to the checklist title and click it.
The order in which the items will be displayed on the card will depend on the sorting setting. If the Hide done items setting is enabled, the done items won't be displayed on the card.
Please, note: the weight indicator won't be reflected on the card if it equals 1 for all the items. However, if there is at least one item with a weight of more than 1 in the checklist, the weight indicator will be reflected on the card.
You may check items as done right on the card without opening it.
To unpin the checklist from the card, open the card again and click .
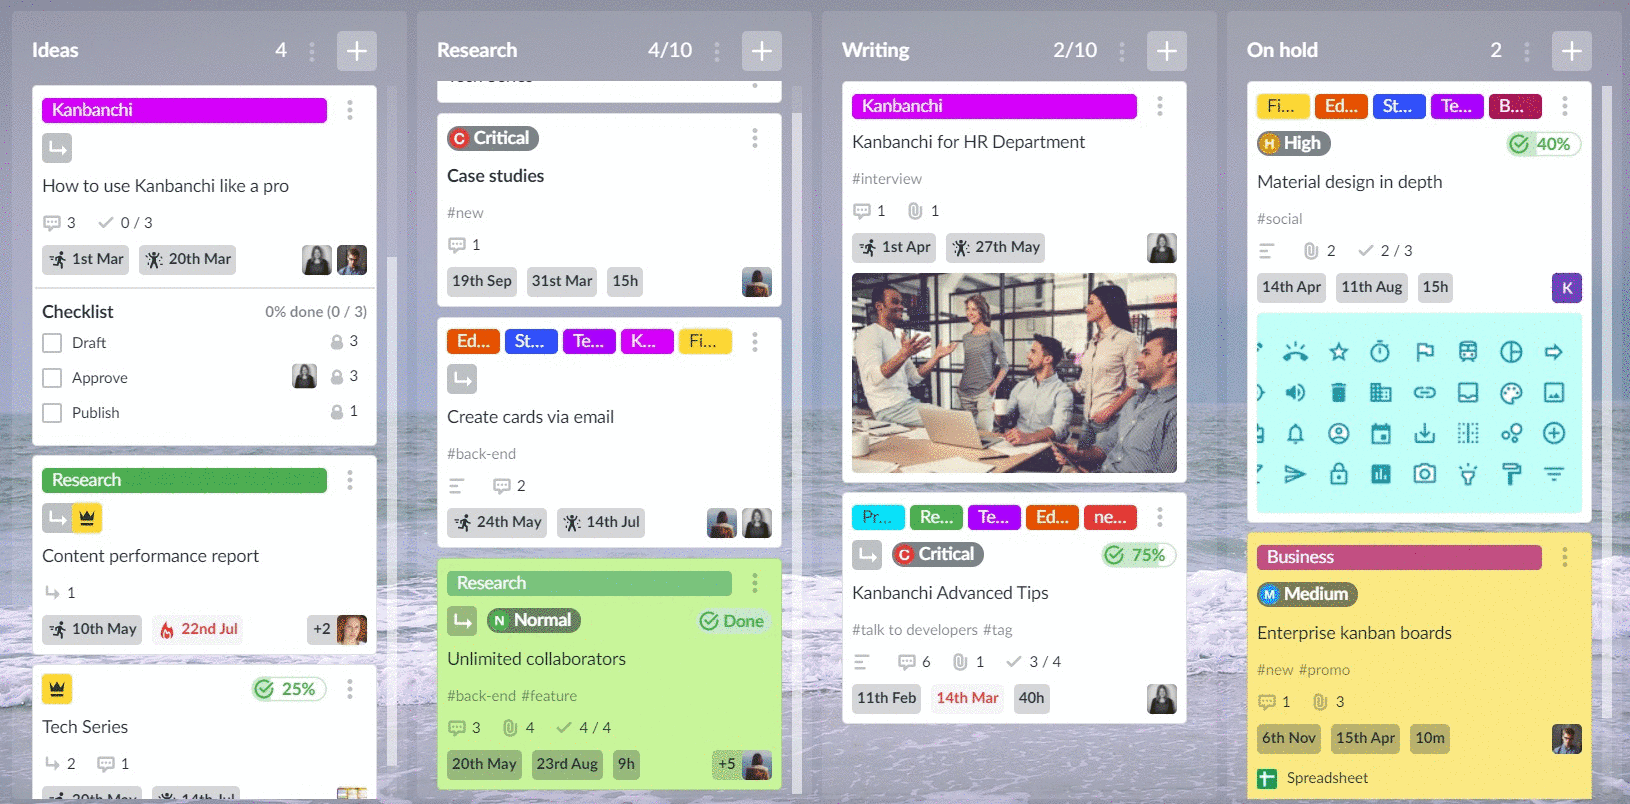
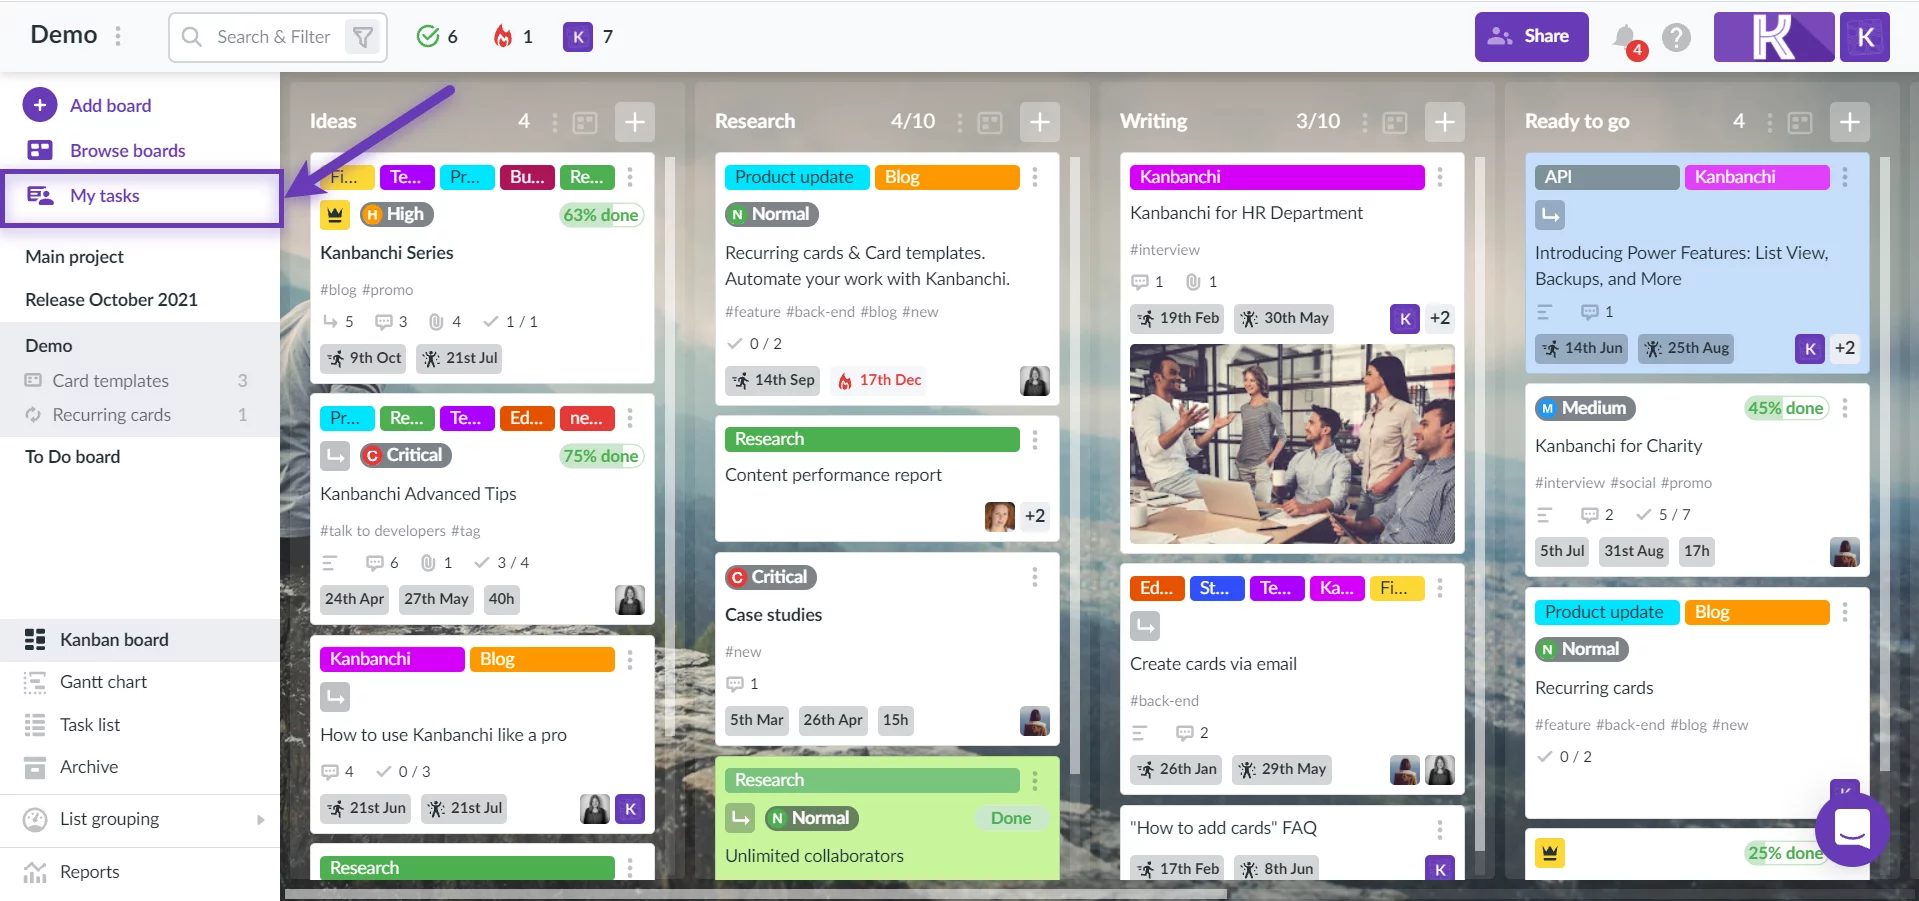
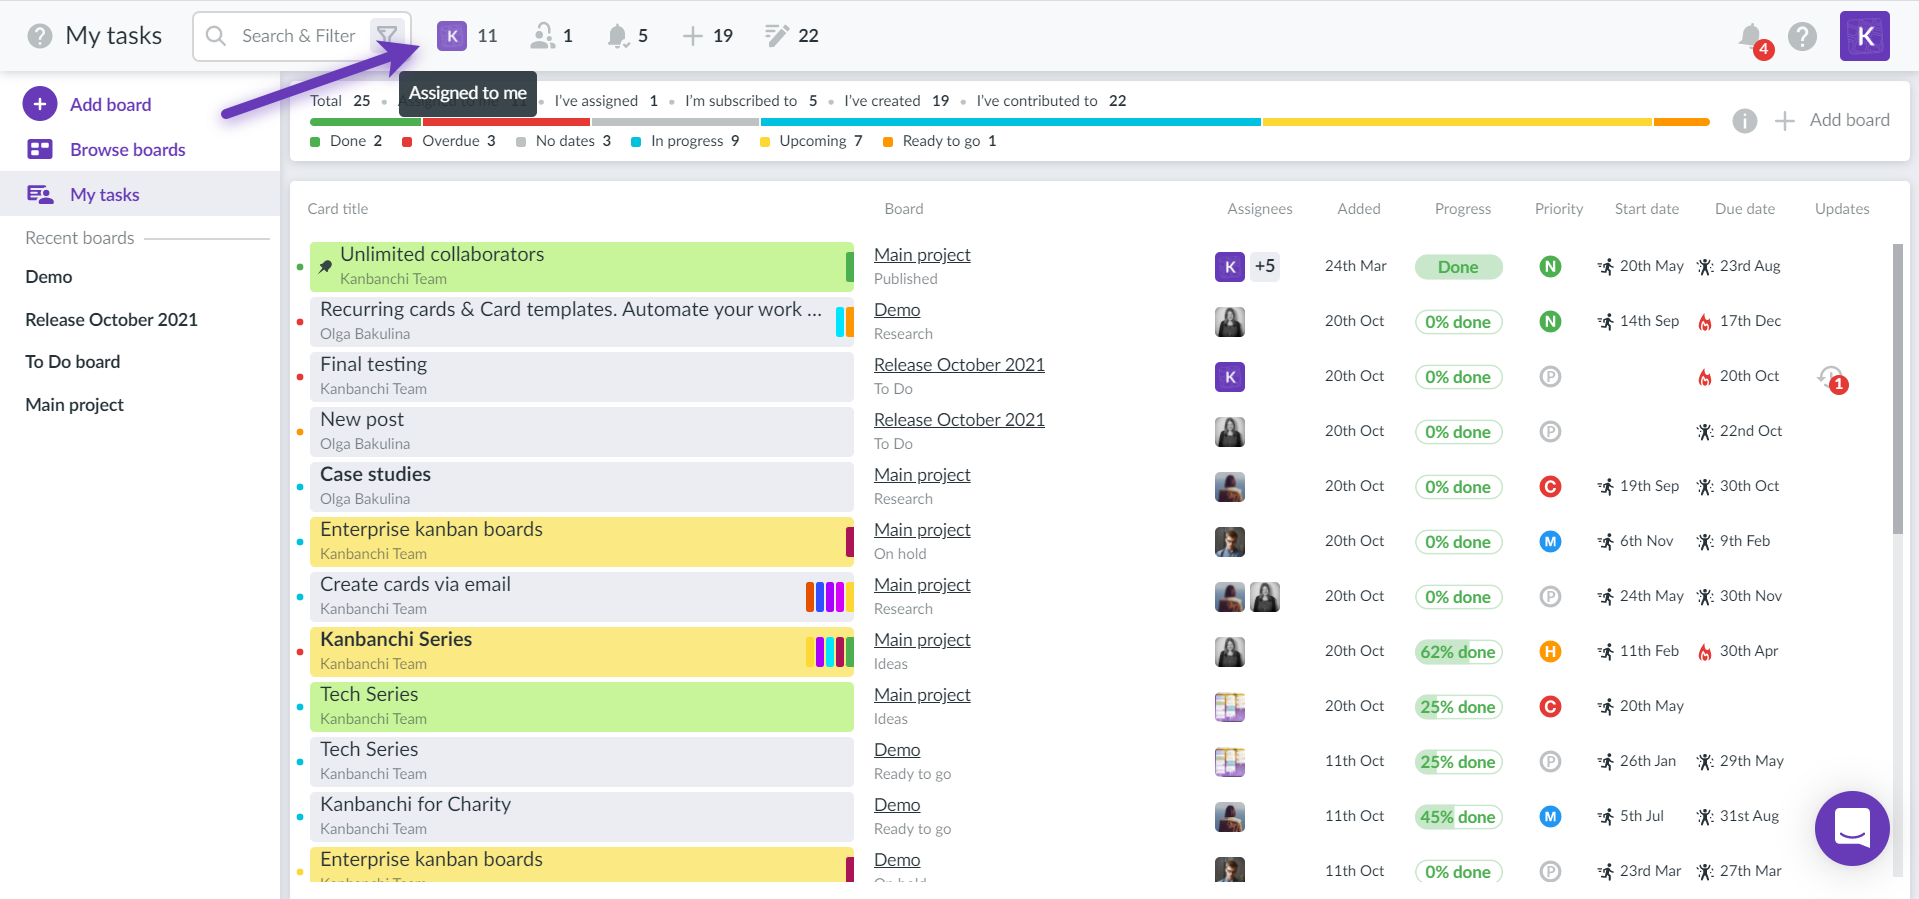
42. Where can I find all the cards assigned to me?
To find all the cards assigned to you from different Kanbanchi boards, please click "My tasks" in the left-side navigation panel.
You will see all the tasks you are involved in. To see only the tasks assigned to you, click the button with your profile picture at the top panel. The number on the button shows how many cards are assigned to you. "Assigned to me" contains all the tasks assigned to you, even if you made the assignment by yourself.
To learn more about the "My tasks" space, please review this FAQ article:
43. How can I use Kanbanchi on a mobile device? Is there a mobile app?
If you're looking for Kanbanchi mobile app then you will be interested in several options of how you may use Kanbanchi on your mobile device:
Any mobile browser. Just open app.kanbanhi.com and use it the same way you do it on your PC. Allows you to start working as well as to evaluate Kanbanchi during a piloting period.
Install a separate web-based app on your mobile phone. This is a more proficient way of using the app on your phone/tablet. it gives you more opportunities and control over the app on your mobile device.
Separate Kanbanchi app on mobile devices
We do care about your Kanbanchi experience on mobile devices. Currently, you are able to install Kanbanchi as a separate app on your mobile device. First of all, if you haven't yet done it, the app itself will suggest this option to you whenever you try to log in from your mobile browser. You will see the suggestion to add Kanbanchi to your Home screen. Choose this option and then choose to Install the app.
When the installation is completed, your phone should send a notification, and also you will see the Kanbanchi app among your apps. You may change its location as any other app on your mobile phone.
*What if I missed or declined Kanbanchi's suggestion to add itself to my Home screen?
You may install the Kanbanchi app at any time. Whenever you want to do it, please, log in to Kanbanchi in your mobile browser and tap on a three-dot sign in the upper right corner. From the list of actions, please, choose Install app and then confirm that you want to perform this action. Kanbanchi app will appear among your other apps on your mobile device.
Using Kanbanchi in a mobile browser
All you need to do is open Kanbanchi in a mobile browser. Quick access from the home screen can be configured in most browsers. Just open browser settings and choose “Add to home screen”. You will see the Kanbanchi icon on the home screen. Additionally, you may switch from the mobile version to the desktop one in case you need a bigger visual. To switch, open browser settings and check in the checkbox beside the “Desktop site” option.
Please, don’t hesitate to contact us and share what's your preferred way of using Kanbanchi and why. Your feedback is the most important thing that can help us make a better app.
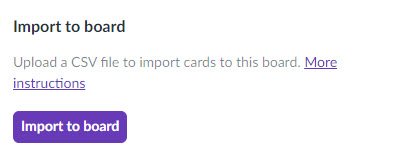
A CSV file can be created and edited using any text editor. Additionally, you may export an Excel sheet or a Google Spreadsheet to create a CSV file and subsequently import it to Kanbanchi. You may use this spreadsheet as a template
Step 2. Import the file to Kanbanchi
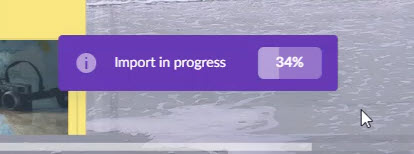
Open the list of your Kanbanchi boards. You will see the Import board from option at the bottom of the page. Please, click CSV and upload the file.
Kanbanchi will create a new board using imported data.
Please, note: only UTF-8 encoding is supported.
You may find out details about the other import options in this FAQ article:
45. How can I get to know who and when created a card?
You can easily find information about who and when created a card in the Card Details. Just click on a card and after a popover window appears on the right you will find this information at the top of it.
46. How do I see how much time my colleagues have spent on the task?
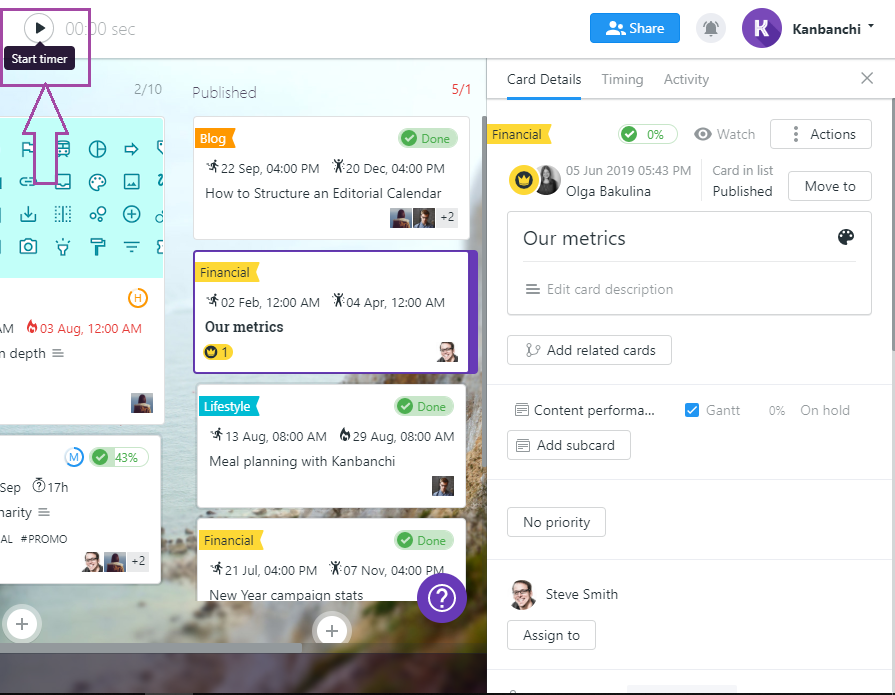
Click on any card on any dashboard and you will see the Timing section in the right panel. There you can see the report showing how much time your collaborators have spent working on the task.
If you don’t have Time Tracker, you will not be able to see the Timing section of the right panel. However, as far as each time entry appears as a simple comment in the Comments section of the right panel - you still will be able to see the time spent by your collaborators.
Gantt Chart is a horizontal graph used to track specific tasks in a project. When you switch to a Gantt Chart view you see the same cards as on your Kanban board but in a chronological order. Sounds simple, right? Gantt Chart in Kanbanchi is simple, intuitive, and will get you started in no time.
Switch to Gantt Chart clicking the drop-up list on the left panel of the board.
Choose Gantt Chart.
Switch to Gantt Chart clicking the drop-up list on the left panel of the board. Choose Gantt Chart.
To track time spent on your tasks you need to open the card with the task you want to track first. On the top panel of your dashboard a Start timer icon will appear. Hit the start button when you start working on the task and stop it when you’re done.
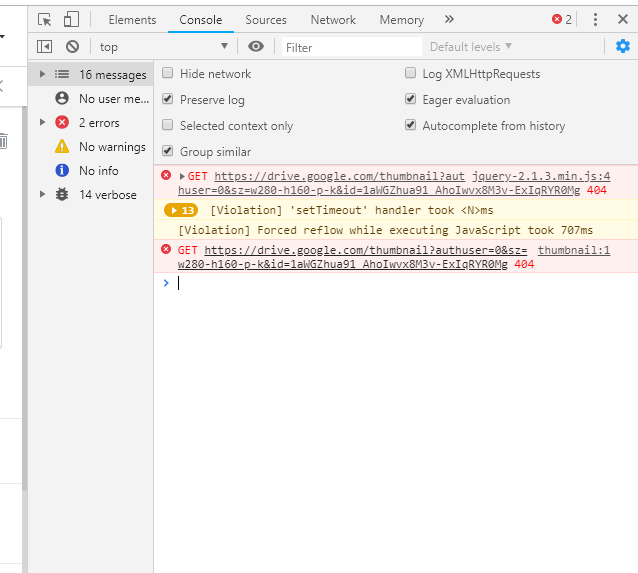
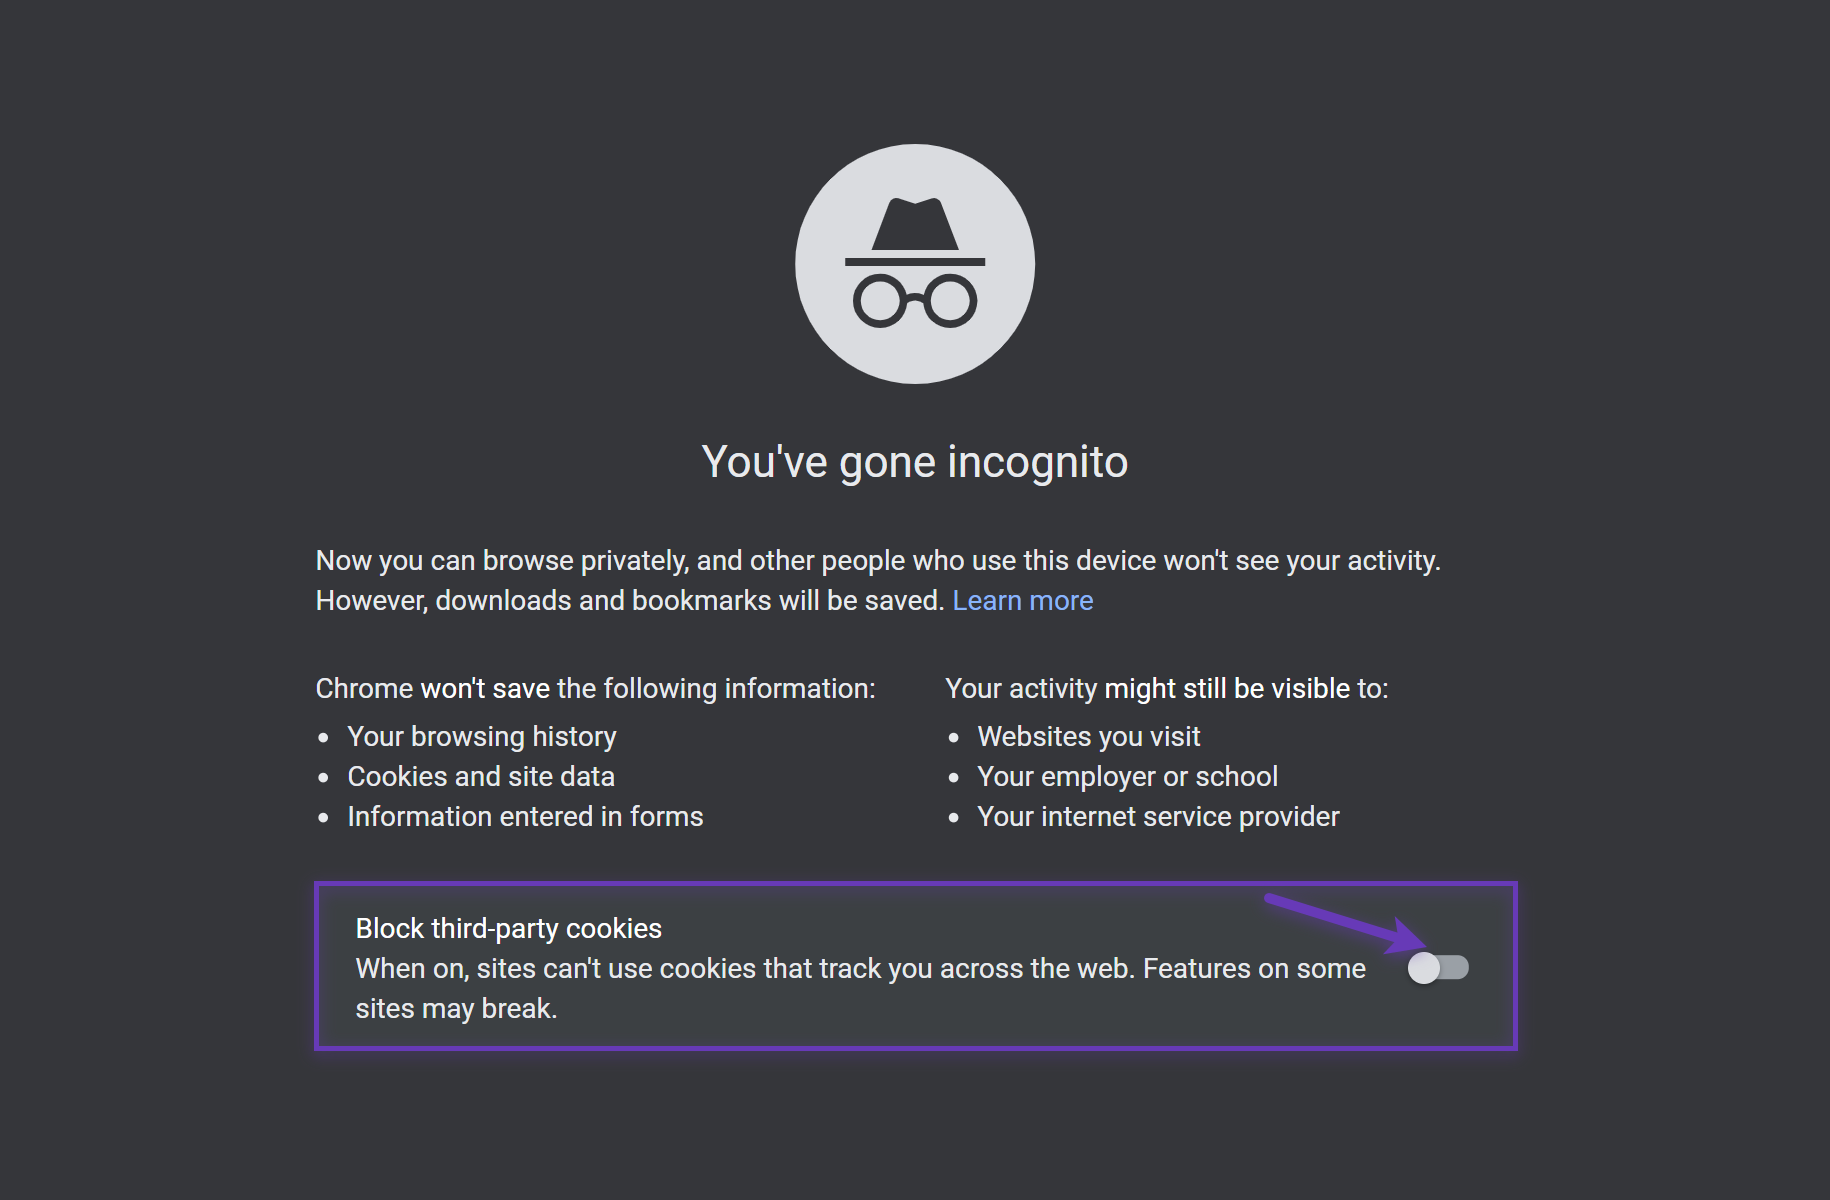
49. I have a problem with Kanbanchi. What do I need to do?
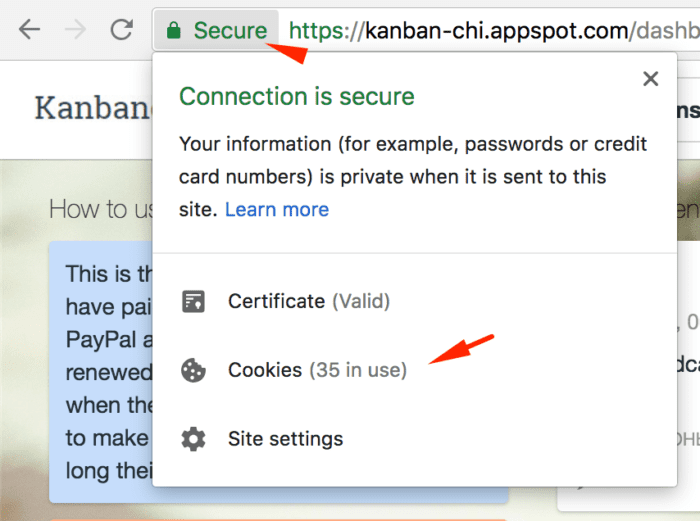
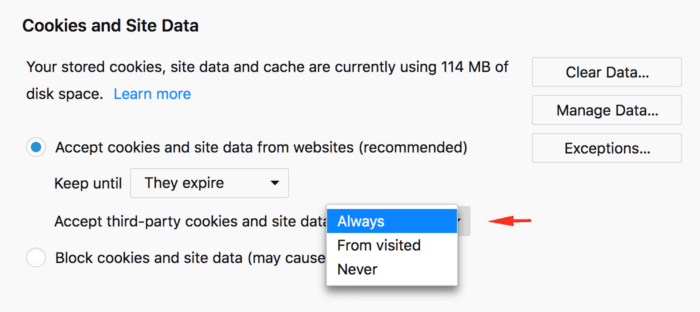
1. Allow third-party cookies in your browser settings. Kanbanchi will need Google's cookies to connect with your Google account, and if they are blocked by the browser, you'll face never-ending loading.
Chrome:
Chrome gives hints in the address bar if cookie settings interfere with Kanbanchi.
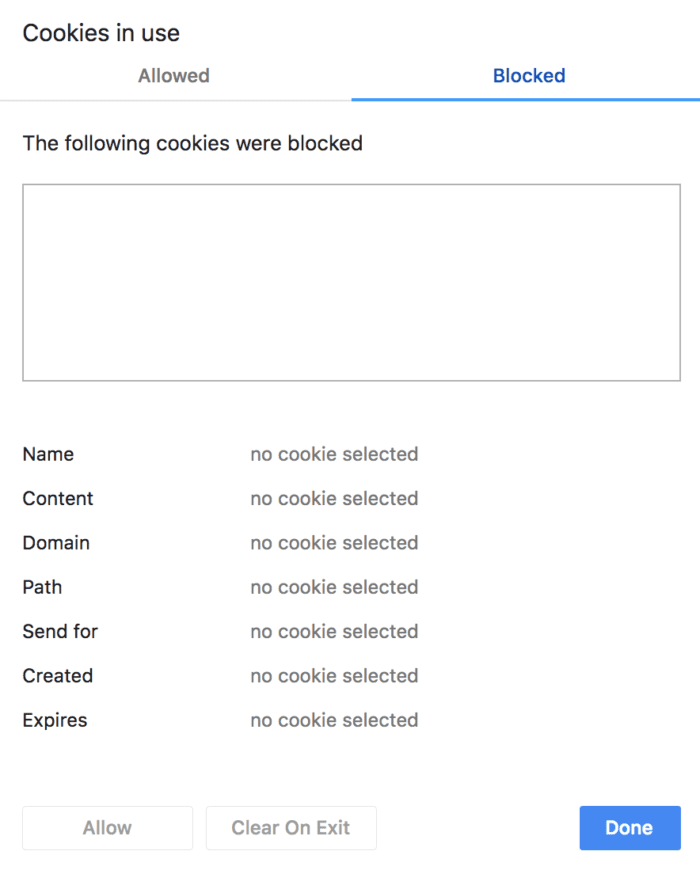
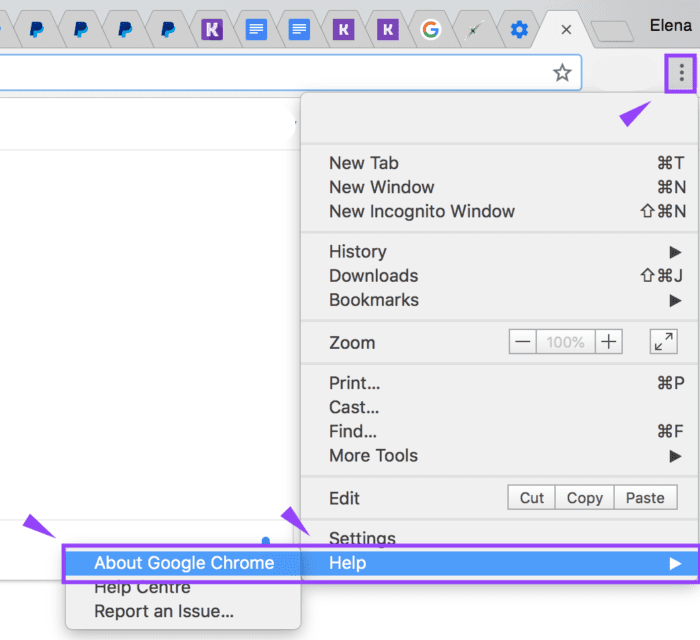
Step 1: Click here
Step 2: Make sure the Blocked list is empty
Firefox:
Go to browser preferences. In cookie settings allow third-party cookies.
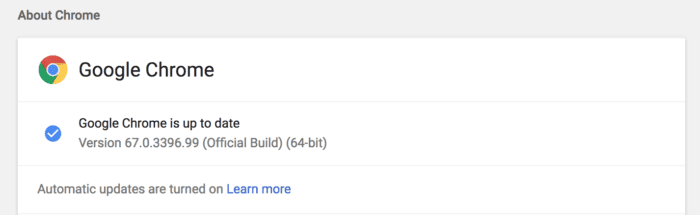
2. Make sure you're using the latest stable version of your browser.
3. Log out of your Google Account, clear your browser history (including cookies) and restart your browser.
4. Sometimes, browser extensions interfere with Kanbanchi. Try disabling them one by one to identify the troublemaker.
Here is the list of errors you may come across:
1) Cookies are not enabled in the current environment.
2) Google is blocked for your system
3)Temporary server error
4) Difficulties connecting to Google services
5) Failed to initialize a required iframe from Google, for instance, due to an unsupported environment.
6) Closing the popup before finishing the sign-up process
7) Permission to the scopes required denied
If the above-mentioned steps don't help, contact Support:
1. Try to access Kanbanchi in Incognito (Private) mode of your browser. Please, make sure the third-party cookies are not blocked.
3. Describe your actions and the results you get in detail. Inform us whether the issue is resolved in Incognito (Private) mode of your browser.
4. Attach:
URL of the page, where you get the issue;
Screenshots and/or a screencast. You can use https://recordit.co/ or another screen recording tool.
Here are examples of problems some our users occasionally come across:
Can not add new collaborators. It always says “currently not available, please try again later”; No application with ID “XXXX” has been installed.
Please, log out of your Google Account, clear your browser history (including cookies) and restart your browser.
Bad Request 400 error when I try to load my boards.
Unfortunately, we could not help you resolve that problem. The probable reason for such a mistake might be the consequence of connection problems on the client side (firewall, proxy, or other network software).
Kanbanchi freezes often, and I need to reload the page. We have about 1500 cards in our dashboard. Is it possible we have too many cards in the system?
Dashboard with 500 cards works fine, but 1500 cards are outside of the limits we have tested. So the reason is actually in the card number. We recommend you to split a workflow into several dashboards. For example, by using separate boards for Backlog and Archive.
You are allowed to create as many boards as you need, but you can open only 10 boards in one tab of your browser at a time. This is a technical limitation, which was established to maintain stability of the app.
Currently you can use the ability to open any number of browser tabs with any set of boards. You can also open one board in different browser tabs simultaneously. All changes occur in real time.
Click this link to see all Kanbanchi features on one dashboard:
This is a Dashboard, where you can find a quick review of all features, possibilities, hidden tricks and useful links to ease your learning curve. Information will be supplemented and changed with each Kanbanchi release. Here on the FAQ page you can always get a fresh version of Advanced Kanbanchi tips & tricks.
52. Can you read all my dashboard information? Does Kanbanchi have access to other files in our Google Drive?
Dashboard data (such as card description, comments, activity and similar) is stored in Google Cloud owned by Kanbanchi Ltd. We need to store this data in our database to deliver some features such as activity feed. Nevertheless, there is some data associated with a board we do not have access to, i.e. user access permissions - we can not include it into a dashboard file by definition.
Files you attach to cards (attachments) are stored in your Google Drive, Kanbanchi does not store them in its database. When you see attachments on cards, they are just links to real files on your Google Drive.
We access your files on Google Drive to be able to attach files on cards, but we do not read or modify files in your Google Drive. When you click on the Attach a file button, Kanbanchi needs to open a window, which shows your Drive files for you to make a selection. If you upload files from your computer Kanbanchi needs to save these files to your Google Drive. It’s only way Kanbanchi interacts with other files in your Google Drive. That is why when you first try to attach a new file to your card in Kanbanchi, a pop-up window with the request for permission will be shown to you. We ask for access to view files in your Google Drive to be able to attach files to cards.
53. If I send someone the generated shared link, they can't see my board. The opened link shows only the Kanbanchi logo and no project info. How can I share it?
The generated shared link is provided by Google and never works to open Kanbanchi boards. To share a dashboard with others (after you change permissions), you need to send a URL from the browser address bar.
You can use the built in browser zoom functionality, which is normally available from settings menu.
Another option is to hold down the Ctrl key and press the plus or minus buttons on a keyboard. You may also hold down the Ctrl key and use your mouse wheel to control zoom.
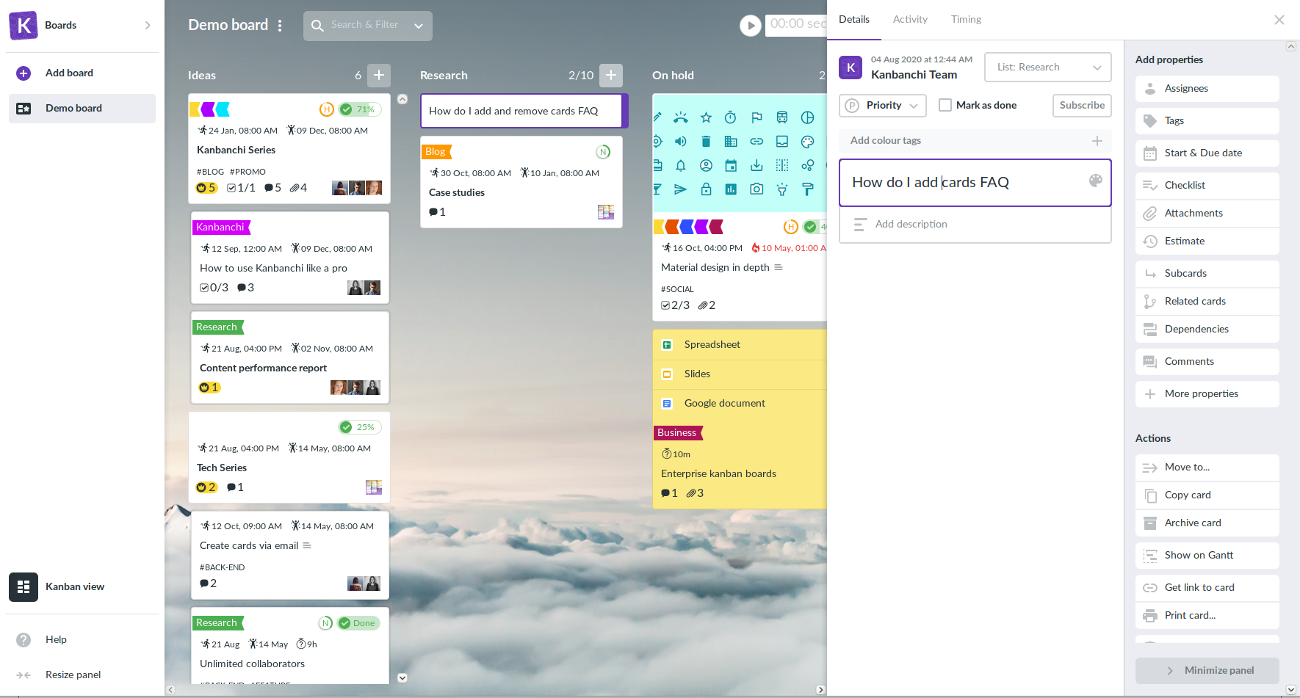
To make changes to a particular card, open the Card Details by clicking on a card. A popover window will appear for editing the selected card. After editing a card title, the change will be saved automatically.
If the card does not have a description click on Add description and type your text. Click on the Save Changes button to save the description.
To edit card description just click on the existing one and change the text. Then click on the Save Changes button to save the new description.
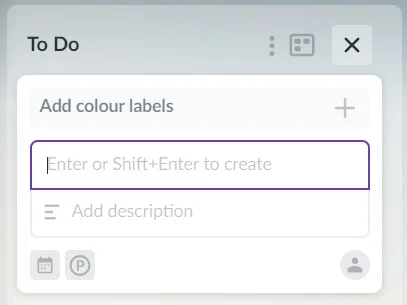
To add a card, click a plus button on the right from the list name in which you need to add the card. Then just type the name of your new card and hit Enter or click the "Add" button.
Editing cards
Click on a card to make changes. A popover window will appear on the right for editing the selected card.
You may edit the Card Title and Description from this window and also make other changes such as assigning people, adding a checklist, and so on.
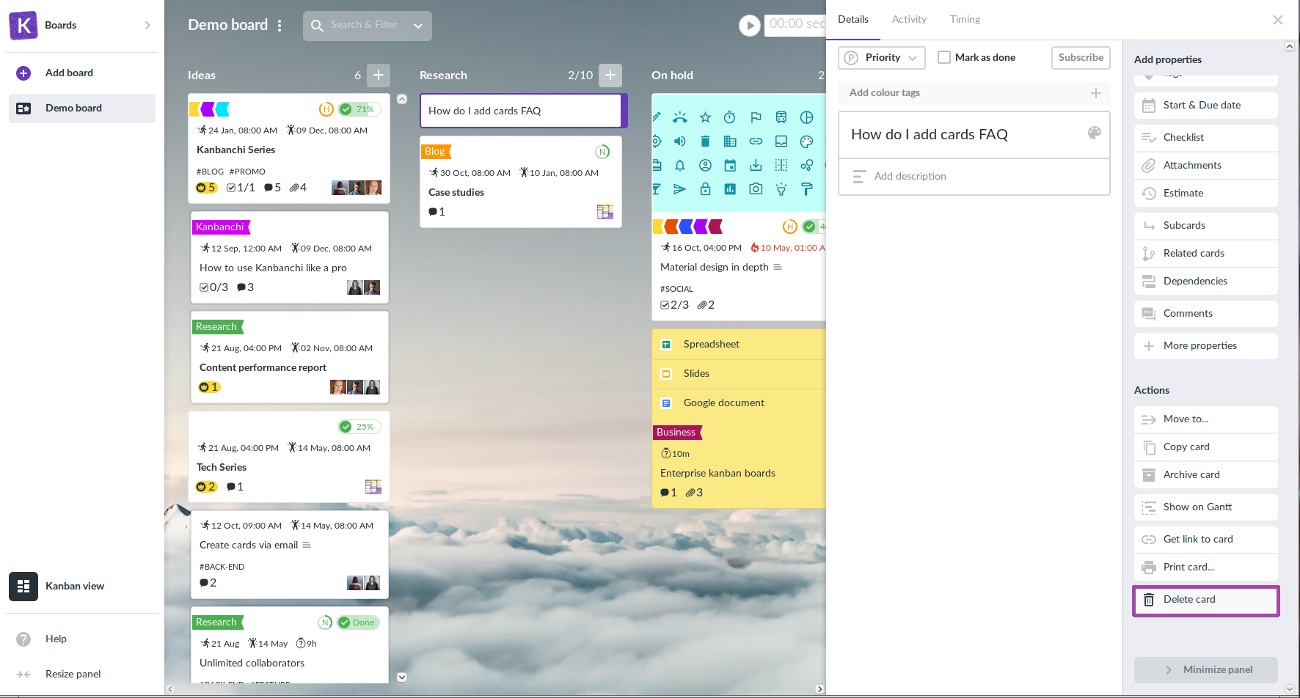
Deleting cards
You may delete cards by choosing this option in the "actions" section of Card Details.
One more easy way to delete a card is by using Delete (or Fn + backspace for Mac OS) on your keyboard.
After card removal, you have 10 seconds to restore it. To do it just click the Cancel button that appears at the bottom centre of a dashboard. After a card is deleted there is no way to restore it.
To create a new list, click Add new list in the right part of the board (to the right of the last list).
Edit list
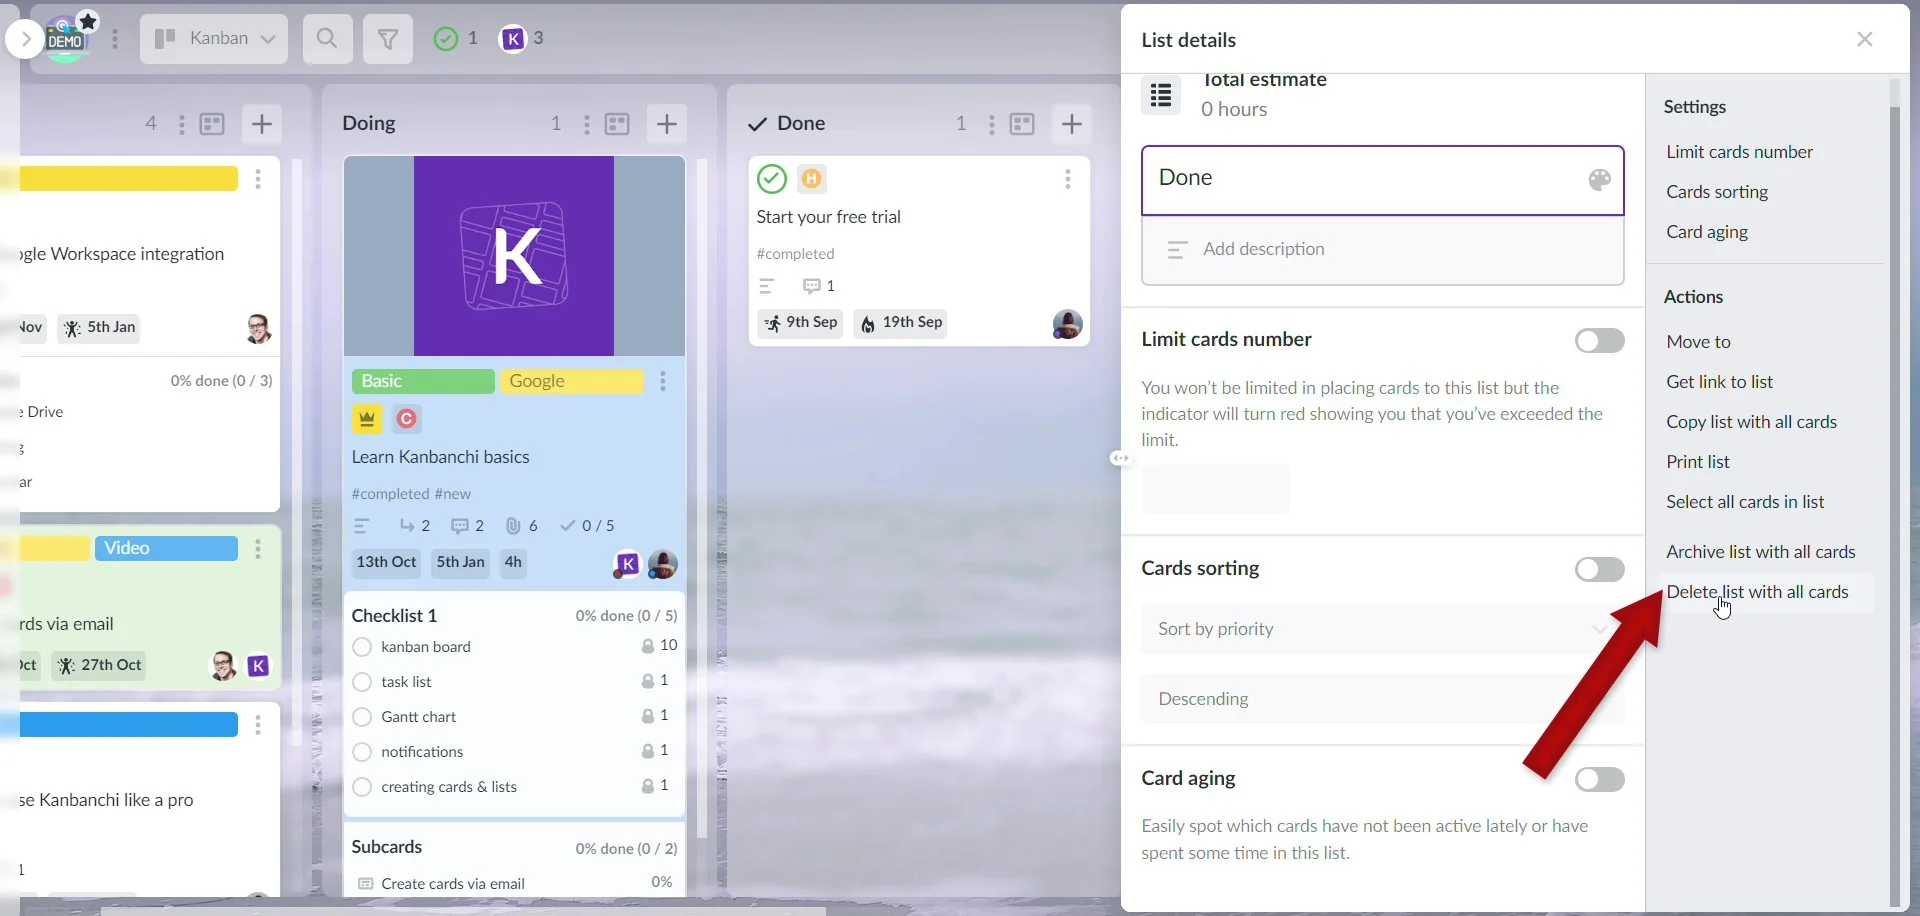
To edit a list, click on its title and the List Details popover window will open. Here you can change the list title, add information to the list by clicking on Add description and change list Settings. Here you can also conduct different Actions with the list.
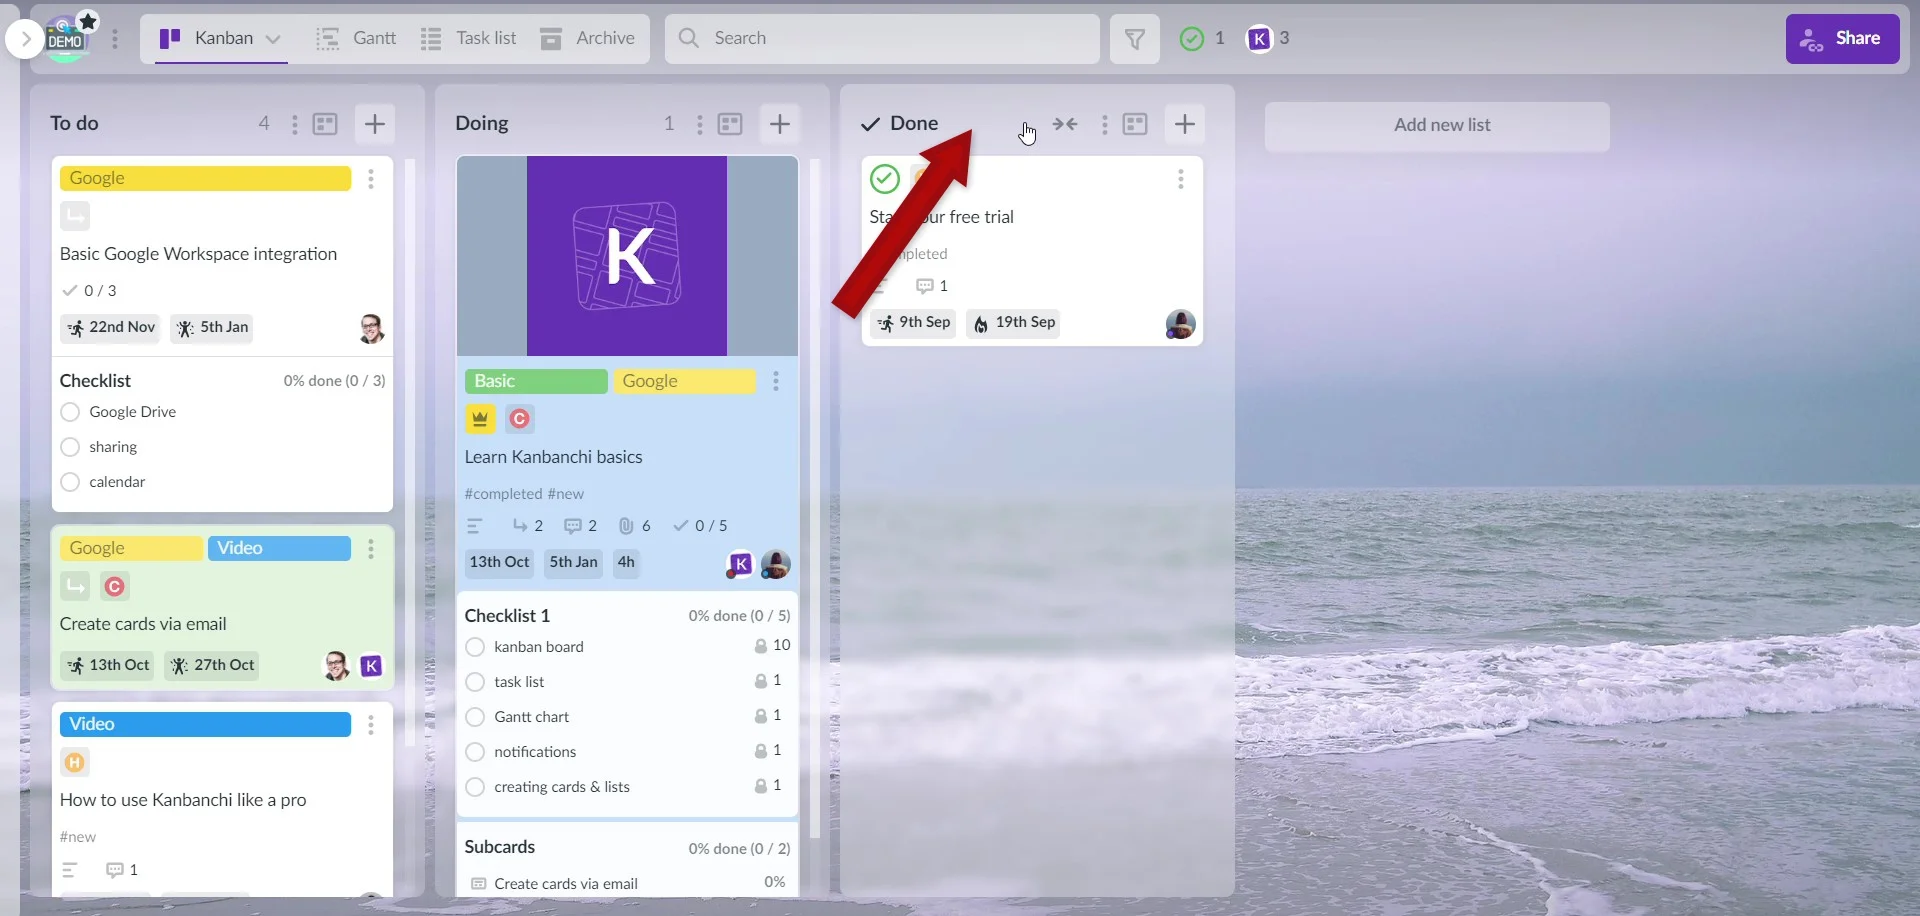
Delete list
To delete a list, open List Details and select Delete list with all cards from the list Actions.
After the list has been removed, you have 10 seconds to restore. You can do it by clicking on the Undo delete button that appears at the bottom of a board.
Kanbanchi boards may be removed in two ways: within the app and within Google Drive.
Within the app
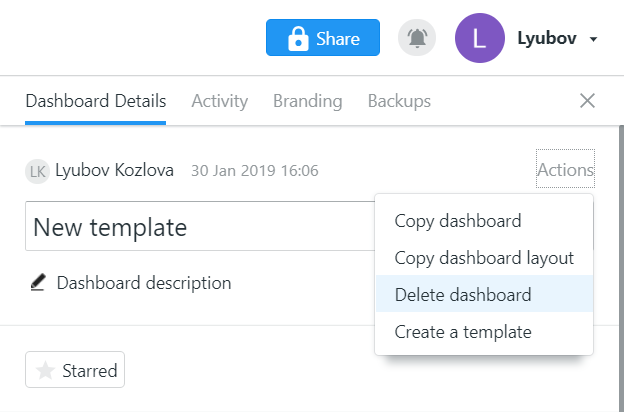
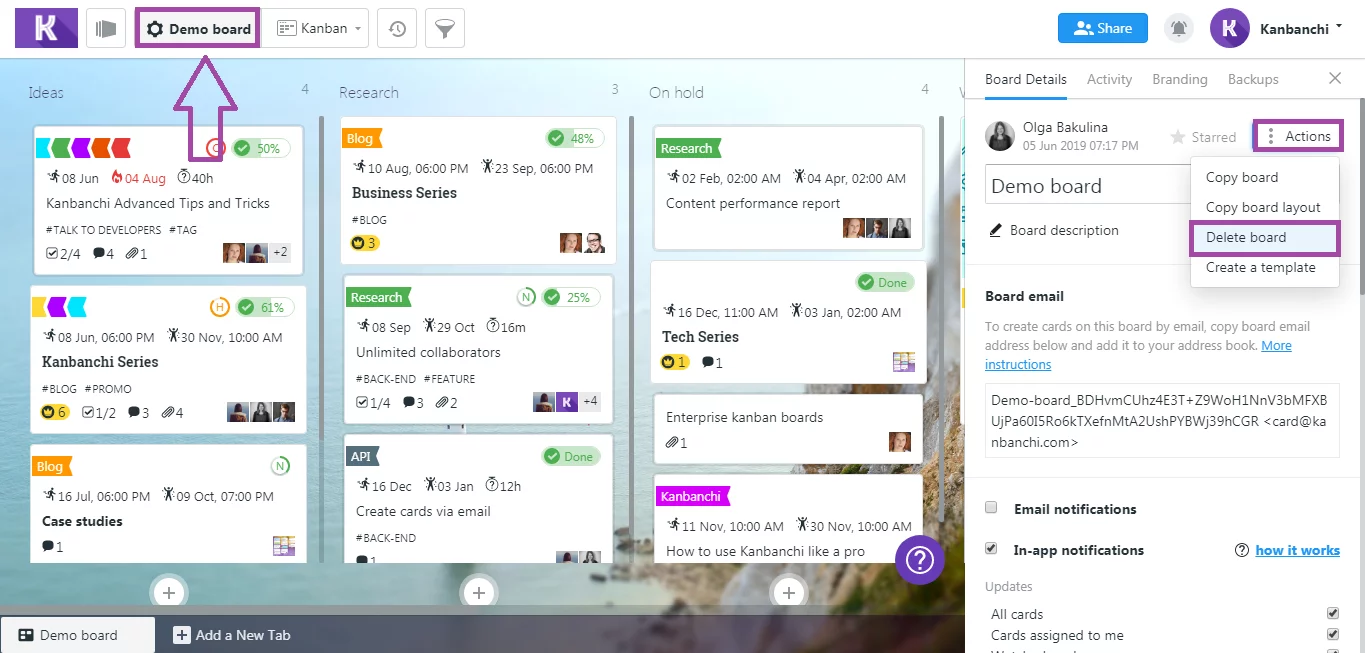
You will need to view the details of an open board to remove it from Kanbanchi. Click on the board’s name at the top of the screen or on its tab at the bottom of the screen to open Dashboard Details.
Click on Actions located at the upper right corner of the Dashboard Details and choose Delete Dashboard from the drop-down menu. When a confirmation window appears, click on Delete to finish removing the board from Kanbanchi.
Within Google Drive
Select a board in your Google Drive and then click on the Remove Icon (Trash Symbol) or hit Delete on your keyboard to move your board into Trash.
In both instances, the removed board will be moved into the Trash Folder of your Google Drive.
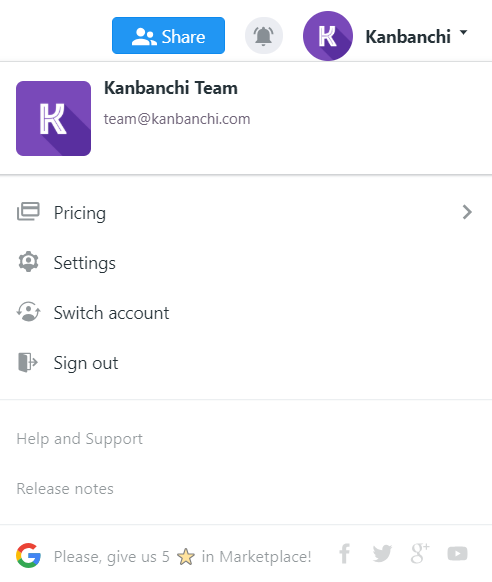
To switch to another Google account, click your profile picture in the upper right corner and choose Switch account. Google Sign-In pop-up will appear, where you can choose another account you'd like to log in.
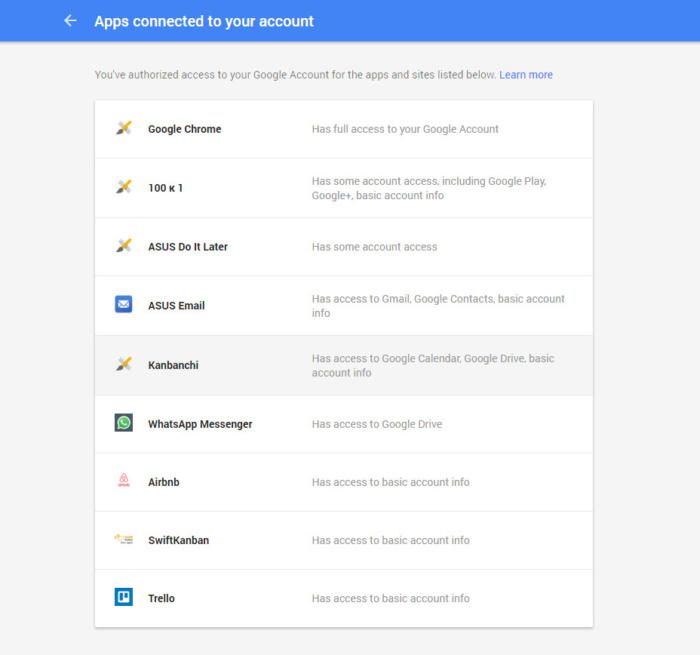
64. How can I unauthorise (disconnect) the application?
You will need to access your Google Apps settings in Google Drive to unauthorise (disconnect) the Kanbanchi application. First, open Google Drive (https://drive.google.com/#my-drive) and click on the Settings wheel located in the upper right hand corner of the screen. Select Settings from the provided drop-down menu and then Manage Apps.
In the Manage Apps Screen for Google Drive, scroll down until you see the Kanbanchi App, click on the Options drop-down menu, and select Disconnect from Drive.
Click on Disconnect in the provided confirmation window to finish disconnecting the Kanbanchi Application from Google Drive.
The application will automatically be disconnected. Click on Done to close the Manage Apps Screen and return to Google Drive.
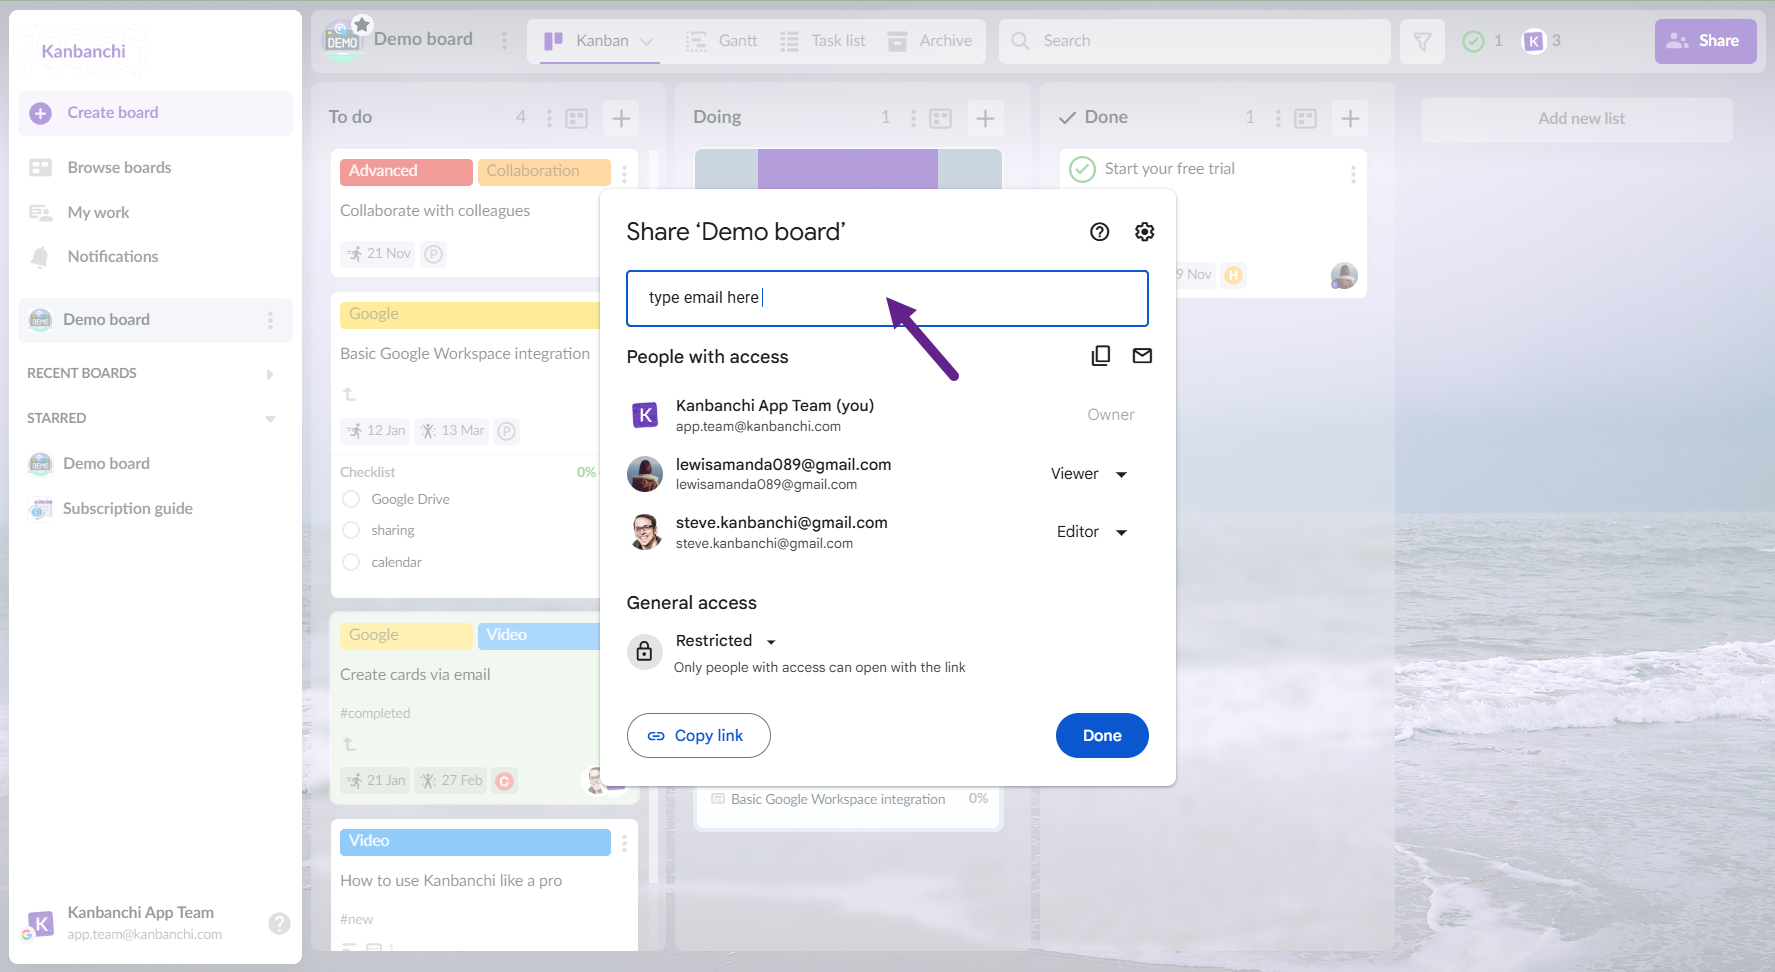
To share a board with one or multiple people, you need to first open Sharing Settings, which you can do:
1. Within Google Drive
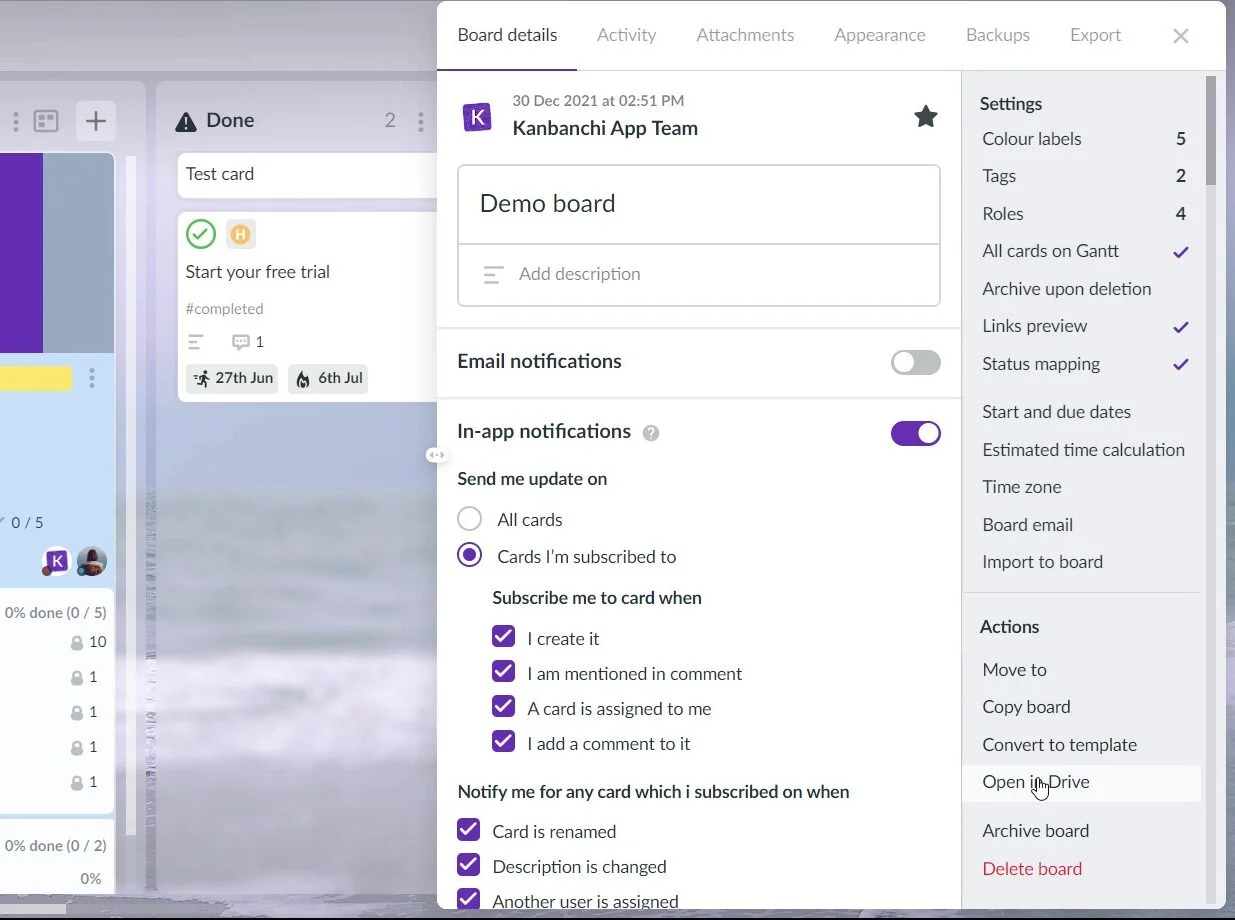
To open the board folder in Google Drive faster, use the Open in Drive button in the board settings.
Once you're in Google Drive, click on the Share button and type in the user’s email in the pop-up window.
2. Within Kanbanchi
Click on the Share button at the top right corner of a board, and you will see familiar Google Drive Sharing.
Define permissions for the invited members. Click on the drop-down menu near them and select Editor, Commentor or Viewer. Then click on Done.
You can allow people to edit, comment, or view your board just by giving them a URL for the board from the address bar of your browser. However, you will first need to make sure that your board is available to Anyone with the link.
Click on the Share button, then click on Get link at the bottom of the appeared screen. Change Restricted for Anyone with the link option and define permissions, choosing between Editor, Commentor, and Viewer.
Note: After you change permissions, feel free to send an URL from the browser address bar to a person https://kanban-chi.appspot.com/dashboard/xxxxxx/d-xxxxxx), as the generated shareable link provided by Google in the Google sharing screen doesn't work to open Kanbanchi boards.
When you create a board it appears in Kanbanchi folder at the root of your Google Drive or on a Shared Drive depending on your Kanbanchi plan and choice. Inside the Kanbanchi folder you can find all boards, backups and attachments which you upload through Kanbanchi. You can organize boards within your Google Drive or on a Shared Drive as you like.
Also, you can use a special command "app:kanbanchi" to look for all boards in your Google Drive.
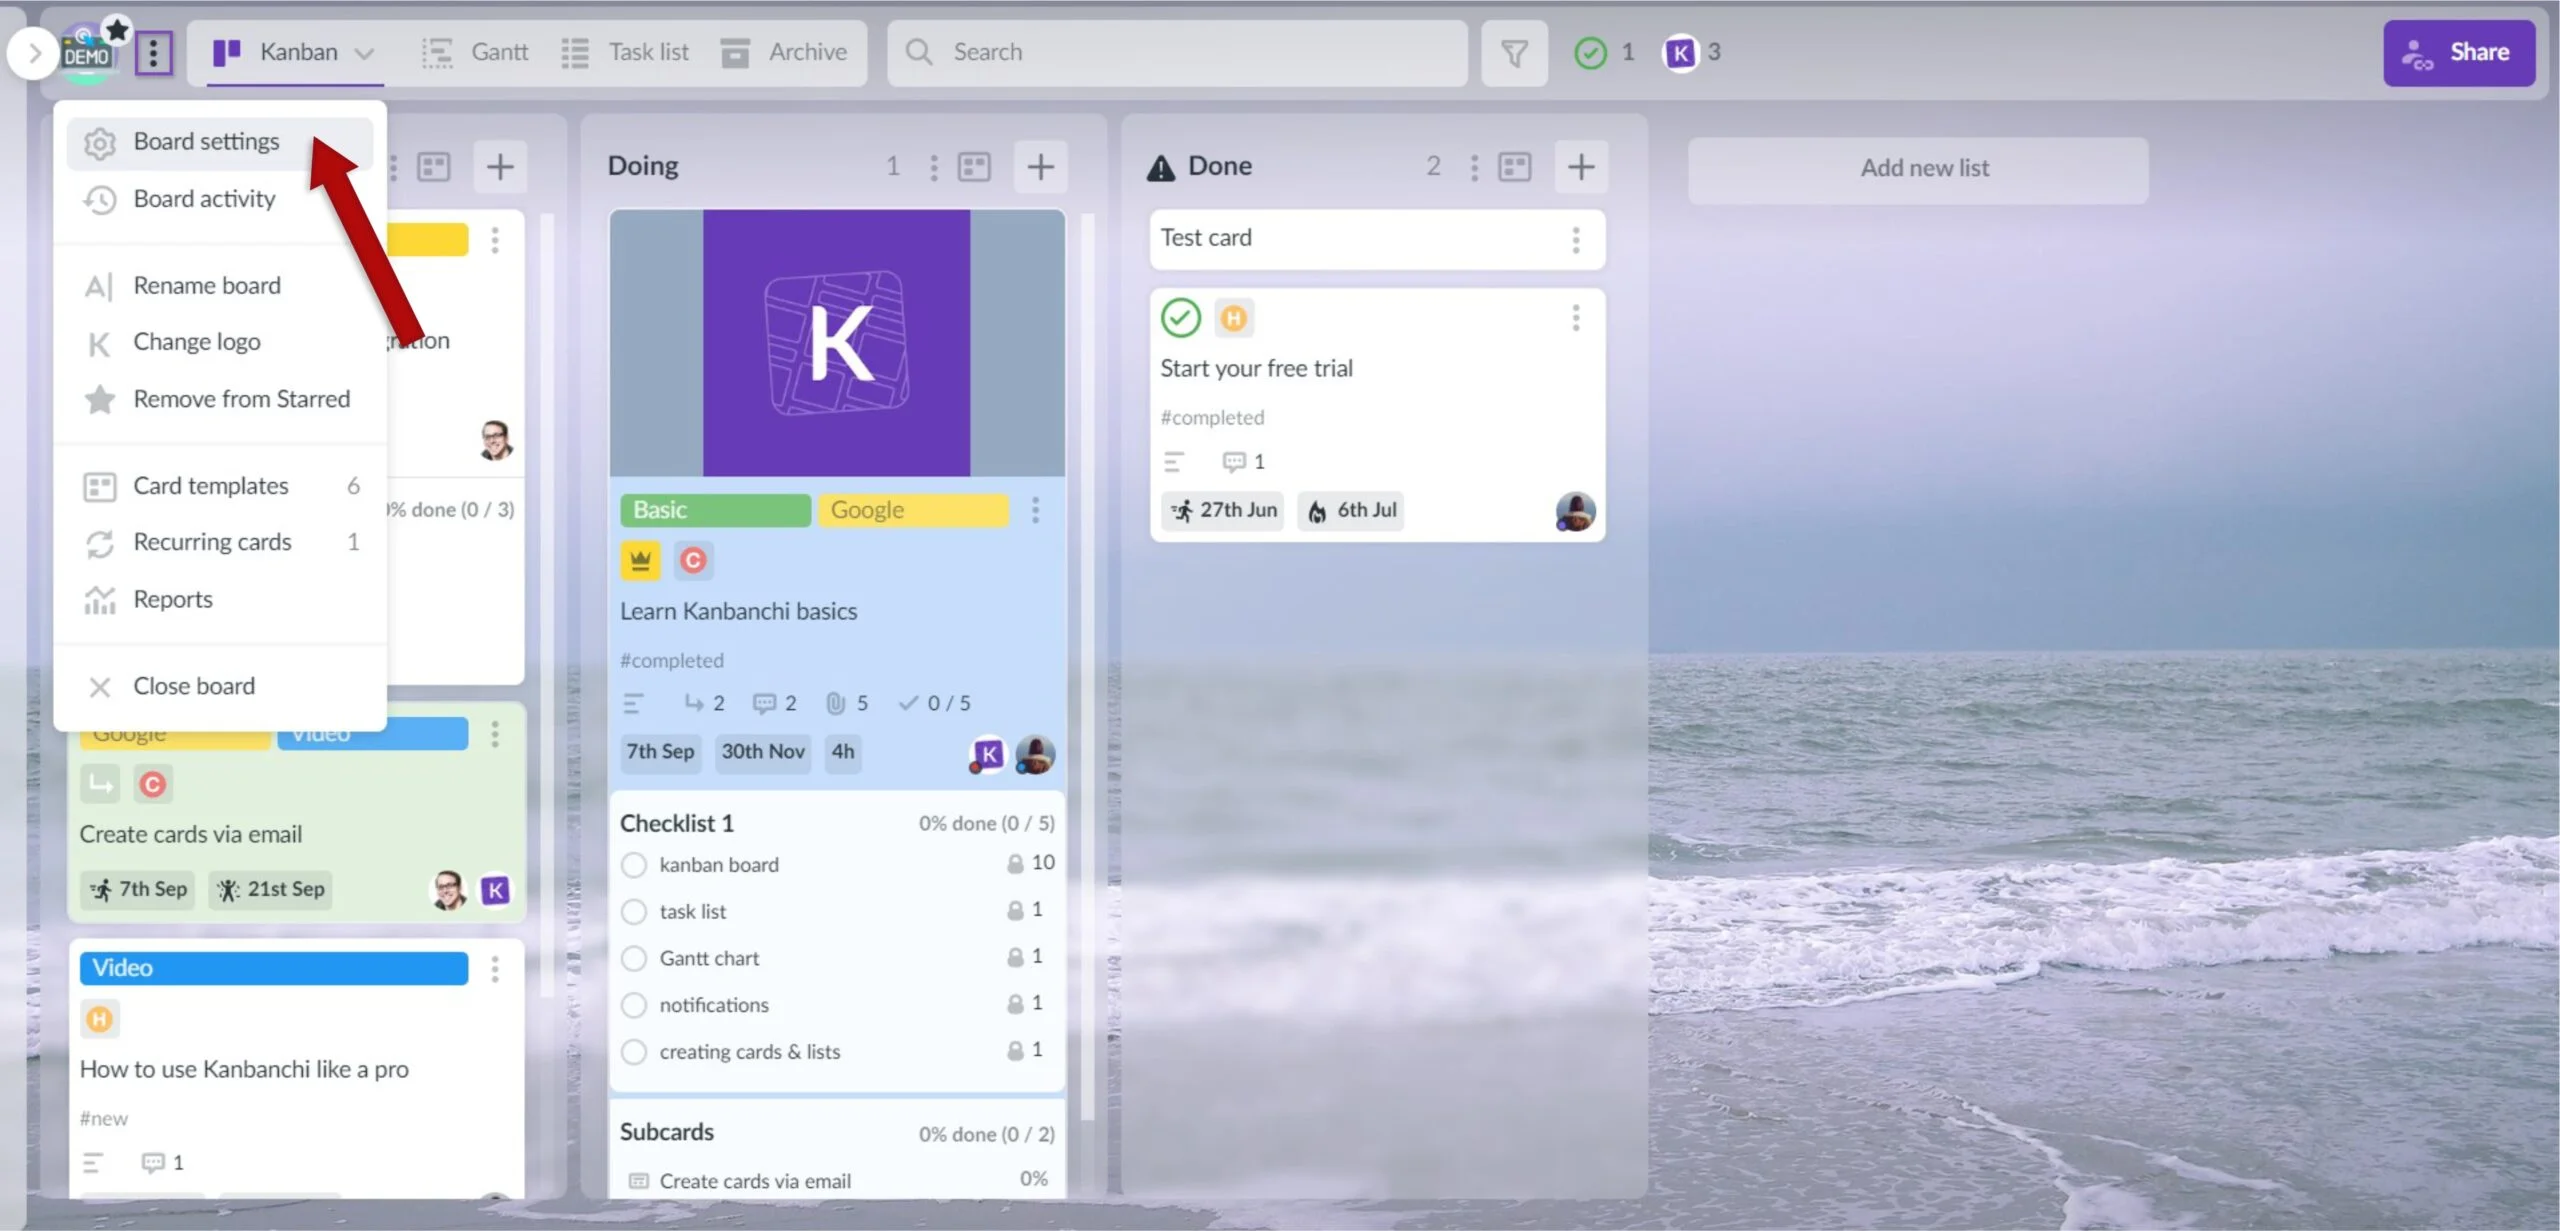
When your board is opened, you can easily go to the folder where this board is stored. To do it click on the board's title on the top panel and choose Board settings from the drop-down list.
Then just click on Open in Drive among Actions on the right.
67. How to cancel my subscription? (PayPal payment)
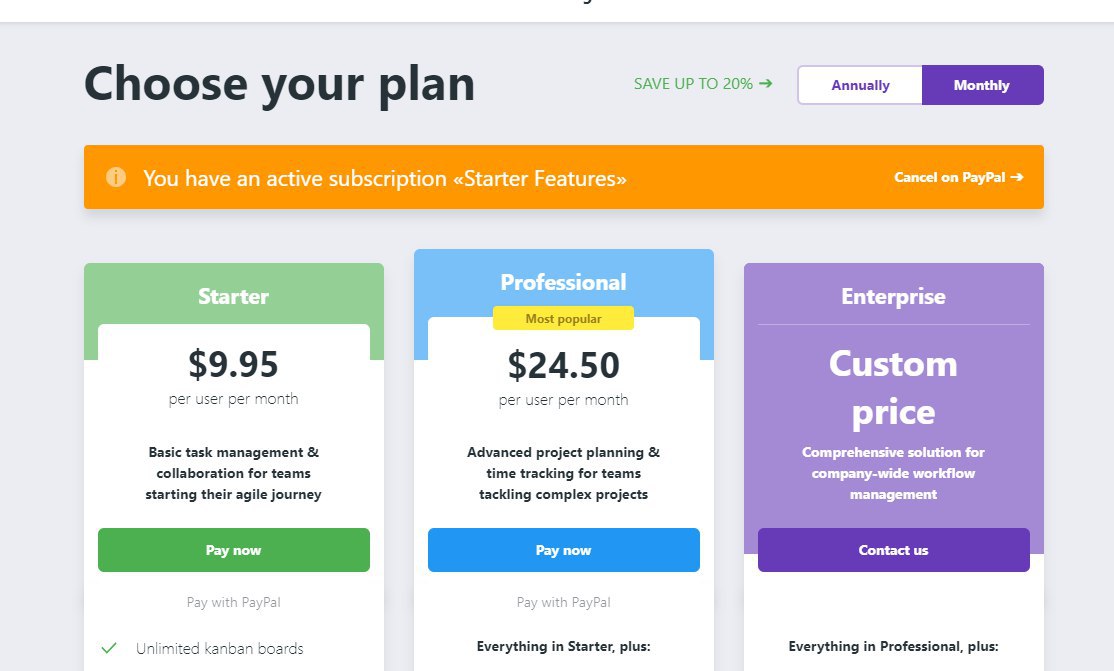
To cancel your subscription, please, click your profile picture in the upper right corner of your Kanbanchi dashboard. In the drop-down list choose Pricing.
You'll see an orange bar showing your subscription status. If you have a PayPal subscription clickCancel on PayPal.
You will be redirected to PayPal. If you paid with Paypal, please, log in to your account and cancel your subscription within PayPal, otherwise, you will continue being charged.
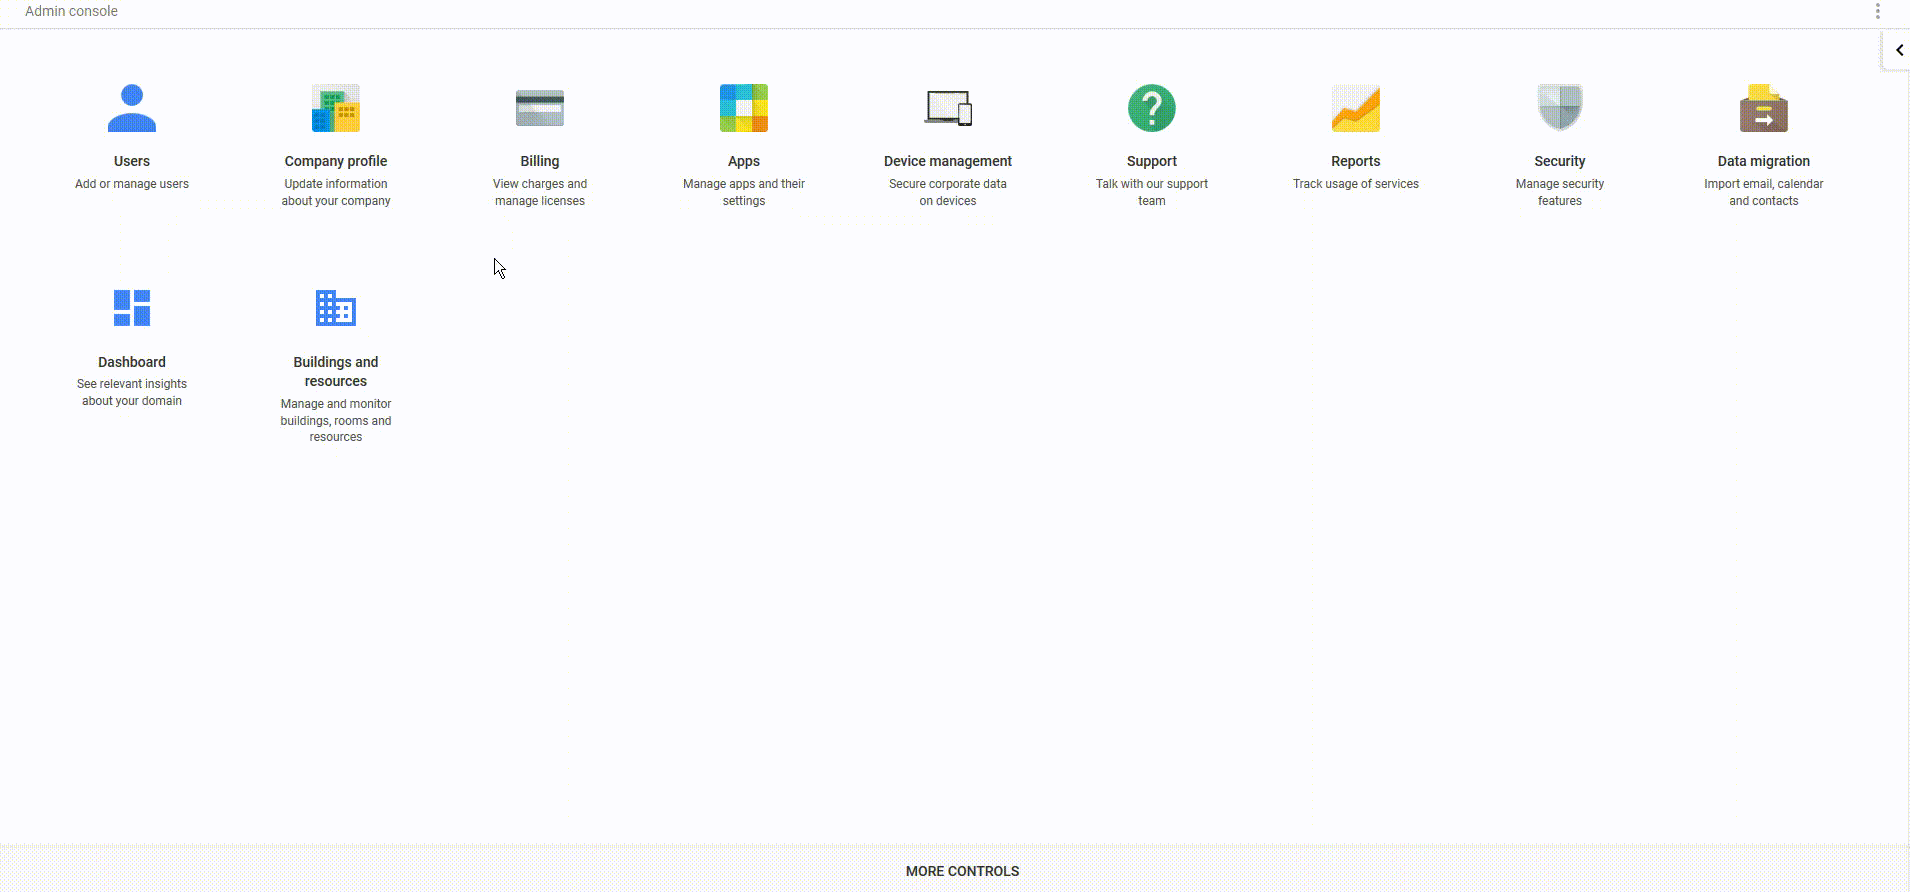
You may brand all your Kanbanchi boards with your company logo. If no configuration is set, the Gmail logo will be shown by default. The logo will be shown to the members of your team at the upper left corner of the board after they sign in to their accounts.
To set a logo sign in to your Google Admin console using your administrator account. Click Company profile. Then choose Personalization. Select Custom logo. Click Choose file and select the file containing your logo. Click Upload.
Tips:
Maximum image size is 300KB with maximum dimensions 320x132 pixels (images with smaller dimensions will scale. But for the logo to upload, you must use the same aspect ratio).
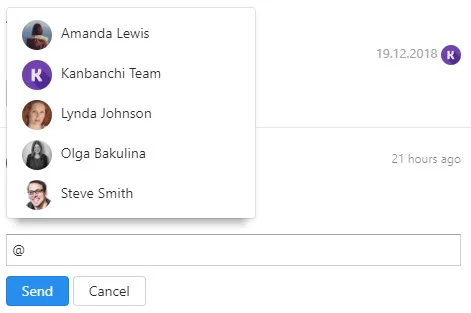
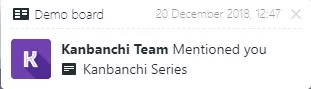
If you want to make sure your colleague will surely see your comment, you can mention them using @ and then typing their name. Just as you used to do it on Facebook or Twitter ;-)
When you insert @ symbol you will see a drop-down list of all users on board. Choose the person you want to mention.
If your colleague turns on notifications, they will receive it and will quickly respond to your comment.
Kanbanchi is SOC 2 and ISO 27001 certified, demonstrating our commitment to the highest security and data protection standards. We take the security of your sensitive information seriously, implementing rigorous industry-recognised practices to safeguard it at every level.
Kanbanchi is integrated with Google Workspace or Microsoft environment, depending on how you sign up. This means there's an ongoing exchange—information flows from your Google or Microsoft account to Kanbanchi and back, ensuring you are always up to date.
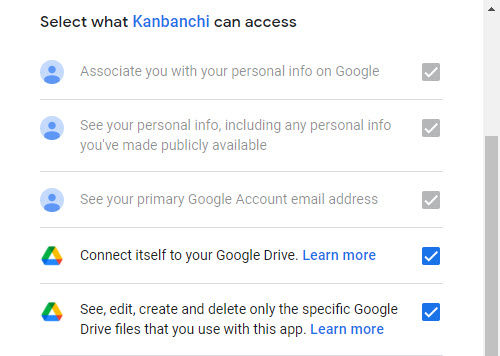
Upon signup, Kanbanchi will ask only for essential permissions to create you as a user and get Kanbanchi going. Here's the list of permissions that Kanbanchi requests to work with the Google accounts:
Kanbanchi has access to
Permission
Why needed?
Basic account information
Associate you with your personal information on Google;
See your personal information, including any information you've made publicly available;
See your primary Google Account email address
To create you as a user in Kanbanchi
Google Drive
Connect the app to your Google Drive
To add the option to create Kanbanchi boards to the + New button in Google Drive
Google Drive
See, edit, create, and delete only the specific files that you use with this app
To create a Kanbanchi folder in your Google Drive to store boards, attachments, and backups
Please, make sure to check all the checkboxes upon signup.
Along the way, as you continue using the app, Kanbanchi will ask you to give permissions to access other parts of your Google account, namely:
Kanbanchi has access to
Permission
Why needed?
Google Drive
View and manage the files in your Google Drive
To attach files from Google Drive
Kanbanchi needs permission to see the list of your Shared Drives
Google Docs
View and manage your spreadsheets in Google Drive
To export data from Kanbanchi boards to Google Sheets
Google Calendars
Manage your calendars
To add dates and events from Kanbanchi to your Google Calendar
Don't worry; giving Kanbanchi permissions is absolutely safe. We will only collect and use personal data in ways described in our Privacy Policy and T&C, in a manner that is consistent with our obligations and your rights under any applicable law.
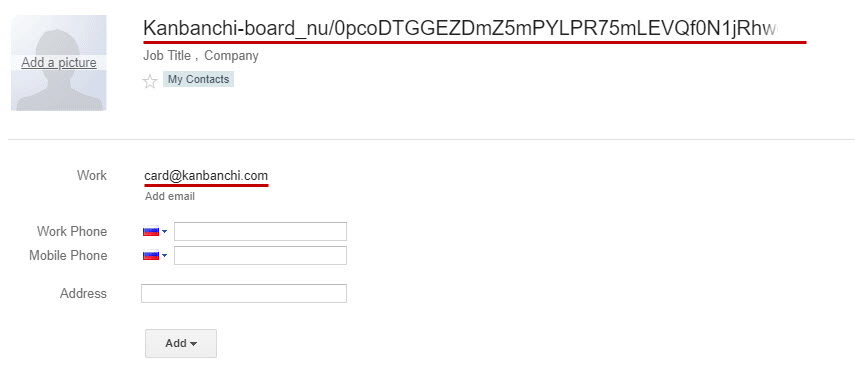
75. How do I add my board address to contacts list?
The structure of Kanbanchi board email address is a bit different from a usual one, due to security and uniqueness reasons. To be able to save it as a contact in Google Mail and any other email client, please, do the following:
- Add the first part as a contact name - Add card@kanbanchi.com as an email address
It shouldn't be any problem, as you can still star such contact and find it in the search field by typing the name of your board.
Example: board address is Kanbanchi-board_nu/0pcoDTGGEZDmZ5mPYLPR75mLEVQf0N1jRhwgKdgim9DcztBtXNT4zmg5MPp1K <card@kanbanchi.com> First part: Kanbanchi-board_nu/0pcoDTGGEZDmZ5mPYLPR75mLEVQf0N1jRhwgKdgim9DcztBtXNT4zmg5MPp1K Email: card@kanbanchi.com The first part always starts with the name of your board.
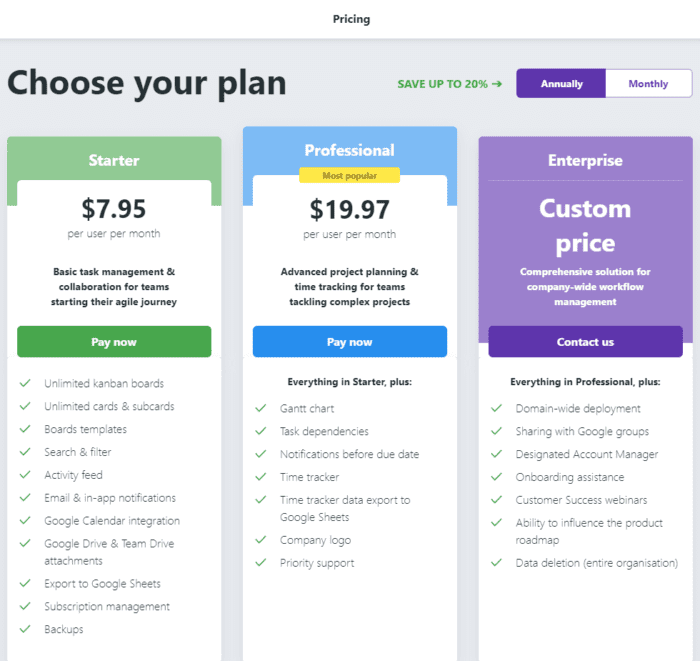
76. What's the difference between Kanbanchi plans?
Kanbanchi plans are designed to cover the needs of different individuals and companies, as well as to suit the budget ;)
1. Which plan should I choose?
Essential is suitable for individual task management and fundamental collaboration.
Premium is ideal for teams that are starting their agile journey and need a shared space to manage tasks and collaborate in real-time.
Professional is the best choice for teams needing more sophisticated project management functionality (Gantt Chart, Time Tracker) and priority support.
Enterprise is a comprehensive company-wide solution that offers more flexibility, control, and a custom approach to each enterprise.
2. Do you offer discounts for education?
Edu users can apply for a discount on any plan with yearly billing. Contact us to get a promo code.
3. Do you offer discounts or special conditions for non-profits?
Yes! Non-profits get a discount on yearly subscriptions. Contact us to get a promo code.
4. Can I try Kanbanchi before committing to buy?
Sure! We offer a free trial on the Enterprise plan so that you may try all the features. Sign up to get started - no credit card is required.
5. What happens when my free trial ends?
You can access the Enterprise plan with Kanbanchi's full functionality during your free trial. When the trial ends, you will be reverted to the free version. We preserve your boards if you upgrade to any of Kanbanchi plans. If you need more time to evaluate Kanbanchi, tell us why you need more time, and we’ll extend your trial.
6. Is there an installable version of Kanbanchi?
Kanbanchi is a complete cloud application. If you need Kanbanchi installed on the server, please contact us to learn about this possibility.
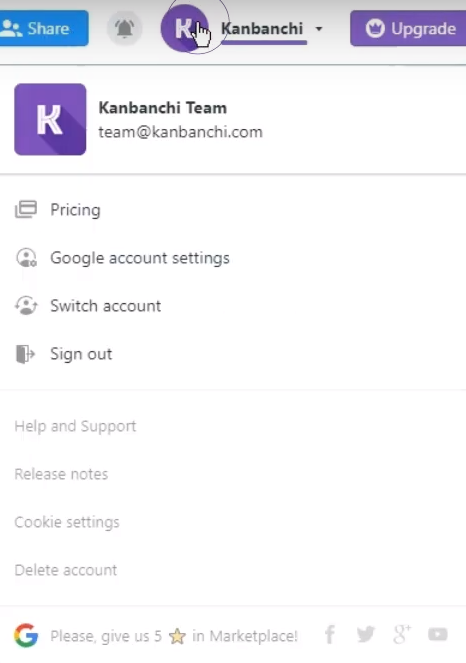
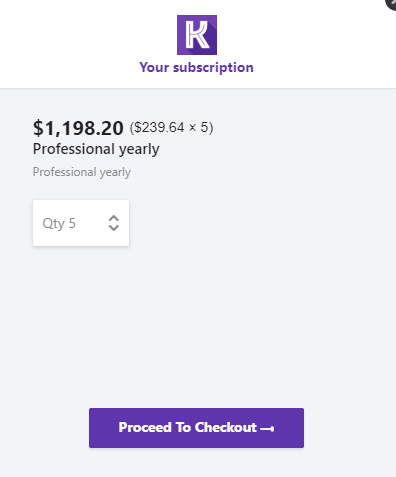
To upgrade Kanbanchi account click your profile picture in the upper right corner of the app.
Choose Pricing in the drop-down menu
You will be redirected to Kanbanchi pricing page where you can discover the plans Kanbanchi offers and choose the right one for you. You may also choose the type of billing: annual or monthly
Choose the plan and type of billing and click Pay now.
Choose the number of seats you need to be purchased.
Please, note if you would like to purchase more than 10 seats, you may enter the number manually.
Click Proceed to check out to continue the purchase.
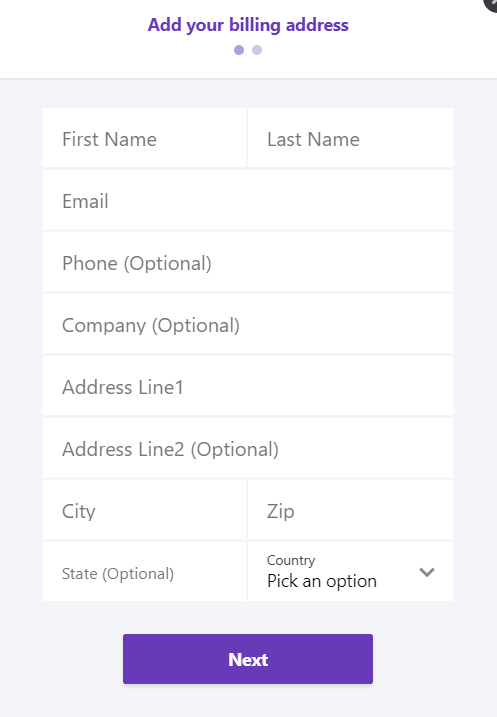
Add your billing address and click Next.
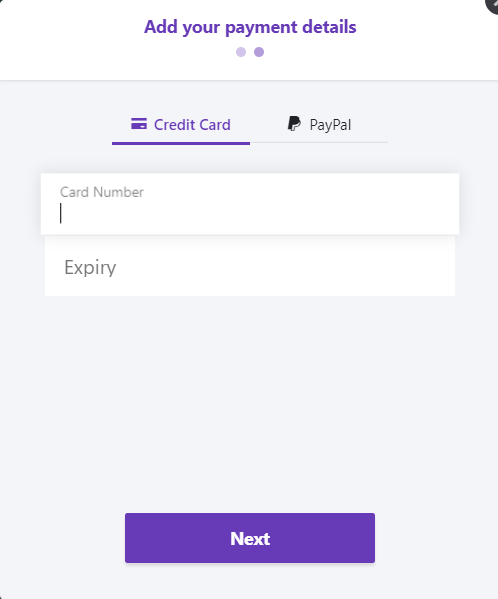
Choose the payment method. Add your payment details and and click Next.
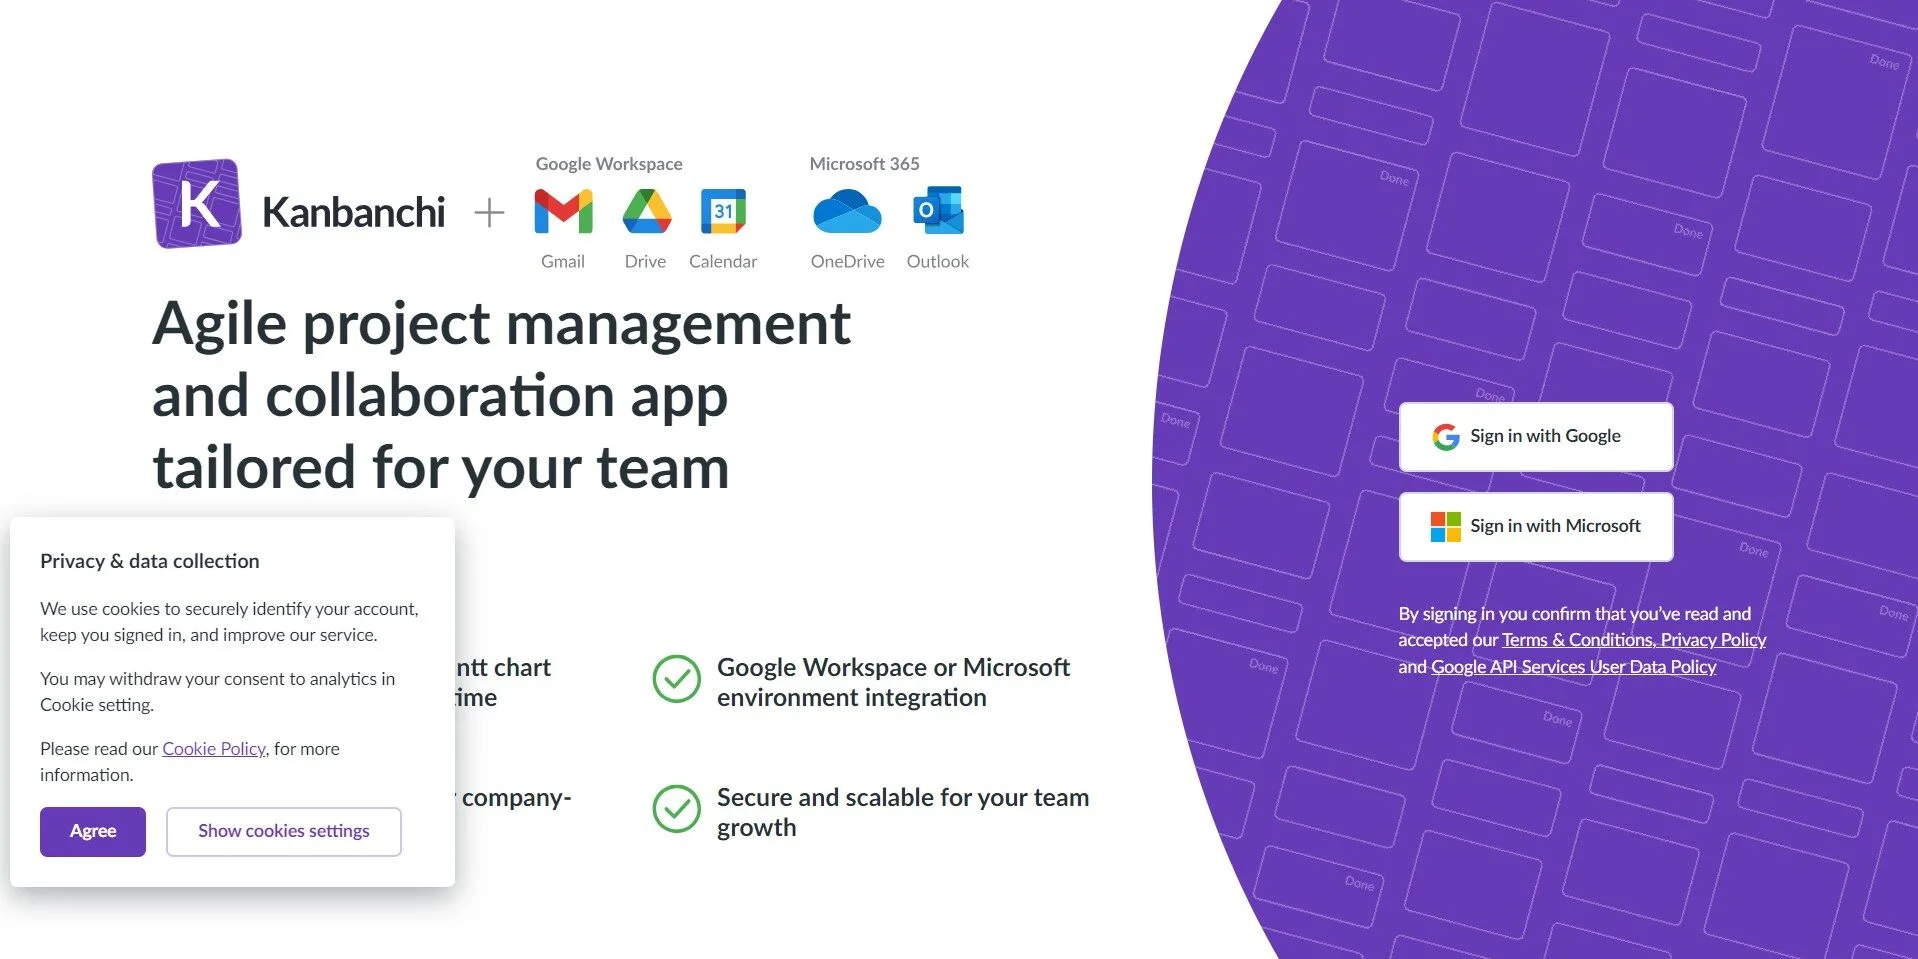
Go to Kanbanchi, sign in with your Google or Microsoft account, and accept permission requests Kanbanchi asks you for on the authorization screen. Once this step has been completed, you can start using Kanbanchi for task management.
In Kanbanchi you can create visual boards for your projects and activities. To create a board, click Create board.
Each board consists of cards that are grouped in lists. You can create as many lists and cards as needed and move cards between lists. To create a card click the white Plus button, type your text in the dashed rectangle, and hit Enter.
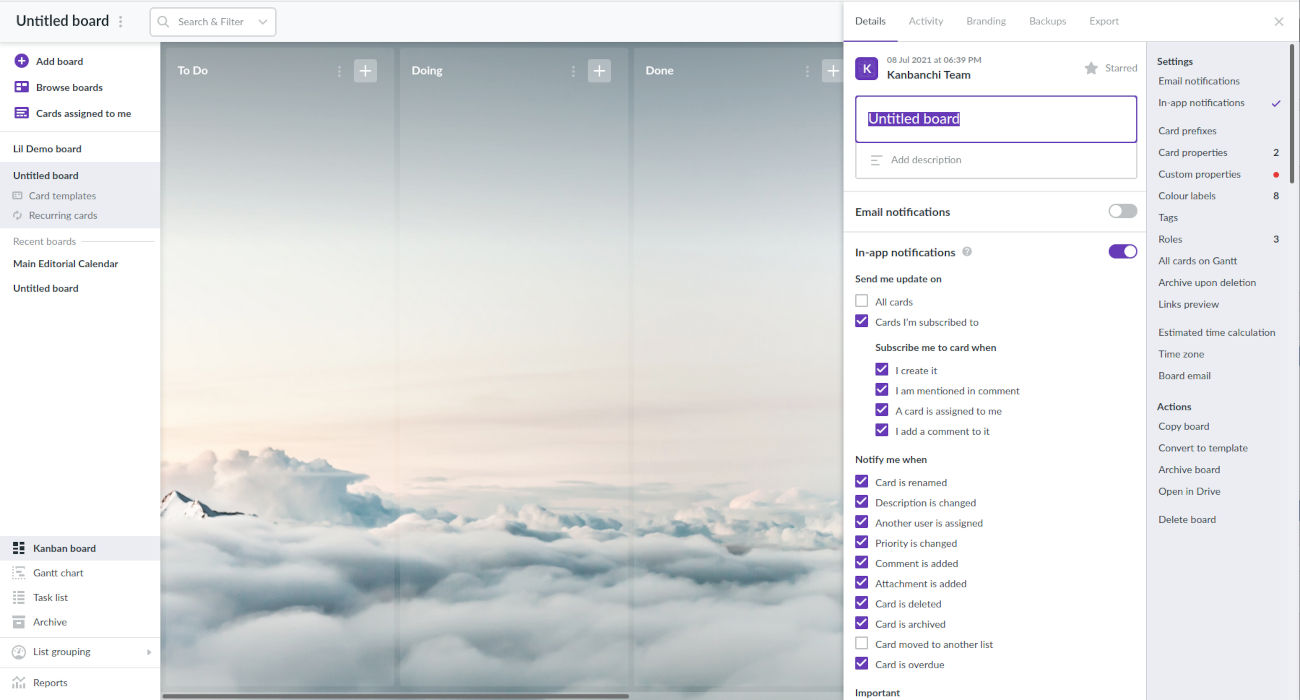
79. How to receive in-app notifications in Kanbanchi?
In-app notifications in Kanbanchi are updates about activity on Kanbanchi boards, which you receive in real-time in the app.
Enabling in-app notifications in Kanbanchi
In-app notifications are turned on for all new boards that you create. However, they may be turned off for some boards if they have been created a while ago. To enable in-app notifications for a particular board, first, click on the board’s title on the top panel and then choose Board settings from the drop-down list.
Turn on the in-app notifications first and then configure what types of notifications you want to receive. You may receive notifications about the updates of cards and important activities (for example, when someone assigns cards to you or mentions you in a comment). Also, you may choose cards on the board you want to receive in-app notifications for (all cards, cards assigned to you or cards you are subscribed to).
Here are the default settings for in-app notifications for all new boards. Please, note, that for some old boards that you've created some time ago, you will need to manually reset in-app notifications.
Receiving in-app notifications in Kanbanchi
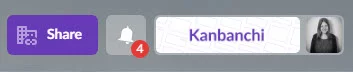
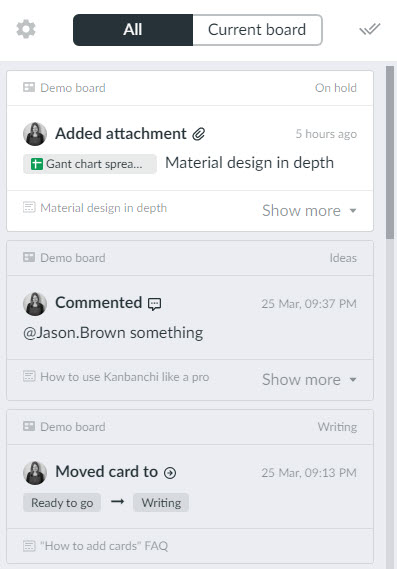
Notifications are located behind the bell-shaped button in the top right corner. When you have new notifications, the badge appears, which displays the unseen notifications count. Click on the notifications button to view your notifications.
The red badge displays the number of unseen notifications
Notifications from all your Kanbanchi boards are gathered in one place. Looking at a new notification, you are able to see at a glance what board it belongs to, which card it is about and who performed the change. You can also use a filter to see notifications only from a current board or from all boards.
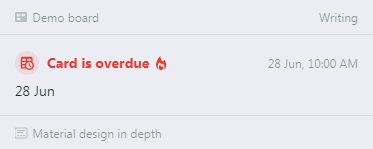
Due Date Notifications and Notifications before the Due Date
If you set a due date on a card, you will receive a notification in case it's overdue.
You may also set up notifications before the due date to be notified in advance. Consult this FAQ for the details.
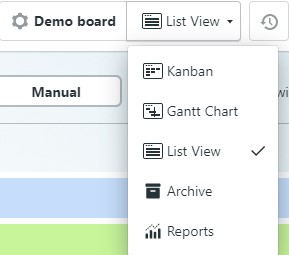
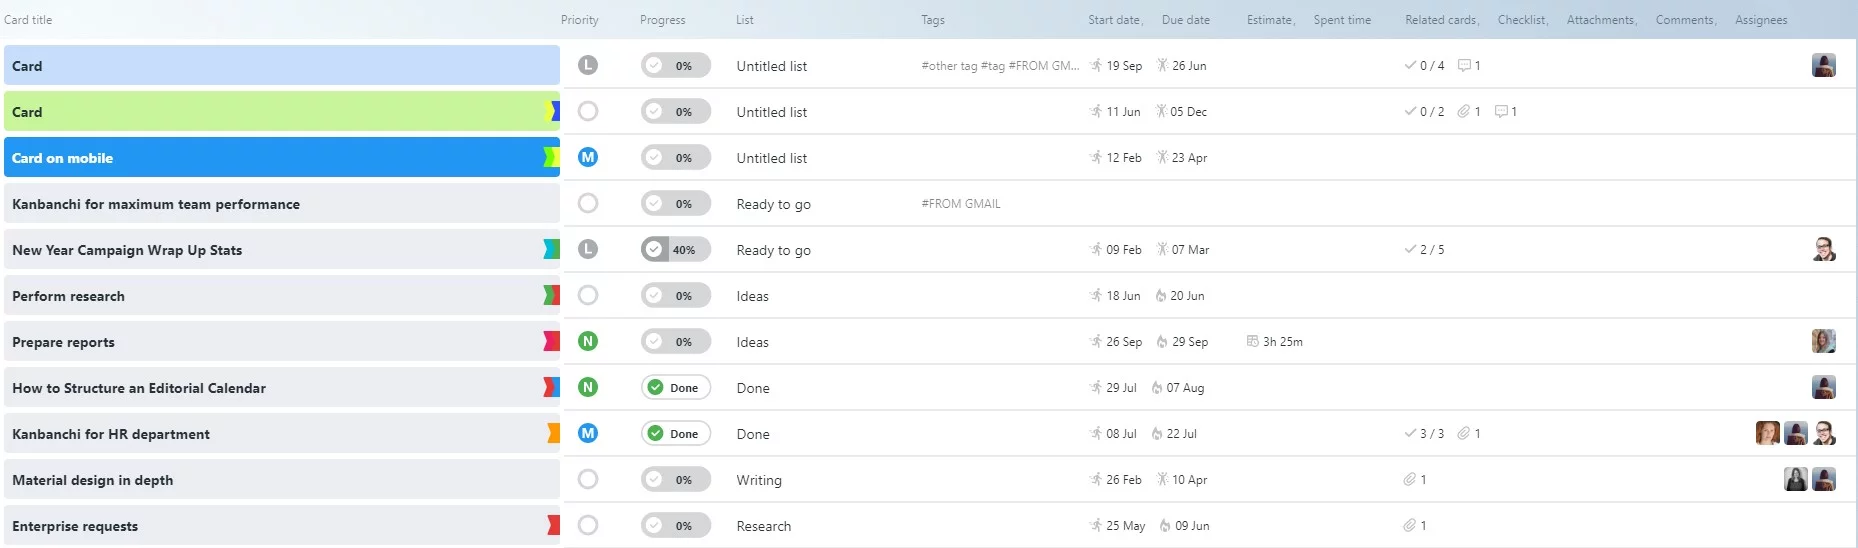
List View is an easy way to see all cards in a scrollable list in the natural order. Switch to the List View by clicking the drop-down list on the top panel near the board name.
You see the list of your cards.
Columns determine card properties. Apart from card title, description and its overall progress you may see the following columns: Priority, List name, Tags, Start Date/Due date, Estimate/Spent time, Related cards, Checklists, Attachments, Comments, Assignees. All columns are visible by default.
However, you may customise your List View by showing/hiding the columns. If you would like to hide any property, click the Gear Wheel icon in the top right corner and check/uncheck the elements.
Please, note: this setting is saved while switching between Kanbanchi views.
Moreover, you may edit cards right in the List View.
Epic cards are marked with the crown icon in List View, just like in Kanban View or Gantt chart.
Subcards may be grouped with epics. If Group subcards with epics is checked, you may choose to Expand or Collapse all groups.
The order of the cards in the List view is Chronological by default, but it may be switched to Manual. When switched to Manual, Drag&Drop is available. In this case, moving cards on the List View will influence Kanban View as well. But if Manual order is chosen together with Group subcards with epics, it won't influence Kanban View.
List View and all the changes made to Manual order are saved if you switch between Kanbanchi Views.
Sorting by properties is available in the List View as well.
You may sort by card title, overall progress, tags, priority, list name, start date/due date, related cards, attachments, comments, assignees. There is no opportunity to sort by card description.
Please note, turned on filter effects sorting. Filter configurations take precedence over sorting.
To sort the column click on the property. The first click initiates sorting in descending order.
The second click initiates sorting in ascending order.
The third click turns sorting off.
Sorting can be enabled only in one column at once.
Reset settings may be used to return to the default. It affects sorting and drag&dropping of cards.
Please, note: sorting settings don’t save when you switch to another view or leave the page.
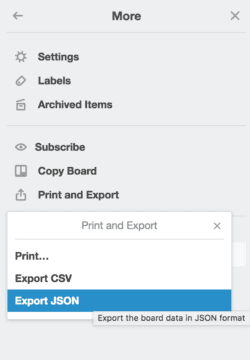
Are you a Trello user curious to try out Kanbanchi? To ease the transition, you can import Trello Boards to Kanbanchi. Here’s a short set of instructions on how to do that.
Step 1: Export Your Trello Board
Log in to Trello and go to the board you’d like to export.
In the Board settings click Print and Export… and select Export JSON.
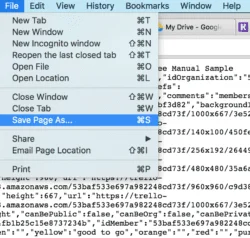
Don't be confused if you see the screen full of text. Click Save Page As... and the file in JSON format will be saved on your computer.
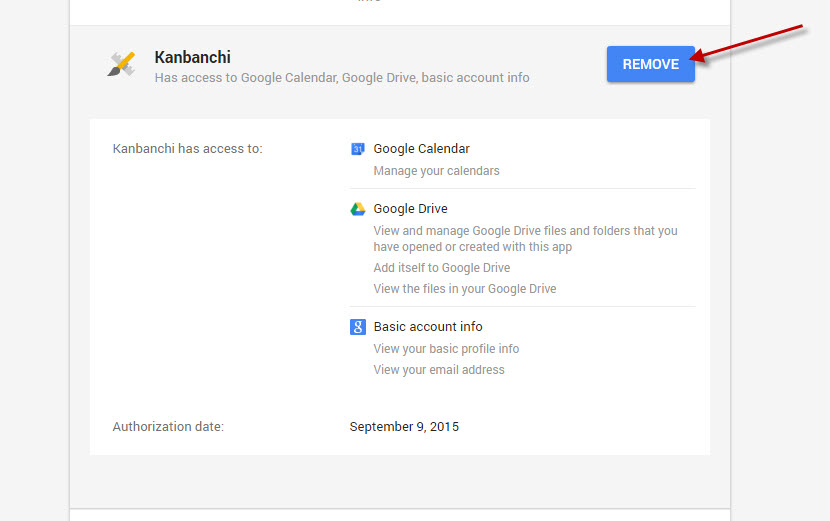
2. Click on Kanbanchi to open settings, then you will see a REMOVE button. Please, click on it. Be sure, all your data will be safe after removing the app.
3. After you removed Kanbanchi, you need to close your browser completely. Then open it again. You will now need to install Kanbanchi again. To do this, simply open kanban-chi.appspot.com and go through the process of installation again, grant Kanbanchi permissions to access your Google Drive.
If you want to delete your account and all your data (including Personal data) from Kanbanchi, you’re in the right place. Read this article carefully to understand what happens when you delete your Kanbanchi account, and how to do that.
Notice:
-If you are still in doubt, write to our Support. Let us see if we can help you before you go. A unique offer, maybe?
-If you need your board data for safekeeping, feel free export your boards to Google Sheets before deleting your account.
-Make sure to have cancelled your paid subscription before deleting your account.
-Please, note that after deletion Kanbanchi files (boards and backups) in Google Drive will become broken links, and you won’t be able to open them anymore. Attachments won’t be affected and will stay intact in your Google Drive.
If you firmly decided to delete your account with Kanbanchi, go to kanban-chi.appspot.com, click your profile picture in the upper right corner.
Step 1 – We find all boards, where you're the owner. It takes time, so be patient, and do not close the browser.
Step 2 – Answer one question to activate Delete button. This protects you from accidental deletion and helps us understand your choice.
Step 3 – We delete your account information and all the boards you own, then log you out. Be sure there's no information about you in Kanbanchi database.
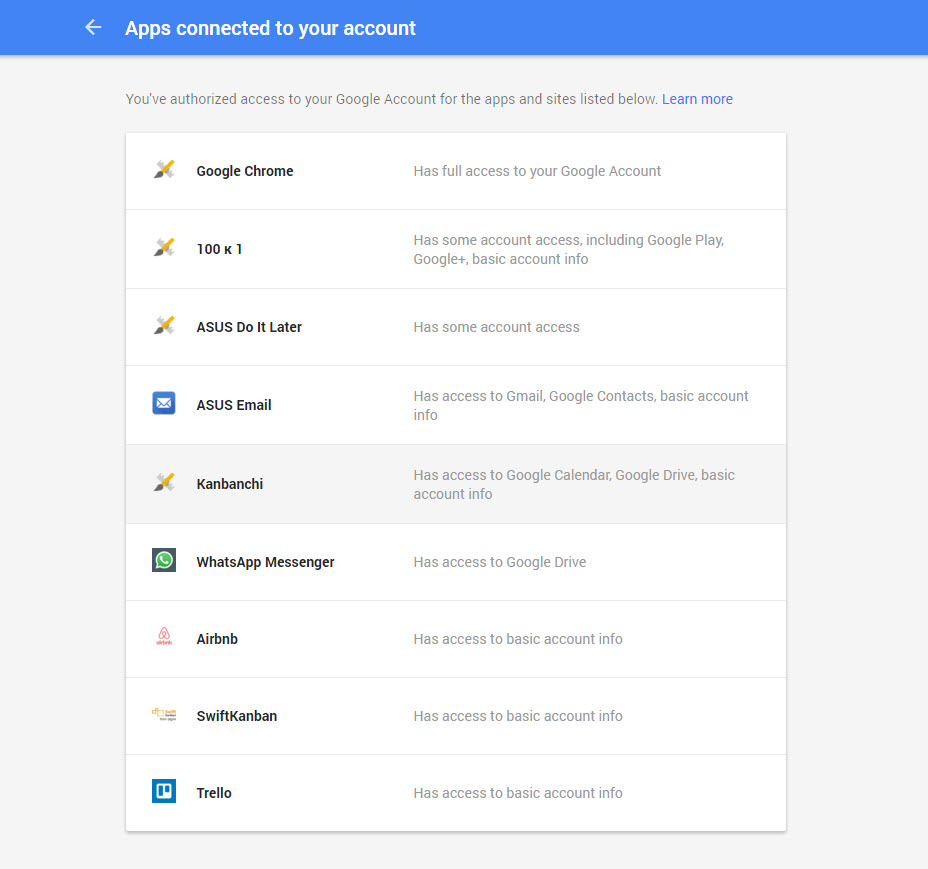
Step 4 – Go to the list of the apps connected to your Google account and remove Kanbanchi from the list of apps with access to your Google. Your list will look similar to this, and you will find Kanbanchi on the list. Click on Kanbanchi to open settings, then you will see a REMOVE button.
Step 5 – You will be logged out of Kanbanchi.
You can now delete files (boards and backups) in Google Drive (which have become broken links after deletion).
NOTE: deleting your account in our system doesn't remove your data from the third-party apps connected to Kanbanchi. If you would like us to remove your data from them, please, reach out to our support.
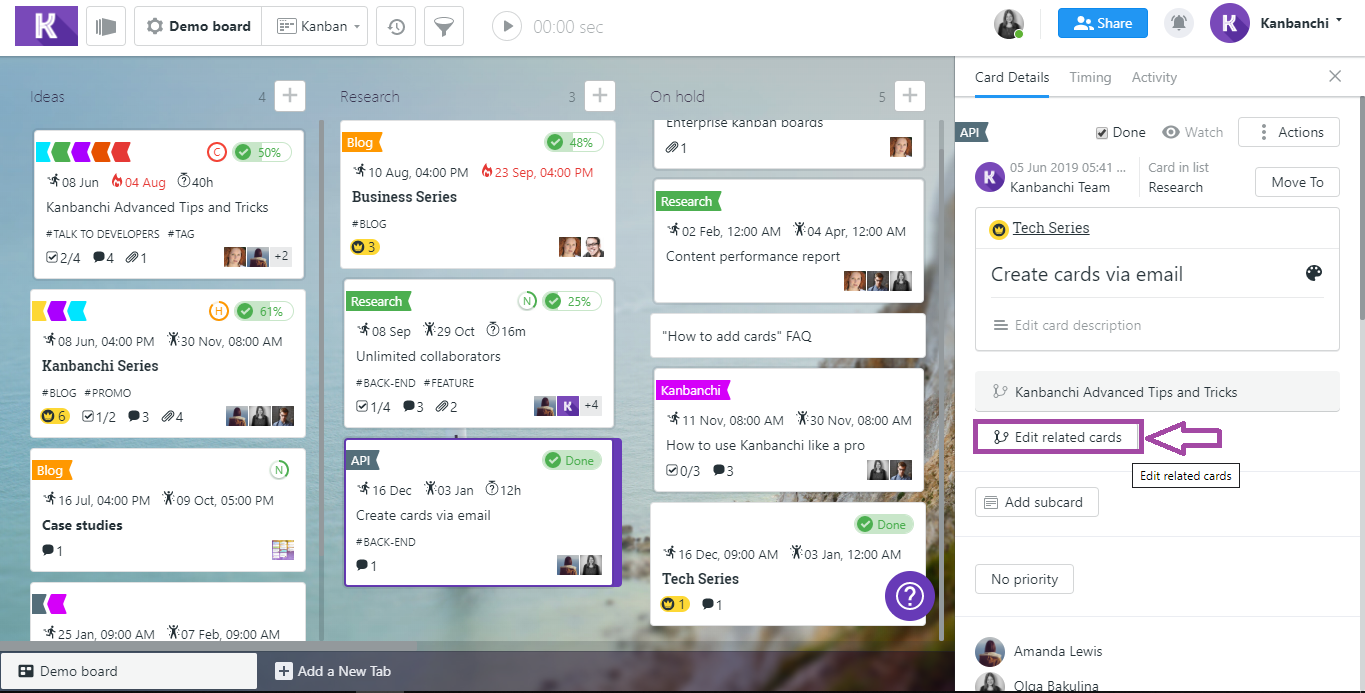
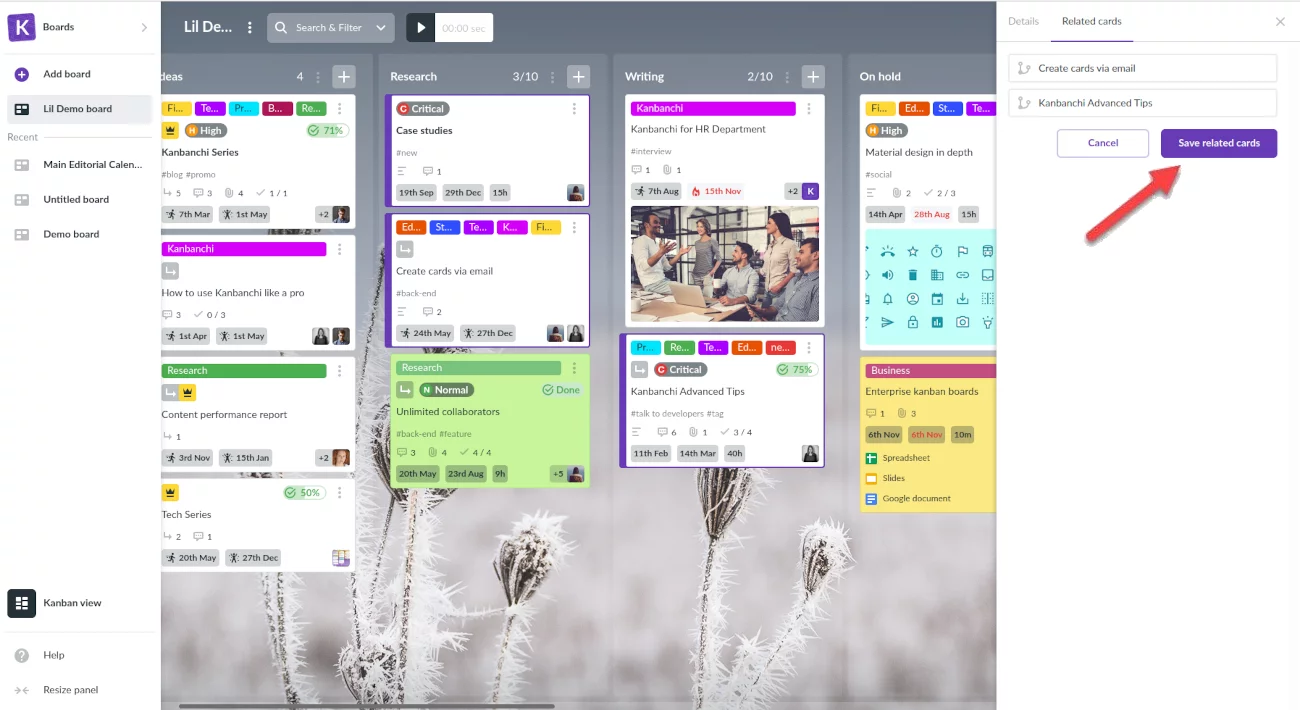
To remove related cards, click Edit related cards button. You will see a list of related cards. To delete any of them, put the cursor on its title and click on the trash icon. After that, click Save related cards button.
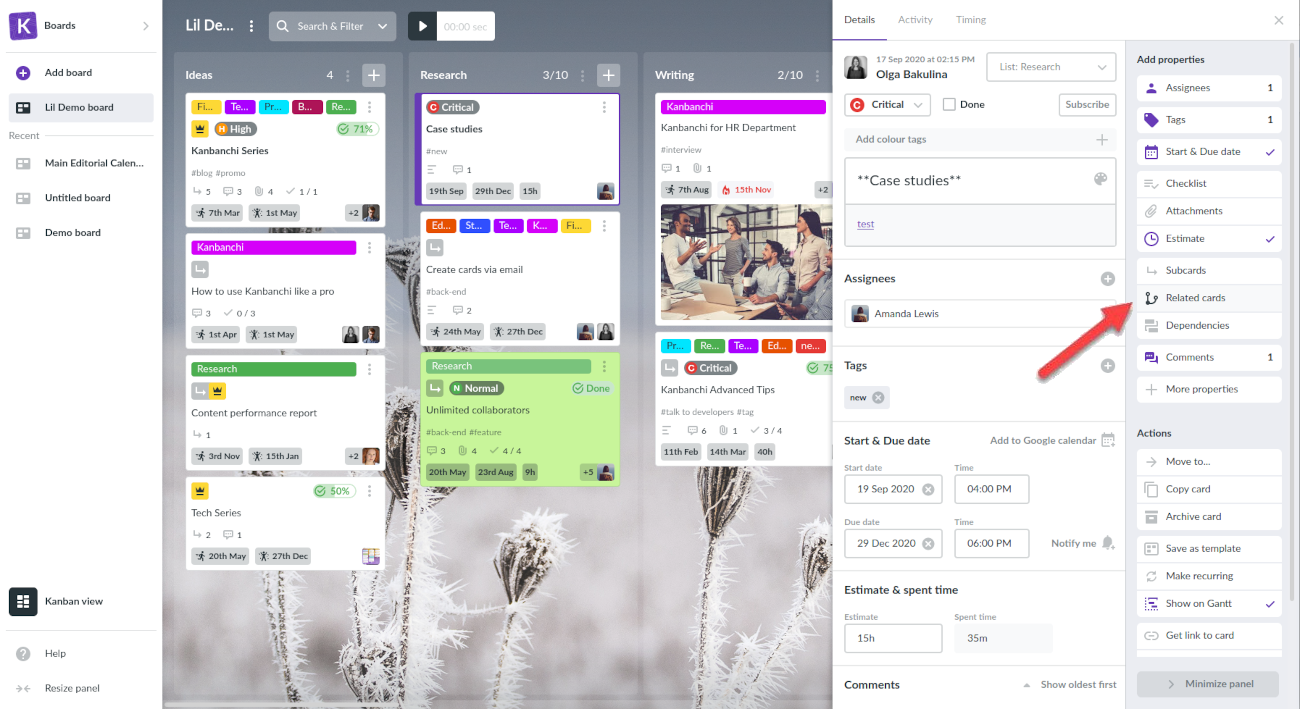
85. How do I create relations between cards in Kanbanchi?
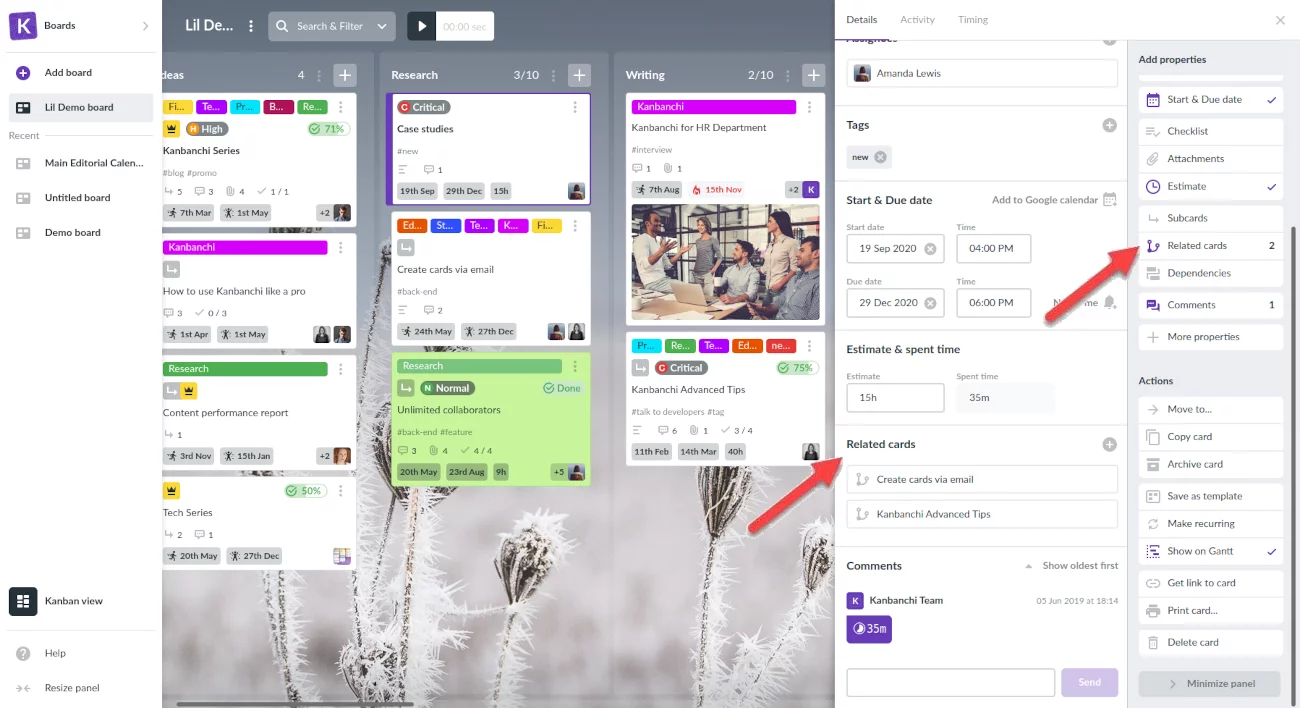
If some of your tasks are related semantically, you can connect them with each other in Kanbanchi for quick reference. To do that, open a card and click the Related cards button in the Card Details panel.
Select cards you want to connect with the active card by clicking them. You can choose as many cards as you wish including those from other boards (they need to be opened in the same browser tab, though). When you're done with the selection, click Save related cards button.
A list of related cards will appear under the card description and all collaborators will be able to view it. For quick reference scroll down a bit or just press the Related cards button. You can easily switch between related cards from here. Just click on the card you need in the list.
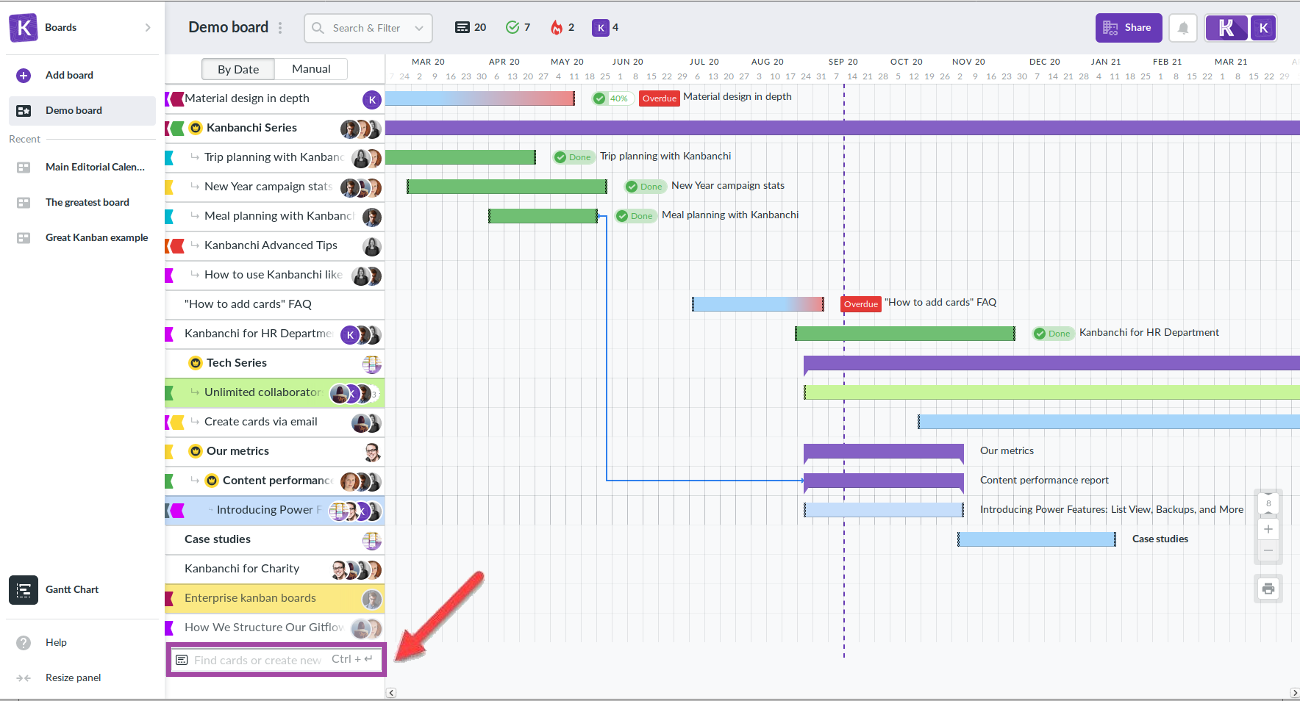
There are several options to add cards to Gantt chart:
From Gantt Chart. When you're in Gantt Chart, you will see a list of your cards at the bottom of which there's a special field where you can either add an existing card or create a new one right there. To find an existing card simply start typing its name in the field and click on a card when it appears in the list. To add a new card, type its title and then either click Create New Card or use a shortcut ctrl+Enter.
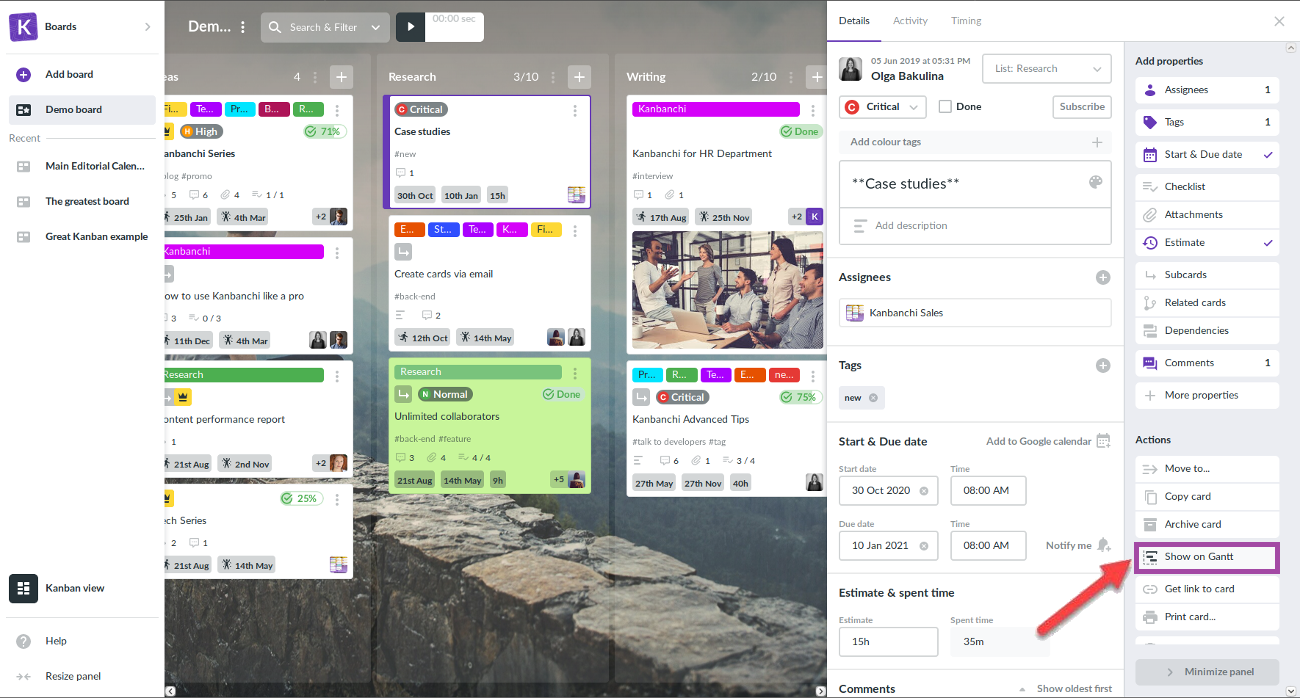
2. From the right panel in any view. Click on a card you'd like to show on Gantt Chart, go to Card Details and choose Show on Gantt option in the "actions" section.
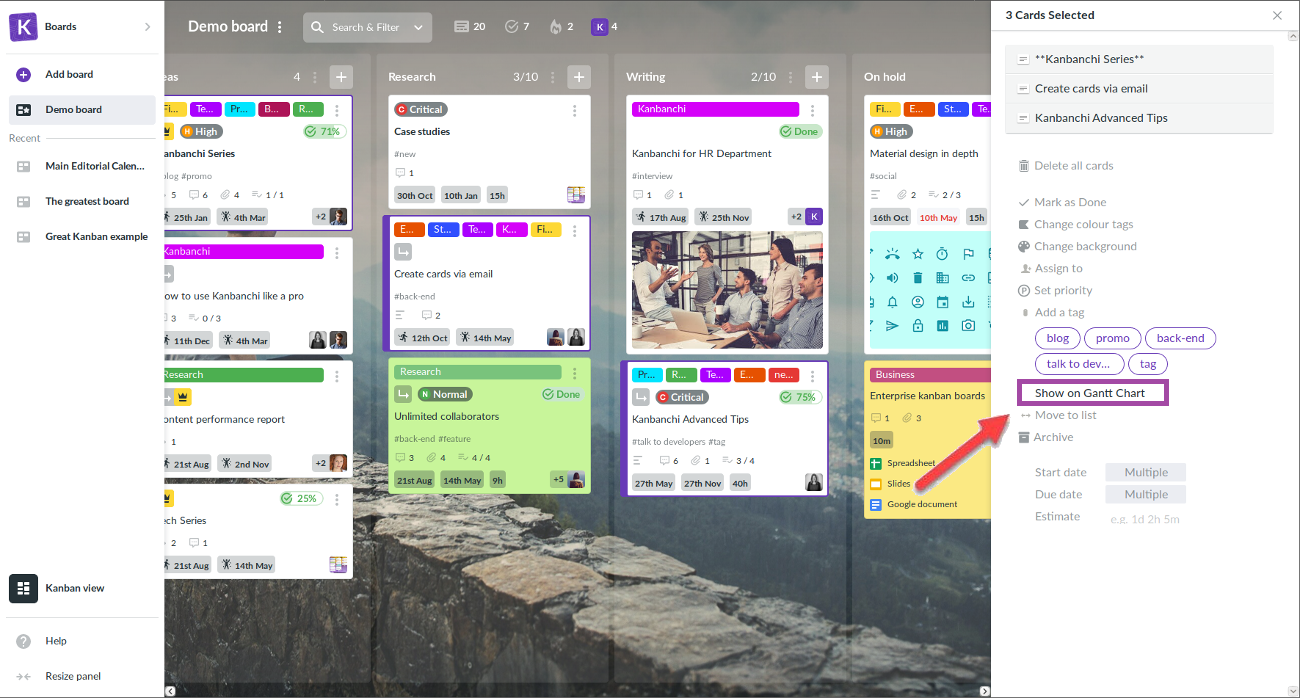
Add multiple cards to Gantt Chart from Kanban view. When you select multiple cards, you can Show on Gantt Chart all the selected cards by choosing this option in the right panel.
87. I need everyone in my team to track time. What do we need to do?
If you want everyone to see the Timing section with the report showing the time spent by each member of your team, then everyone should purchase a plan with the Time Tracker.
To add spent time you can simply add a comment to a card of this form: [Xh Xm Xs] meaning that h - hours, m - minutes, s-seconds. The system will transform such comment into time and will add it to the total spent time.


 or hit Delete on your keyboard to move your board into Trash.